
On this page
Although an unofficial build of TWRP recovery is available for the Zenfone 6, it doesn’t work well with the latest software currently. So, in this tutorial, we will show you how to root ASUS Zenfone 6 (ASUS 6Z) without TWRP, using Magisk.
Recently, we covered a detailed tutorial on how to install TWRP on Asus Zenfone 6 (ASUS 6z) and root it using Magisk. However, several of our readers and also users over at the XDA thread have reported that TWRP doesn’t work following the latest software update on the phone. As per the said users, using the ‘fastboot boot’ command to temporarily boot the TWRP recovery image fails. Once the command is executed, the phone reboots and enters the Bootloader Mode, instead of TWRP Recovery Mode.
XDA member mauronofrio, who compiled and built the unofficial TWRP for the Asus Zenfone 6 also responded to the reports. According to him, he doesn’t own the device himself, which makes debugging, fixing, and retesting the issue even harder. He also added that TWRP lead developer Dees_Troy and bigbiff have recently received the Zenfone 6 under the developer program. Which means that the device may gain official TWRP support in the near future. And so, he wouldn’t be releasing any updated for now.
Even if not for the given situation, rooting your Zenfone 6 without TWRP has its own advantages. For instance, you can easily install OTA updates on your rooted phone with the least amount of effort.
So, irrespective of the reason you are here, the instructions below will guide you on how to root ASUS Zenfone 6 (ASUS 6z) without TWRP. This could be easily done by patching the stock boot image with Magisk and then flashing the patched boot image to the device using fastboot to root it. The process is pretty easy and same as we’d had detailed for the OnePlus 7/OnePlus 7 Pro and many more devices. So, just go ahead and follow the instructions below to root your Asus Zenfone 6 (ASUZ 6z).
Requirements
- Unlock your Zenfone 6’s bootloader first. For now, there’s only the official method available. Note that this method is irreversible and will void your phone’s warranty.
- Like always, take a complete backup of all your data stored on your phone, including the internal storage. If your phone’s bootloader is already unlocked, then no data will be wiped. However, it is still a good practice to keep a backup.
- Charge your Zenfone 6 to a sufficient battery level so that it doesn’t power off accidentally during the rooting process.
- Install Asus USB Drivers on your PC.
- Also, install Android SDK Platform-Tools on your PC. During this tutorial, we will refer to “C:\adb”. This would be the folder on your PC where the platform-tools have been installed.
How to Root ASUS Zenfone 6 (ASUS 6z) without TWRP?
For your convenience and better understanding, we have split the instructions into three major steps.
The first step involves downloading the official stock firmware and then extracting the payload.bin file found in it to get the stock boot image. The second step guides you to patch the stock boot image using Magisk Manager. And finally, the third step shows how to flash the patched boot image using fastboot to root your ASUS Zenfone 6 (ASUS 6Z).
Step 1: Get the Stock Boot Image
In order to get the stock boot image, you must download the official firmware update package corresponding to the software version installed on your Asus Zenfone 6/Aus 6Z. The firmware package could be downloaded from here. Once downloaded, you will need to extract the downloaded package for the Payload.bin file.
Once you have done that, you must extract the Payload.bin file to get the stock boot image. This could easily be done using the Payload Dumper Tool. Once you have got the stock boot image for the software version installed on your phone, head over to step #2 to patch it using Magisk.
Step 2: Patch the Stock Boot Image using Magisk Manager
- Connect your ASUS Zenfone 6 (ASUS 6z) to the PC using the USB cable.
- Copy the extracted stock boot image (boot.img) file to your phone’s internal storage.
- Once copied, disconnect the phone from the PC.
- Download the latest version of Magisk Manager on your phone and install it.
- Go to the app drawer and launch the ‘Magisk Manager’ app.
- Tap on the ‘Install’ button.
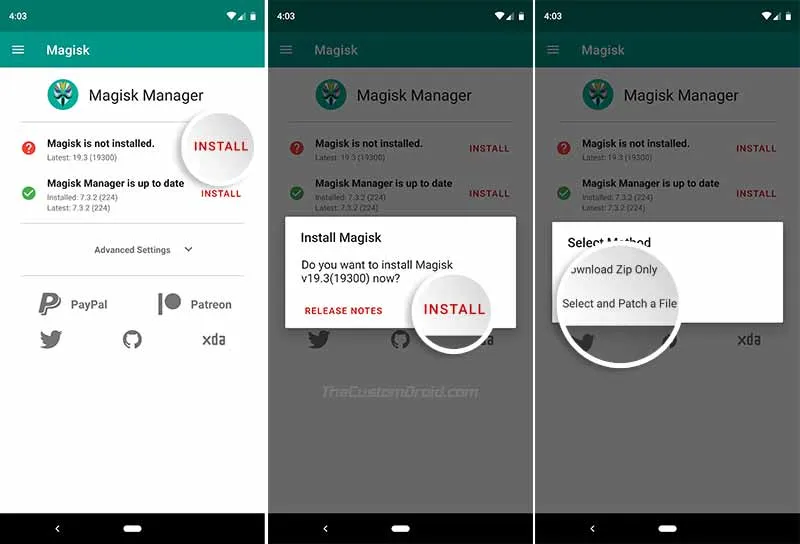
- Next, tap on ‘Install’ and then on ‘Select and Patch a File’ option.
- Navigate to the phone’s internal storage and select the stock boot image (boot.img) transferred earlier.
- As soon as the file is selected, Magisk Manager will start patching it.
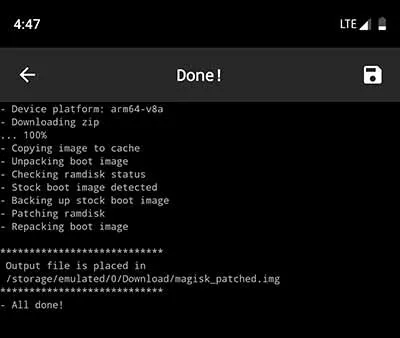
Once the process finishes, the patched boot image could be found in [internal storage]/Download as ‘magisk_patched.img’ file.
Step 3: Flash the Patched Boot Image to root ASUS Zenfone 6 (ASUS 6z)
Now that you have the Magisk Patched Boot Image, follow the instructions below to flash it and root your ASUS Zenfone 6 (ASUS 6z).
- Connect your ASUS Zenfone 6 (ASUS 6z) to the PC using the USB cable.
- Go to [internal storage]/Download.
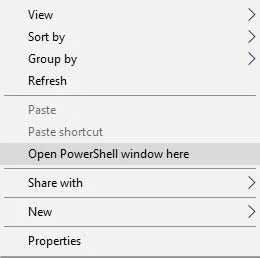
- Transfer the Patched Boot Image (magisk_patched.img) file to the folder on the PC where the Android SDK platform-tools are installed (e.g. C:\adb).
- Hold the SHIFT key and right-click on an empty space inside the folder.
- Select the ‘Open PowerShell window here’ option.
- Power off your ASUS Zenfone 6 (ASUS 6z).
- Hold the Volume Up and Power buttons together to boot your phone into Fastboot Mode.

-
Once the phone is in Fastboot Mode, connect it to the PC using the USB cable.
-
Enter the following command to ensure that your phone is successfully being detected by your PC over fastboot:
fastboot devices
-
The command should return a device ID. In case it doesn’t, make sure that you have installed the appropriate USB drivers on your PC.
-
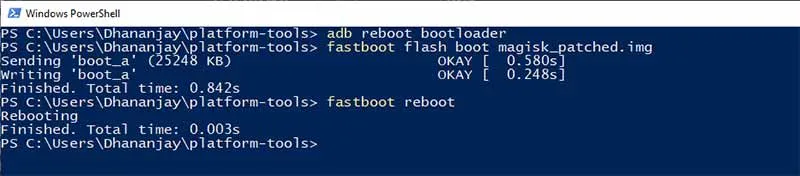
Finally, enter the following command to flash the patched boot image and root ASUS Zenfone 6 (ASUS 6z):
fastboot flash boot magisk_patched.img
-
Reboot your phone by entering:
fastboot reboot
Your phone should now be rooted using Magisk. Once it boots into the OS, go the app drawer and launch the Magisk Manager app to confirm.
The instructions above flash the patched boot image to the active slot on your ASUS Zenfone 6 (ASUS 6z), leaving the secondary/inactive slot untouched. This means you can easily install future OTA updates on your phone easily while still maintaining root. For a more detailed explanation of how to do it, follow this link.
Now that your phone is rooted, you can go ahead and install Magisk Modules for third-party features or install audio mods like ViPER4Android. You can also use the MagiskHide feature to hide root from certain apps.
There you go! This was out detailed tutorial on how to root ASUS Zenfone 6 (ASUS 6z) without TWRP recovery. If you have any questions regarding the procedure, do let using know by commenting below.
Comments
Comments are moderated, and published only if they are relevant to the topic and add value in a constructive way. If you disagree with something, please be polite and respectful. We suggest you read our comment policy before commenting.