Disable Forced-Encryption and Decrypt Nexus 5X
Security is an attribute that is taken very seriously nowadays. Especially when there's a lot of advanced technology all around, it is an imperative

On this page
Security is an attribute that is taken very seriously nowadays. Especially when there’s a lot of advanced technology all around, it is an imperative task to preserve personal data.
Google, about two years now, introduced the concept of forced-encryption for its upcoming lineup. Starting off with devices like the Nexus 6 and Nexus 9, the forced-encryption protocol made its way to Google’s latest - Nexus 6P and 5X. While we already covered an article on how you can decrypt the Nexus 6P, we are here today to help you disable forced-encryption and decrypt Nexus 5X running Android Oreo, Nougat, or Marshmallow.
What is forced-encryption & why should I decrypt?
Forced-encryption on Android is implemented through the kernel, which triggers the encryption process on your complete /data partition, on the first boot.
The idea of forced-encryption hooked up a lot of users, seeing this as a one-more-added step towards security. But when it came to the custom users, like you and me, who like to customize their device (A LOT!), it is not so much useful. In the contrary, it creates a barricade, preventing any kind of modifications.
In order to successfully disable forced-encryption and decrypt your Nexus 5X, you will first need a modified boot.img, that has dm-verity check disabled. By flashing this boot.img (kernel), you will ensure that your storage doesn’t get encrypted all-the-way, during the first boot. Also, it is a pretty high chance that you have your storage encrypted now, so flashing the modified boot alone won’t decrypt your device (Think logically, it just disables FE on first boot, either after you bought the device, or did a factory reset).
In order to decrypt, you will need to format the entire userdata partition on your Nexus 5X, so that the encryption wears-off instantly.
Disable forced-encryption and decrypt Nexus 5X
Appreciations to XDA Recognized Contributor - Tigerstown, who has brought us the modified boot image files for the Nexus 5X, with dm-verity disabled. The modified boot images work on both, latest Marshmallow and Android N Developer Preview (If you need it for a previous build or DP1, let us know via comments).
Before you begin
- Make sure that you have backed up your Nexus 5X completely. This includes the internal storage, messages, contacts, and everything else that you feel necessary.
- Charge your 5X to a sufficient battery level, so that it doesn’t shut down during the process.
- This tutorial will make use of fastboot commands, so make sure to have Android SDK installed. Alternatively, you can also use Minimal ADB Installer.
- Download the kernel (boot.img) corresponding to your Android version and build number. Flashing a wrong boot.img, may lead to a bootloop. So make sure that you download and use the correct one.
Instructions
- Once you have downloaded the modified kernel (boot.img), you are ready to go.
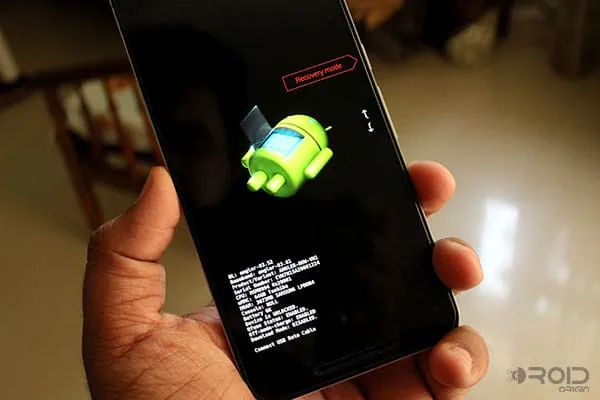
- To begin, boot your Nexus 5X into bootloader mode — Power down your 5X completely. Now, press and hold the Volume Down and Power keys, until you see the bootloader screen on your 5X (Below is the image of bootloader mode on Nexus 6P, which is pretty much similar to that of the 5X).
- While your 5X is in bootloader mode, connect it to the PC using a USB Type-C cable.
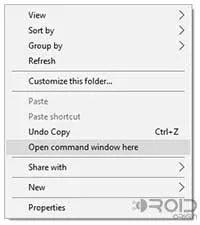
- On your computer, open the folder (directory), where the *“*boot.img” file was downloaded. Inside that folder, press SHIFT key and right-click on an empty space. Then, select ‘Open command window here’ from the pop-up menu. A new command-prompt/CMD window should open, which will already be pointing to the current folder.
-
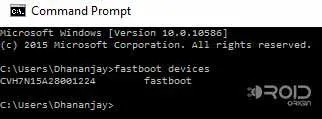
Type in the following command to confirm whether your device has been detected successfully.
fastboot devices
The command should return a device ID along with the current mode - ‘fastboot’. If it doesn’t, make sure that your 5X is connected to the PC while in bootloader mode, and that you have properly setup fastboot.
-
Once you have your device detected successfully, enter the command below to flash the modified kernel (boot.img):
fastboot flash boot boot.img
-
Now it’s time to decrypt the device, by formatting the complete data partition. Enter:
fastboot format userdata
fastboot format cache
-
Finally, when everything is done, you can reboot your Nexus 5X, that has now been decrypted.
fastboot reboot
Now that you have successfully disabled forced-encryption, and decrypted your 5X, you can go on installing TWRP or even root N Developer Preview, if you’re running it.
If you have issues, during or after the process, or any prior questions, you can ask us directly.
Comments
Comments are moderated, and published only if they are relevant to the topic and add value in a constructive way. If you disagree with something, please be polite and respectful. We suggest you read our comment policy before commenting.