What is Qualcomm EDL Mode and How to Boot your Android Device into it
Android phones and tablets equipped with Qualcomm chipset contain a special boot mode which could be used force-flash firmware files for the purpose of

On this page
Android phones and tablets equipped with Qualcomm chipset contain a special boot mode which could be used force-flash firmware files for the purpose of unbricking or restoring the stock ROM. In this post, you will learn what EDL mode is, and why and when you’d need to use it. Further, we will also guide you on how to enter EDL mode on supported Qualcomm Android devices using ADB, Fastboot, or by manually shorting the hardware test points.
What is EDL Mode?
EDL or Emergency DownLoad Mode is a special boot mode in Qualcomm Android devices that allows OEMs to force-flash firmware files. This special mode of operation is also commonly used by power users to unbrick their devices.
EDL implements Qualcomm’s Sahara or Firehose protocol (on modern devices) to accept OEM-digitally-signed programmer in ELF file format (or in MBN file format on older devices). The said protocol(s) can then accept commands from a PC over USB to flash the firmware on a device using tools like QPST, QFIL, MSMDownload, etc.
When in this mode, the device identifies itself as “Qualcomm HS-USB QDLoader 9008” over a USB connection.
Why and when would you need to use EDL Mode?
If you’re familiar with flashing firmware or custom binaries (like TWRP, root, etc), you’d know that it is required to boot the Android device into specific boot modes like Fastboot or Download Modes. The OEM flash tools can only communicate with a device and flash it through the said modes.
Generally if the device’s software is corrupted due to a wrong flash or any other software issue, it could be revived by flashing the firmware through Fastboot and Download modes.
However, that’s not the case always. Some times, flashing the wrong file can also potentially corrupt the Android bootloader itself. Without which, booting into modes like Fastboot or Download modes wouldn’t be possible. And thus, there would be no chance of flashing the firmware to revive/unbrick the device. We often like to refer to this device state as a “Hard-brick”.
That’s exactly when you’d need to use EDL mode. EDL itself is a part of the Primary Bootloader (PBL) on Qualcomm Devices. Unlike Fastboot, Download, and Recovery modes on Android, which reside in the Secondary Bootloader (SBL), PBL resides within the ROM and so it could not be corrupted due to software errors (again, like a wrong flash).
To have a better understanding, please take a look at the figures below.
- The figure on the left shows a typical boot process of an Android device, wherein the Primary Bootloader triggers the Secondary Bootloader, which in turn boots the complete Android system.
- The figure on the right shows the boot process when EDL mode is executed. During this process, EDL implements the Firehose/Sahara protocol and acts as a Secondary Bootloader to accept commands for flashing.

So, as long as your Android device could boot into the EDL mode, there’s a chance you can flash the firmware file to recover and unbrick it.
How to Enter EDL Mode on Qualcomm Android Devices
If your Qualcomm device is already in a bricked state and shows nothing but a black screen, then chances are that it is already in Emergency Download Mode. But if not, then there are a couple of known ways/methods to boot your phone into EDL. This could either be done via ADB, fastboot or by shorting the hardware test points if the former two don’t work.
To gain access to EDL mode on your phone, follow the instructions below.
Method 1: Using ADB
This method is for when your phone can boot into the OS and you want to boot it into EDL mode for restoring the stock firmware. If it is in a bootloop or cannot enter the OS, move to the second method.
- Download the latest Android SDK tools package from here.
- Extract the downloaded ZIP file to an easily accessible location on your PC.
- The extracted ‘platform-tools’ folder will contain ADB and other binaries you’d need.
- Launch the command-line tool in this same folder. To do this:
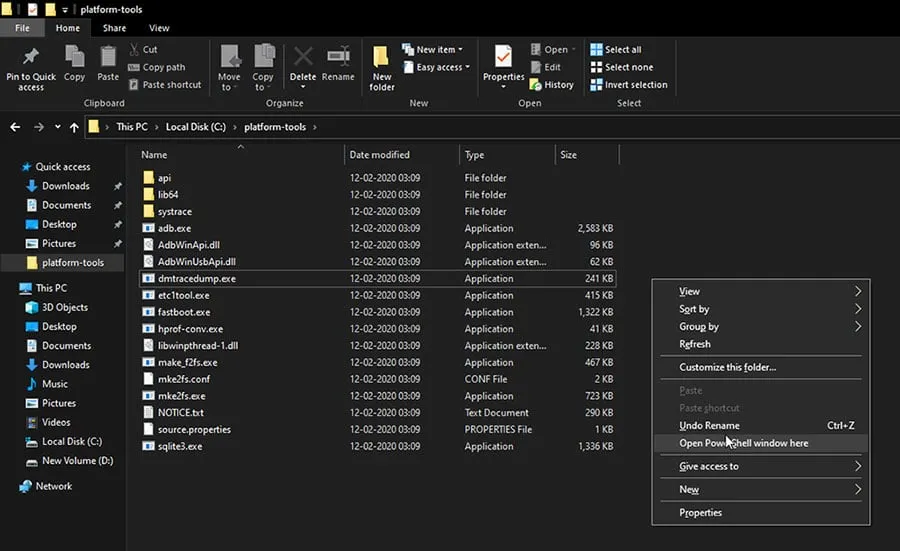
- On Windows: Open the ‘platform-tools’ folder. Hold the SHIFT key on the keyboard and right-click on an empty space inside the folder. Then select ‘Open PowerShell window here’ or ‘Open command window here’ from the contextual menu.
-
On Linux or macOS: Launch the Terminal and change its directory to the ‘platform-tools’ folder using the ‘cd’ command. For example, if the folder in the Documents directory, the command should be:
cd Documents/platform-tools

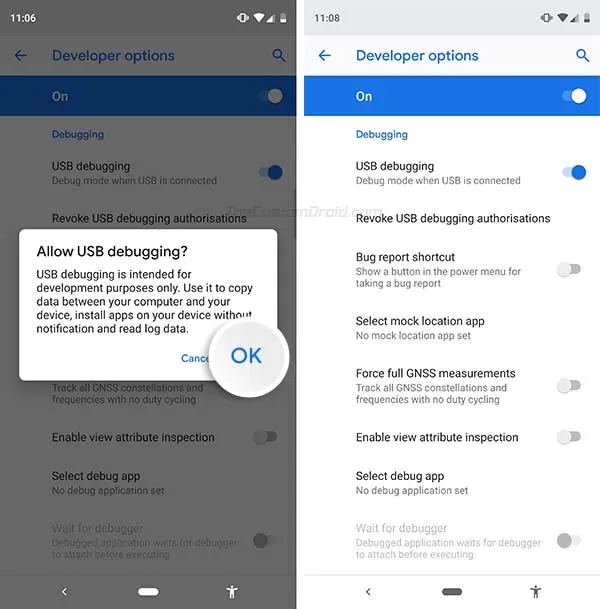
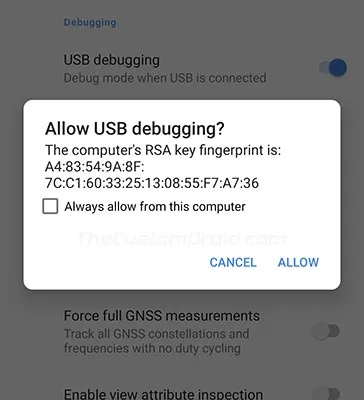
- Now, enable USB debugging on your Android device using the instructions here.
-
Connect the device to your PC using a USB cable.
-
Finally, enter the following command in the PowerShell window to boot your phone into EDL mode:
.\adb reboot edl

In Terminal:
./adb reboot edl
- If you see a prompt on the device’s screen to allow USB debugging, press ‘Allow’.
That’s it! Your phone should now reboot and enter EDL mode.
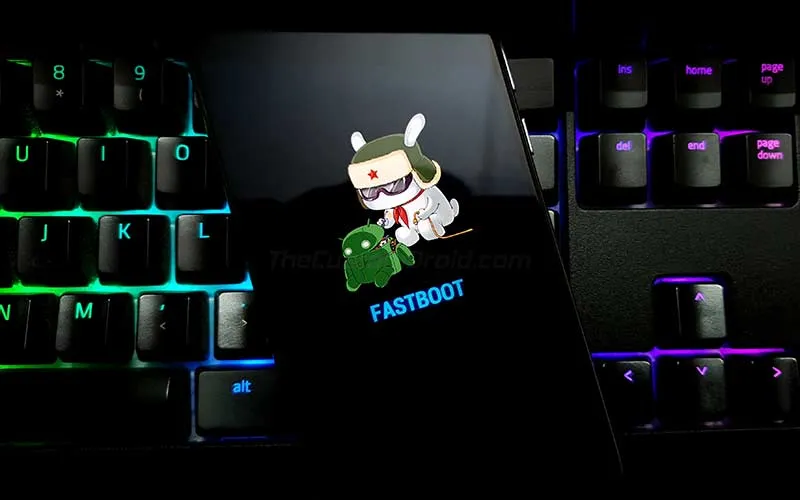
Method 2: Using Fastboot
This method is for when your phone cannot enter the OS but can boot into Fastboot mode (Also sometimes referred to as ‘Bootloader mode’).
- Download the latest Android SDK tools package from here.
- Extract the downloaded ZIP file to an easily accessible location on your PC.
- The extracted ‘platform-tools’ folder will contain ADB and other binaries you’d need.
- Launch the command-line tool in this same folder. To do this:
- On Windows: Open the ‘platform-tools’ folder. Hold the SHIFT key on the keyboard and right-click on an empty space inside the folder. Then select ‘Open PowerShell window here’ or ‘Open command window here’ from the contextual menu.
-
On Linux or macOS: Launch the Terminal and change its directory to the ‘platform-tools’ folder using the ‘cd’ command. For example, if the folder in the Documents directory, the command should be:
cd Documents/platform-tools
- Now, boot your phone into Fastboot mode by using the buttons combination.
-
Connect the phone to your PC while it’s in Fastboot mode.
-
Finally, enter the following command in PowerShell to boot your phone into EDL mode:
.\fastboot oem edl
In Terminal:
./fastboot oem edl
As soon as the command is entered, your phone will enter Emergency Download Mode.

Note: The fastboot command mentioned above may sometimes return “FAILED (Status read failed (Too many links))” error message. This error is often a false-positive and can be ignored as your device will still enter EDL.
Method 3: By Shorting Hardware Test Points
Not all Qualcomm devices support booting into EDL via ADB or Fastboot as shown above. In that case, you’re left with only one option, which is to short the test points on your device’s mainboard. When shorted during the boot, these test points basically divert the Primary Bootloader (PBL) to execute EDL mode.
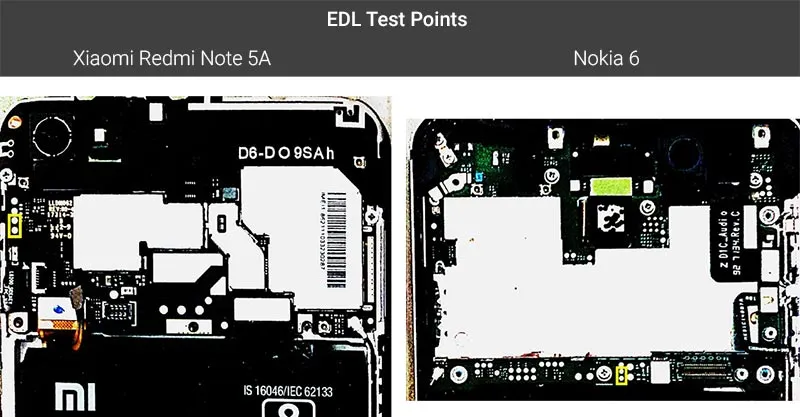
The availability of these test points varies from device to device, even if they are from the same OEM. Phones from Xiaomi and Nokia are more susceptible to this method. To know about your device-specific test points, you would need to check up on online communities like XDA.
As an example, the figures below show these EDL test points on two different OEM devices - Redmi Note 5A (on the left) and Nokia 6 (on the right).
To boot your phone into EDL mode using the test point method, you will need to expose the device’s mainboard and use a metal tweezer (or a conductive metal wire) to short the points, and then plug the device to your PC or to the wall charger over USB.
Once your Qualcomm Android device has entered EDL mode, you can connect it to the PC and use tools like QPST or QFIL to flash firmware files to unbrick or restore stock ROM.
That’s it! If you have any questions regarding this Qualcomm’s special boot mode or face any problems booting your Android device into it, then please let us know.
Credits: Aleph Security for their in-depth research on Qualcomm’s EDL programmer
Comments
Comments are moderated, and published only if they are relevant to the topic and add value in a constructive way. If you disagree with something, please be polite and respectful. We suggest you read our comment policy before commenting.