Download ROG Phone 2 Stock Firmware, Install it, and Relock Bootloader
Restoring the stock firmware on your phone could be very useful if you want to fix software issues, unroot, or want to take official OTA updates again.

On this page
Restoring the stock firmware on your phone could be very useful if you want to fix software issues, unroot, or want to take official OTA updates again. In this guide, I have covered the step-by-step instructions on how to download and install stock firmware on ROG Phone 2 using the RAW firmware file. These same instructions could also be used to unbrick your phone if has been soft-bricked. Further, you will also learn how to relock the phone’s bootloader.
Asus’ ROG Phone 2 is not only great with hardware but also when it comes to the software and its modification. The phone has received decent support from the custom development community, be it custom ROMs, custom recovery (TWRP), root, etc. While each and every one of these modifications would give you great flexibility with the software, but it may sometimes also give you enough reasons to revert your phone back to the stock ROM/firmware.
For instance, if you want to sell your phone or submit it for an RMA claim (repair under official warranty). But also if you want to receive the latest OTA system updates from Asus again. Or, the custom ROM experience wasn’t that satisfactory as you thought initially. Another thing that should be taken into consideration is Widevine L1 support (for HD streaming in apps like Netflix). As soon as you unlock the bootloader, the Widevine certification turns from L1 to L3, limiting your streaming to SD quality.
Restoring the Stock Firmware on ROG Phone 2
In any of these cases, simply performing a factory reset via the settings menu or via the recovery will not help. A factory reset only erases all the data on your phone, and since you might have performed modifications to the system (includes the system, vendor, or boot partitions) when flashing custom ROMs, rooting, etc, it will be of no use.
So, in order to fully revert to the stock ROM, you will need to manually install the stock firmware on your ROG Phone 2. This has to be done by flashing the RAW firmware file via fastboot mode.
If you rooted your phone via the Magisk patched boot image, you could simply restore the stock boot and uninstall Magisk. Or, if you have installed TWRP recovery, you could use it to flash the official full firmware ZIP provided by Asus.
So, why are we using the RAW firmware file for this purpose? Well, while all those methods could work, but if even the slightest of the modifications are left over, your phone will probably end up in a soft-brick, which could be daunting, especially if you are new to flashing.
Flashing the RAW firmware file is the fool-proof way of restoring the stock firmware on your ROG Phone 2. In doing so, all the partitions of your phone will be flashed back to stock, leaving no scope for any previous modifications to persist.
Now, without any further ado, let’s start!
Prerequisites
Make sure that you fulfill all the requirements stated below before you proceed.
- Always take a backup first! Flashing and restoring the stock firmware will erase all the data stored on your phone. This includes the contacts, messages, photos, documents, music, and everything on the internal storage. So, make sure that you have backed-up all your important data before you head to the instructions. If you need it, you could also follow this detailed guide.
- Charge your ROG Phone 2 to a sufficient battery level. This will prevent the phone from suddenly shutting down during the restore process due to a lack of battery charge. In case your phone is bricked and not booting, simply charge it for about an hour or so.
- A USB 2.0 port on the PC. New generation ports like USB 3.0, 3.1, and 3.2 could cause issues while flashing.
Download ROG Phone 2 RAW Firmware
Below, you will find links to download the RAW firmware files for various software versions of the ROG Phone 2. These files are voluntarily provided by developers in online communities like XDA, 4PDA, etc. So, a huge thanks to them!
You would need to download the type of firmware according to the method you choose to install it. Also, it is strongly advised to download the stock firmware whose version is either the same or greater than the one currently installed on your phone.
WW ROM (for Global/Strix edition)
- WW-17-0240.2004.9: WW_ZS660KL_17.0240.2004.9_M3.23.44.9-ASUS_1.1.185_Phone-user.raw.zip
- WW-17.0230.2004.60: WW_ZS660KL_17.0230.2004.60_M3.23.44.9-ASUS_1.1.162_Phone-user.raw.zip
- WW-17.0230.2002.32: WW_ZS660KL_17.0230.2002.32_M3.23.44.8-ASUS_1.1.145_Phone-user.raw.zip
- WW-16.0631.1910.64: WW_ZS660KL_16.0631.1910.64_M3.13.33.33-ASUS_1.1.253_Phone-user.raw.zip.zip
CN ROM (for Tencent edition)
- CN-17.0230.2004.60: CN_ZS660KL_17.0230.2004.60_M3.23.44.9-ASUS_1.1.35_Phone-user.raw.zip
- CN-17.0235.2004.1: CN_ZS660KL_17.0235.2004.1_M3.23.44.9-ASUS_1.1.171_Phone-user.raw.zip
- CN-17.0230.2004.60: CN_ZS660KL_17.0230.2004.60_M3.23.44.9-ASUS_1.1.35_Phone-user.raw.zip
- CN-16.0631.1910.52: CN_ZS660KL_16.0631.1910.52_M3.13.33.32-ASUS_1.1.240_Phone-user.raw.zip
Instructions to Install Stock Firmware on ROG Phone 2
Flashing the RAW firmware file on the ROG Phone 2 is extremely simple. You wouldn’t need to issue any commands manually. All you’d have to do is use the included flashing script within the firmware package.
It doesn’t matter if your phone is rooted, has TWRP or a custom ROM installed, or any other modifications for that matter. This method will work. The only requirement being that your phone should be able to enter fastboot mode.
Now, the Instructions are as follows:
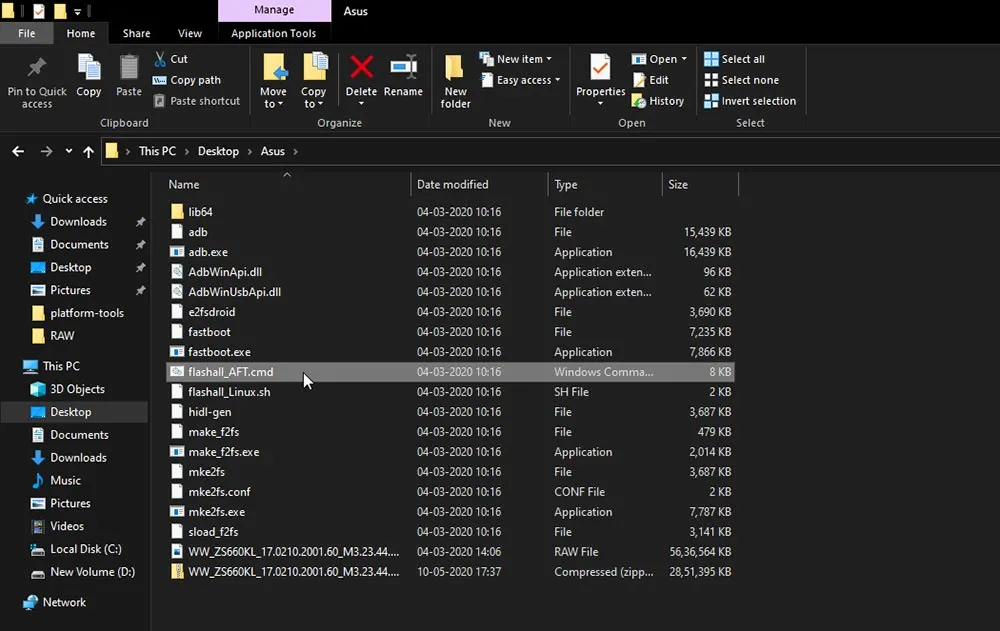
- First of all, download the ROG Phone 2 RAW firmware ZIP file on your PC.
- Extract the contents of the downloaded ZIP file using an archive utility like 7-Zip.
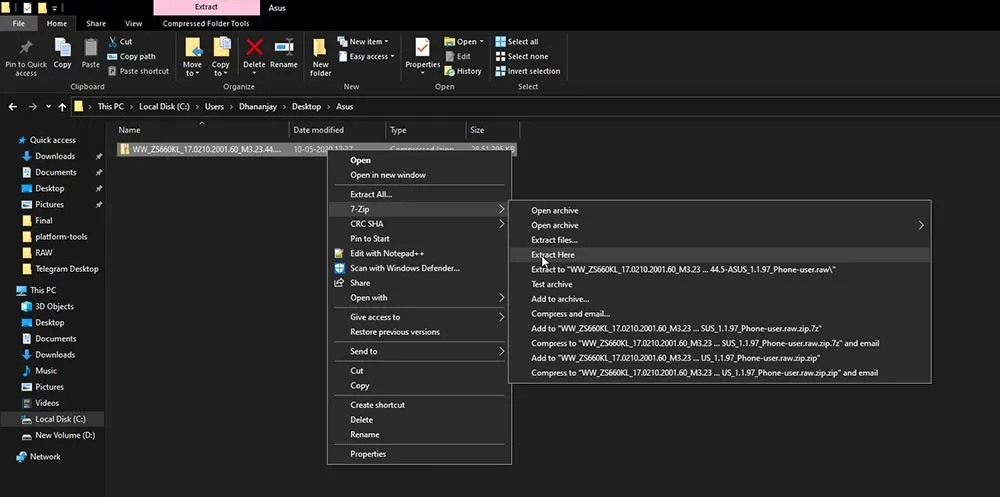
- The extracted files should contain the required Android tools like fastboot, stock RAW firmware file, and the flashing script.
- Now, power off your ROG Phone 2 completely. To do this, hold the Power key until the Power menu appears. Then select ‘Power off’.
- Once your phone is powered off, hold the Volume Up and Power keys together to enter Fastboot Mode.
- Connect the phone to your PC while it’s in Fastboot Mode by plugging in the USB-C cable to side port (not the bottom charging port).
- Finally, double-click on the ‘flashall_AFT.cmd’ file (flashing script) to launch it and install the stock firmware on your ROG Phone 2.
- As soon as the script is launched, you will see a black colored Command Prompt (CMD) window open up on your PC’s screen. This will show you the progress of the flashing process.
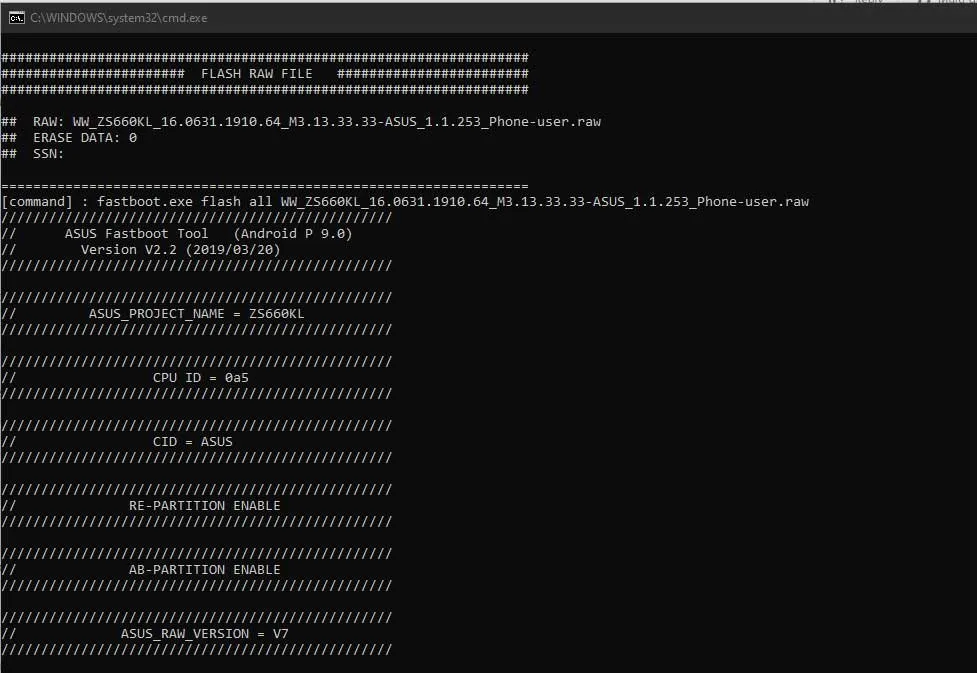
- Once finished, your phone will automatically reboot into the newly flashed stock OS.
You can now close the CMD window. That’s it! You have just restored your ROG Phone 2 to its stock firmware.
Instructions to Relock Bootloader on ROG Phone 2
Now, if you have no further plans to root the phone, install a custom ROM, or perform any other sorts of modifications, then it’s also a wise choice to relock the phone’s bootloader. This will not only ensure your phone’s integrity but will also allow you to restore the Widevine L1 support. So, you should be able to stream media in HD quality in apps like Netflix.
Relocking the bootloader on the ROG Phone 2 is as simple as issuing a fastboot command via your PC. To do this:
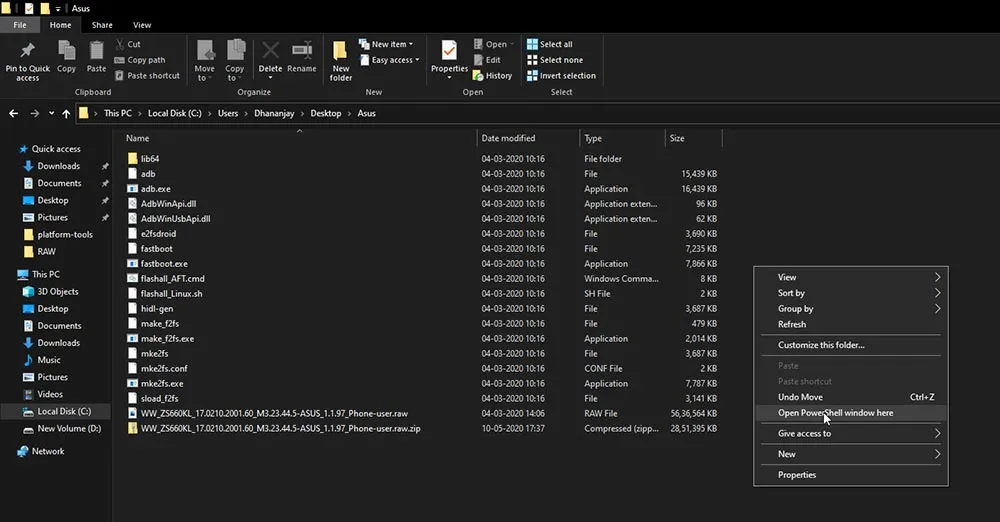
Step 1: Open the folder where you extracted the RAW firmware ZIP file during the previous instructions. As I mentioned, the extracted files already include the Android platform-tools like fastboot, so you will not need to install them separately.
Step 2: Now, hold the SHIFT key on the PC’s keyboard and right-click on any empty space inside the folder (where the files are not present). Then select the ‘Open PowerShell window here’ option from the contextual menu that appears. This will launch the Windows PowerShell in the same folder where the required fastboot tool is present.
Step 3: Power off your ROG Phone 2 and boot it into Fastboot Mode by holding the Volume Up and Power keys together. Once the phone is Fastboot Mode, connect it to the PC by plugging the USB cable to the port on the side of the phone.
Step 4: Enter the following fastboot command in PowerShell to finally relock the bootloader on your ROG Phone 2:
.\fastboot oem asus-csc_lk
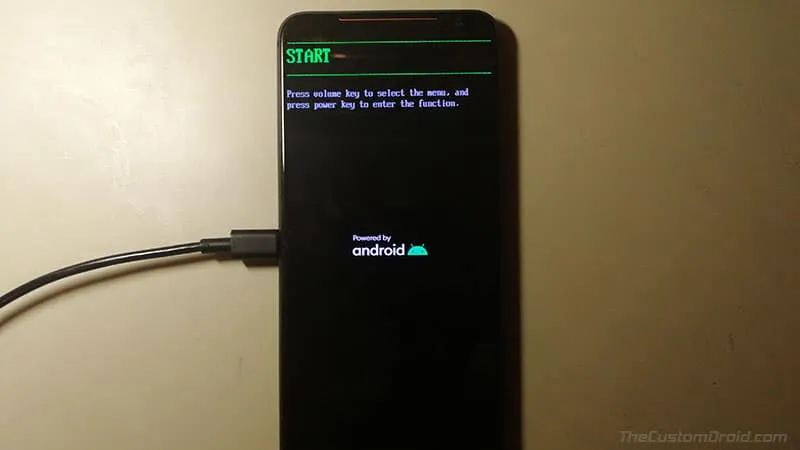
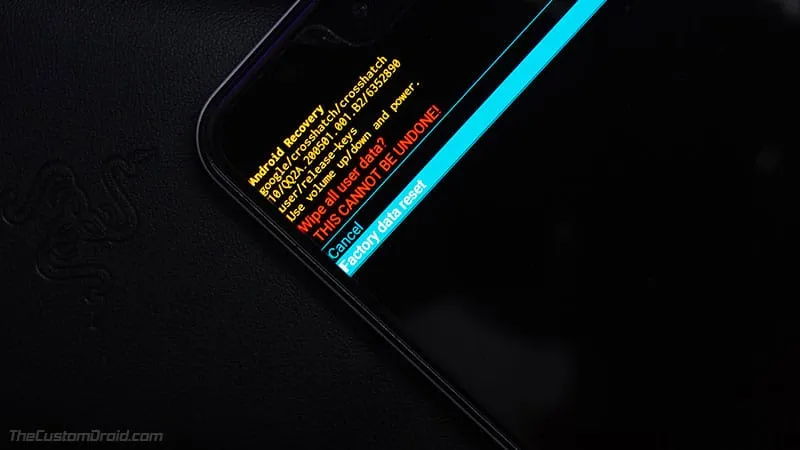
Step 5: As soon as the command is entered, your phone’s bootloader will be locked again. Now press the volume keys until you see ‘Start’ selected in Fastboot Mode, then press the Power key to confirm and reboot the phone.
Step 6: At this point, you will see that the phone will enter the stock recovery mode saying “Can’t load Android system. Your data may be corrupt…”. Now press the power key to select ‘Factory data reset’ and then select ‘Yes‘ to confirm and perform a factory reset on your phone.
Once this is done, your ROG Phone 2 will reboot into the system (OS). That’s it! You have successfully restored the stock firmware on your phone and relocked the bootloader.
More for you:
F.A.Q.
Below, I have put along some of the most frequently asked questions and their corresponding answers. These could help you solve some of the issues that you might encounter while performing the instructions in this guide.
Question 1: The phone is connected to the PC in Fastboot Mode, but the flashing script in the CMD window doesn’t show any progress?
- Answer: The flashing process could take a few minutes. However, if the window is stuck at one point for longer than that period, then it could possibly be an issue with the USB drivers. Go to ‘Control Panel’ > ‘Device Manager’ on your Windows PC and check if the phone is detected as ‘Android Bootloader Interface’. In case it shows a yellow warning icon, please try installing the Google ADB drivers via this post. Also, try using a USB 2.0 port if you are currently using a USB 3.0/3.1/3.2 port.
Question 2: After performing step #5, my phone doesn’t boot into stock recovery and instead enters a bootloop?
- Answer: This could be caused in certain cases. A factory reset is mandatory in order to boot the phone after relocking the bootloader. If your phone doesn’t enter the stock recovery as intended, then force-reboot your phone into it and perform a factory reset manually.
If you have any questions regarding the topic or the provided instructions, or you feel stuck somewhere during the process, please feel free to let me know via the comments.
Comments
Comments are moderated, and published only if they are relevant to the topic and add value in a constructive way. If you disagree with something, please be polite and respectful. We suggest you read our comment policy before commenting.