How to Fix Android 10's Sensors Bug Caused by Corrupted Persist Partition
A step-by-step guide on how to fix the Android 10 Sensors bug caused by corrupted Persist partition, on devices like Google Pixel, Xiaomi Mi A3, and others.

On this page
Have the sensors stopped working on your device after upgrading to Android 10? This is a known issue caused by a corrupted ‘Persist’ partition leading to non-working sensors. In this post, we will discuss what this issue is, its cause, and finally, guide you on how to fix the Android 10 Sensors Bug on devices on devices like Google Pixel, Xiaomi Mi A3, etc.
The Sensors Bug
The problem is that after the Android 10 update, users noticed that the on-device sensors stopped working. This means any features that use the sensors like automatic brightness, auto-rotation, double-tap-to-wake, Ambient/Always-On Display, proximity sensors, etc also stopped working. This certainly has a very big impact on the device’s usage.
This issue was first reported last year by Google Pixel users over at XDA forums and was also logged in Google’s official issue tracker. It was also covered by known publications like 9to5Google, Android Authority, etc. And the same bug has again been brought to light by users of the Xiaomi Mi A3 and Mi A2 series after the Android 10 update. The reports were posted on several threads in Mi community, as well as in XDA.
This bug seems to randomly affect devices, so it doesn’t matter if you updated over-the-air, by sideloading the update, or by flashing the factory image (or fastboot ROM).
What Causes It?
So, what causes the issue in the first place? According to an email sent by Google, the issue is caused by some new checks introduced by Qualcomm in Android 10 (Q) that prevent the sensors from working if corrupted calibration files were detected. This email was received by XDA senior member nikhilnangia, the same person who has provided us and the affected users with a possible fix.
But that’s not all. The sensors bug is also highly suspected to be caused by TWRP recovery damaging the ‘Persist’ partition.
According to XDA member nikhilnangia: “TWRP uses the /persist partition to store logs and caches can cause major issues. Essentially, this partition is only 40MB in size and the logs (for those who make nandroid backups, in particular) can run larger than 20MB, thereby corrupting the factory calibration and configuration files on Pixel phones. Suggestion would be to not write to this partition at all, if possible - or to put a check to clear log files if they exceed a certain date or size.”
One of TWRP’s lead developer bigbiff has recognized the issue and already pushed the required patches in TWRP’s source code. Update: The patch has been merged into production. Starting with TWRP 3.5, the recovery does not store any logs or cache files inside the /persist partition anymore.
Even if you do not have TWRP installed on your phone right now, but if you did have it earlier and used it on Android Pie, it might have already caused the damage by corrupting the sensor calibration data stored in the ‘Persist’ partition.
Possible Fixes
According to several users who have been affected by this issue, downgrading back to Android Pie allows the sensors to work normally. However, that’s not a proper solution since the calibration data on the persist partition will still be corrupted. Android Pie simply ignores the corrupted data, which also means that some sensors might still not work effectively. This certainly also defies the purpose of keeping your phone’s software up-to-date. In the end, if you ultimately upgrade to Android 10 again, the issue will still be present.
Some users also tried re-flashing the persist partition from someone else’s device. While this could fix the problem, but will also mean that you will end up losing your device’s unique factory calibration data like audio, camera, and sensor configurations. This should be considered as the very last resort if nothing works.
So, is there any actual way to fix this sensor bug on Android 10? Yes, read the instructions ahead.
Instructions to Fix Android 10’s Sensors Bug
If your phone is rooted, you could manually delete the cache and logs created by TWRP within the persist partition which caused the corruption and is supposed to be the root cause of the issue. This, followed by some additional steps, will allow you to fix the sensors on your device running Android 10.
These instructions are not only limited to the Google Pixel phones or Xiaomi Mi A3, but also supports any device affected by the sensor bug on Android 10.
We have split the instructions into five major steps to help you understand the whole process.
Step 1: Root your Device on Android 10
The first step of the process is to root your device on Android 10. You will need root permissions to backup the original persist partition of your device, as well as to delete the TWRP cache and log files as shown in the next steps. If it’s already rooted, you can skip this step and head over to the next one.
Rooting guides for some of the devices which are known to be affected by this issue are linked below. If the guide for your particular device isn’t listed, you could search for it on our website or on the XDA-Developers forum.
- Pixel 3 and Pixel 3 XL
- Pixel 3a and Pixel 3a XL
- Pixel 2 and Pixel 2 XL
- Xiaomi Mi A3
- Xiaomi Mi A2 and A2 Lite
Alternatively, if you have a copy of the stock boot image of the firmware installed on your phone, you can root by using the Magisk Patched Boot Image method. Instructions for the same could be found here.
Step 2: Backup your Original Persist Partition
Now, the second step is to backup your device’s original persist partition. Since you will be making changes to said partition in the next step, it is a good idea to have the original partition backed up as a fallback if anything goes wrong.
-
To do this, first, download and install a Terminal Emulator on your Android device. You can use anyone, but we recommend ‘Termux’. Once the app is installed, launch it from the app drawer.
-
Now, enter the following command Termux:
su
-
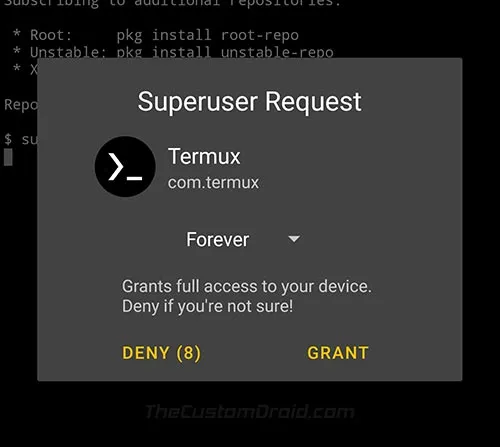
Select ‘Grant’ when prompted to grant superuser (root) permissions to Termux.
-
Next, enter the following command to backup your device’s Persist partition:
dd if=/dev/block/by-name/persist of=/sdcard/persist.img
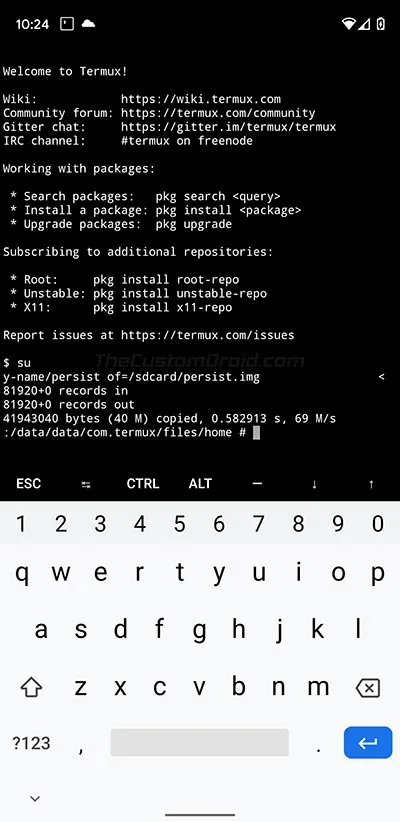
The backed-up partition (persist.img) will be stored in the root of your device’s internal storage. Copy the file to your computer and keep it safe.
Step 3: Delete TWRP’s Cache and Log Files from Persist Partition
In this step, you have to delete the cache and log files created by TWRP that led to the corruption of sensor calibration data in the ‘Persist’ partition.
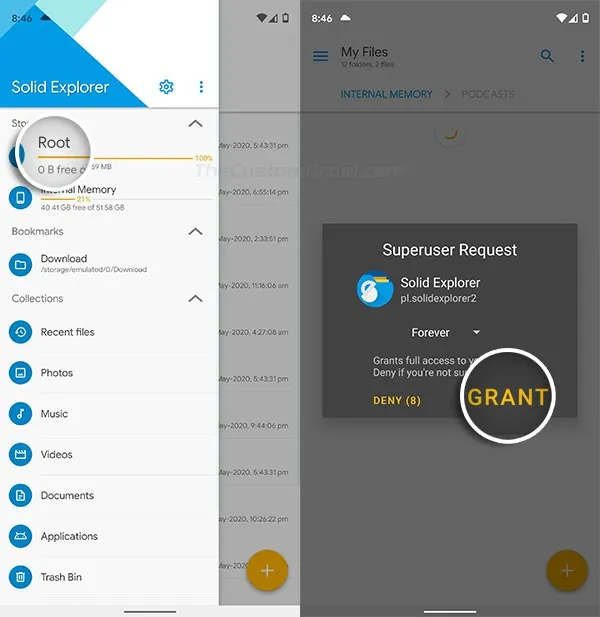
To delete these files, download and install a Root File Manager application on your device. We will be using Solid Explorer to demonstrate, but you can download and use anyone.
Once installed, go to the app drawer and launch the Solid Explorer app. Then press the menu icon on the top-left and select ‘Root’. Upon doing this, the app will prompt you to grant root permissions, so select ‘GRANT’.
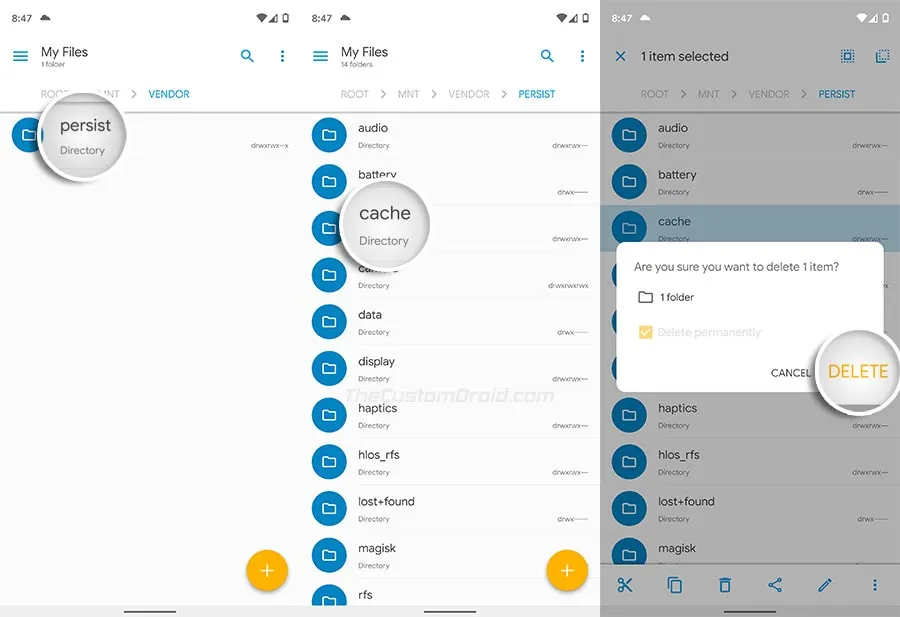
Next, go to “mnt” > “vendor” > “persist” from the root directory and delete the ‘cache’ folder completely. To do this in Solid Explorer, long-press the “cache” folder, tap on the bin icon on the bottom tab, and select “Delete”.
With the folder deleted, now head over to the next step.
Step 4: Flash Android Pie Factory Image/Fastboot ROM
Now, you have to flash Android Pie on your device. According to several users who have performed this method, this is the step that will fix the corrupted calibration data in the ‘persist’ partition. And don’t worry, this downgrade from Android 10 to Android Pie is temporary.
Depending on the OEM device your using, the method of flashing Android Pie will be different. Since we have primarily taken only Google Pixel and Xiaomi Android One devices in our use-case, we will only be discussing the methods for them. If you have a different device, we’d suggest searching our website database for your device-specific guide or visit the XDA-Developer forums.
- Google Pixel users: Download the Android Pie factory image from this page and follow the provided instructions on the same page on how to flash it. To prevent your data from wiping, edit the flash script, and remove the ‘-w’ flag from it.
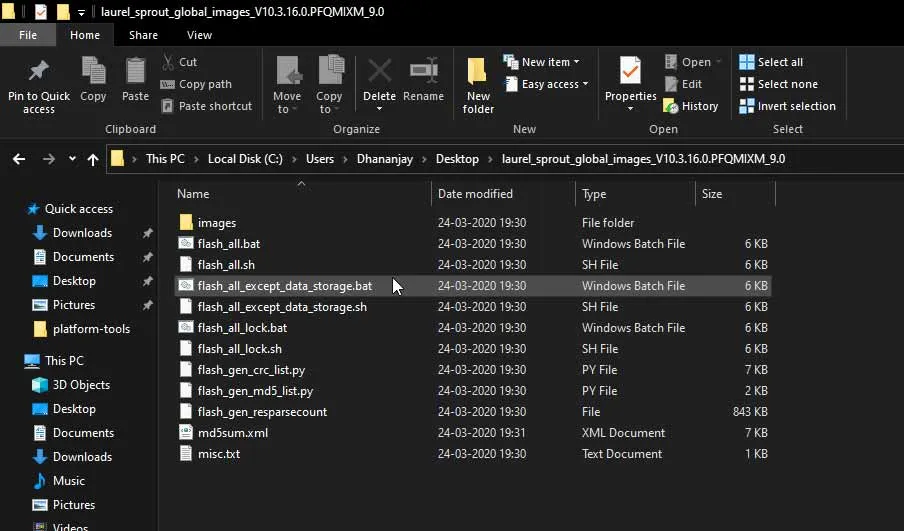
- Xiaomi Mi A3 users: Download the Android Pie fastboot ROM from here and follow the provided instructions. To prevent your data from wiping, use the ‘flash_all_except_storage.bat’ only.
After flashing Android Pie, let your device reboot into the OS. It will keep bootlooping and might end up on the ‘Can’t load Android system’ screen. This is normal and there’s no need to perform a factory reset (as prompted on the screen).
Step 5: Re-flash Android 10 Factory Image/Fastboot ROM
Now, the last step is to reflash and upgrade your device back to Android 10. This can be done the same way as shown in the previous step, that is, by flashing the Android 10 factory image/fastboot ROM on your corresponding device.
Once you have flashed Android 10, reboot your device into the OS and check if the sensors have started working again. A lot of Pixel users affected by this issue on the official XDA thread have confirmed that this method works. Several Xiaomi Mi A3 users have also successfully fixed the sensors on their devices by following the same method.
Have you faced this problem on any other device than the ones listed in this post? If so, then have you tried the instructions provided above to fix the sensors bug? Has it worked? Please let us know your device name and model.
Credits: A huge thanks to XDA member nikhilnagia for his research and findings, and also for providing plausible solutions to this annoying issue.
Source: XDA
Comments
Comments are moderated, and published only if they are relevant to the topic and add value in a constructive way. If you disagree with something, please be polite and respectful. We suggest you read our comment policy before commenting.