
On this page
In this tutorial, I will show you how to easily root the Xiaomi Mi A3 using Magisk, without installing or using a custom recovery such as TWRP at all. These instructions are compatible with both the Global and European variants of the Mi A3 and supports all Android versions including Android 11, Android 10, as well as Android Pie.
Since its launch in 2019, the Mi A3 received support from the custom development community in no time. A major reason for that was the fact that the phone runs near-stock Android OS being a part of Google’s Android One program. This makes a lot of things easier at the developers’ end to set things in motion when it comes to custom development.
Traditionally, rooting involved flashing Magisk through a custom recovery such as the popular TWRP recovery. However, that’s not the norm anymore, in fact, it hasn’t been for some years.
The process of rooting the Mi A3 is a tried-and-true one and does not rely on a custom recovery.
You can now easily root your Xiaomi Mi A3 using Magisk. You will not only be able to use root applications, but you can also use Magisk to apply modifications to the phone’s software systemless-ly, hide root access from individual apps, pass SafetyNet checks (well, not after Google’s new hardware-backed attestation), and much more.
That being said, the instructions below in this guide will take you through the complete process in detail.
Prerequisites
Before you begin, make sure that you fulfill all the requirements listed below.
- Rooting your phone will not wipe data. But we still strongly recommend that you take a complete backup of all your data, including the internal storage, to prevent data loss if anything goes wrong. Here’s a detailed guide on how to manually backup your Android device completely, just in case you need it.
- In order to root, you must first enable OEM unlocking and unlock your Mi A3’s bootloader. If you have not unlocked yet, then note that unlocking the phone’s bootloader will wipe all the data including internal storage.
- Charge your phone to a sufficient battery level (About 50% or above). This shall help avoid any sudden shutdowns during the rooting process.
- (For Method 1 only): Download the latest TWRP for Mi A3 and install it. If you already have TWRP installed, then this is not needed.
- (For Method 2 only):
- Enable USB Debugging on your Mi A3. We will be using ADB to pull the Magisk Patched Boot Image from the device to the PC.
- Download the latest ADB and Fastboot package and extract it to a suitable location on your PC (example: C:\platform-tools).
- Launch the command-line window on PC:
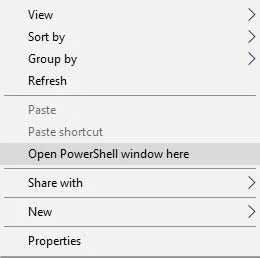
- PowerShell in Windows: Go to the folder where ADB and Fastboot are installed. Then hold the Shift key on the keyboard and right-click on any empty space inside the folder. Finally, select the ‘Open PowerShell window here’ option.
- Terminal in macOS/Linux: Open the Terminal window and “cd” to the folder where ADB and Fastboot are installed (example: cd Documents/platform-tools)

- When executing ADB or fastboot commands during the instructions, make sure to prepend them with ”.\” while using Windows PowerShell or ”./” when using macOS/Linux Terminal.
Download Xiaomi Mi A3 Stock Boot Images
For rooting the Mi A3 using Magisk Patched Boot Image (Method #2), you will need the stock boot image (boot.img) for the software version/build number installed on your phone.
Although you can simply extract the boot image from the OTA file, we decided to save you that trouble. Below, you will find the links to download the stock boot image for both the Global and European variants of the Mi A3, for all the software versions released to date.
Note: Please avoid using pre-patched boot images provided by others. In doing so, you would lose the ability to restore the stock boot image, which is required for installing OTA updates after rooting, as well as for unrooting the phone later.
For Global Variant
- V12.0.7.0.RFQMIXM: stock_boot_V12.0.7.0_mi_a3_global.zip
- V12.0.6.0.RFQMIXM: stock_boot_V12.0.6.0_mi_a3_global.zip
- V12.0.3.0.RFQMIXM: stock_boot_V12.0.3.0_mi_a3_global.zip
- V11.0.23.0.QFQMIXM: stock_boot_v11.0.23.0_mi_a3_global.zip
- V11.0.21.0.QFQMIXM: stock_boot_v11.0.21.0_mi_a3_global.zip
- V11.0.20.0.QFQMIXM: stock_boot_v11.0.20.0_mi_a3_global.zip
- V11.0.19.0.QFQMIXM: stock_boot_v11.0.19.0_mi_a3_global.zip
- V11.0.17.0.QFQMIXM: stock_boot_v11.0.16.0_mi_a3_global.zip
- V11.0.15.0.QFQMIXM: stock_boot_11.0.15.0_mi_a3_global.zip
- V11.0.14.0.QFQMIXM: stock_boot_v11.0.14.0_mi_a3_global.zip
- V11.0.11.0.QFQMIXM: stock_boot_v11.0.11.0_mi_a3_global.zip
- V11.0.08.0.QFQMIXM: stock_boot_v11.0.8.0_mi_a3_global.zip
- V10.3.13.0.PFQMIXM: stock_boot_v10.3.13.0_mi_a3_global.zip
- V10.3.12.0.PFQMIXM: stock_boot_v10.3.12.0_mi_a3_global.zip
- V10.3.9.0.PFQMIXM: stock_boot_v10.3.9.0_mi_a3_global.zip
- V10.3.8.0.PFQMIXM: stock_boot_v10.3.8.0_mi_a3_global.zip
- V10.3.6.0.PFQMIXM: stock_boot_v10.3.6.0_mi_a3_global.zip
- V10.3.5.0.PFQMIXM: stock_boot_v10.3.5.0_mi_a3_global.zip
- V10.3.4.0.PFQMIXM: stock_boot_v10.3.4.0_mi_a3_global.zip
For European Variant
- V12.0.2.0.RFQEUXM: stock_boot_V12.0.2.0_mi_a3_eu.zip
- V11.0.10.0.QFQEUXM: stock_boot_v11.0.10.0_mi_a3_eu.zip
- V11.0.6.0.QFQEUXM: stock_boot_v11.0.6.0_mi_a3_eu.zip
- V11.0.5.0.QFQEUXM: stock_boot_v11.0.5.0_mi_a3_eu.zip
- V11.0.3.0.QFQEUXM: stock_boot_v11.0.3.0_mi_a3_eu.zip
- V11.0.2.0.QFQEUXM: stock_boot_v11.0.2.0_mi_a3_eu.zip
- V11.0.1.0.QFQEUXM: stock_boot_v11.0.1.0_mi_a3_eu.zip
- V10.3.17.0.PFQEUXM: stock_boot_v10.3.17.0_mi_a3_eu.zip
- V10.3.14.0.PFQEUXM: stock_boot_v10.3.14.0_mi_a3_eu.zip
- V10.3.13.0.PFQEUXM: stock_boot_v10.3.13.0_mi_a3_eu.zip
- V10.3.12.0.PFQEUXM: stock_boot_v10.3.12.0_mi_a3_eu.zip
- V10.3.11.0.PFQEUXM: stock_boot_v10.3.11.0_mi_a3_eu.zip
- V10.3.9.0.PFQEUXM: stock_boot_v10.3.9.0_mi_a3_eu.zip
- V10.3.8.0.PFQEUXM: stock_boot_v10.3.8.0_mi_a3_eu.zip
- V10.3.7.0.PFQEUXM: stock_boot_v10.3.7.0_mi_a3_eu.zip
Instructions to Root Xiaomi Mi A3 using Magisk
As we mentioned initially, there are two different ways/methods to root the Xiaomi Mi A3 using Magisk. The method you choose purely depends on what you’re trying to achieve overall.
- If you have TWRP installed on your phone and plan on using it to flash custom ROMs, kernels, and mods, then you should use Method #1.
- On the other hand, if you just want to root your phone and keep using the stock firmware, then Method #2 is what you should follow.
After you finish following either of these methods, your Mi A3 will be rooted with Magisk. So, the result stays the same. Now, without any further ado, let us start with the instructions.
Method 1: By flashing Magisk through TWRP recovery
In this method, you will be flashing the latest Magisk installer ZIP file through TWRP recovery.
- First, download the latest Magisk APK file (e.g. Magisk-v22.0.apk) on your Mi A3.
- Open a file manager and rename the .apk file to a .zip file (e.g.
Magisk-v22.0.apktoMagisk-v22.0.zip). - Next, hold the power button of your phone to bring up the Power Menu and select ‘Power off’.
- Once the phone is fully powered off, hold the Volume Up and Power buttons together to enter TWRP recovery mode.
- Select ‘Install’ from the TWRP main menu.
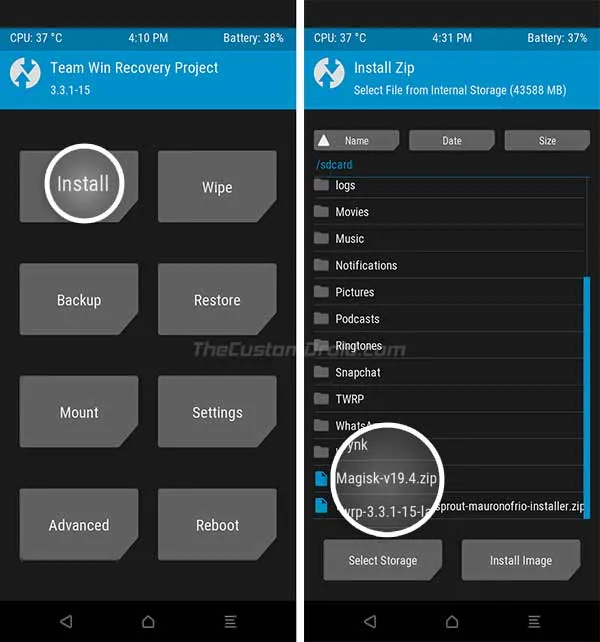
- Navigate to the phone’s internal storage (/sdcard) in the file selector window.
- Select the Magisk installer ZIP file that you downloaded earlier (e.g. Magisk-v22.0.zip) to add it to TWRP’s flashing queue.
- Swipe the button on the bottom of the screen to flash Magisk and root your Xiaomi Mi A3.
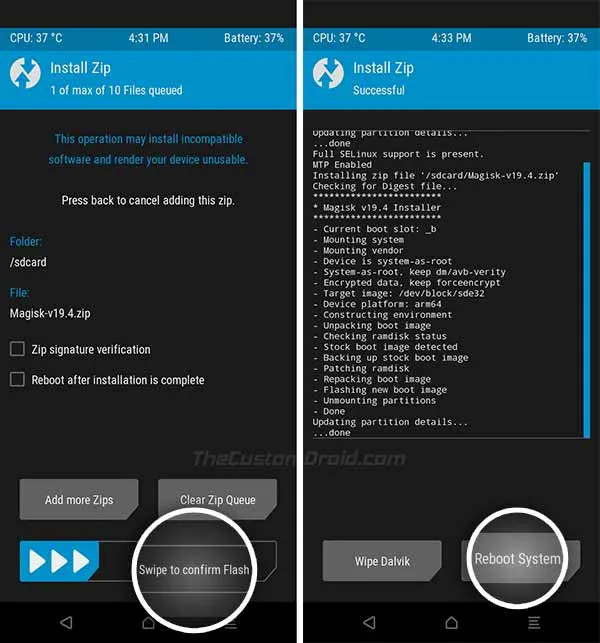
- Press the ‘Reboot System’ button once the flashing process is finished.
That’s it! Your phone will now reboot into the rooted stock firmware environment.
Method 2: By flashing Magisk patched boot image (without TWRP)
In this method, you will be downloading and patching the stock boot image, and then flashing the resultant patched boot image to your Mi A3 using fastboot commands.
- First, download the stock boot image according to your Mi A3’s software build number on your PC.
- Extract the contents of the downloaded ZIP file (stock_boot_vxx.x.x.x_mi_a3_xxxx.zip) to get the stock boot image (boot.img).
- Transfer the extracted stock boot image to your phone’s internal storage.
- Now download the latest version of Magisk Manager and install the APK on your phone.
- Once installed, launch the Magisk Manager app and select ‘Install’.
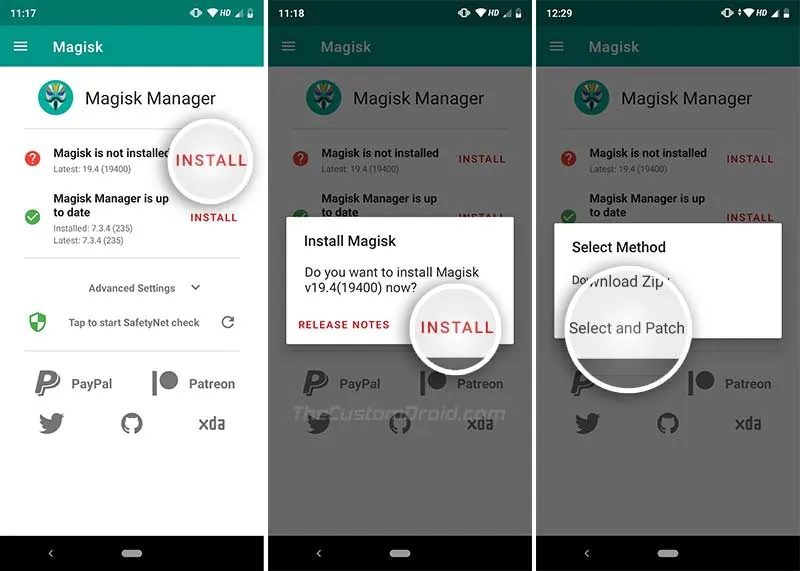
- Press ‘Install’ and then select the ‘Select and Patch a File’ option.
- Navigate to your phone’s internal storage and select the stock boot image file (boot.img) that you transferred earlier.
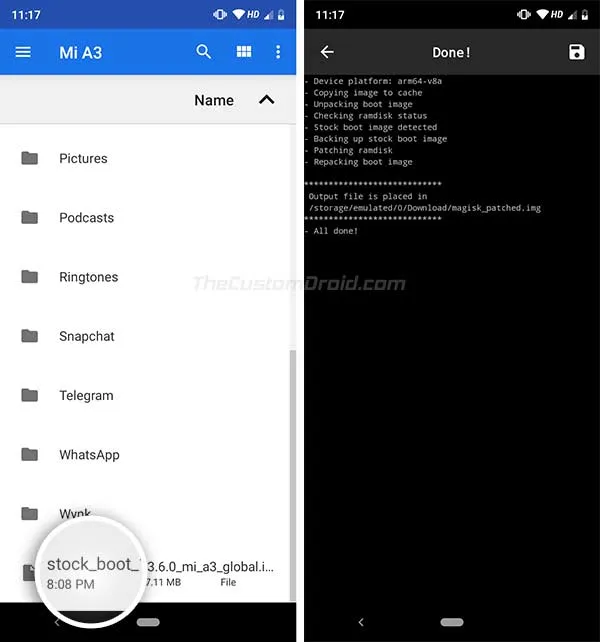
- Magisk Manager will now automatically patch the stock boot image file with the latest version of Magisk. The resultant Magisk Patched Boot Image (magisk_patched.img) file will be stored in the ‘Download’ folder of your phone’s internal storage.
- Launch the command-line window inside the ‘platform-tools’ folder on your PC (refer to pointer #4 of the ‘Prerequisites’ section).
- Enter the below command to transfer the ‘magisk_patched.img’ file from the phone to the PC. Alternatively, you could also transfer the file manually.
adb pull /sdcard/Download/magisk_patched.img - Now power off your Xiaomi Mi A3 and boot it into Fastboot Mode by holding the Volume Down and Power buttons.

- Connect your phone to the PC using a USB cable.
- Now, enter the following command to flash the Magisk Patched Boot Image and root your Xiaomi Mi A3.
fastboot flash boot magisk_patched.img
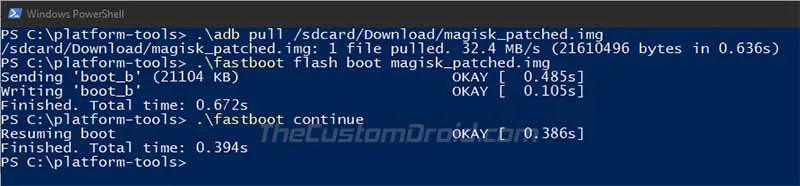
- Once the flashing process finishes, reboot your phone back into the OS using the following command.
fastboot continue
Once your phone boots, it should be rooted with Magisk. To verify, you can open the Magisk Manager app and verify the installation status.
Wrapping Up
So by now, you have learned how to root the Xiaomi Mi A3 using two different methods. Rooting gives you tons of control over each and every part of your phone’s software. You can now install your favorite root apps like Titanium Back and start using them. You could also install Magisk Modules to install mods such as ViPER4Android, Xposed Framework, etc.
If you ever wish to unroot the phone, you can use the ‘Uninstall’ option in Magisk Manager.
Comments
Comments are moderated, and published only if they are relevant to the topic and add value in a constructive way. If you disagree with something, please be polite and respectful. We suggest you read our comment policy before commenting.