Advertisement

Official and unofficial builds of TWRP recovery for Xiaomi Mi A3 are now available. In this guide, you will learn how to download and install TWRP recovery on Xiaomi Mi A3. Installing TWRP will allow you to flash custom ROMs, kernels, mods, backup/restore NANDroid, and also flash Magisk installer zip to root your phone.

The Xiaomi Mi A3 is the third iteration of Xiaomi’s Mi A series that is part of the Android One program. And so, the phone runs the near-stock version of the Android OS, as seen on the Google Pixel series. This means, the software is not filled with gimmicks, that you might have seen on the regular Xiaomi devices running MIUI. This also means that you wouldn’t have many options at your hand to customize the software.

If you’re looking for ways to customize the software for more features or for optimizing the performance and battery life, then you can do so by installing custom ROMs or kernels. You can also root your phone using Magisk if you want to use apps that require root permissions or apply modifications to your phone, systemless-ly. But to do any of this, you must first install TWRP on your Xiaomi Mi A3.

Although it has been more than two months since the Mi A3 was released, there’s still no official TWRP support for the phone yet. According to the developer (source), the current build does not support external storage (SD card) and USB OTG.

Thanks to XDA developer mauronofrio, we now have working TWRP for the Xiaomi Mi A3, available both officially and unofficially. The new builds support external storage (SD card) and USB OTG in TWRP.

Every major feature of the TWRP recovery work seamlessly, as listed below:

  • Installing custom ROMs, kernels, mods, and any other flashable zips.
  • Installing partition images (system, boot, etc)
  • Taking Nandroid backups and restoring them
  • Wiping individual device partitions like Data, System, Cache, etc
  • Performing a full factory reset
  • Mounting and unmounting device partitions
  • Mounting your phone’s internal/external storage for MTP
  • …And more.

Now that you’re here for it, go ahead and follow the instructions below on how to install TWRP recovery on Xiaomi Mi A3.

Installation Process In-brief

Since the Mi A3 supports the A/B partition scheme, there’s no dedicated [/recovery] partition anymore (Just like on Mi A2 and Mi A1) and the recovery itself resides inside the [/boot] partition.

The first step is to flash the stock boot image corresponding to the software version installed on your phone, to the currently active slot (Say “a”). Although not mandatory, this is done so as to eliminate any chance of the /boot partition being previously modified.

Once that is done, you will have to switch the phone’s active slot to the currently inactive slot (Say “b). Then, flash the TWRP recovery image to the newly active boot slot (“b”) and then force-reboot the phone into TWRP recovery. Finally, you have to flash the installer zip to permanently install TWRP recovery to both the slots (a & b) of your Mi A3.

Once everything is done, the last step is to re-switch the phone’s active slot to the one that was active initially (“a”).

Don’t worry if it sounds a bit confusing at first. We have tried and simply the procedure as much as possible, below.

Table of Contents

Prerequisites

  • Take a complete backup of all your data. Although this procedure will not wipe any data on your phone, it would be wise to safeguard your data in case anything goes wrong. Here’s an extensive guide on how to take a backup of all sorts of data on your device.
  • In order to flash TWRP, your Mi A3’s bootloader must be unlocked. If you haven’t done it yet, then follow our step-by-step guide on how to do it. Note that unlocking the bootloader will WIPE ALL DATA including the internal storage.
  • Installing TWRP on Xiaomi Mi A3 requires the use of “fastboot”. So, install Android SDK platform-tools (ADB and Fastboot) on your PC, if you haven’t done it yet.
    • Note: During the instructions, make sure to prepend the fastboot commands with [.\] while using PowerShell on Windows, and [./] while using Terminal on macOS or Linux.
  • When asked to launch the command-line window on the PC, do the following:
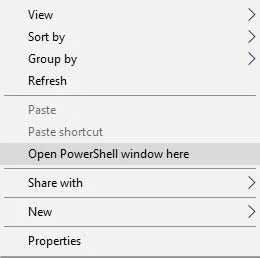
    • PowerShell in Windows: Go to the folder where the ADB and fastboot are installed. Then press and hold the “Shift” key and right-click on any empty space inside the folder. Finally, select “Open PowerShell window here” to launch the PowerShell on your Windows PC.
      Install TWRP Recovery on Xiaomi Mi A3 - Open PowerShell in Windows
    • Terminal in macOS/Linux: Open the Terminal and “cd” to the folder where the ADB and fastboot binaries are installed (e.g. cd Documents/platform-tools).
      Install TWRP Recovery on Xiaomi Mi A3 - Open Terminal on macOS/Linux
  • Also, download USB drivers for your Mi A3 and install them on your PC.
  • Last, ensure that you have charged your phone to a sufficient battery level to avoid any sudden shutdowns in the midst of the installation process.

Download Xiaomi Mi A3 TWRP Recovery (laurel_sprout)

The download links were directly sourced from the original XDA thread, thanks to developer mauronofrio! Although we will try our best to keep this post updated with the latest version of TWRP. But we encourage you to always check the XDA thread and official database for the latest available version.

Note: We strongly recommended using the unofficial TWRP build as it offers full support for Android 10. Although the official builds offer a more recent TWRP version 3.4.0-0, but they do support Android 10 properly.

1. Official TWRP v3.4.0-0

2. Unofficial TWRP v3.3.1-17 (Recommended)

Instructions to Install TWRP Recovery on Xiaomi Mi A3

To make it easier to understand, we have split the instructions into three major steps. Make sure that you go through them first and understand what you’ll be doing before you proceed.

Step 1: Flash Stock Boot Image and Switch Slot

  1. Download the latest TWRP recovery image and installer zip files for Xiaomi Mi A3.
  2. Also, download the stock boot image for the software version currently installed on your phone. For instance, you have the “V10.3.13.0.PFQMIXM” software version installed, then download the V10.3.13.0 stock boot image.
  3. Move the stock boot and recovery img files to the folder on the PC where the ADB and Fastboot binaries are installed (e.g. C:\platform-tools).
  4. Next, transfer the downloaded TWRP installer zip (e.g. twrp-3.3.1-17-laurel_sprout-Installer-mauronofrio.zip) file to your phone’s internal storage.
  5. Now power off your Mi A3 and boot it into Fastboot Mode.
    Install TWRP Recovery on Xiaomi Mi A3 - Enter Fastboot Mode
  6. Connect your phone (while it is in Fastboot Mode) to the PC using the USB cable.
  7. Launch the command-line window on your PC.
  8. Enter the below command to ensure that your PC is able to recognize your Mi A3 over fastboot:
    fastboot devices
  9. Now flash the stock boot image to the currently active slot using the command below:
    fastboot flash boot stock_boot_x.x.x.x_mi_a3_xxxxx.img

    Example:

    fastboot flash boot stock_boot_10.3.13.0_mi_a3_global.img
  10. Once flashed, check the active slot of your phone:
    fastboot getvar current-slot
  11. The command should output the slot that’s currently active (Let’s say it’s “a”; we will refer to this as “original slot”).
  12. Change the active slot to the current inactive slot (Say “b”; we will refer to this as “new slot”) by using the following command:
    fastboot --set-active=b
  13. Do not disconnect or switch off the phone yet. Head over to Step #2.

Now, we will be using a bit of naming convention from hereon to avoid any confusion.

  • We will refer to the initially active slot (shown in #11) as the “original slot“. For demonstrating, this will be slot “a”.
  • The currently active slot (shown in #12) which was previously inactive as the “new slot“. For demonstrating, this will be slot “b”.

Step 2: Flash TWRP Recovery on Xiaomi Mi A3

  1. Flash the TWRP recovery image on Xiaomi Mi A3’s new slot:
    fastboot flash boot twrp-recovery-image.img

    Replace “twrp-recovery-image.img” with the actual filename of the recovery you’re using. For example:

    fastboot flash boot twrp-3.3.1-17-laurel_sprout-Q-mauronofrio.img


    Install TWRP Recovery on Xiaomi Mi A3 - Flash TWRP Recovery Image

  2. Now, it is important to boot your Xiaomi Mi A3 directly into TWRP recovery mode. To do so, enter the following command while holding the Volume Up key until the TWRP splash screen appears:
    fastboot reboot
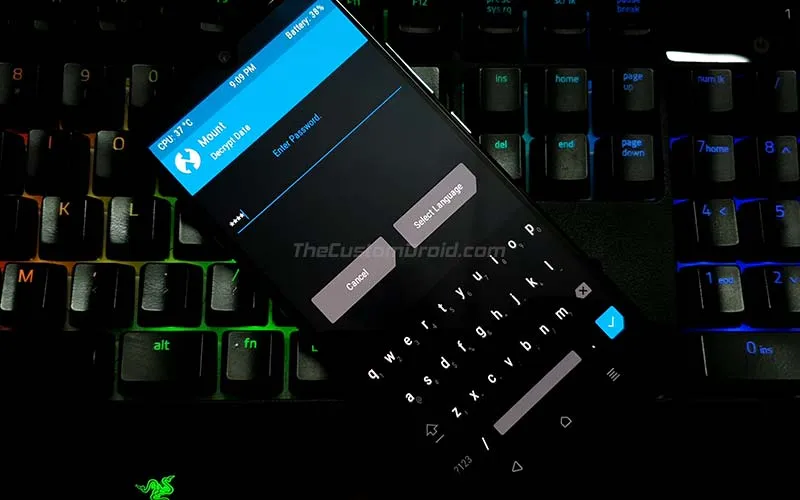
  3. Enter your lock screen PIN/Password when prompted to allow TWRP to decrypt the [/data] partition (internal storage).
    TWRP Decrypting Data Partition on Xiaomi Mi A3
  4. Swipe the “Swipe to Allow Modifications” button when prompted.
    TWRP on Xiaomi Mi A3 - Swipe to Allow Modifications
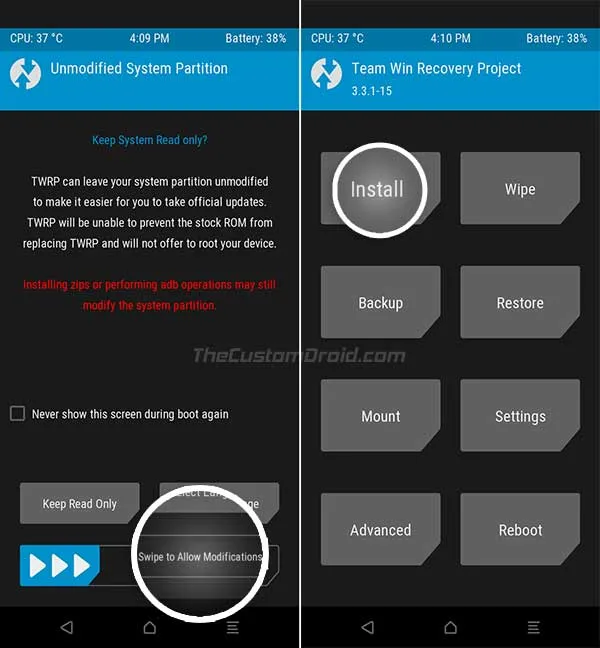
  5. Press the ‘Install’ button in TWRP and select the TWRP installer zip file (e.g. twrp-3.3.1-0-installer-laurel_sprout.zip).
  6. Finally, swipe the “Swipe to confirm Flash” button to flash the TWRP installer zip and permanently install TWRP recovery on Xiaomi Mi A3.
    Permanently Install TWRP Recovery on Xiaomi Mi A3 - Flash TWRP Installer Zip

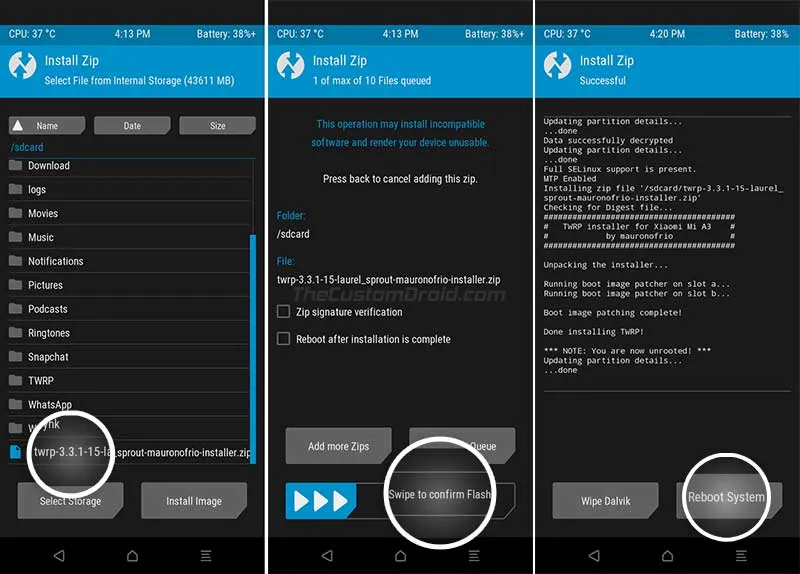
The process could take a few seconds. Once finished, do not reboot the phone yet. Head over to the third and final step of the procedure.

Step 3: Re-switch to the Original Slot

Now, before you reboot your Mi A3 back into the system, it is important to re-switch the slot to the one that was active initially (original slot). To do so:

  1. Go to the “Reboot” menu in TWRP
  2. Tap on the slot that was active initially (Say “a”) to switch to it.
  3. Once the active slot has been set correctly, tap on the “Recovery” button to reboot your Mi A3 into TWRP recovery.
  4. Finally, go to the “Reboot” menu and tap on “System” to boot your phone into the system (OS).

If you’re prompted to install the TWRP app, tap on “Do Not Install”. Your phone should now boot into the OS.

You now have TWRP installed on your phone. You can either use it flash Magisk to root your Mi A3, or flash a custom ROM for a totally fresh and unique software experience. Like we mentioned earlier, TWRP also allows you to take Nandroid backups of your complete OS, which can come in handy if you want to restore a previous ROM or even the stock firmware.

So there you go! This was our guide on how to install TWRP recovery on Xiaomi Mi A3 easily. If you have any questions regarding the procedure or have any doubts before you proceed with it, then do let us know through the comments section below.

Comments

  1. I flashed the installer zip and switched to slot A, and TWRP works fine, but when trying to boot into the system, it’s just stuck on the MI logo (not the Android One) and I can’t do anything. I already tried formatting System, Dalvik and Data.

  2. Hello there!
    I’m tryng to install twrp, but when I flash it on the boot_a (boot b its the main one) it wont boot the recovery

    I tryed with different versions of twrp (I currently have Android 11, image 12.0.24.0 Global) but when I “fastboot reboot” it istantly reboots in fastboot 🙁

    Any advice?

  3. Hi Dhananjay,

    I am not able to switch between slots of see current slot in getvar all. When ever I put any code in fastboot related to slots – it gets back to me with an error “fastboot: error: Device does not support slots”. Same happens in EDL mode with Mi Flash Tool. i get error tz_a not available. System is not able to switch between slots as if the slots are not available. I am able to get to recovery mode (twrp) and fastboot mode, but not able to install any rom since slots are not detected. Please Help…

    1. Nandhu, the Mi A3 supports the dual-slot partition system. The fact that neither fastboot and nor Mi Flash Tool are able to read it, indicates that the partition table has be altered or corrupted.

      A user over at this XDA thread faced the similar issue and posted a plausible solution. Have a look and let me know if you have any follow up questions.

    1. TWRP for the Mi A3 hasn’t yet been updated to support Android 11.

      You might want to keep an eye out on the releases page of Mauronofrio’s build and the official TWRP release page.

      Chances are that the unofficial build by Mauronofrio will be out before the official build.

      The official build available for the Mi A3, on the other hand, is based on the Android 9.0 branch. Even though it’s a more recent TWRP version, it will work on Android Pie, but might not on Android 10, and definitely not on Android 11.

    2. It works! I managed to boot the twrp image, but now that I have installed TWRP, when I access the fresh installed recovery from the main partition “a” it flash the starting screen of twrp and then turns black in loop…

  4. It worked successfully. Thanks a lot. This is currently the most perfect tutorial I’ve ever seen!!!!!

  5. At the end of the guide you said: “If you’re prompted to install the TWRP app, tap on “Do Not Install”. Your phone should now boot into the OS.”

    But why do I not need to install TWRP app though?

    1. The app is generally only needed for downloading the TWRP recovery image and installer files directly from the TWRP official repo. Other than that, it serves no practical purpose.

      And yes, make sure that you download and use the unofficial TWRP image and installer provided on Github (Until I update the links above). It’s more recently updated and also fully supports Android 10 Q.

    2. I see, thanks!

      Btw, when I was installing TWRP through this guide I checked for the new version of TWRP on the official site “https://twrp.me/Devices” and the last version was “3.4.0-0” and when I tried to flash that version nothing happened, then I tried that another “3.3.1-17” from Github and it worked. Why did it happen? Isn’t “https://twrp.me/Devices” provides the latest working version of TWRP for each device? Should I rely next time only on TWRP’s from Github?

    3. Yaroslav, I can understand that it could be confusing at first. But I will try and break it down for you.

      TWRP has developers (TWRP contributors) who voluntarily compile TWRP recovery for particular devices. “mauronofrio” here is the developer who works on TWRP for the Mi A3. Now developers, in general, have to go through laid-down guidelines to submit patches for the builds posted on twrp.me/devices, which could take some time because the patches are merged and pushed into the build environment as per the lead developers. In short, it’s a bit time-consuming.

      So developers might often choose to create unofficial versions through their local environment and setups, which allows them to patch, build, and upload builds as it suits them. This is what mauronofrio has done here. The patches for Android 10 support (among other things to get TWRP working) have been merged in “3.3.1-17” (the unofficial version on Github), but not in the official 3.4.0-0 builds posted on the official database. So, it’s best to refer to his Github releases page from now on.

  6. Hi Dhananjay,

    Thanks for your very nice instructions. Everything turned out to be installed and everything worked, but after the updates systems TWRP stopped loading. I understand correctly that now updates systems need to be installed through a firmware replacement and everything must be re-installed TWRP and Magisk?

    1. Hi Nex. A system update (performed manually) will re-write the boot partition (where both TWRP and Magisk are present). So, you will need to redo it.

  7. Hi Dhananjay
    Staying in stock rom and rooted, how can I to uninstall twrp and return to stock recovery? In this case need I to reinstall magisk?

    1. Hi again, Fanis. You have to restore the stock boot image for the software version installed on your phone.

      Now, this will simultaneously remove TWRP as well as Magisk. And so, you will have to re-root the phone by reinstalling Magisk.

    2. Hi Dhananjay
      I followed your advice, I restored the boot.img via magisk but only the magisk and the root removed.Twrp was still there! I don’t know what I did wrong… So I followed your other guide and returned to stock firmware ant and stock recovery, without any problem.
      Thanks!

    3. That’s great! It could be because you installed Magisk after installing TWRP. So Magisk basically backed up your boot image that already had TWRP in it. And that’s why TWRP still persists.

      This time, try booting into TWRP via the fastboot boot command, then flash the Magisk zip first and then the TWRP installer zip.

  8. Dhananjay
    The command for installing the boot image must have exactly the form stock_boot_x.x.x.x_mi_a3_xxxxx.img
    or simple the same name with the adb folder’s one?

    1. Hi Fanis. That’s just for reference. ‘stock_boot_x.x.x.x_mi_a3_xxxxx.img’ is the file name format I use to sort the boot images. You have to replace it with the exact filename of the stock boot image you’re flashing.

  9. In differents guides there isn’t the step of installing the stock boot.image. Why? Other words If i do that i will have problem? Second do you suggest to install magisk without twrp? Thanks!

    1. Hi Fanis. We added that step as a safeguard to ensure that the currently active slot has the matching stock boot image without any modifications. Users who are doing this for the first time can skip this because there’s no chance that their current boot partition might have been modified in any manner.

      As for root without TWRP, I haven’t personally installed TWRP on most of my devices since months, because I don’t plan on installing custom ROMs on them, or use TWRP to flash any mods.

      Without TWRP, it’s even easier to get OTA updates on my rooted phones.

      To sum up, I don’t need it (at the moment), so I don’t install it. It totally depends on what’s your ultimate goal, is it installing custom ROMs? Or is it just using root apps, Magisk modules, and other mods?

      I hope that clears it up. Please feel free to let me know if you have any questions.

    2. Hi Dhananjay,
      Thanks a lot for your replay, I think you are clear! It will be my first time to do similar like these and I want to be sure! Tell me if I use magisk without twrp it will be any problem with OTA updates?

    3. Hi again Fanis. Yes, it’s best to be sure first of what you’re going to do. I have seen users mess up on the first go, that’s quite normal, but mostly because they didn’t focus on the details and blindly followed the instructions. Which is wrong.

      It’s a great idea to first have a prior understanding of things before following them.

      Installation of OTA updates shouldn’t pose a problem unless you have manually mounted the /system partition as R/W and make direct modifications to it.

      The beauty of Magisk is that it allows altering the /system partition without even actually touching it. So, limit yourself to modifications that rely on Magisk itself, and avoid any manual modifications unless extremely necessary.

      If you ever have a doubt regarding something, I am right here to help.

      And, if you make a mistake on the first go, don’t be afraid to retry again. You’ll surely learn something out of it. I did 😉

  10. Hi Dhananja!

    I just read this article but before this I read another article that was outdated and I ruined my phone because of it eventually. Unfortunately I found your article only after that, I did everything that was described in your article but I got recovery bootloop for both slots A and B 😭 Can you pls help to fix it?🙏🙏 I really don’t know what to do… Is there a way to reset all these things to default or something like that so I can do everything step by step described in your article from zero?😥

    I also contacted you on your Facebook page. 🥺

    1. Hi Yaroslav. Thanks for getting in touch.

      Don’t worry, it can be fixed easily. But I would like to know how exactly the phone got to this state.

      Could you first tell me which software build number was installed prior to following our guide?

      One more thing, the “another” article that you referred to, which ruined your phone in the first place, can you please provide a link to that? It will give a good idea of what things you previously did on the phone, that may have had an impact.

    2. Thanks for such a fast response, Dhananjay!

      Here’s the link to that article: https://4pda.ru/forum/index.php?showtopic=962154&st=680#entry90061851 (it’s a Russian popular forum, it seems you know about it).

      Btw I already had my phone unlocked before I did all these things.

      So here’s what I did:

      1. I run my phone in Fastboot mode.

      2. Wrote this command in terminal: fastboot erase boot.

      3. Then I flashed TWRP (which I downloaded from here and renamed the file to recovery.img: https://dl.twrp.me/laurel_sprout/twrp-3.3.1-0-laurel_sprout.img.html): fastboot flash boot recovery.img

      4. Then I run my phone in TWRP and flashed boot.img (which I downloaded from here and renamed the file to ‘boot.img’: https://www.thecustomdroid.com/xiaomi-mi-a3-root-guide/#Xiaomi_Mi_A3_Stock_Boot_Images) with software version currently installed on my phone. And when it prompted me which partition to use to flash that image I chose ‘boot’.

      5. Then I installed twrp-installer.zip (which I downloaded from here: https://drive.google.com/file/d/1AO86F9iUZflwuqiTWFw5OsDWT-VxUcSL/view).

      6. After all of this, I clicked reboot system and it had bootloop then I read your article and tried to switch from slot A to B and it launched. But then wanted to do all these things again but using your article because I thought it would be better if I will install twrp using your method and I did all that described in your article but in the end, I still couldn’t run my phone from slot A (it had bootloop) and only could launch from slot B but then I decided to factory reset my phone from Phone settings hoping it will help me to launch my phone from slot A but it didn’t work and after this, I couldn’t even launch my phone from slot B, lol. 😕

      Then in twrp I went to Settings or something like this and clicked something like Fix bootloop hoping it will help me. But it didn’t help…

      Hope you can help me with this, Dhananjay. 😘🙏
      Is it possible to reset all these operations I did so I can install twrp as descibed in your article?

    3. Hi Yaroslav. First off, you did a fantastic job taking the time and explaining exactly what all you did. It surely helped me gain good insight.

      Actually, you cannot boot into slot A because it may have a different boot. But investigating that would just waste more of your time.

      It’s best that you first restore the stock firmware on your Mi A3. Now, I know you performed a factory reset from the Settings. But both of these are two very different things.

      You can find some explanation of the factory reset here and what exactly it does.

      I recently also covered the article to restore the stock firmware. It will flash both your phone’s A and B slots to the stock firmware. The instructions are here.

      Once you are done with it and have booted your phone into the OS, refollow the steps in this TWRP guide from start and you should be good to go.

    4. Hi, Dhananjay!

      Thank you a lot for your help! I managed to fix my broken phone with the guide you provide (https://thecustomdroid.com/xiaomi-mi-a3-stock-firmware-guide) and after this, I refollowed the steps in this current guide and it worked!

      Now I have installed TWRP on my Xiaomi Mi A3. 🙂 I also installed Magisk after this. All works fine!

      Btw, I wanna also install XPosed. Maybe you have some good guide on your forum or somewhere else (because I tried to find such a guide on your forum but I couldn’t)?

      Thanks again for the help! 🙂 Your forum is great!

    5. Hi again, Yaroslav. I am glad you were able to fix the issue and have now successfully installed TWRP and rooted your Mi A3.

      As for Xposed, I recently covered a guide for it here. I have already tested it on my Pixel 3 XL, and it works without any problems.

  11. Hi Dhananjay,
    I have the same issue of not being able to use WiFi after flashing the listed TWRP.
    I tested it twice with my fresh new Mi A3, because first I thought the problem was the Magisk root, that I installed according to your guide with TWRP. However after recovering my Nandrod backup that I made first before rooting with Magisk, the issue still remained. After flashing the stock boot.img firmware and doing a factory reset the WiFi worked alright. After trying to reflash TWRP the issue came back immediately, so I reflashed the stock boot.img and did the factory reset again.
    So it must be a compability issue with the TWRP installation and the phone itself. My build version is 10.3.9.0 (EU) build. So maybe this version is not compatible? Should I update first and then retry with the updated build?

    1. To everyone facing issues with WiFi/Mobile data, etc after using the instructions

      Hi Bernd. It seems like, despite the A/B partition setup similar to that of the previous Mi A series, the A3 has something that’s different on the software end.

      So, considering the number of reports that have been posted here by readers (including you), I decided to revisit the procedure. And yes, that’s the exact same issue I faced too.

      After some digging on XDA, I finally found the perfect way to install TWRP. I have revised the instructions completely, and have also added the links to the official TWRP recovery, as it has been released recently.

      Would you please try the new instructions and let me know how it goes? Please make sure that you go through the instructions once before you start performing them. If you have any questions, please reach back.

    2. Hi Dhananjay,

      Thanks for your very nice instructions. I can confirm that they work. I have accidentally flashed the wrong boot image and then the wifi did not work. But after flashing the correct image and following the instructions, I can confirm everything works. Thanks a lot!

      By the way, I wanted to ask you where do you get the stock boot images. Can one download them from the official xiaomi website?

      Best, Djoko

    3. Hi Djoko.

      Thank you so much for confirming that it works without any issues now.

      I recently revised the instructions to make sure that users can go through with the process without having to fall into issues like no WiFi/mobile network, etc.

      As for the question you asked regarding the stock boot images, I basically try and find the full OTA package for the latest update on multiple online resources like XDA, 4PDA, Reddit, or sometimes even Xiaomi’s own forums (They are quite late in publishing the latest firmware files on their site).

      Once I get hands on them, I use Payload Dumper tool (See the instructions here) to extract the ‘payload.bin’ file inside the OTA package.

      Now, this file contains all the partition images that we might need for flashing. And the one precisely we care for is the boot.img, right? So, I just grab it from there and rename it for better usability, and finally upload it.

      Again, thanks for confirming that it worked. Really value the feedback and time you have put it. If you have any more questions, please feel free to reach back.

    1. Hi Carlos. Yes, you’re correct. Both methods are equally correct.

      Only that the ones on XDA make sure that if you accidentally flash a wrong boot image/TWRP to the inactive slot, you will still be able to boot your device using the active slot.

      My experience is that if you follow all the steps correctly, use the correct files, and flash them to the correct slot, the chances are minimal. I personally follow these same steps on my Mi A3.

      If you think, as a reader, that the method on XDA is more fool-proof, I would be more than happy to update the instructions accordingly.

Post a Comment

Comment Policy: We welcome relevant and respectable comments. Only input your real first name and valid email address if you want your comment to appear. Read our comment policy fully before posting a comment.