With an unlocked bootloader, it is now possible to root Pixel 3 with Magisk. The instructions in this tutorial will help you easily install TWRP recovery and simultaneously root Google Pixel 3/Pixel 3 XL.
Advertisement
Note: The instructions provided on this page are only compatible with the said Pixel devices running Android Pie. The new Dynamic Partition layout introduced in Android 10 on Pixel phones poses a roadblock in TWRP’s development. For more information & a detailed explanation, please visit this page.
This year’s Google Pixel phones are everything you’d need from a flagship standard device, be it the hardware, the design, or the software. Talking of the software, the Pixel 3 and Pixel 3 XL come with a clean AOSP software experience that offers some very interesting features. At the same time, Pixel devices are also the most developer-friendly Android devices out there. A bunch of root tweaks and you can modify a lot when it comes to the software.
But ever since the first Pixel phones were released in 2016, we have seen some difficulties when it came to the rooting scene. Things like the all-new A/B partition system and certain security features in the kernel have hindered the developers from gaining root access for a long time. Similarly, the 2018 Google flagships come with a rather small change in the kernel, that prevented users from rooting their phone.
Advertisement
Page Contents
Boot Image Header v1 in Google Pixel 3 (XL)
The small change that we just mentioned above is the new Boot Image Header version. The Google Pixel 3/Pixel 3 XL comes with Boot Image Header v1. According to Google – “Versioning the boot image header allows future modifications to the header while maintaining backward compatibility.” and every smartphone that comes with Android 9 Pie must come with Boot Image Header of v1.
Earlier versions of Magisk (The popular Android root solution) followed the legacy boot image header v0. This means rooting the Pixel 3 with previous versions of Magisk failed rigorously. However, it didn’t take long for XDA developer topjohnwu to implement the same and push an update to Magisk that supports the new Boot Image Header version.
Advertisement
To sum up, you can now easily root Google Pixel 3 and Pixel 3 XL by flashing the latest version of Magisk through TWRP recovery. The instructions below will take you through the complete process in a step-by-step manner.
Also Read: How to Hide the Notch on Google Pixel 3 XL
Requirements
- First and foremost, you must take a full backup of all your personal data stored on the phone. Everything including the internal storage, apps, and related data will be wiped when you unlock the bootloader on your Google Pixel 3 (XL). We also have a comprehensive guide on how to backup Android phones completely.
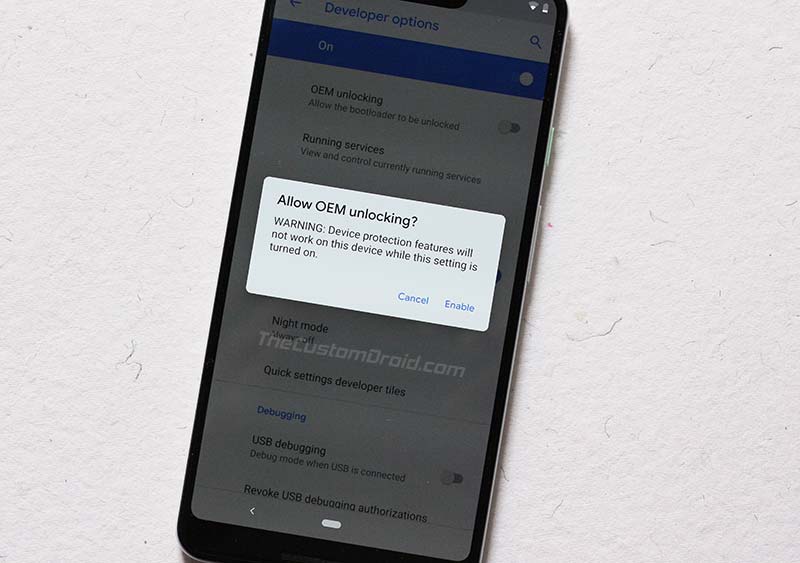
- Next, you must enable Developer Options in device settings. Once enabled, go to Settings -> System -> Developer options and enable the ‘OEM Unlocking’ toggle.

- Your Pixel 3/3 XL’s bootloader must be unlocked. If you haven’t unlocked it yet, then we suggest you follow our tutorial on how to do it.
- You must download Android platform tools (ADB and Fastboot) and extract them on the PC. Alternatively, you can also use Minimal ADB and Fastboot Tool. Once installed, you will need to open the PowerShell/Terminal window inside the extracted ‘platform-tools’ folder.
- On Windows: Go to the ‘platform-tools’ folder that you extracted earlier. Now, while holding the SHIFT key, right-click on an empty space inside this folder. Select ‘Open PowerShell window here’ from the menu.
- On Linux/macOS: Open the ‘Terminal’ and cd to the location of the ‘platform-tools’ folder. Example:
cd /Users/Dhananjay/Desktop/platform-tools
- Charge your Pixel 3 to a sufficient battery level. This shall help avoid any sudden shutdowns during the unlocking/rooting process due to low battery.
Downloads
Below, you will find the links to download all the files you’d need while performing the instructions.
Advertisement
- TWRP for Google Pixel 3 (codename: blueline)
- Recovery Image: twrp-3.3.0-0-blueline.img
- Installer ZIP: twrp-pixel3-installer-blueline-3.3.0-0.zip
- TWRP for Google Pixel 3 XL (codename: crosshatch)
- Recovery Image: twrp-3.4.0-0-crosshatch.img
- Installer ZIP: twrp-installer-3.4.0-0-crosshatch.zip
- Latest Magisk Flashable ZIP: Magisk-v20.4.zip (or check the latest version on the Github Releases Page)
Install TWRP Recovery on Google Pixel 3 and Pixel 3 XL
- Download TWRP recovery image and Installer ZIP files for your Google Pixel 3/Pixel 3 XL.
- Transfer the Installer ZIP from your PC to your phone’s internal storage.
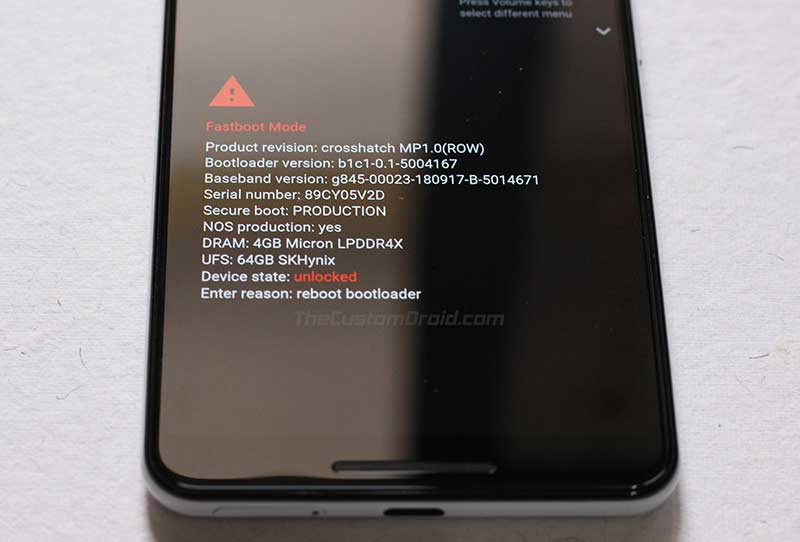
- Power off the phone completely and boot it into Fastboot Mode by holding the Volume Down and Power keys together.
- Your Pixel phone should now enter Fastboot Mode, which should look as shown in the figure below.

- Connect your phone to the PC while it is in Fastboot Mode.
- Next, copy the downloaded TWRP recovery image file inside the ‘platform-tools’ folder (where ADB and Fastboot are installed) on your PC.
- Enter the following fastboot command to temporarily boot the TWRP recovery image on your Google Pixel 3:
.\fastboot boot twrp-3.3.0-0-blueline.img
On Google Pixel 3 XL:
.\fastboot boot twrp-3.3.1-0-crosshatch.img
- Your phone should now boot into TWRP recovery and you shall see the ‘Unmodified System Partition’ screen. Choose the “Keep Read Only” option.
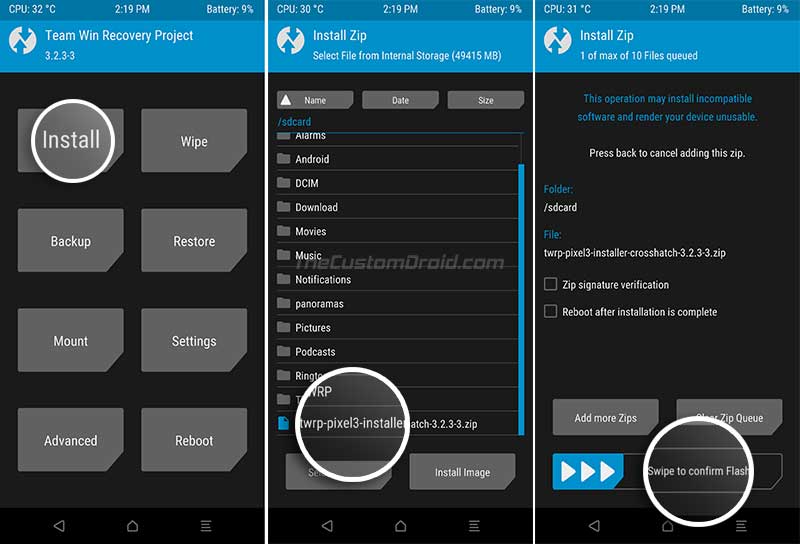
- Now, tap on ‘Install’ and navigate to the location where you transferred the TWRP Installer ZIP earlier.

- Select the TWRP installer zip file and swipe the button on the bottom to permanently flash TWRP on Google Pixel 3 (XL)
- Once the flashing process finishes, tap on the ‘Reboot System’ button.
Your Pixel 3 device should now boot into the OS.
Now that you have succeeded to install TWRP recovery on Google Pixel 3 (XL), follow the rooting instructions below.
Instructions to Root Google Pixel 3 and Pixel 3 XL
- Download the latest Magisk flashable ZIP file.
- Connect your Google Pixel 3 to the PC and enable ‘Transfer files’ mode
- Transfer the downloaded Magisk-20.4.zip file to your phone’s storage.
- Disconnect the phone and power it off completely.
- Now, hold the Volume Down and Power buttons together to enter Bootloader Mode on Pixel 3.
- Tap the volume buttons until you see ‘Recovery Mode’ on the screen and then press the Power button to boot into TWRP recovery.
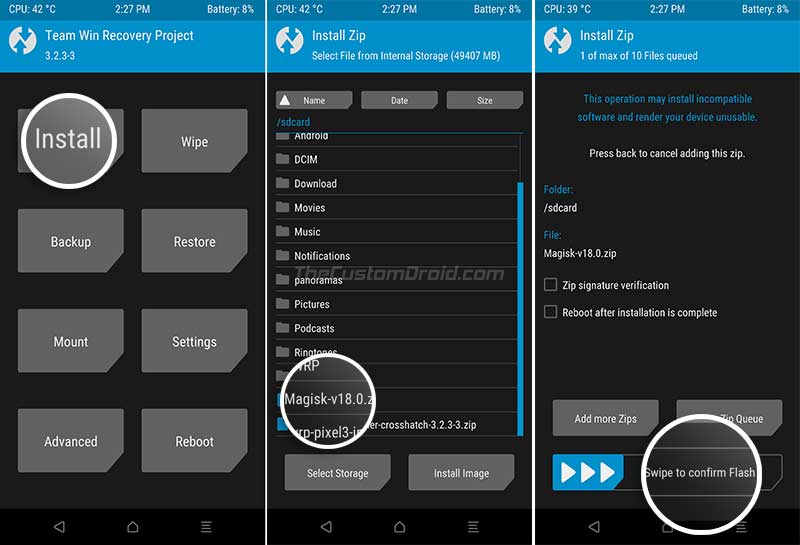
- In TWRP, tap on the ‘Install’ button and select the Magisk flashable ZIP file from your phone’s internal storage.

- Finally, swipe the button on the screen to flash Magisk and root your Google Pixel 3 (XL).
- Once the installation is complete, press the ‘Reboot System’ button.
Your Pixel 3 should now be rooted. Once it boots back into the OS, you shall see ‘Magisk Manager’ in the app drawer.
Advertisement
So now that you have been able to install TWRP recovery and root your Google Pixel 3 (XL), you have a lot of different ways to customize your phone. For starters, you can use root applications like Titanium Backup.
With Magisk, you have the ability to install mods such as ViPER4Android without modifying the /system partition. You can also use MagiskHide to hide root from apps/games like Pokemon Go and pass SafetyNet. Overall, there are a lot of things you can do on your rooted phone, so go ahead and enjoy it.
This was our tutorial on how to install TWRP recovery and root Google Pixel 3 and Pixel 3 XL using Magisk. If you have any questions, please leave them down in the comments. We will try the best of our knowledge to help you.
Comments 4 Comments
Comments are moderated, and published only if they are relevant to the topic and add value in a constructive way. If you disagree with something, please be polite and respectful. We suggest you read our comment policy before commenting.
Google pixel 3 doesn’t support sd cards, so I’m super confused as to how you had the choices shown in the screenshots… I can’t find these files at all, how were you able to access the download file?? You said go to navigate to the location where the TWRP installer zip was transferred, and I transferred it to my download file. I go to the sdcard location and all that’s there are a bunch of folders with long gibberish names.
Hi Aiden, the gibberish folder names you are seeing is because the storage is encrypted. When you boot into TWRP, you will be asked to enter the password to decrypt, which is the PIN/Password of your lockscreen. Just enter that and you shall see the files/folders as they actually are.
Oh, and I didn’t mention SD card anywhere, did I?
Okay, I’m a giant bonehead. My phone pin worked, but after finally being able to install Magisk, my phone bricked up completely. ADB won’t recognize it, and I can’t access recovery mode, and all it says at the bootloader menu is “error booting from boot.img” and “invalid slot to boot from”. Pretty sure there’s nothing I can do now. I tried to flash it back to stock, but nothing was specific enough to point me to the exact right one. This is why I should’ve meant it when I swore I’d never root a phone again.
And, you didn’t mention an SDcard, I was just losing my mind because I wasn’t seeing what was in the screenshots. And I saw the folder SDcard. That’s completely my bad.
Hi Aiden. I can totally understand your situation, the frustration, and fear as well. But don’t let it stop you from rooting. Once you start to understand the complete process and how everything works, you will be rooting any phone in a jiffy.
So, I will try my best here to explain what happened here.
You flashed Magisk on your device, which basically modifies the boot.img (kernel). In case it doesn’t work, you can always recover your device by flashing the stock boot.img.
So, start by downloading the stock factory image from here. Once downloaded, extract the zip file and let me know what files have been extracted.
NOTE: Make sure that you download the factory image corresponding to the software version installed on your Pixel currently. For example: If your Pixel was on November security patch before performing this, then you should download the Nov factory image.