A Beginner's Guide to Unlock Bootloader, Install TWRP Recovery, and Root Asus ROG Phone 2 via Magisk
Learn how to unlock the bootloader, install TWRP recovery and simultaneously root Asus ROG Phone 2 via Magisk using this step-by-step guide.

On this page
Through this comprehensive guide, you will learn how to unlock the bootloader, install TWRP Recovery, and simultaneously root Asus ROG Phone 2 via Magisk. It is compatible with and will work on any ROG Phone 2 running Android 9 Pie and Android 10.
Asus’ ROG gaming phones are a stellar example of what gaming phones should be like when it comes to design, software, and performance. The ROG Phone 2, released in 2019 has successfully surpassed several other popular gaming smartphones in the market, like Xiaomi’s BlackShark and Razer Phone 2.
Although the phone offers a very powerful software experience, it has a lot of scope for transcending further. If you’re an enthusiast, you could explore custom ROMs, mods, kernels, etc to get the software that’s tailored to your needs. For any customizations that you may want to perform, you will need two things - (1) TWRP recovery and (2) Root.
The former is a custom recovery that will allow you to flash custom ROMs, mods, kernels, take NANDroid backups of the complete OS, wipe/reformat partitions and do much more. Unofficial and official builds of TWRP for ROG Phone 2 are available, thanks to XDA Senior Member and developer mauronofrio. His builds are compatible with both Android 9 Pie and Android 10, and also support the decryption of data partition.
Furthermore, you can root your ROG Phone 2 via Magisk to use applications/mods that require Superuser permissions to modify any part of the software you want. Additionally, Magisk also allows you to hide root from certain apps (such as banking apps, games, etc) and install Magisk Modules to customize the software systemless-ly.
Note: If you do not plan on installing custom ROMs or find no use of TWRP for yourself, you can also root your phone without TWRP, using an alternate method. This method will also make it easier for you to install firmware updates after rooting. For the instructions, please refer to this post.
To sum up, there are literally endless things you can do once you have these two things in your arsenal. And if you’re inclined towards it, the instructions below will guide you on how to unlock the bootloader, install TWRP recovery, and root ROG Phone 2.
Before You Begin
Make sure that you fulfill all the requirements listed below before you begin. These are extremely important.
- First and foremost, take a complete backup of all your important data. Unlocking the bootloader of your phone will erase all the data stored on it, including everything on the internal storage. So, backup your apps, contacts, messages, photos, videos, documents, and everything else you feel is important to you. If you need, you can refer to our detailed guide for this purpose as well.
- Make sure that your ROG Phone 2 is charged to a sufficient battery level. This shall help prevent the phone from suddenly shutting down while performing the process.
Downloads
Below, you will find download links for all the files that you will require during the process. When asked to download a particular file, come back here to download it. Or, you can just download them all before beginning with the instructions. It’s all up to you.
For TWRP, both the official and unofficial builds have been provided. Using the latest version of the unofficial build is recommended, as quoted by the developer “The unofficial one is always more updated and more supported”.
- Unofficial TWRP for ROG Phone 2 (ZS660KL)
- Android 9 Pie Image: twrp-3.3.1-14-I001D-Pie-mauronofrio.img
- Android 10 Image: twrp-3.4.0-0-I001D-Q-mauronofrio.img
- Installer ZIP: twrp-3.4.0-0-I001D-installer-mauronofrio.zip
- Official TWRP for ROG Phone 2 (ZS660KL)
- Image: twrp-3.5.0_9-0-I001D.img
- Installer ZIP: twrp-installer-3.5.0_9-0-I001D.zip
- Magisk Installer ZIP: Magisk 21.4 (Current version at the time of updating this guide) | Check the latest version available on the official Github release page of Magisk
Unlocking the Bootloader on ROG Phone 2
In order to apply any modifications or flash the files on to your ROG Phone 2, you must first unlock its bootloader. Normally, the bootloader on Android is unlocked via fastboot. However, that method is not applicable to ROG Phone 2. Instead, you will need to use the on-device unlock tool provided by Asus itself. This official tool is way easier to work with and does the job much quicker.
To unlock the bootloader on your ROG Phone 2, download the official Asus Unlock Tool (in APK format).
- ZS660KL_0807-1814_SIGNED_UnlockTool_9.2.0.0_200807_fulldpi.apk (works on both Android 10 and Pie)
- For Android 10: YODA_SIGNED_UnlockTool_9.1.0.11_190708_fulldpi.apk
- For Android 9 Pie: ZS660KL_SIGNED_UnlockTool_9.1.0.10_190702_fulldpi.apk
If you have downloaded the APK file on your PC, transfer it to your phone’s internal storage. Then, install the tool’s APK file on your phone. If you do not know how, please refer to the steps here.
Once you have installed the tool, go to the app drawer and launch the ‘Unlock Device Tool’ app. As soon as the app launches, it will prompt you with the user license agreement, simply check the box where it says that you agree and tap on ‘OK’.
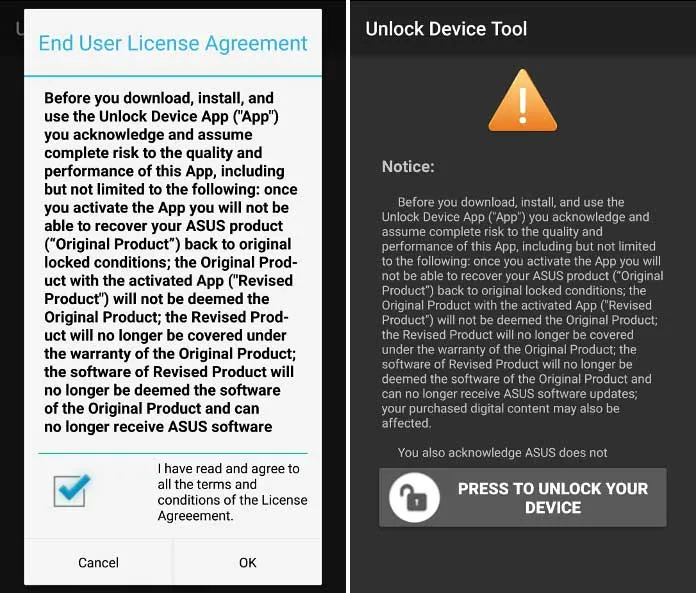
After this, you should see the app’s main screen. Scroll through the ‘Notice’ and check the ‘Agree’ box. Finally, press the ‘Press to Unlock your Device’ button to unlock the bootloader on ROG Phone 2.
Your phone will automatically reboot and the bootloader will be unlocked. Once it boots back into the OS, go through the on-screen instructions, and set up your phone.
Installing TWRP Recovery and Rooting ROG Phone 2 via Magisk
Now that the bootloader is unlocked, you can easily install TWRP recovery on your ROG Phone 2 and simultaneously root it via Magisk. The instructions have been split into five (5) major steps so that it’s easier for you to understand and perform them. These could be performed using any Windows, macOS, or Linux PC.
Step 1: Set Up Android Platform-tools on your PC
In order to flash TWRP, you will need the Android fastboot tool. This tool comes as a part of the complete Android SDK platform-tools package. So, start by downloading the latest tools package from the official links below, according to the operating system of your PC.
Extract the downloaded ZIP file on your PC to get the ‘platform-tools’ folder. This folder should contain all the Android platform-tools including ‘fastboot’. Move this folder to an easily accessible location on your PC. I would recommend copying the ‘platform-tools’ folder to the C:\ drive if you are using a Windows PC or to the ‘Documents’ directory if you’re using macOS/Linux PC.
Note: Please avoid using one-click ADB/Fastboot installer tools. A lot of these tools come with an outdated version of the tools which may cause problems.
Step 2: Launch PowerShell/Terminal in the ‘Platform-tools’ Folder
Now, you have to launch the PowerShell/Terminal depending on your PC’s OS in the same folder where the Android platform-tools are installed. Depending on your PC’s OS, follow the instructions below.
On Windows: Go to the ‘C:\’ drive and open the ‘platform-tools’ folder. Now, hold the SHIFT key of the keyboard and right-click on any empty space inside this folder (anywhere the files are not listed/displayed).
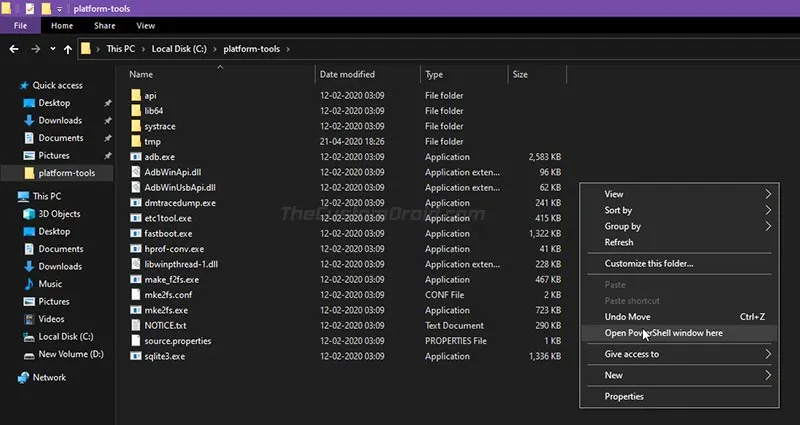
This should open a contextual menu on your PC’s screen. Simply select the ‘Open PowerShell window here’ option. This should open the PowerShell window in the same folder where the tools are installed.
On macOS/Linux: Launch the ‘Terminal’ on your PC and change its directory to the platform-tools folder using the ‘cd’ command. For example, if the ‘platform-tools’ folder is present in the ‘/Documents’ directory, you should enter the following command:
cd Documents/platform-tools

At this point, the required setup on your PC is done. We will now move to the phone.
Step 3: Boot your ROG Phone 2 into Fastboot Mode and Connect it to the PC
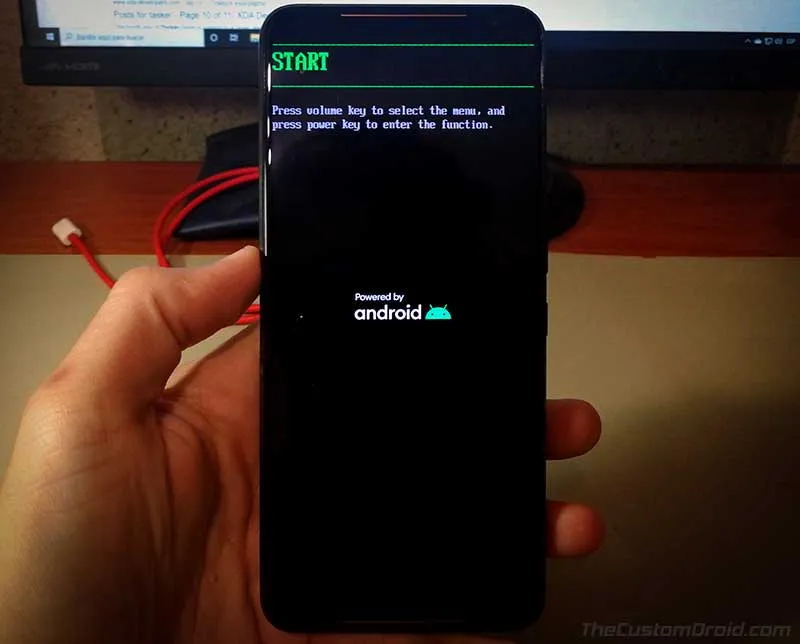
To flash TWRP on your ROG Phone 2 via fastboot, it must be connected to the PC while in Fastboot Mode. To do this, first power off your phone completely and let it rest for a couple of seconds after the screen turns off. This will ensure that the phone is powered off completely.
Now, hold the Volume Up and Power keys of your ROG Phone 2 together until you see the fastboot screen. The Fastboot Mode should look similar to what you see in the image below.
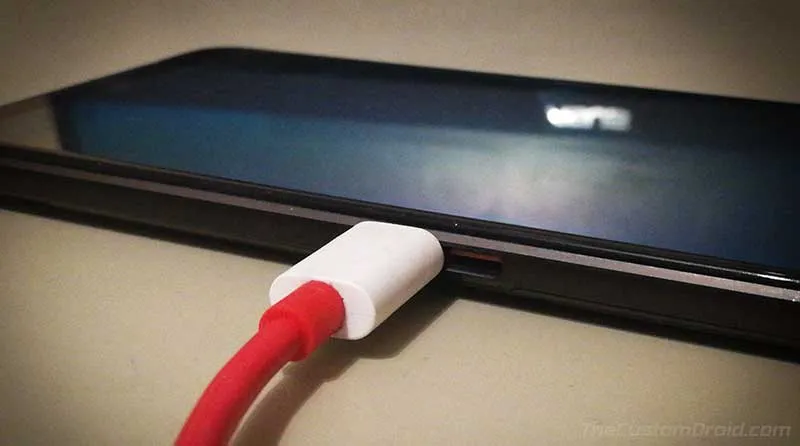
With your phone in Fastboot Mode, connect it to the PC via a USB cable. Make sure that you plug the cable to the port on the side of the phone, instead of the one on the bottom.
Step 4: Boot TWRP Recovery Image via Fastboot
In order to flash both TWRP and Magisk, you must first temporarily boot the TWRP image on your ROG Phone 2 via fastboot.
Note: When entering the command below in PowerShell (Windows), prepend them with a dot and backward slash [.\]. In the case of Terminal (macOS/Linux), prepend the commands with a dot and forward slash [./].
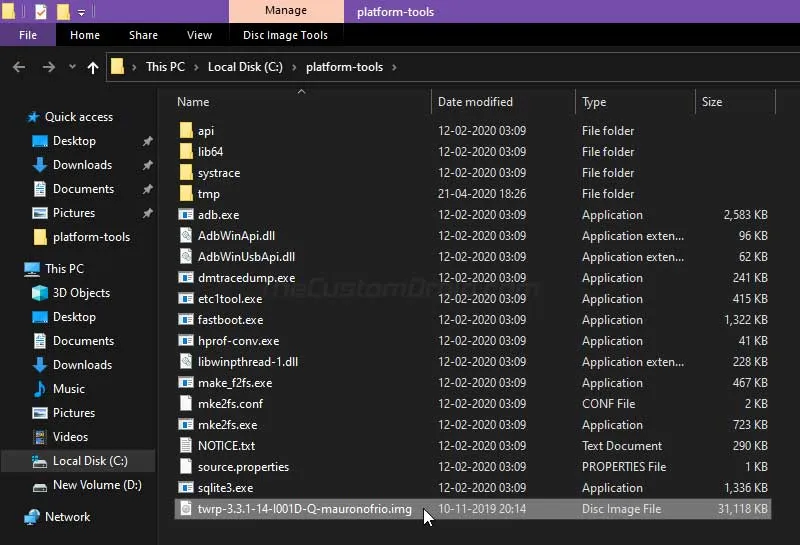
- First, download the TWRP recovery image (.img file) on your PC from the ‘Downloads’ section of this post.
- Copy the downloaded file (e.g. twrp-3.4.0-0-I001D-Q-mauronofrio.img) to the ‘platform-tools’ folder on your PC.
-
Enter the following command to ensure that your PC can detect your phone over fastboot:
fastboot devices
-
The command should return your phone’s unique device ID. If it doesn’t, it means that the USB drivers are missing on your PC. To fix this, download the USB drivers from here and install them.
-
Now, enter the following command to temporarily boot the TWRP recovery image on your ROG Phone 2. Replace “twrp-image-filename.img” with the full filename of the TWRP image file you have downloaded (See the example below).
fastboot boot twrp-image-filename.img
For example, if you download the unofficial Android 10 TWRP image, the command should be:
fastboot boot twrp-3.4.0-0-I001D-Q-mauronofrio.img
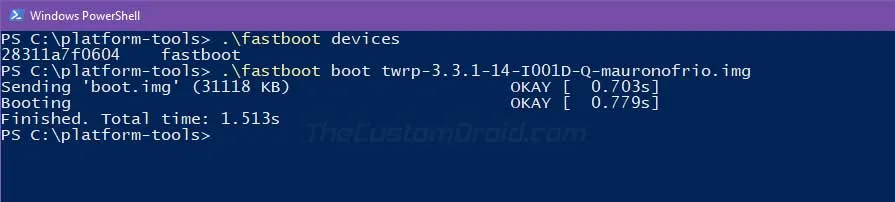
- As soon as the command is entered, your phone will automatically reboot and enter the TWRP recovery mode.
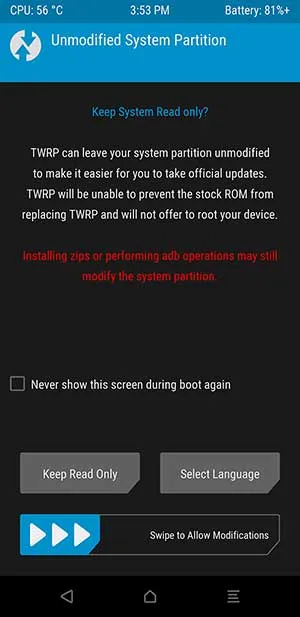
When your phone boots into TWRP for the first time, you should see the ‘Unmodified System Partition’ prompt on the screen. What you choose on this screen depends largely on what you want to do later with your phone.
- If you plan on running the stock ROG UI firmware with just Magisk root, then it’s advised to select the ‘Keep Read Only’ option. This should prove useful especially when installing OTA updates on your rooted phone via Magisk.
- On the other hand, if you think that you will be flashing a custom ROM or updating your stock ROG UI firmware by manually flashing the full OTA packages provided by Asus, then you can swipe the ‘Swipe to Allow Modifications’ button.
Selecting either of these options will have no effect on installing TWRP or rooting. It’s important for what you plan on doing next with the phone and making things easier for you.
Step 5: Flash TWRP Installer and Magisk ZIP Files
This is the last step, where you have to install TWRP and root your ROG Phone 2 via Magisk. To do this, first, download the TWRP Installer and Magisk ZIP files on the PC, from the ‘Downloads’ section above.
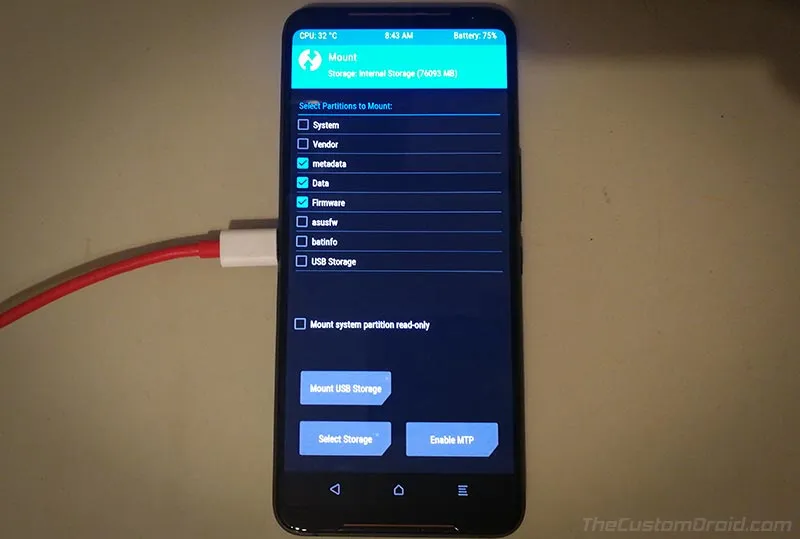
Go to the ‘Mount’ menu of TWRP on your phone and press the ‘Enable MTP’ button on the bottom right. On the other hand, if it shows ‘Disable MTP’, then it means that MTP is already enabled. Now, connect your phone to the PC by plugging in the USB cable to the side port. Copy the downloaded TWRP installer and Magisk ZIP files to your phone’s internal storage. Once the files have been successfully copied, disconnect the phone from the PC.
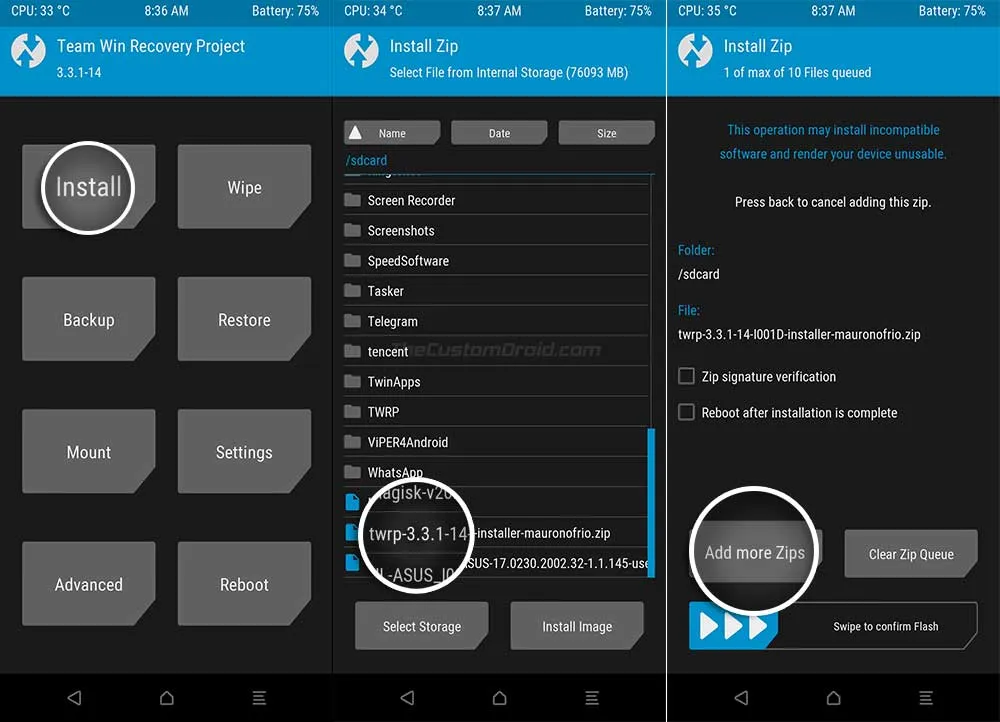
Go back to the TWRP main screen and press the ‘Install’ button. Navigate to the folder/location on your phone’s internal storage where you transferred the ZIP files. Select the TWRP Installer ZIP file (twrp-3.4.0-0-I001D-installer-mauronofrio.zip) first. Now, with the file selected, tap on the ‘Add more Zips’ button and select the Magisk ZIP file (Magisk-v21.4.zip or the latest version you have downloaded from the official repository) to add it to TWRP’s flashing queue.
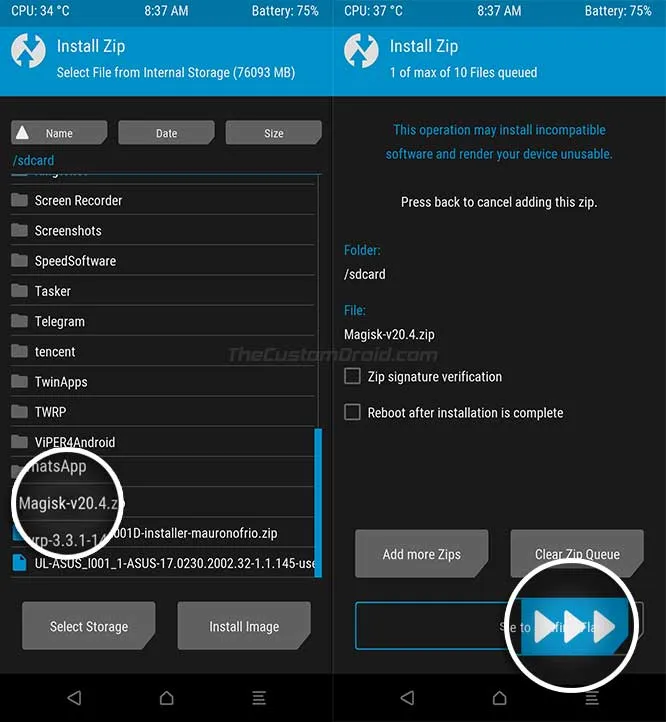
Once both the files have been added to the flashing queue, swipe the button on the bottom of the screen to flash them on your phone. The flashing process should take a few seconds to finish. When it finishes, press the ‘Reboot System’ button to reboot your phone into the system (OS).
Wrapping Up
That’s it! You have successfully installed TWRP recovery and rooted your ROG Phone 2 via Magisk. After your phone boots, you can go to the app drawer and launch the Magisk Manager app to verify if Magisk was installed properly. Using the same app, you can also install modules to customize the software or use MagiskHide to hide root from applications.
You can further verify if your rooted phone passes SafetyNet in Magisk Manager itself. A few notes regarding SafetyNet:
- MagiskHide is now disabled out-of-the-box on new installations due to the SafetyNet’s hardware attestation. So, make sure that you turn it on by going to ‘Magisk Manager’ > ‘Settings’.
- If the new attestation is enforced on your device, you can refer to our guide to fix hardware attestation in Magisk and force basic attestation.
Since the phone supports A/B partition system (seamless updates), it is possible to take OTA updates on your rooted phone via Magisk.
With TWRP, you can flash custom kernels for improving your phone’s performance (which I highly doubt you’d need) or flash custom ROMs like LineageOS 17.1 or HavocOS (among others) should you feel like trying them. For the available custom kernels and ROMs, please visit the ROG Phone 2 development section on XDA-Developers.
Flashing your phone can sometimes lead to a hard-brick (in rare cases) if done wrong. If you experience such a situation, you can unbrick the ROG Phone 2 by flashing the firmware via Emergency Download (EDL) Mode .
If you have any questions regarding the method or feel stuck anywhere during the instructions, please feel free to ask me.
Related Posts
TWRP Source: XDA | All the images and screenshots were provided by Uriel Roselló Beneitez. A huge thanks for this contribution!
Comments
Comments are moderated, and published only if they are relevant to the topic and add value in a constructive way. If you disagree with something, please be polite and respectful. We suggest you read our comment policy before commenting.