
On this page
In this guide, I will cover the instructions to root Asus ROG Phone 2 via Magisk. This will be done using the patched boot image method, without installing TWRP recovery at all. Further, you will also learn how to install OTA updates on your rooted phone, while still preserving root after the update. This guide is compatible with both the Global/Strix and Tencent editions of the ROG Phone 2, running Android 10 and Android 9 Pie.
Asus’ ROG Phone 2 has received commendable support from the custom development community. For those who are interested in modding the software would look for two things in particular - (1) TWRP recovery and (2) Root. The former is a custom recovery that allows you to flash custom ROMs, kernels, and mods. Normally, for users who want to root their phone first install TWRP and then further use it to flash the root package (Magisk). And I have already covered all these things in the detailed guide here.
However, it is not mandatory to install TWRP in order to root your ROG Phone 2. If you’re not planning to install custom ROMs or find no use of TWRP in the first place, then you can skip installing TWRP and directly root your phone via Magisk.
Magisk offers an alternate installation method that involves patching the stock boot image of the firmware installed on your phone, and then flashing the resultant patched boot image to your phone via fastboot. The additional benefit of using the patched boot image method is that it’s easier to install OTA updates on your phone after it is rooted, instructions for which have also been provided in this guide.
So, without any further ado, let us get to it!
Before You Begin
- It is strongly advised to take a full backup of all the important data stored on your phone before you perform procedures like rooting. Although rooting your ROG Phone 2 will not erase any data, it’s best to safeguard the data in case anything goes sideways. If you need help with it, you may refer to our guide here.
- In order to root, you must first unlock the bootloader on your ROG Phone 2. If you haven’t done it yet, then please follow the instructions listed in this guide and then come back here. Note that unlocking the bootloader will erase all the data.
- Charge your phone to a sufficient battery level to prevent it from shutting down during the process. Not mandatory, but advisable.
Instructions to Root Asus ROG Phone 2 via Magisk
So, how can you root ROG Phone 2 without installing TWRP recovery? The method is quite simple. I have split the instructions below into five (5) major steps that will take you through the complete process.
Step 1: Download the Stock Boot Image
The first step of the rooting process to download the stock boot image of the software build number (firmware version) that’s currently installed on your ROG Phone 2. This is very important, as using a mismatched boot image will cause issues with WiFi, mobile network, or may even lead to a non-bootable state.
From the links below, you can download boot images of the latest firmware version(s) for both the Global Edition (with WW ROM) and Tencent Edition (with CN ROM).
For Global Edition with WW ROM
- WW-17.0230.2004.60 Stock Boot Image
- WW-17.0230.2002.32 Stock Boot Image
- WW-17.0210.2001.60 Stock Boot Image
- WW-16.0631.1910.64 Stock Boot Image
- WW-16.0631.1910.44 Stock Boot Image
- WW-16.0631.1910.35 Stock Boot Image
For Tencent Edition with CN ROM
- CN-17.0230.2004.60 Stock Boot Image
- CN-17.0225.2001.13 Stock Boot Image
- CN-16.0631.1910.63 Stock Boot Image
- CN-16.0631.1910.52 Stock Boot Image
- CN-16.0631.1910.34 Stock Boot Image
Note about pre-patched boot images
Although I could have provided pre-patched boot images and you can get them from elsewhere too. When you patch the boot image by yourself (as shown in the next step), Magisk automatically takes a backup of your phone’s current stock boot image. This is very essential, especially when installing OTA updates on your rooted ROG Phone 2.
If you use and flash a pre-patched image, Magisk won’t be able to take a backup and you will not be able to restore the stock boot via Magisk Manager during the OTA installation.
Step 2: Patch the Stock Boot Image via Magisk Manager
Now, the second step is to patch the stock boot image using the Magisk Manager app on your ROG Phone 2. To do this:
- First of all, download the latest version of the Magisk Manager app (in APK file format) from here.
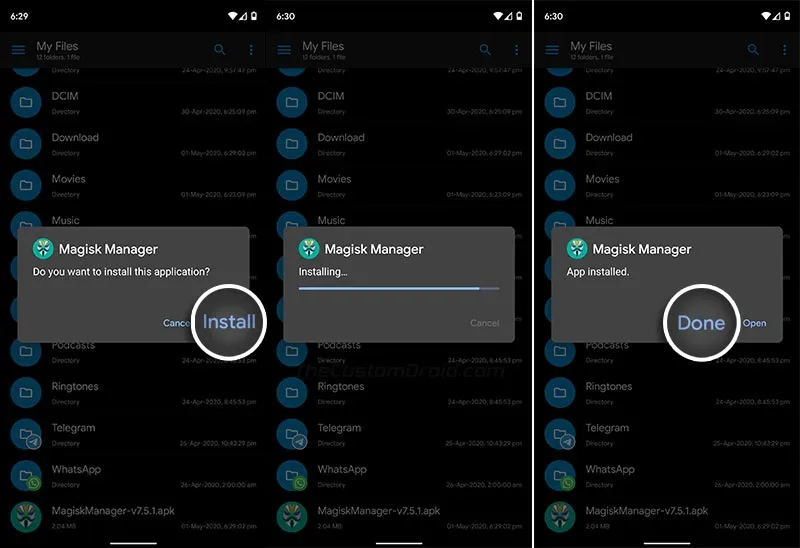
- Install the downloaded APK file on your phone. If you’re new to it, please refer to this resource.
- Now, download the stock boot image for the software build number installed on your phone.
- Extract the ZIP file to get the ‘boot.img’ file and transfer it to your phone’s internal storage.
- Go to the app drawer on your phone and launch the Magisk Manager application.
- Press the ‘Install’ button, then select ‘Install’ when prompted, and choose ‘Select and Patch a File’ option.

- Navigate to the phone’s internal storage and select the ‘boot.img’ file.
- The Magisk Manager app will download the latest version of Magisk and patch the stock boot image with it.
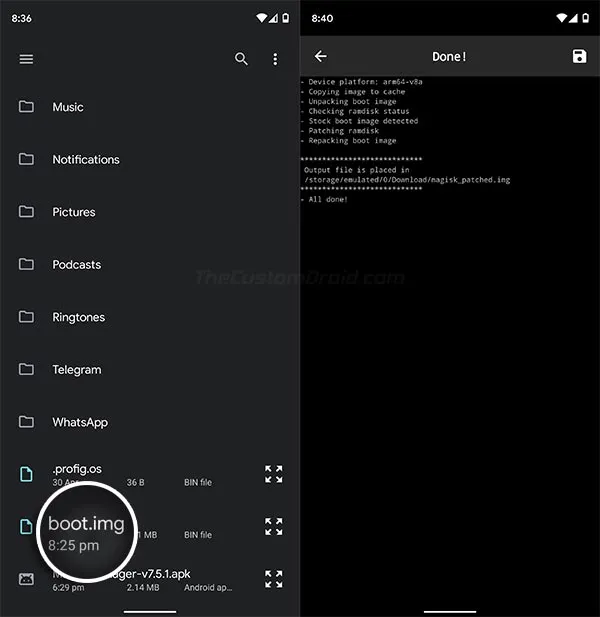
The resultant patched boot image (magisk_patched.img) will be stored inside the ‘Download’ folder of your phone’s internal storage.
You will now need to move to your PC for the rest of the steps.
Step 3: Set Up Android SDK Platform-tools on your PC
To flash the patched boot image to your phone, you will need to use the Android fastboot tool. Fastboot itself is a part of the Android platform-tools, so start by downloading the latest tools package for your PC from the links below, depending on your PC’s OS.
- Windows: platform-tools-latest-windows.zip
- macOS: platform-tools-latest-darwin.zip
- Linux: platform-tools-latest-linux.zip
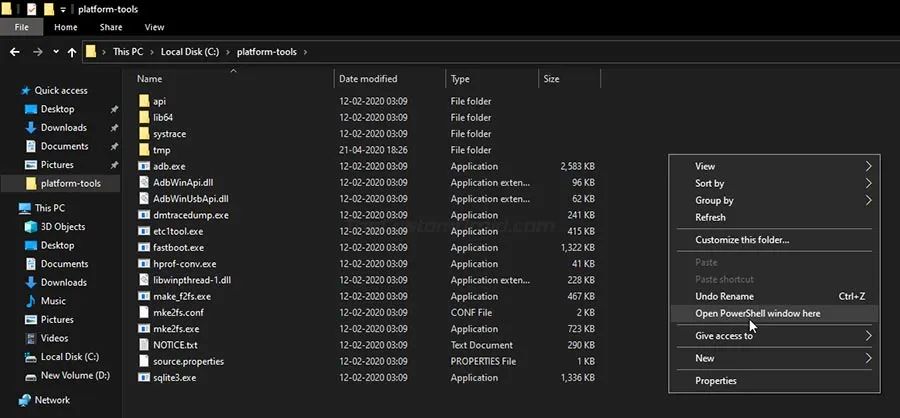
Once the ZIP file has been downloaded, extract it on your PC to get the ‘platform-tools’ folder. This folder contains the fastboot tool that you will need.
For the ease of accessibility, I suggest moving the extracted ‘platform-tools’ folder to the C:\ drive if you’re operating on a Windows machine. In the case of macOS or Linux, move the folder to the ‘Documents’ directory.
Step 4: Launch Command-line Window on your PC
Now, you have the required Fastboot tool (among other tools) in place. To use these tools, it is required that you launch the command-line window (PowerShell/Command Prompt in Windows, or Terminal in macOS/Linux) in the same ‘platform-tools’ folder. To do this:
On Windows: Go to C:\platform-tools (or wherever you have installed the tools), then hold the SHIFT key and right-click on any empty space inside the folder. Then select ‘Open PowerShell window here’ or ‘Open command window here’ (depending on your Windows OS version). A blue-colored PowerShell window or a black-colored Command Prompt window should now open up on your PC’s screen.
On macOS/Linux: Launch the Terminal on your PC and change its directory to the ‘platform-tools’ folder using the ‘cd’ command. For example, if you installed the platform-tools in the Documents directory, then the command should look like the following:
cd Documents/platform-tools

With this done, you will now have everything ready on your PC to carry out the flashing.
Step 5: Flash the Patched Boot Image via Fastboot
The final step of the process is to flash the patched boot image on your ROG Phone 2 to root it via Magisk.
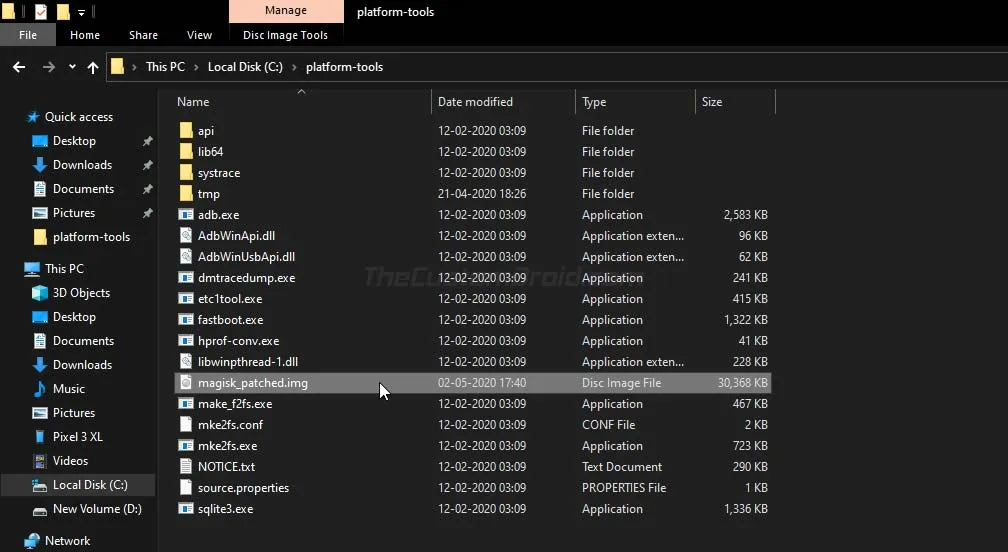
First, transfer the patched boot file (magisk_patched.img) from your phone’s internal storage to the PC. Then move the transferred file inside the folder where the Android platform-tools are installed (e.g. ‘C:\platform-tools’ on Windows, or ‘Documents/platform-tools’ on macOS/Linux PC).
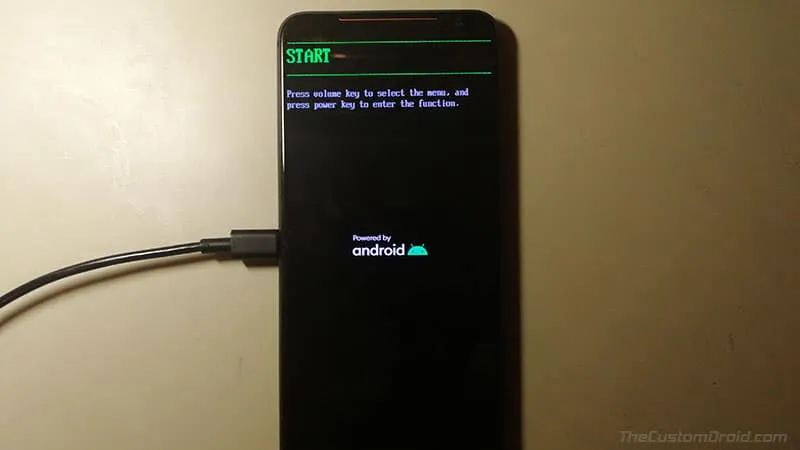
Now, power off your ROG Phone 2 completely and boot it into Fastboot Mode. To do this, hold the Volume Up and Power keys simultaneously while the phone is powered off. With your phone in Fastboot Mode, connect it to your PC via a USB cable. Ensure that you plug in the cable to the side port (not the bottom one).
Commands Usage
When entering commands (shown below) in Windows PowerShell, make sure to prepend them with a dot and backward slash [.\]. When doing the same in macOS/Linux Terminal, prepend the commands with a dot and forward slash [./]. In the case of Command Prompt (CMD) in Windows, you can simply enter the commands as they are shown.
Enter the following command in the PowerShell/CMD/Terminal (depending on what you’re using) window to ensure that your PC can successfully recognize your phone over fastboot:
fastboot devices
This command shall return your phone’s unique identifier (ID). If it doesn’t, then make sure that you have the proper USB drivers installed on your PC. I’d suggest installing the latest Google ADB drivers if you face any issues with connectivity.
Now, enter the following command to flash the patched boot image file and root your ROG Phone 2 using Magisk:
fastboot flash boot magisk_patched.img
This command will automatically flash the patched file to the currently active slot of your phone, leaving the inactive slot intact. This is the sole basis of installing OTA updates after rooting.
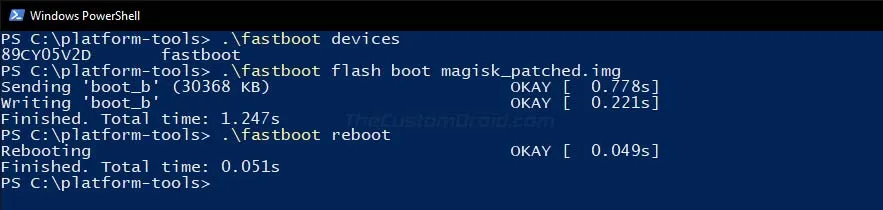
Once the file has been flashed, reboot your phone back into the system (OS) using the following command:
fastboot reboot
That’s it! You have successfully rooted your ROG Phone 2 using Magisk. To verify this, you can launch the Magisk Manager application on your phone and check if Magisk is installed and updated to the latest version.
You can now use root applications, install Magisk Modules to gain additional features or perform modifications, and do much more. If you ever want to unroot your phone and revert to full stock firmware, then follow this guide.
Instructions to Install OTA Updates on ROG Phone 2 after Rooting
Installing OTA updates on your rooted ROG Phone 2 isn’t easy, but that’s where Magisk and the above rooting method comes to your rescue. Since the phone supports seamless updates (A/B partitions) and Magisk is only installed on the currently active slot, you can easily install the OTA update on the inactive slot.
You will first need to uninstall Magisk from the currently active slot, and then install it to the inactive slot after the OTA installation. In doing so, not only will you be able to maintain root after updating, but will also make sure that your current slot is completely stock for installing the next OTA update in the future. Sounds confusing? Don’t worry, you will get a good understanding when you perform the instructions below.
Although I already have a very detailed guide published here on this very topic and the instructions below are practically the same. However, there are a few things that are specific to the ROG Phone 2 and need to be done slightly differently.
Now, let’s get straight to the instructions.
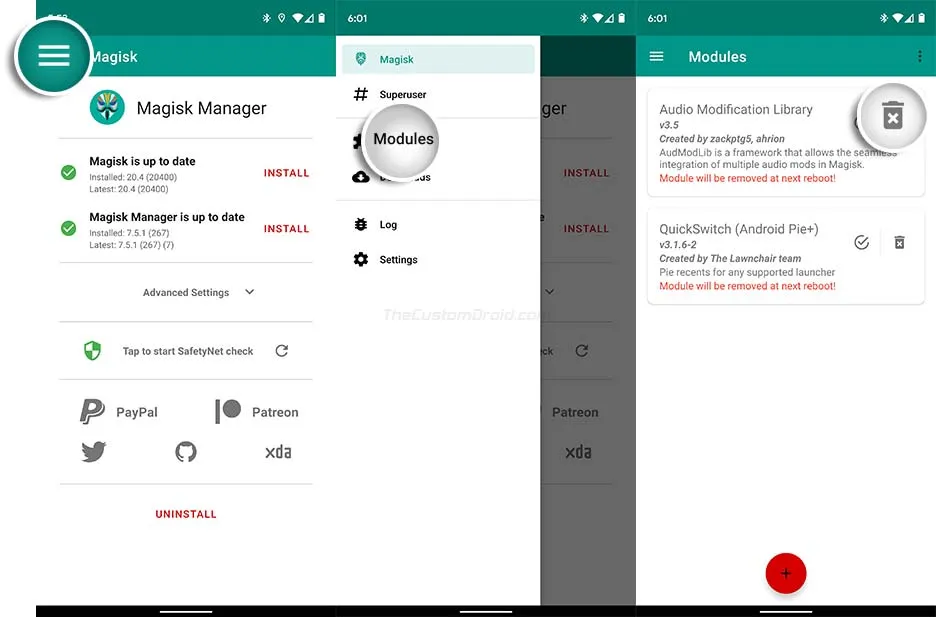
Step 1: Uninstall Modules and Undo Any Modifications
The first step towards the successful installation of OTA updates is to make sure that your phone doesn’t have any sort of modifications. So, start by disabling, and then uninstalling the installed modules from the Magisk Manager application.
Further, you will also have to make sure to undo any modifications done to the /system or /vendor partitions of your phone. These may include manually removing/adding a file from/to the said partitions, modifying the build.prop file, etc. Even mounting these partitions R/W (re-writable) will be counted as a modification.
Once you have made sure that everything on the phone is stock, unchanged, and not modified in any manner, then continue to the next step.
Step 2: Download the Full Firmware Package of the Update
The second step is to download the full firmware (ROM) package of the latest update that you want to install. Asus provides the official firmware files of all the updates they release on this page. For your convenience, I have added direct download links for the full firmware package of some of the most recent updates released for the ROG Phone 2, including Android 10.
Note: Make sure that you download the ‘WW’ global ROM if you have Global/Strix/Ultimate edition of the ROG Phone 2, or the ‘CN’ China ROM if you have the Tencent edition.
Global ‘WW’ ROM
- WW-17.0230.2004.60: UL-ASUS_I001_1-ASUS-17.0230.2004.60-1.1.162-user.zip
- WW-17.0230.2002.32: UL-ASUS_I001_1-ASUS-17.0230.2002.32-1.1.145-user.zip
- WW-17.0210.2001.60: UL-ASUS_I001_1-ASUS-17.0210.2001.60-1.1.97-user.zip
- WW-16.0631.1910.64: UL-ASUS_I001_1-ASUS-16.0631.1910.64-1.1.253-user.zip
- WW-16.0631.1910.44: UL-ASUS_I001_1-ASUS-16.0631.1910.44-1.1.227-user.zip
China ‘CN’ ROM
- CN-17.0230.2004.60: UL-ASUS_I001_1-CN-17.0230.2004.60-1.1.35-user.zip
- CN-17.0225.2001.13: UL-ASUS_I001_1-CN-17.0225.2001.13-1.1.117-user.zip
- CN-16.0631.1910.63: UL-ASUS_I001_1-CN-16.0631.1910.63-1.1.252-user.zip
- CN-16.0631.1910.52: UL-ASUS_I001_1-CN-16.0631.1910.52-1.1.240-user.zip
- CN-16.0631.1910.34: UL-ASUS_I001_1-CN-16.0631.1910.34-1.1.205-user.zip
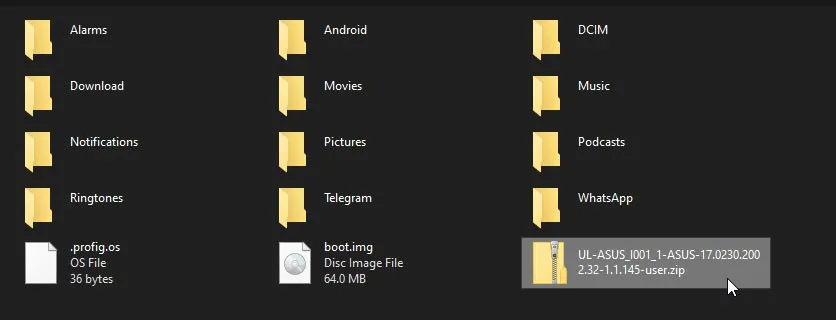
Step 3: Place Full Firmware Package in the Root of Internal Storage and Reboot Phone
After downloading the full firmware package (in ZIP file format), transfer it to the root of your ROG Phone 2’s internal storage. By ‘root’, I mean outside all the folders. This is extremely important. If you place the file inside a folder or anywhere else except the root directory, then the system will not be able to detect the update package.
Once the file has been placed, reboot your phone. After the reboot, the OS will prompt you with a notification to install the update. Do not begin the installation yet. Again, if you do not see the update notification, it means that the file hasn’t been placed in the right place.
Step 4: Restore Stock Boot on the Current Slot
Now, you have to uninstall Magisk from the currently active slot of your phone. This could be done by restoring the stock boot image via Magisk Manager. Simply launch the Magisk Manager app, tap on ‘Uninstall’ and select ‘Restore Images’.
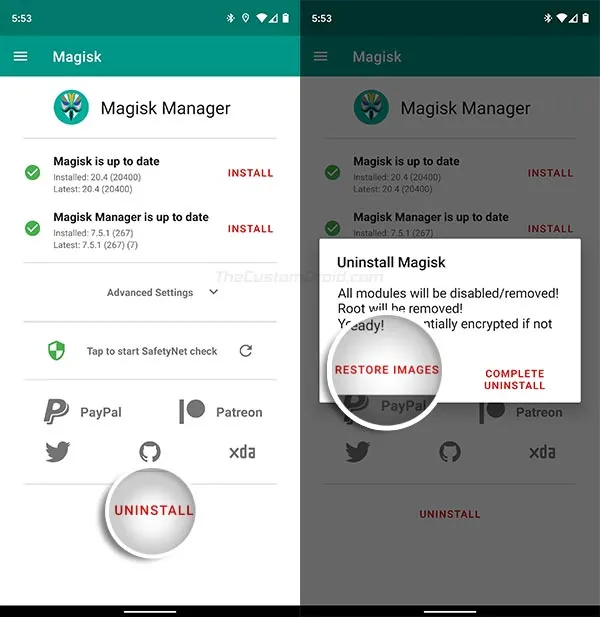
Remember the note about pre-patched boot images in Step #1 of the rooting instructions above? This is what it’s for. If you would have used a pre-patched boot, Magisk wouldn’t have any backup of the stock boot to restore.
Step 5: Install the Update on your Phone
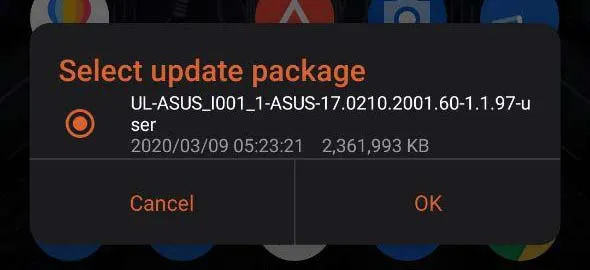
Once the stock boot has been restored on the active slot, tap the update notification you saw during step #3. Then press ‘Ok’ to install the update on your ROG Phone 2. After the update has been successfully installed, you should see a prompt to restart your phone. Do not reboot the phone yet and select ‘Later’.
Step 6: Preserve Magisk Root After Update
And now before you reboot, the final step is to install Magisk to the inactive slot (where the update has been installed) to preserve root after updating. To do this, go to the app drawer and launch the Magisk Manager application. Then tap on ‘Install’, again on ‘Install’, and select the ‘Install to inactive slot (After OTA)’ option.
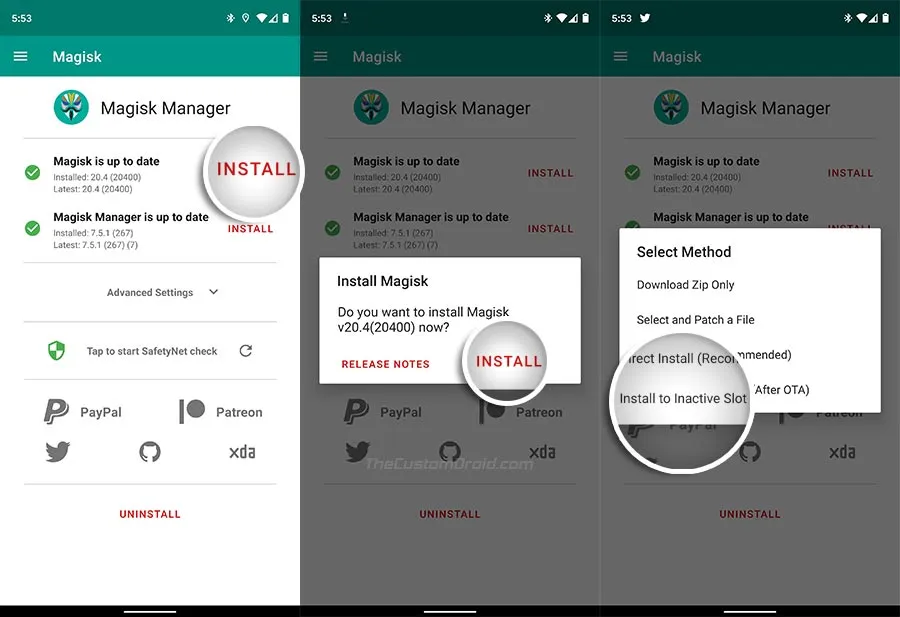
When prompted to confirm with a warning message, press ‘Yes’ to install Magisk to the inactive slot. Once the installation finishes, press the ‘Reboot’ button to reboot your ROG Phone 2 into the updated slot. That’s it!
Your phone should now be updated and should still have Magisk root installed on it. You can repeat this same process every time a new update is rolled out and its corresponding full firmware package is available.
Note: To make things easier and prevent errors while updating your phone using this method, I’d strongly suggest staying away from manually performing any modifications to the /system or /vendor partitions. Even the slightest of changes to these partitions can lead to failed updates.
So by now, you have learned how to root ROG Phone 2 using Magisk (without TWRP) and also how to install firmware updates on it after rooting. If you face any problems while rooting your phone or installing updates using the above instructions, or have any doubts, please feel free to let me know. I will try to the best of my knowledge to help you.
Comments
Comments are moderated, and published only if they are relevant to the topic and add value in a constructive way. If you disagree with something, please be polite and respectful. We suggest you read our comment policy before commenting.