
On this page
In this tutorial, I will walk you through the steps to properly convert ROG Phone 3 Tencent Edition (CN ROM) to the Global Edition (WW ROM), or vice-versa. This could be easily done by flashing the Global RAW firmware through fastboot and then changing the device’s fingerprint from ‘CN’ to ‘WW’.
Similar to its predecessor, the ROG Phone 3 comes in two different editions. The first one is the Global Edition, which is pretty self-explanatory, as it’s sold throughout the world. The second one is the Tencent Edition, which is only sold in China.
So how are the two exactly different? Well not much. For one, the Tencent ROG Phone 3 costs cheaper compared to the Global counterpart. However, it does lack the free AeroActive Cooler 3 gaming accessory that’s bundled with the Global edition. This could be correlated to the higher MSRP of the Global version.
The next difference is the lack of certain LTE and 5G bands in the Tencent edition of the ROG Phone 3. According to the users over at Reddit (1, 2), this affects the LTE and 5G coverage on certain carriers in the US. If you want, you can also refer to the list of supported bands on ZenTalk forums.
In any case, if you have the Tencent edition of ROG Phone 3 and wish to convert it into the Global edition, then the instructions below will help you with it.
Overview: Converting ROG Phone 3 Tencent to Global Edition
So, why exactly would you want to convert your phone to the Global edition, and are there any advantages of the same?
There are a couple of reasons why you would want to convert your phone and install the Global ROM on it. For starters:
- The Global edition with the WW ROM tends to receive software updates earlier than the Tencent version and also supports more languages.
- Moreover, it also comes with all the standard Google Apps like the Play Store, Google Photos, etc built-in. Although you can install the Play Store and other Google apps on the original Tencent edition, having them integrated into the ROM is convenient.
- The ROG Phone 3 Tencent edition also includes a lot of Chinese apps baked into the ROM, thus a lot of pre-installed system apps (bloatware). These apps do not exist on the Global ROM.
But there’s a minor setback. The only disadvantage of converting your phone is that you will not be able to install FOTA (Firmware Over-the-Air) updates. In which case, you will need to manually update your phone by installing the ROM package through the in-built updater.
With that aside, how can you convert your ROG Phone 3 Tencent edition and install Global ROM on it? - To do this, you would need to flash the Global RAW firmware through fastboot, then root the phone to change the device fingerprint from ‘CN’ to ‘WW’.
This is pretty much the exact same approach followed in the ROG Phone 2 conversion guide.
Before You Start
Requirements: The only things you will need in order to follow this tutorial are:
- Your Tencent ROG Phone 3
- A Windows computer.
- A compatible USB-C cable
With that aside, here are a few things you should do before you start performing the instructions.
Take a complete backup: Make sure to take a complete backup of all your important data including apps, music, videos, photos, contacts, messages, etc. Your phone will be completely formatted while performing the conversion. If you need it, you can also follow our detailed guide on backing up Android devices.
Charge your ROG Phone 3: To ensure that your phone doesn’t shut down in the middle of the conversion process, charge your phone to a minimum of 40-50% battery level.
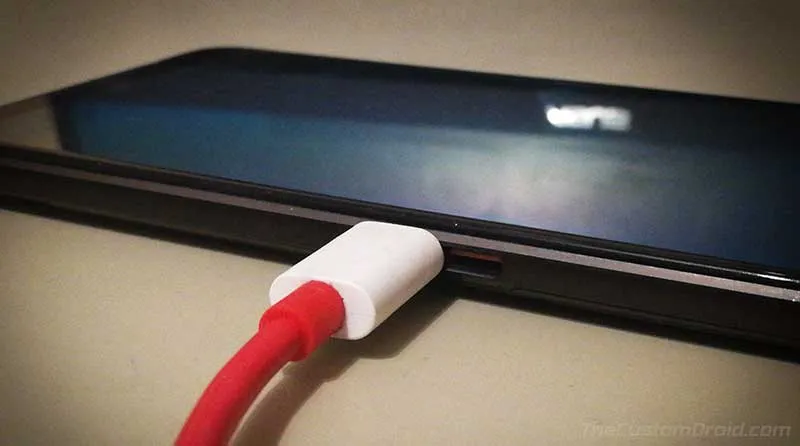
Connection: When asked to connect your phone to the PC, plug in the USB-C cable to the port on the side of the phone (not the charging port on the bottom).
Important Note: In order to convert your phone to Global Edition (or back to Tencent Edition), you will need to unlock the phone’s bootloader (as mentioned in the instructions). In doing so, your phone will lose its official limited warranty offered by Asus. So, make sure that you understand this completely before you proceed.
If you’re using the phone outside China, chances are that it will not be covered under warranty anyway.
Download ROG Phone 3 RAW Firmware
Below, you will find download links for the RAW firmware files of both Global WW ROM and China CN ROM and of different firmware versions. Make sure that you download the file according to which edition you’re converting to.
Global WW ROM RAW Firmware
For converting ROG Phone 3 Tencent Edition to Global Edition
- WW-17.0823.2009.99: WW_ZS661KS_17.0823.2009.99_M3.30.14.13-ASUS_1.1.76_Phone-user.raw.zip
- WW-17.0823.2009.98: WW_ZS661KS_17.0823.2009.98_M3.30.14.13-ASUS_1.1.74_Phone-user.raw.zip
- WW-17.0823.2008.78: WW_ZS661KS_17.0823.2008.78_M2.30.14.6-ASUS_1.1.63_Phone-user.raw.zip
- WW-17.0823.2007.58: WW_ZS661KS_17.0823.2007.58_M2.23.3.32-ASUS_1.1.9_Phone-user.raw.zip
- WW-17.0823.2007.47: WW_ZS661KS_17.0823.2007.47_M2.23.3.31-ASUS_1.1.32_Phone-user.raw.zip
- WW-17.0823.2007.32: WW_ZS661KS_17.0823.2007.32_M2.23.3.27-ASUS_1.1.9_Phone-user.raw.zip
China CN ROM RAW Firmware
For converting ROG Phone 3 Global Edition to Tencent Edition
- CN-17.0823.2009.100: CN_ZS661KS_17.0823.2009.100_M3.30.14.13_Phone-user.raw.zip
- CN-17.0823.2009.98: CN_ZS661KS_17.0823.2009.98_M3.30.14.13-ASUS_1.1.74_Phone-user.raw.zip
- CN-17.0823.2008.78: CN_ZS661KS_17.0823.2008.78_M2.30.14.6-ASUS_1.1.68_Phone-user.raw.zip
- CN-17.0823.2007.58: CN_ZS661KS_17.0823.2007.58_M2.23.3.32-ASUS_1.1.45_Phone-user.raw.zip
- CN-17.0823.2007.48: CN_ZS661KS_17.0823.2007.48_M2.23.3.31-ASUS_1.1.34_Phone-user.raw.zip
- CN-17.0823.2007.32: CN_ZS661KS_17.0823.2007.32_M2.23.3.27-ASUS_1.1.14_Phone-user.raw.zip
A huge thanks to XDA Senior Member deadlyindian for uploading and providing the download links of the RAW firmware files over at this forum thread.
How to Convert ROG Phone 3 Tencent Edition to Global Edition
Converting the ROG Phone 3 Tencent edition (CN ROM) to Global edition (WW ROM) is a five-step process. The instructions below will take you through each of these steps in detail. Let’s begin.
Note: These same instructions can also be used to convert your phone to Tencent edition. If you want to do it, simply use the CN ROM package whilst following the steps instead of the Global one.
Step 1: Unlock the Bootloader
The first step of the conversion process is to unlock your ROG Phone 3’s bootloader. Usually, the bootloader on Android is unlocked through fastboot commands. But in the case of the ROG Phone 3, it’s much simpler and could be done on the device itself without using a computer. This is done through the official unlock tool provided directly by Asus.
So, begin by downloading the Unlock Tool directly to your ROG Phone 3 using the direct link below:
Once downloaded, install the APK on your phone. Then go to the app drawer and launch the ‘Unlock Device Tool’ application on your phone. Scroll until the end and check ‘Agree’ and finally press on the ‘Tap to unlock your device’ option to unlock the bootloader on your ROG Phone 3.
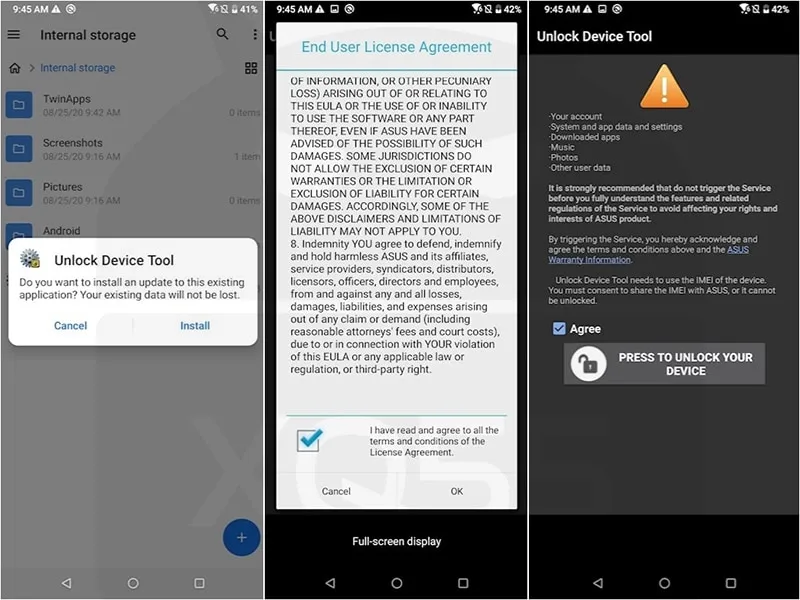
Your phone will automatically reboot, the bootloader will be unlocked, and all the data will be erased. Once it is, you will see a bootloader unlocked warning message on the screen and your phone will reboot into the system (OS).
Step 2: Flash Global WW ROM on ROG Phone 3 Tencent edition
Now that your phone’s bootloader is unlocked, it can accept fastboot commands for flashing the partitions (RAW firmware). To do this:
First, turn off your ROG Phone 3 completely and then boot it into Fastboot Mode by holding the Volume Up and Power keys together. While the phone is in Fastbot Moe, connect it to the computer by plugging the USB-C cord into the side-port.
Now, download the RAW Firmware file of the Global WW ROM on your computer. Once downloaded, extract the contents of the ZIP file by right-clicking on the file and selecting ‘Extract All’. The extracted files should contain the required Android SDK tools, the flashing scripts, and the actual RAW firmware file that will be flashed onto your phone.
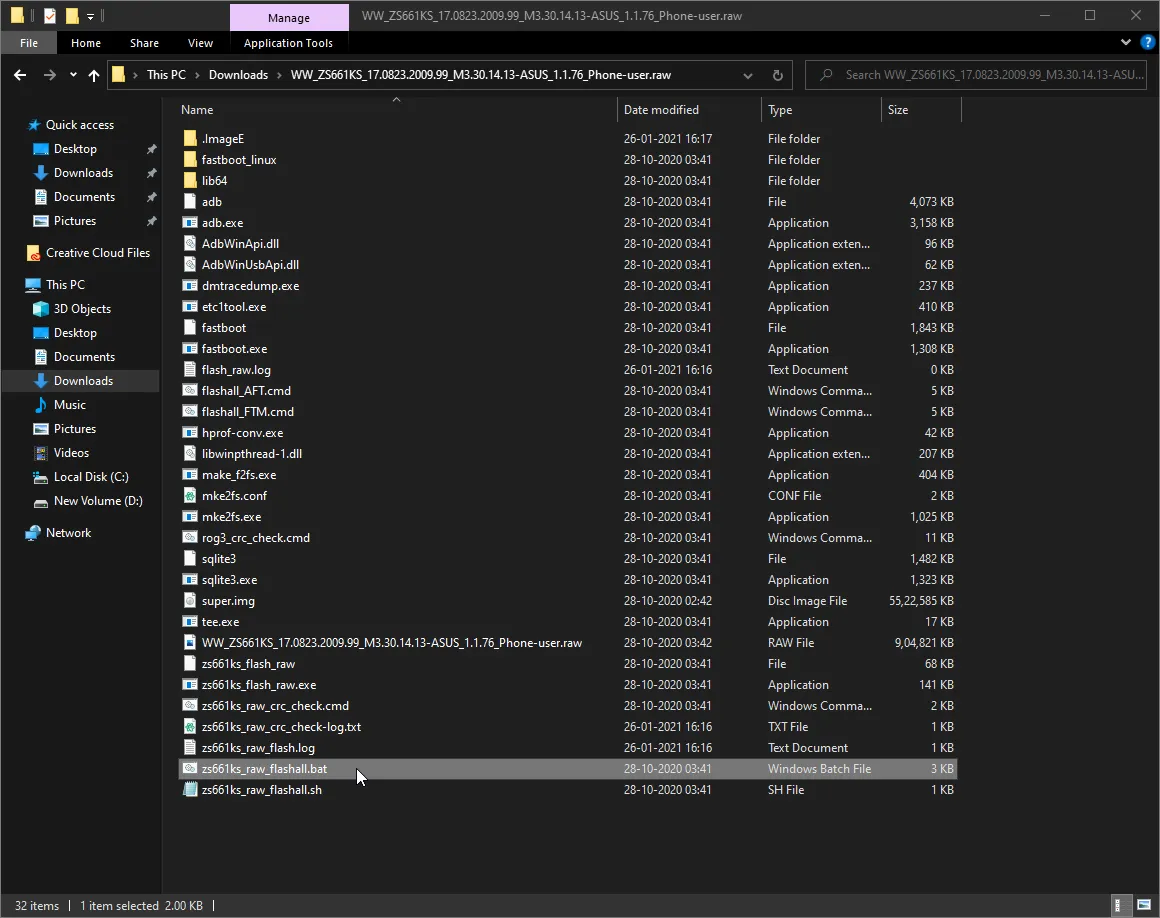
Finally, double-click on the zs661ks_raw_flashall.bat flashing script to flash the RAW firmware on your ROG Phone 3.
As soon as you launch the script, you should see a command-line (CMD) window on your PC’s screen. The complete flashing process could take a couple of minutes to finish. During this time period, do not disrupt the connection between the phone and the PC and also do not close the CMD window.
Once the flashing finishes, your ROG Phone 3 will automatically reboot into the OS.
Step 3: Root your phone and install Root Explorer
At this point, your phone has the Global WW ROM installed. In order to complete the conversion, you will need to change the device’s fingerprint from ‘CN’ to ‘WW’. To do this, you must root your phone and use the Root Explorer application.
I recently covered a pretty detailed tutorial on how to root the ROG Phone 3 using Magisk. So, you will need to follow the instructions in that guide and come back here when it’s done.
Once your phone is rooted, download the Root Explorer application from this link and install it on your phone.
Step 4: Change Device Fingerprint from CN to WW
Now comes the actual part where you have to manually change the device’s fingerprint from ‘CN’ to ‘WW’. This step is important to fully convert your Tencent edition ROG Phone 3. Without doing this step, I suspect that you might not be able to manually install updates. That’s because your phone still has the ‘CN’ fingerprint that will mismatch with the installed Global WW ROM.
To do this, go to the app drawer and launch the ‘Root Explorer’ application that you installed during the previous step. As soon as the app is launched, it will prompt you to grant superuser permissions. So, press ‘Grant’ to grant the request.
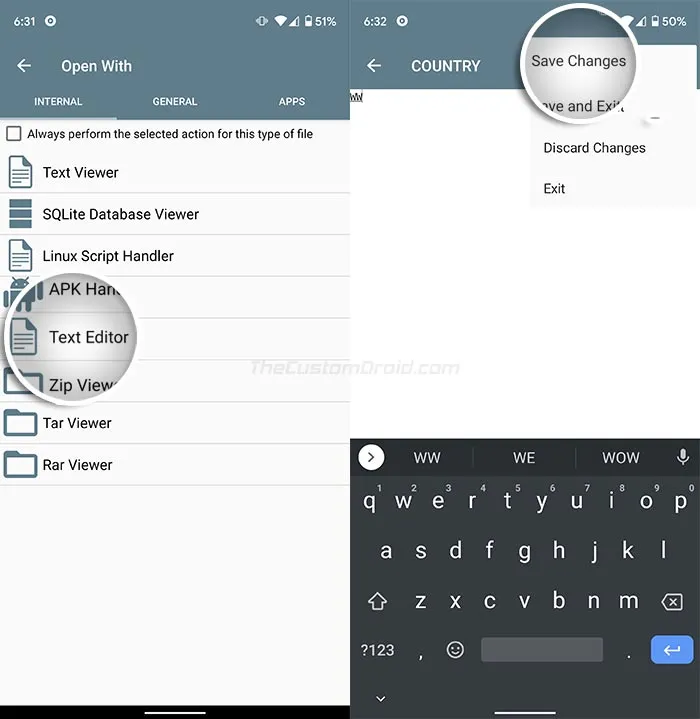
Next, press on the ‘ROOT’ tab to access the root storage of your phone. Navigate to the ‘/Vendor/Factory’ folder and find the file with the name ‘COUNTRY’. Tap on the file and open it with the ‘Text Editor’.
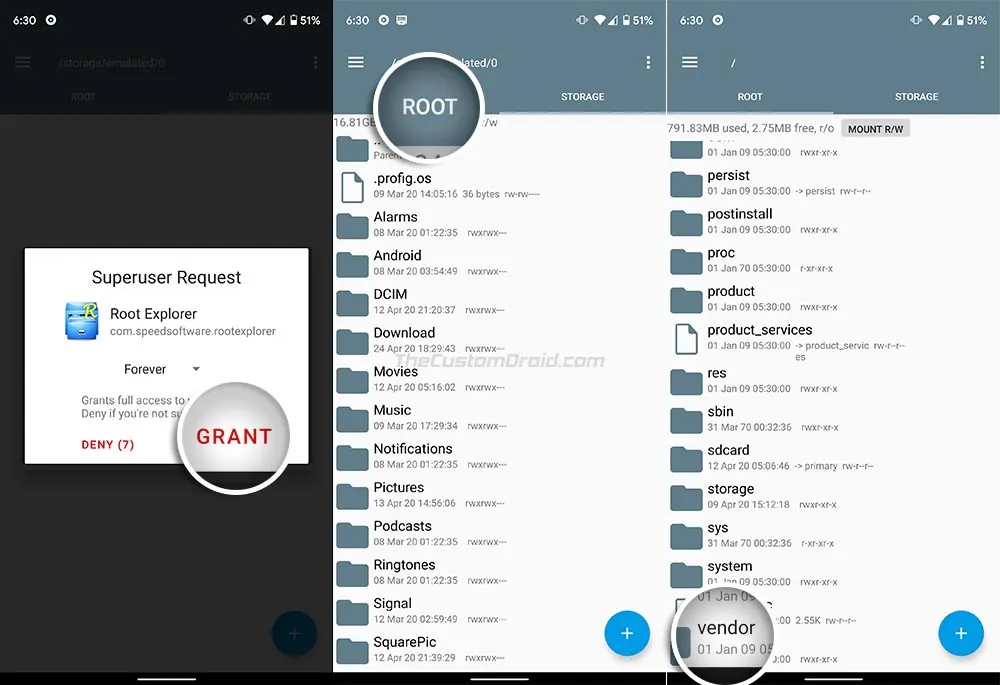
Change the fingerprint by renaming ‘CN’ to ‘WW’ (in caps). Once you have made the change, tap the 3-dot buttons on the top right and press ‘Save Changes’. Editing and saving this file will create a backup of this file in the same directory as ‘COUNTRY.bak’. Simply delete this backup file.
That’s it! You have successfully changed your device’s fingerprint from ‘CN’ to ‘WW’. For the changes to take effect, simply reboot your phone.
Step 5: Unroot and relock bootloader on your ROG Phone 3
Although the conversion is complete, your ROG Phone 3 is still rooted at this point. If you wanted to root, you wouldn’t need to follow this step. If not, you can unroot and relock the bootloader on your phone.
Important Note: The bootloader on the ROG Phone 3 can only be unlocked once. If you relock it now, you will not be able to unlock it again. Also, read the additional information below before you attempt this.
Go to the app drawer and launch Magisk Manager. Then press the ‘Uninstall’ button and select ‘Complet Uninstall’. Doing this will uninstall Magisk completely and restore your phone’s stock boot image to unroot it.
As a precautionary measure, it’s always good to re-flash the stock boot image back to your phone. This will ensure that there are no traces of Magisk or any other modifications leftover in the /boot partition.
To do this, you will need the stock boot image you extracted while rooting your phone in Step #3. Copy the stock boot.img file inside the ‘platform-tools’ folder. Then boot your ROG Phone 3 into Fastboot mode and connect it to the computer.
Enter the following command to flash the stock boot image to your phone:
fastboot flash boot boot.img
Once flashed, reboot your phone back into the Fastboot mode using:
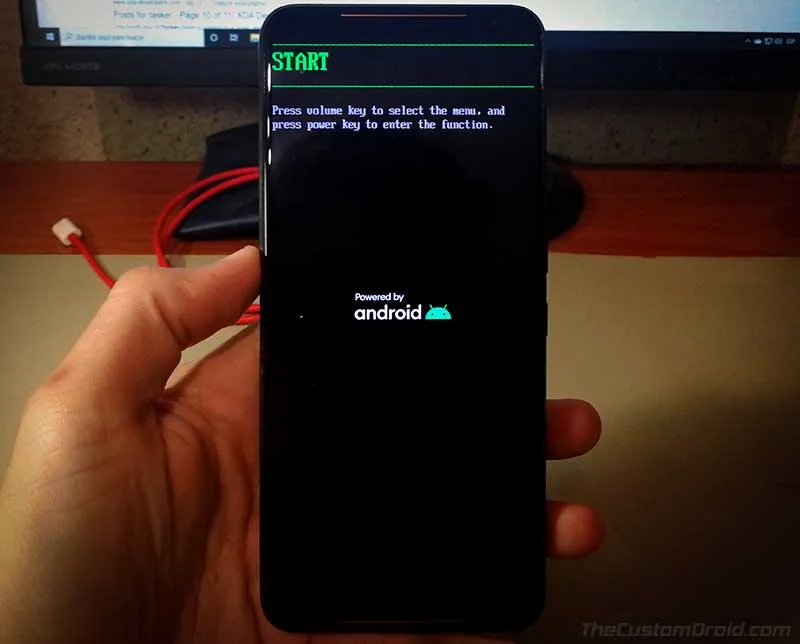
fastboot reboot-bootloaderFinally, relock the bootloader of your ROG Phone 3 using the following command:
fastboot oem asus-lockYour phone’s bootloader is now locked again. Tap the volume keys until you see the “START” message at the top and press the Power key to exit Fastboot mode.
After doing this, your ROG Phone 3 will reboot into the system (OS) with the Global ROM installed, along with the ‘WW’ fingerprint. To verify that the fingerprint was changed successfully, just download the ‘Device Info HW’ app on the phone and run it. Under the ‘System’ tab of the app, you can verify that the device’s fingerprint shows as ‘WW’ instead of ‘CN’.
Additional Information
Before you leave, here’s a bit of additional information that could be helpful.
No FOTA updates after this:
Converting your ROG Phone 3 will prevent it from taking FOTA updates, even after relocking the bootloader.
You will need to manually install updates by downloading the latest one from the official Asus support page. After downloading, copy over the ROM package to the root of your phone’s internal storage (i.e. outside all the folders). Then reboot your phone. You will be presented with a prompt to install the update.
HardwareStub Services notification:
After the conversion, you might notice a warning message in the notification panel stating that “The installed firmware does not match the device origin. Please note that you may not receive any FOTA updates.”
This is an obligatory warning message. There have been reports over at XDA and Reddit that uninstall the HardwareStub service might limit your phone’s refresh rate to 60Hz. XDA senior member JPxMODz has proposed two solutions for this over this forum thread. To summarize, you can get rid of the HardwareStub Services notification by either muting it, or you can permanently disable the notification by using the Premium version of the NCleaner app.
That’s it! You have successfully installed Global WW ROM, changed the fingerprint, and converted your ROG Phone 3 Tencent Edition to Global Edition. If you have any questions regarding the method shared here or face any issues while performing the instructions, please feel free to comment below and let me know. I will try to the best of my knowledge to help you.
Comments
Comments are moderated, and published only if they are relevant to the topic and add value in a constructive way. If you disagree with something, please be polite and respectful. We suggest you read our comment policy before commenting.