Asus ROG Phone 3 Guide: Unlock Bootloader, Install TWRP, and Root using Magisk
Learn how to unlock the bootloader, install TWRP recovery, and simultaneously root the Asus ROG Phone 3 (ZS661KS) using Magisk.

On this page
In this guide, I will show you how to unlock the bootloader, install TWRP recovery, and simultaneously root ROG Phone 3 using Magisk. These instructions are applicable to both the Tencent and Global edition of the ROG Phone 3 (ZS661KS) running Android 10.
Asus’ ROG gaming phones are a stellar example of what gaming phones should be like when it comes to design, software, and performance. The all-new ROG Phone 3 follows the same footsteps as its predecessor (ROG Phone 2) but with a faster and much brighter display, the new-gen Snapdragon 865+ processor, UFS 3.1 storage, an improved camera, and more. But you know that already, don’t you?
Although the phone offers a powerful and stock-like software experience with ROG UI, it has a lot of scope for transcending further. If you’re an enthusiast, you could explore custom ROMs, mods, kernels, etc to get the software that’s tailored to your needs. For any customizations that you may want to perform, you will need two things - (1) TWRP recovery and (2) Root.
The former is a custom recovery that will allow you to flash custom ROMs, mods, kernels, take NANDroid backups of the complete OS, wipe/reformat partitions and do much more. Official TWRP for the ROG Phone 3 has recently been released with the latest TWRP 3.5 recovery update, courtesy of XDA Recognized Developer Captain_Throwback, who is also one of TWRP’s lead developer. The recovery is completely stable to use, supports decryption of the /data partition and fastbootd (userspace fastboot) as well.
Further, you can use TWRP to flash Magisk and root the ROG Phone 3. This will allow you to use applications/mods that require Superuser permissions to modify any part of the software you want. Additionally, Magisk also allows you to hide root from certain apps (such as banking apps, games, etc) and install Magisk Modules to customize the software systemless-ly.
To sum up, there are literally endless things you can do once you have these two things in your arsenal. And if you’re inclined towards it, this guide is here to take you through the complete process in detail. The instructions below will show you how to unlock the bootloader, install TWRP recovery, and root the ROG Phone 3.
If you do not want to install or use TWRP, you can also root the ROG Phone 3 without TWRP as well. This method will also make it easier for you to install OTA updates after rooting.
Before You Start
The only things you’ll need to follow this tutorial are - A Windows/macOS/Linux computer and a compatible USB-C cable.
But, before you begin performing the instructions, there are a few things I advise you to do.
- First and foremost, take a complete backup of all your important data. Unlocking the bootloader of your phone will erase all the data stored on it, including everything on the internal storage. So, backup your apps, contacts, messages, photos, videos, documents, and everything else you feel is important to you. If you need, you can refer to our Android backup guide for this purpose as well.
- Next, make that your ROG Phone 3 has a sufficient battery charge to prevent the phone from suddenly shutting down while performing the process. 30-40% battery level is a good starting point.
Downloads
Below, you will find the links to all the files required for this guide. When asked to download a particular file, come back here to download it. Or, you can just download them all before beginning with the instructions. It’s all up to you.
- Asus ROG Phone 3 Bootloader Unlock Tool: obiwan-0902-1738_SIGNED_UnlockTool_9.3.0.0_200820_fulldpi.apk
- Official TWRP for ROG Phone 3 (ZS661KS): twrp-3.5.0_10-0-I003D.img
- Magisk Installer ZIP: Magisk 21.4
The TWRP and Magisk files linked above are the latest at the time of publishing this post. You can always check for an updated version of TWRP on this page and Magisk on Github.
How to Unlock Bootloader, Install TWRP, and Root ROG Phone 3 using Magisk
To make it easier for you to understand, I have broken down the instruction into 6 major steps.
Step 1: Unlock your ROG Phone 3’s Bootloader
In order to flash the partitions or apply any other sorts of software modifications, you will first need to unlock the bootloader of your ROG Phone 3. Generally, you would need to use fastboot to unlock the bootloader on Android. But, that method is not applicable to ROG Phone 3. Instead, you will need to use the on-device unlock tool provided by Asus itself. The official method requires the least amount of effort and does the job very quickly.
To unlock the bootloader on the ROG Phone 3:
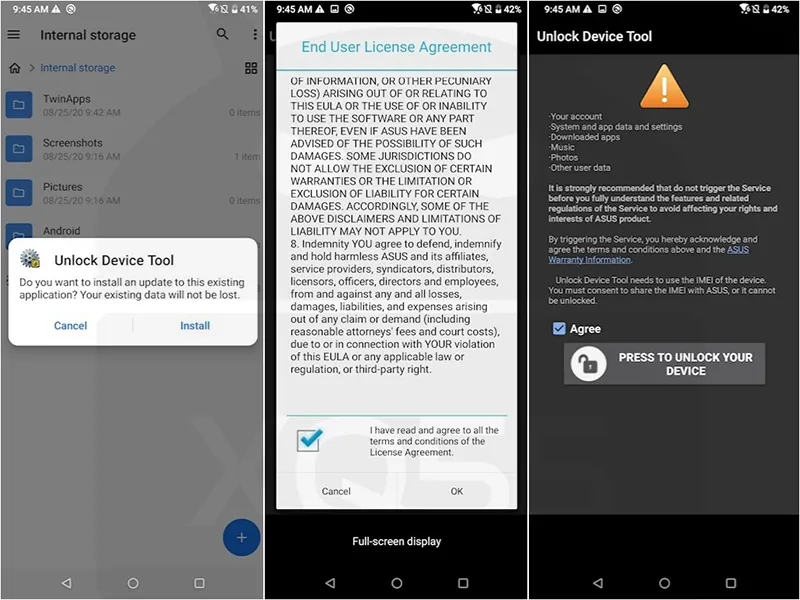
- Download the official Unlock Tool on your phone.
- Use a file manager app to install the APK file on your phone.
- Once you have installed the tool, go to the app drawer and launch the ‘Unlock Device Tool’ app.
- The app will prompt you with the user license agreement when launched.
- Check the box where it says that you agree and tap on ‘OK’.
- Scroll through the ‘Notice’ in the app’s main screen and check the ‘Agree’ box.
- Finally, select ‘Press to Unlock your Device’ to unlock the bootloader on ROG Phone 3.
Your phone will automatically reboot and the bootloader will be unlocked. Once it boots back into the OS, go through the on-screen instructions, and set up your phone.
With the bootloader unlocked, you can now install TWRP recovery on your ROG Phone 3 and simultaneously root it via Magisk.
Step 2: Install Android SDK Platform-Tools on your computer
In order to flash TWRP, you will need the Android fastboot tool. This tool comes as a part of the complete Android SDK platform-tools package. So, start by downloading the latest tools package according to your PC’s operating system from the link below.
Once downloaded, extract the contents of the ZIP file on your computer by right-clicking the file and selecting ‘Extract All’. On a macOS/Linux computer, you could just double-click the file to extract it.
The extracted ‘platform-tools’ folder should include the binaries of various tools including ‘fastboot’. For easier access, move this folder to the C:\ drive if you are using a Windows PC, or to the ‘Documents’ directory if you’re using macOS/Linux PC.
Note: Please avoid using one-click ADB/Fastboot installer tools. A lot of these tools come with an outdated version of the tools which may cause problems.
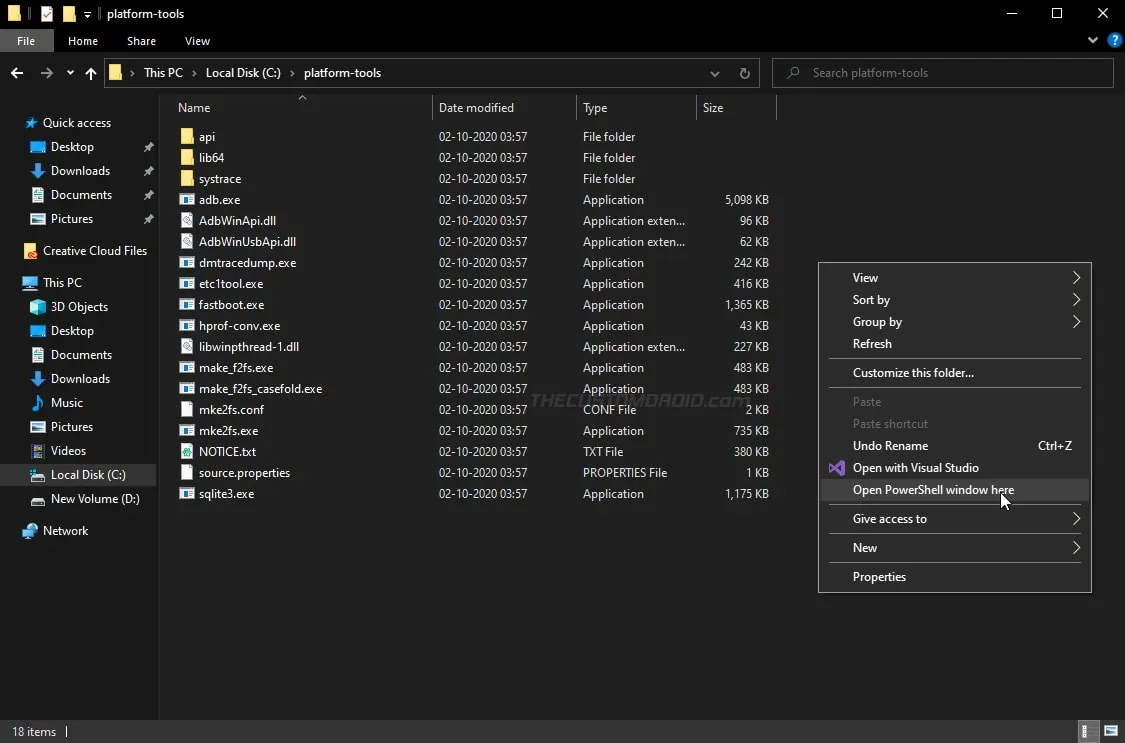
Step 3: Launch Command-line Window inside the ‘platform-tools’ folder
Now that you have the required tools, you will need to launch the command-line window (i.e. PowerShell or Terminal) inside the working directory (the ‘platform-tools’ folder). To do this:
- On Windows: Go to the ‘C:\platform-tools’ on your Windows computer. Then, hold the SHIFT key of the keyboard and right-click on any empty space inside this folder (anywhere the files are not listed/displayed). Select the ‘Open PowerShell window here’ option from the contextual menu that appears.
-
On macOS/Linux: Launch the ‘Terminal’ and change its directory to the platform-tools folder using the ‘cd’ command. For example, if the ‘platform-tools’ folder is present inside the ‘Documents’ directory, then the command should be:
cd Documents/platform-tools

At this point, your computer should be completely ready for the steps that follow.
Basic command-line usage: When entering the commands mentioned below, make sure to precede them with a dot and backslash ”.\” in Windows PowerShell, or with a dot and forward slash ”./” in macOS/Linux Terminal.
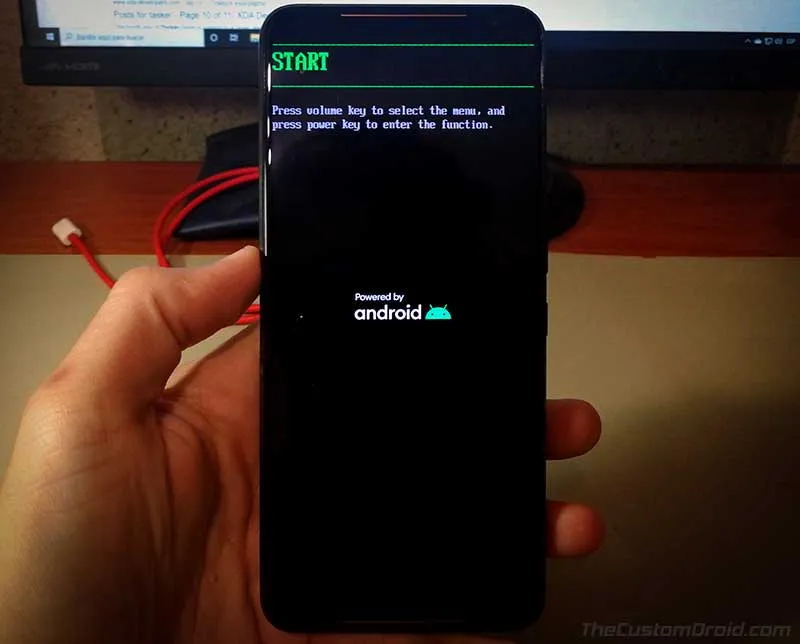
Step 4: Boot your ROG Phone 3 into Fastboot Mode and connect it to the PC
Fastboot can only flash files/images while your ROG Phone 3 is in Fastboot Mode. To enter Fastboot Mode, first power off your phone and let it rest for a couple of seconds to ensure that the phone is powered off completely.
Then, hold the Volume Up and Power keys together until you see the fastboot mode. The screen should look similar to what you see in the image below.
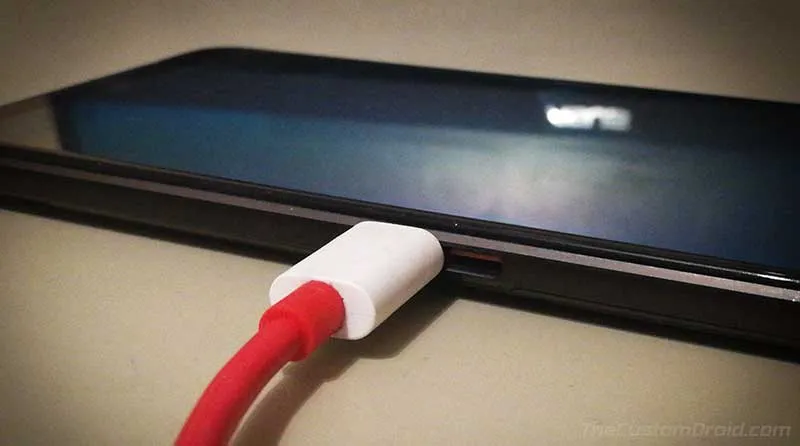
With your phone in Fastboot mode, connect it to your computer by plugging in the USB-C cable to the side port.
Step 5: Install TWRP on ROG Phone 3 by flashing the recovery image
Unlike its predecessor, the ROG Phone 3 retains a dedicated /recovery partition. This means that you wouldn’t have to go through the trouble of booting the recovery image and then flashing the installer script. Rather, you can just flash the TWRP image to the device’s recovery partition.
Now, to install TWRP on the ROG Phone 3:
-
Download the latest TWRP recovery image on your computer.
-
Move the downloaded image file (twrp-3.5.0_10-0-I003D.img) inside the ‘platform-tools’ folder on your computer.
-
Enter the following command to ensure that the computer can communicate with your phone over fastboot:
fastboot devices -
The command should output your phone’s unique ID.
-
Enter the following commands to flash the TWRP recovery image on your ROG Phone 3:
fastboot flash recovery_a twrp.img -
Replace “twrp.img” in the above command with the actual filename of the recovery img. For example:
fastboot flash recovery_a twrp-3.5.0_10-0-I003D.img
After flashing the image, tap the Volume Up or Down keys of your phone until the ‘Recovery’ option comes up. Then press the Power key to confirm and boot your ROG Phone 3 straight into TWRP recovery mode.
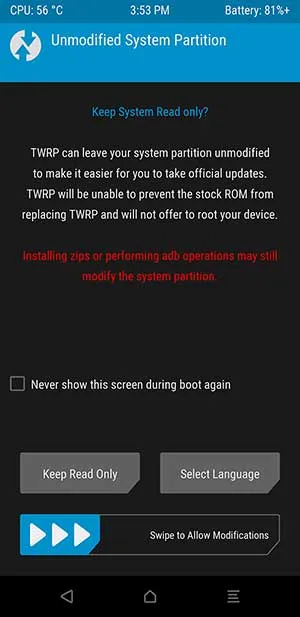
When booting into TWRP for the first time, you should see the ‘Unmodified System Partition’ prompt on your phone’s screen. What you choose on this screen depends largely on what you want to do later with your phone.
- If you plan on running the stock ROG UI firmware with just Magisk root, then it’s advised to select the ‘Keep Read Only’ option.
- On the other hand, if you think that you will be flashing a custom ROM or updating your stock ROG UI firmware by manually flashing the full OTA packages provided by Asus, then you can swipe the ‘Swipe to Allow Modifications’ button.
Selecting either of these options will have no effect on installing TWRP or rooting.
Step 6: Flash Magisk ZIP to Root ROG Phone 3
This brings us to the last step of this guide, which is to root the ROG Phone 3 using Magisk.
First, download the latest Magisk installer ZIP file to your computer. Then go to the ‘Mount’ menu in TWRP and select ‘Enable MTP’. Make sure that your phone is connected to the PC and transfer the downloaded Magisk package (e.g. Magisk-v21.4.zip) to your phone’s internal storage.
Now, go back to TWRP main screen and select ‘Install’. Then navigate to your phone’s internal storage and select the Magisk ZIP file to add it to TWRP’s flashing queue. Finally, swipe the button on the screen to install Magisk and root your ROG Phone 3.
After the flashing process finishes, press the ‘Reboot’ button and boot your phone into the ‘System’ (OS).
Wrapping it up
That’s it! You have successfully installed TWRP recovery and rooted your ROG Phone 3 with Magisk. After the phone boots, launch the Magisk Manager app and verify the installation status.
You can further verify if your rooted phone passes SafetyNet in Magisk Manager itself. A few notes regarding SafetyNet:
- MagiskHide is now disabled out-of-the-box on new installations due to the new hardware-backed attestation for SafetyNet. So, make sure that you turn it on by going to ‘Magisk Manager’ > ‘Settings’.
- If the new attestation is enforced on your device, you can refer to our guide to fix SafetyNet’s hardware attestation and force basic attestation.
Moving on, Magisk also gives you the ability to install Magisk modules to make modifications to the software without mounting or altering the /system partition. Some of the most useful modules we have covered include FOSSApps, an open-source alternative to Google Apps. Moreover, you can install the EdXposed module to get Xposed Framework.
With TWRP, you can flash custom kernels and custom ROMs like LineageOS 18.1 and OmniROM (among others) should you feel like trying them. For the available custom kernels and ROMs, please visit the ROG Phone 3 development section on XDA-Developers.
Flashing your phone can sometimes lead to a hard-brick (in rare cases) if done wrong. If you experience such a situation, you can unbrick the ROG Phone 3 by flashing the firmware via Emergency Download (EDL) Mode.
If you have any questions or face any difficulties while following the instructions, let me know through the comments.
Comments
Comments are moderated, and published only if they are relevant to the topic and add value in a constructive way. If you disagree with something, please be polite and respectful. We suggest you read our comment policy before commenting.