How to Root Xiaomi Poco F1 and Install TWRP Recovery
Here's a detailed guide on how to install TWRP recovery and root Xiaomi Poco F1 using Magisk. Rooting your phone will enable you to customize the OS, get the

On this page
Here’s a detailed guide on how to install TWRP recovery and root Xiaomi Poco F1 using Magisk. Rooting your phone will enable you to customize the OS, get the most out of the battery with custom kernels, add third-party features via Magisk modules.
Xiaomi recently launched it’s Poco F1 smartphone, which has since been trending for all the right reasons. It features top of the line hardware, comparable to flagship devices like the Samsung Galaxy S9/S9+ and the Note 9, and is currently the most affordable smartphone powered by the Snapdragon 845 chipset.
If you happen to have gotten your hands on one of these and are looking forward to unleashing its full potential by rooting it, you have come to the right place. You would be pleased to know that, thanks to XDA member Shivam Kumar Jha, an unofficial TWRP recovery is now available for the Poco F1, we have a handy guide here on how to root Xiaomi Poco F1.
UPDATE (3 Jan 2019):
Official TWRP for Poco F1 is now available as v3.2.3-1 (XDA thread). The download links in this post have been updated.
According to the release notes – “This build of TWRP will (probably) only work with devices using Full Disk Encryption (FDE) and may not work with devices that have been converted to File-Based Encryption (FBE). FBE support may be added at a later date.”
Also, if you have trouble flashing TWRP using fastboot, switch to a USB 2.0 port instead of USB 3.0.
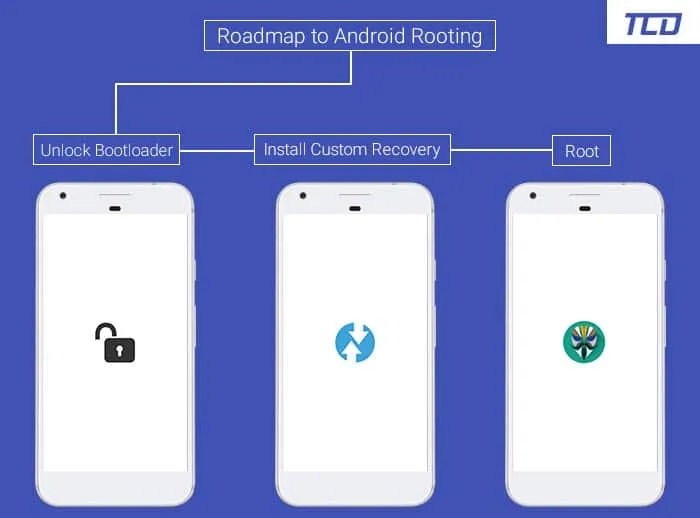
Rooting the Poco F1 is a 3 step process, as is the case with almost every modern-day Xiaomi device. It basically involves - (1) Unlocking the bootloader, (2) Flashing TWRP recovery, and finally (3) Flashing Magisk via TWRP.
The bootloader unlocking process has been a cause of a wee bit of frustration, as it took anywhere between a week to a month to get approval from Xiaomi. However, with the Poco F1, Xiaomi seems to have adopted a more developer-friendly approach and has officially stated that new users should be able to unlock the bootloader within 3 days.
Here’s a step-by-step guide to install TWRP recovery and then root Xiaomi Poco F1.
Prerequisites
- First and foremost, ensure that you take a full backup of all the data on your phone. This includes messages, contacts, and everything else that you feel necessary. We also have a tutorial that will help you backup your data with ease.
- Charge the Poco F1’s battery to at least 60%
- Enable USB debugging on Poco F1: To do so, go to the device ‘Settings’ -> ‘About phone’. Then tap on the ‘MIUI version’ continuously until ‘You are now a developer!’ message appears on the screen.
- Also, enable OEM Unlocking in Developer Options. For that, go to ‘Settings’ -> ‘Aditional settings’ and tap on ‘Developer options’. Scroll down and enable the ‘OEM Unlocking’ toggle.
- In order to root, you must first unlock the bootloader on Xiaomi Poco F1. If you still haven’t done it, then we have a guide here to Unlock Bootloader on Xiaomi Devices.
- Make sure to install Android platform-tools on the PC. Here’s a quick guide on how to do it.
Downloads
- TWRP Recovery for Xiaomi Poco F1:
- Unofficial: twrp-3.2.3.0-beryllium-20180831.img
- Official: twrp-3.2.3-1-beryllium.img
- Forced Encryption Disabler: Disable-Force-Encryption-Treble.zip
- Latest Magisk Installer zip: Magisk-v18.0.zip (More details and changelog)
How to Install TWRP Recovery on Xiaomi Poco F1
- Download the TWRP recovery image and transfer it to the C:/adb folder where the ADB/fastboot binaries are present.
- Next, download the Forced Encryption Disabler and Magisk Installer zip files.
- Copy the downloaded files to the phone’s internal storage.
- Power off your Xiaomi Poco F1
- Hold the Volume Down and Power button simultaneously to boot into Fastboot mode
- Connect the phone to the PC while it is in Fastboot mode
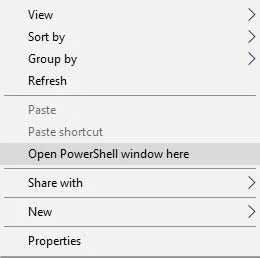
- Go to C:/adb on the PC, where you copied the TWRP image. Then hold the SHIFT key and right-click on an empty space inside the folder.
- Select ‘Open PowerShell window here’
- Enter the following command to install TWRP recovery on Xiaomi Poco F1:
fastboot flash recovery twrp-3.2.3.0-beryllium-20180831.img - Now it is important to boot to TWRP first before you can boot into the OS. Use the following command to boot the Poco F1 directly into TWRP mode:
fastboot boot twrp-3.2.3.0-beryllium-20180831.img
Your phone should now be in TWRP recovery mode. So, go ahead and follow the steps below to finally root Xiaomi Poco F1.
How to Root Xiaomi Poco F1
- On TWRP screen, tap on the ‘Keep Read Only’ button to not allow system modifications.
- Tap on ‘Install’ and select the ‘Disable-Force-Encryption-Treble.zip’ file. Then swipe to confirm the installation.
- Go back to the TWRP home screen, then tap on ‘Reboot’, and then on ‘Recovery’.
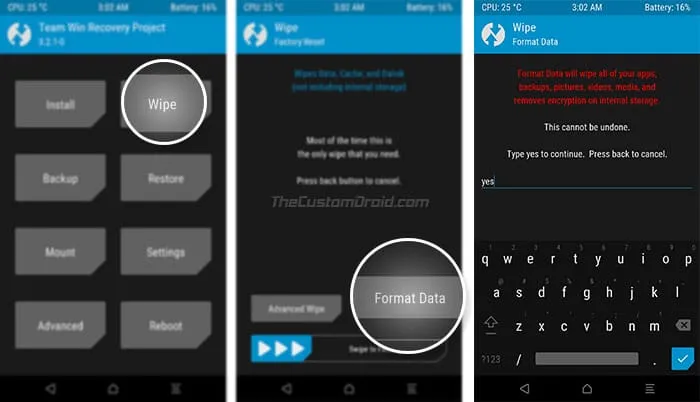
- When your Poco F1 boots back into TWRP, go to ‘Wipe’ -> ‘Format Data’. Type ‘yes’ in the field to confirm wiping of data and hit Enter. This will completely erase all the data on the device.
- Now once encryption is disabled on the phone, you can go ahead and install Magisk to root.
- Go back to the TWRP main screen and tap on ‘Install’ again and select the ‘Magisk-v18.0.zip’ file.
- Finally, swipe to confirm the installation and root Xiaomi Poco F1.
- Once the installation is complete, tap the ‘Reboot System’ button and let the device reboot
- After it has rebooted, set it up like a new device. You should now see Magisk Manager among your apps.
If you want to verify if your device has been successfully rooted, download and run the Root Checker app from the Play Store.
Now that your phone is rooted, you can start using root-enabled apps or install Magisk modules to add extra features to the software. On the other hand, you can use TWRP recovery to flash custom ROMs/kernels.
Hope you find our guide on how to root Xiaomi Poco F1 and install TWRP recovery on it. If you have any questions or if you get stuck at any step, feel free to drop a comment below, and we will try our best to help you out.
Comments
Comments are moderated, and published only if they are relevant to the topic and add value in a constructive way. If you disagree with something, please be polite and respectful. We suggest you read our comment policy before commenting.