How to Root Exynos Samsung Galaxy Note 9
In this comprehensive guide, we will show you how to root Exynos Samsung Galaxy Note 9 with or without using TWRP recovery.

On this page
In this comprehensive guide, we will show you how to root Exynos Samsung Galaxy Note 9 with or without using TWRP recovery.
The Samsung Galaxy Note 9 is the latest offering from Samsung’s Note flagship lineup and is widely considered to be the best Note device to date. With top of the line hardware, and running Android Oreo 8.1.0 out of the box, it is a powerhouse of a device and easily ranks among the top devices currently available out there.
If you have acquired one of these and would like to be able to run root apps, or simply get rid of pre-installed Samsung bloatware, then you already know that root access is required. Thanks to XDA senior member geiti94, we now have an unofficial TWRP recovery for Galaxy Note 9. To add, we now also have Magisk 17.1 that fully supports the new range of Samsung devices including the S9, S9+, and Note 9. To sum up, you can flash the TWRP recovery and then use Magisk to root Exynos Samsung Galaxy Note 9 easily.
Wait! We have listed another method for rooting the Galaxy Note 9, which doesn’t rely on TWRP and works by flashing a patched (pre-rooted) kernel. The credits for this method goes to XDA Recognized Developer dr.ketan, who many of you may already know as one of the most prolific devs for the Samsung Galaxy Note series.

If you’d like to go ahead and root your Exynos Samsung Galaxy Note 9, then you are in the right place. Without further ado, let us get to the process.
Compatibility
This guide is meant only for the Exynos Samsung Galaxy Note 9, the specific models for which are listed below. Please DO NOT TRY THIS on the USA/Canada/China/Japan variants that come with the Qualcomm Snapdragon chipset. If your model number does not match either of the ones listed below, please do not proceed.
- SM-N960F
- SM-N960FD
- SM-N960N
Disclaimer
Rooting will void the warranty permanently. KNOX dependent apps like Samsung Pay and Secure Folder will no longer function, even if the device is unrooted/flashed back to stock later. You will also not be able to receive OTA updates.
Before You Begin
- First and foremost, ensure that you take a full backup of all the data on your phone. This includes messages, contacts, and everything else that you feel necessary. We also have a tutorial that will help you backup your data with ease.
- Charge the battery to at least 70%, so as to avoid the device shutting down during the process.
- Download and install the latest Samsung USB drivers.
- Enable USB debugging on Galaxy Note 9: To do so, go to the device ‘Settings’ -> ‘About phone’ -> ‘Software Information’. Then tap on the ‘Build Number’ continuously until ‘You are now a developer!’ message appears on the screen.
- In ‘Settings’ > ‘Developer options’, also enable ‘OEM Unlock’. You can use our tutorial on How to enable OEM Unlocking.
- Download and extract latest Odin flash tool to an easily accessible location on the PC.
How to Root Samsung Galaxy Note 9 using TWRP and Magisk
This method is the more conventional route towards gaining root access on almost all Samsung devices, i.e flashing a custom recovery such as TWRP, and then flashing Magisk to root. Before we begin, please complete all the pre-requisites from the *Before you Begin* section.
Step 1: Install TWRP recovery on Exynos Samsung Galaxy Note 9
- Download TWRP recovery for Exynos Galaxy Note 9: twrp-3.2.3-0-crownlte_UNOFFICIAL.tar .md5
- Switch off your Galaxy Note 9 completely.
- While the phone is powered down, hold the Volume Down + Bixby button, and connect the USB cable. This will put the device in Download mode. » Note: The older button combo of Volume Down + Bixby + Power won’t work on the Note 9.

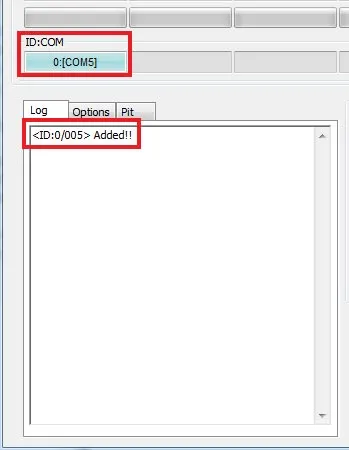
- Fire up Odin 3.13.1. Make sure the device is detected, and the COM port at the top-left of the Odin window turns Blue.
- Next, click on the ‘AP’, select the downloaded TWRP tar file - ‘twrp-3.2.3-0-crownlte_UNOFFICIAL.tar .md5’. » Note: Now, this part is important, to be able to boot into TWRP the first time. It is important to not allow the device to boot into the system (OS), as that will overwrite TWRP with the stock recovery.
- While holding the Volume UP + Bixby + Power buttons, click on the ‘Start’ button in Odin to install TWRP recovery on Exynos Samsung Galaxy Note 9.
Odin will show the ‘PASS’ message when the flashing process is complete. Make sure to keep all 3 buttons pressed till the phone reboots into TWRP. Once in TWRP recovery mode, proceed to the next section to root Exynos Samsung Galaxy Note 9.
Step 2: Root Exynos Samsung Galaxy Note 9
- Swipe the ‘Swipe to Allow modifications’ button in TWRP.
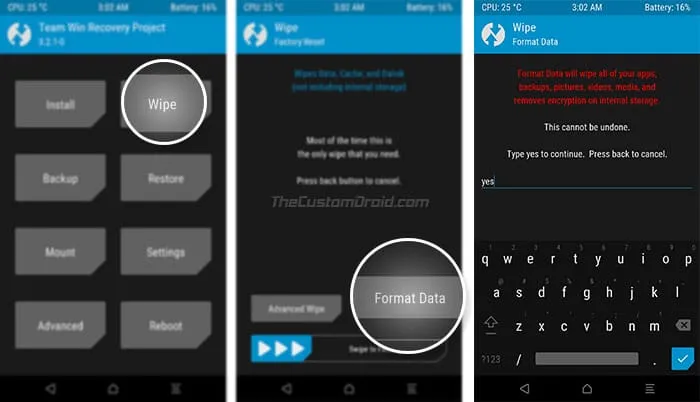
- Go to ‘Wipe‘ -> ‘Format Data‘. Type ‘yes‘ in the field to confirm wiping of data and hit Enter. » This will completely erase all the data on the device including the internal storage.
- Once the format is complete, go to the ‘Reboot’ menu and tap on ‘Recovery’.
- When the phone has rebooted back to TWRP main menu, transfer the RMM Bypass (Fixes OEM unlock disappearing issue) and the Magisk 17.1 installer zip to the internal storage of your phone.
- Tap on ‘Install’ and select the ‘RMM-State_Bypass_Mesa_v2.zip’ file and swipe to confirm the installation
- Finally, install the ‘Magisk-v17.1.zip’ file to root Exynos Samsung Galaxy Note 9.
- Tap on ‘Reboot System’ after the installation is complete
After the phone boots, it should run the stock rooted firmware.
How to Root Exynos Samsung Galaxy Note 9 using Pre-Rooted Kernel
- Download the pre-rooted kernel for Galaxy Note 9 and extract the zip file: Prerooted_N960_Exynos.zip
- Switch off your Note 9 completely.
- While the phone is powered down, hold Volume Down + Bixby button, and connect the USB cable to enter Download mode.
- Fire up Odin 3.13.1 on the PC.
- The COM port on the Odin window should light up Blue.
- Next, click on the ‘AP’ button and select the extracted pre-rooted kernel file - ‘N960F_kernel_PreRoot_RH5_DrKetan.tar.md5’.
- Click the ‘Start’ button in Odin to root Exynos Samsung Galaxy Note 9 using the pre-rooted kernel.
- The phone should automatically reboot after the process is complete.
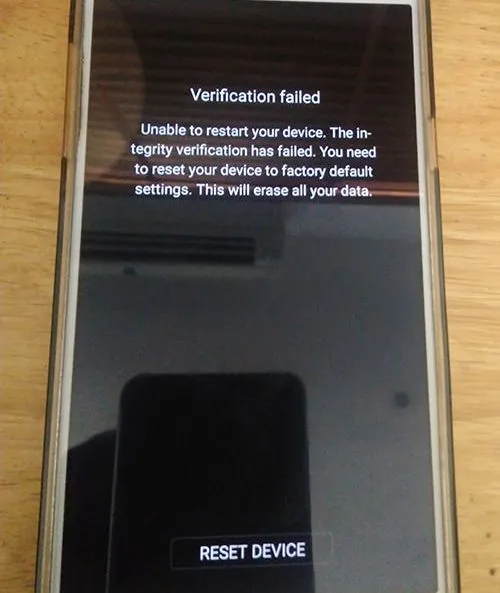
- When you get a ‘Verification Failed’ screen, tap on ‘Reset device’, and let it do its thing. » It may take up to 7 minutes to boot, which is perfectly normal.
- Once booted, set up the phone like new.
Further, download and install the Magisk Manager 5.9.1 APK on your Note 9. You can also install the De-KNOX app and run it to clean up all the KNOX-dependent apps and services.
That’s it. You should now have root access on your Samsung Galaxy Note 9 with Magisk. If you want to verify if your device has been successfully rooted, download and run the Root Checker app from the Play Store. Now that your phone is rooted, you can start using root-enabled apps or install Magisk modules to add extra features to the software.
If you come across any problems during the process, drop a comment below. Don’t forget to share this article on your social media and let your friends know about this too.
Comments
Comments are moderated, and published only if they are relevant to the topic and add value in a constructive way. If you disagree with something, please be polite and respectful. We suggest you read our comment policy before commenting.