Has your Android device entered a bootloop after installing a Magisk Module? Then this guide can help you fix that. In this guide, I will show you how to fix bootloops caused by Magisk Modules using two different methods. This could be done by either using the ‘Magisk Manager for Recovery Mode’ mod in TWRP recovery or by using a simple ADB command (In case you do not have TWRP installed).
Advertisement
Magisk is an all-powerful customization solution for Android that allows modifying the software without altering the /system partition. You can use it to install Magisk Modules, to gain extra features and functionality for a more tailored experience. But some times, a combination of various modules could lead your Android device to a bootloop, a boot state where your device is no longer able to enter the actual OS (system). This could be caused because of incompatibility issues between two, or some times even more than two modules.
Page Contents
How to Fix Bootloops Caused by Magisk Modules
To fix bootloops caused by Magisk Module(s), you’d need to remove the problem-causing module or maybe even all the modules. But since your phone cannot enter the system (OS), you cannot use Magisk Manager. So how would you do it if your Android device is currently in a bootloop? The answer is quite simple actually. You can uninstall Magisk Modules in TWRP Recovery itself without erasing/wiping any data on the phone.
Now, as I mentioned initially, there are two methods/ways to fix bootloops that are caused by Magisk Modules. The first method is for when you have TWRP recovery installed on your device. Though you can also temporarily boot into TWRP using the ‘fastboot boot twrp.img’ command if you’ve rooted your phone using the Magisk patched boot image. But if you do not want to use TWRP at all, then you can use the second method, which involves executing a simple ADB command on the PC.
Advertisement
Note: In the majority of cases, the most recently installed module could be the cause of the bootloop. However, if deleting that individual module still doesn’t fix the problem, you can try deleting other/all installed modules as well.
Now without any further wait, let us get straight to the instructions.
Advertisement
Method 1: Remove Magisk Modules Using TWRP Recovery
This method uses the ‘Magisk Manager for Recovery Mode‘ mod by XDA member VR25. His mod uses the in-built Terminal in TWRP to manage the installed Magisk Modules on your phone. You can use it to disable or completely remove the module(s) that are causing the bootloop.
- Boot your Android device into TWRP recovery first.
- Go to the ‘Mount’ menu in TWRP and select ‘Enable MTP’.
- Connect your phone to the PC using the USB cable.
- Now, download the latest ‘Magisk Manager for Recovery Mode’ mod zip file from this link.
- Copy the downloaded file (‘mm-201904040.zip’) to the phone’s storage.
- Once the file has been copied successfully, disconnect the phone from the PC.
- Go to the TWRP main screen and tap on ‘Install’.
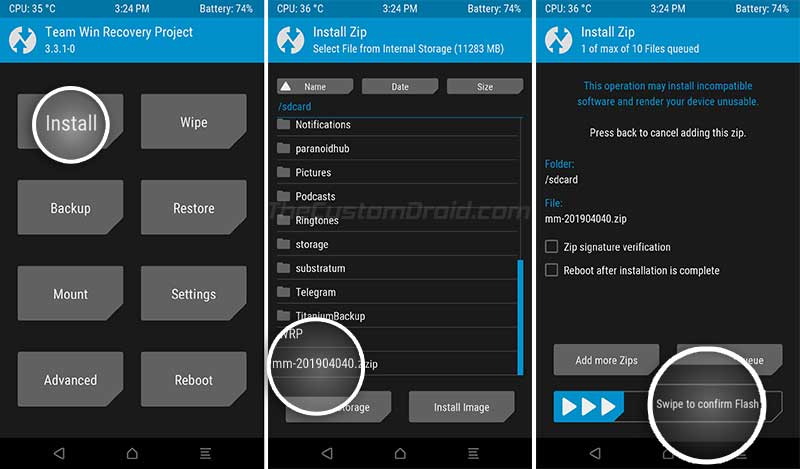
- Select the mod zip file and swipe the button on the screen to install it.
- Once the mod has been successfully installed, go to the ‘Advanced’ menu in TWRP.
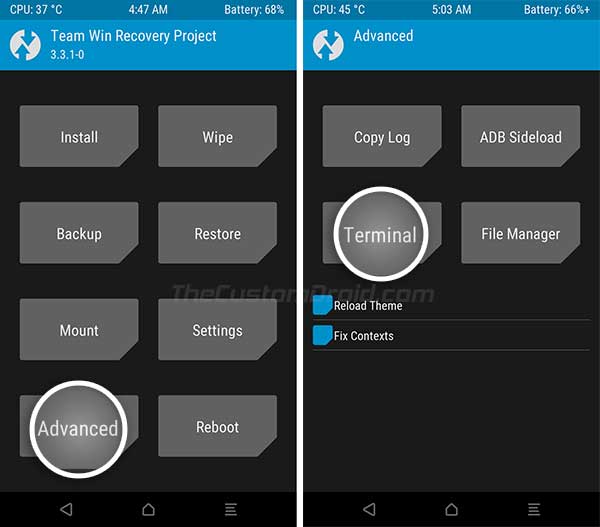
- Select ‘Terminal’ to launch TWRP’s in-built Terminal.
- Enter the following command to launch the Magisk Manager interactive shell:
sh /sdcard/mm
- Enter “r” to list all the install modules for removal.
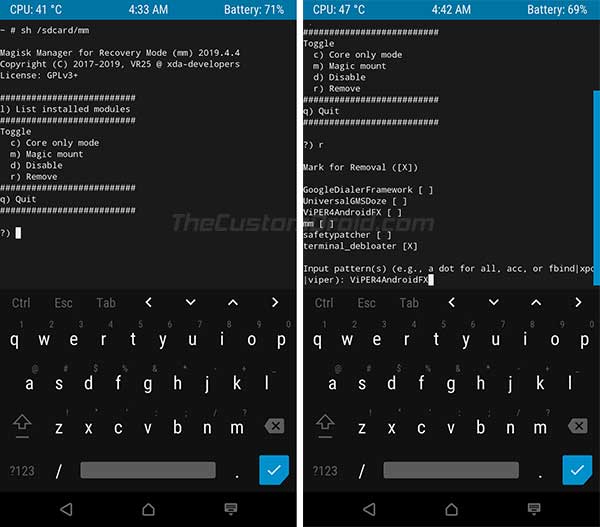
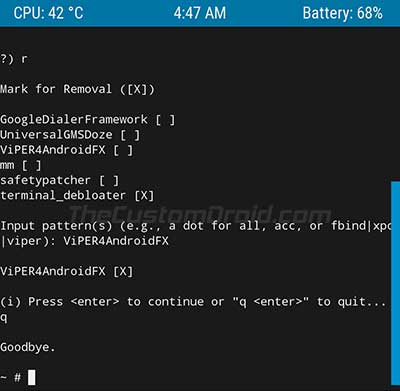
- You will need to mark the installed modules that you want to remove. To mark a module, simply enter it’s exact name as shown in the list.
- Once you have marked the module(s) that you want to uninstall, enter “q” to quit the shell.
- Now go to ‘TWRP’ > ‘Reboot’ and tap ‘System’ to boot your phone.
Upon rebooting, the marked module(s) should be completely removed from the system and your phone should boot normally into the system (OS).
Advertisement
Method 2: Remove Magisk Modules Using ADB
This method utilizes an ADB command which was introduced in Magisk v19.4 and above. It is, in fact, the easiest way to quickly remove all the installed Magisk Modules and fix bootloop issues caused by them. The only requirement for this method is that you should have the Android SDK platform-tools (Specifically ‘ADB’) installed on your PC.
- First, power off your Android device completely.
- Then connect it to the PC via a USB cable.
- Next, open the folder on the PC where ADB is installed (e.g. C:\platform-tools).
- Hold the SHIFT key on the keyboard and right-click on any empty space inside the folder.
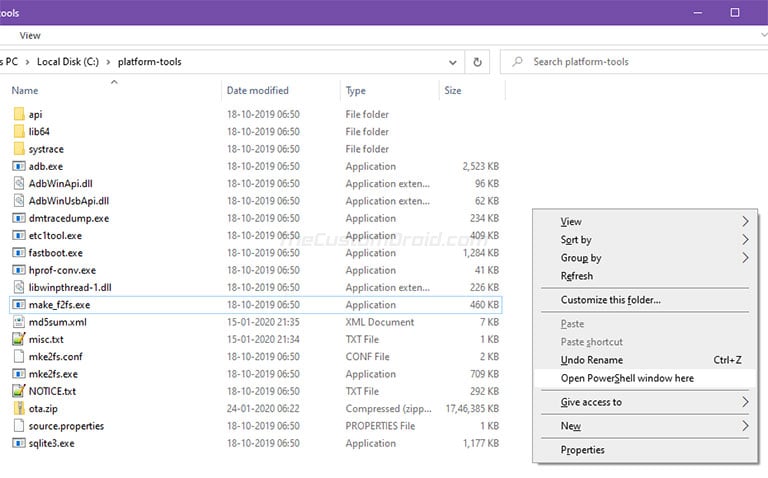
- Select ‘Open PowerShell window here’ from the menu that appears.
- If you’re using macOS/Linux, simply launch the Terminal and change its directory to the folder where ADB is installed using the ‘cd’ command. For example, if ADB is installed in /Documents/platform-tools, then the command should look like:
cd Documents/platform-tools

- This will launch the command-line in the same folder where ADB is installed.
- Now, enter the following command in the command-line window:
adb wait-for-device shell magisk --remove-modules
- After entering, hold the power button of your device to boot it into the OS.
The said command basically waits for your device till it enters the boot screen, from which point ADB is functional. It will then remove all the installed Magisk Modules to fix the bootloop. With that done, your phone should successfully boot into the system (OS).
Advertisement
So, you have just learned how to fix bootloops caused by Magisk Modules, by removing the modules via TWRP or ADB. If you have any questions regarding the topic, please feel free to reach out to us via the comments.
Huge thanks to VR25 for the mod!
Comments 11 Comments
Comments are moderated, and published only if they are relevant to the topic and add value in a constructive way. If you disagree with something, please be polite and respectful. We suggest you read our comment policy before commenting.
Thank YOU SOOOOOOOOOOOOOOOO MUCH!!! IT WORKED
I have a redmi note 9 and i don’t have a custom recovery, so I tried to turn on my phone in safe mode, but there is a module that used or optimized vulkan on phones and left my screen black. I did not have USB debugging enabled. What I can do? I hope you can help me. The module is Atlantis.
Hi Benjamin, were you successfully able to boot your Redmi Note 9 into Safe Mode?
I dont have twrp in my ONEPLUS 8 PRO , so tried the 2nd method using adb, bit I didn’t turn on USB Debugging in my phone, so “adb wait-for-device shell magisk –remove-modules” command is not working. what to do ?? any way using fastboot mode?? please
Yugendhra, starting with Magisk v21, there’s a new feature in Magisk that will automatically disable all modules when the device is booted into Safe Mode. The primary aim of this feature is to help users deal with rogue modules and it’s certainly much more easier and convenient than the two methods shared above.
You can check out this short and precise guide in Verizon’s knowledge-base to learn how to enter Safe Mode.
i am in bootloop after installing a magisk module. I am in 11.0.11 build. I followed the guide but the bootloop continues. Any other solution?
Hi Fanis. Please try to enable Magisk core only mode using Method 1. This should fix any issues if caused by a Magisk Module. If not, then there’s definitely some other underlying problem instead of the Magisk Module.
Yes Dhananjay, at last I followed the first method but it was a little difficult because yesterday I couldn’t install the twrp.img trying to install twrp recovery. There’s a problem with this stock rom build, I think isn’t? At last I used the q- base patched twrp.img and I solved the problem, I installed the twrp recovery and following the first method I disabled the buggy magisk module (sony music!).I reboot normally and I am root again with the rest of modules working fine.
Thanks for your answer!
Hi again, Fanis. Yes, there could be. It’s the third time that Xiaomi has recalled the Android 10 update for the Mi A3 because of bugs.
And I am glad you were able to fix the bootloop. You’re much welcome! And sorry if I am not able to respond to you on Facebook as I am not getting enough time.
Vous m’avez épargné beaucoup de problèmes. Merci!
Hi Vincent. I am glad the tutorial proved helpful to you.