
On this page
In this tutorial, we will show you how to unlock the bootloader and then root Samsung Galaxy Note 10/Note 10+ using Magisk. This guide supports Exynos variants of the Galaxy Note 10 and Note 10+ with model numbers “SM-N970F” and “SM-N975F”, respectively.
Although Samsung has done a great job building its new One UI software which runs on the Note 10 and 10+ out-of-the-box. But it still poses a lot of issues to the custom development scene. This is primarily caused by certain security features (Like KG/RMM State, DEFEX, etc) introduced by the manufacturer. While these features are actually beneficial for an average user, but they also act as a barrier when it comes to things like rooting or install custom recoveries like TWRP.
This year, Samsung introduced even more complications by implementing its own version of A-only system-as-root (Read more about SAR here) to the Galaxy S10 and Galaxy Note 10 series. The same has been implemented to some other OEM devices as well, but the solution for them is rather simple. In the case of Samsung devices, the problem goes even deeper because the bootloader is designed to only load the kernel binary from the boot image. If you’re into development or want to know the technical details, then give read to this post.
In simpler words, the conventional method of rooting that involves installing TWRP first and then using it flash Magisk for root wouldn’t work. But thankfully, Magisk developer topjohnwu has been able to figure out a way, which is by Magisk to the [/recovery] partition of the device. So, you can now root your Samsung Galaxy Note 10/10+ easily, using Magisk.

Important Information, Warning, & Disclaimer
- Rooting your phone will trip the KNOX counter on your Note 10/10+. This, in turn, will void your phone’s limited warranty offered by Samsung.
- After rooting, you will not be able to use some features or apps that rely on KNOX, like Samsung Pay and Secure Folder.
- Make sure that you go through the instructions first and understand exactly what is happening at each step. This will help you root your Samsung Galaxy Note 10/10+ without any issues or errors.
- Do not deviate from the instructions at all. Should you do that even by mistake, you will need to restore the stock firmware and also perform a factory reset further to recover your phone. This will also erase all the data on the phone.
- We (TheCustomDroid.com) or any of our site members or readers shall not be held responsible for any damage caused to your device during or after following this procedure.
Before You Proceed
Make sure that all the requirements stated below are fully met before you head to the instructions below to root Galaxy Note 10 and Note 10+.
- Take a backup first! As always, we strongly recommend taking a full backup of all your data. While performing the instructions below, all the data on your Note 10 will be erased multiple times. Only once you are finished with the instructions, you can restore all your data back.
- In order to establish a successful connection between your phone and the PC, download the latest version of the Samsung USB drivers from here and install them.
- Flashing the firmware files on your Note 10 will be done through Odin. So, download the latest Odin v3.13.3 and extract the downloaded zip on your Windows PC.
- You will also need a copy of the full stock firmware that is currently installed on your phone. To check, open the dialer on your Note 10 device and enter *#1234#. The text corresponding to “AP” is the current software version installed on your phone.
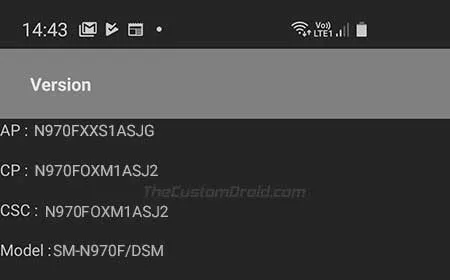
- You can download the corresponding stock firmware for the Note 10 (SM-N970F) from here, or for the Note 10+ (SM-N975F) from here. If you’re running the latest firmware, then you can also use the SamFirm tool.
- Lastly, make sure that your phone is charged to a sufficient battery level to avoid any sudden shutdowns during the rooting process.
How to Root Samsung Galaxy Note 10 and Note 10+
Here’s a brief of the complete process: In order to root, you will first need to unlock the bootloader on your Galaxy Note 10 or Note 10+. Once that is done, you will have to extract the AP firmware file from the stock firmware package and patch it using the latest Magisk Manager app. Then, you have to flash the patched AP firmware (along with other firmware files) to root Samsung Galaxy Note 10 and Note 10+. And finally, you will need to perform a few additional steps before you can boot into the rooted system (OS).
Each and every bit of this procedure is detailed in the instructions below. The process might seem to be a little lengthier than the “conventional method”, but it works (As tested on Galaxy S10/S10+/S10e too) and would be easy once you familiarize yourself with it.
For your own convenience and understanding, we have split the instructions in this guide into four major steps. Please make sure that you follow them in the stated order, and again, do not deviate from them at any point.
Step 1: Unlock the Bootloader
The first step to root is to unlock the bootloader of your Galaxy Note 10/10+. To do so:
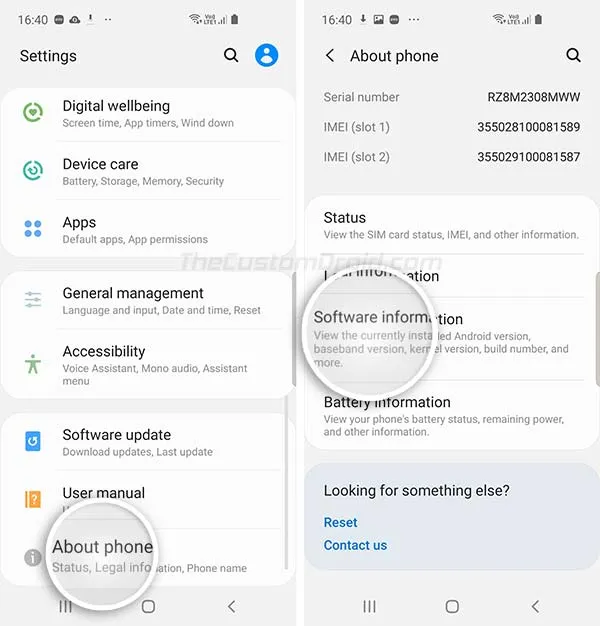
- Go to “Settings” > “About phone” > “Software information” on your phone.
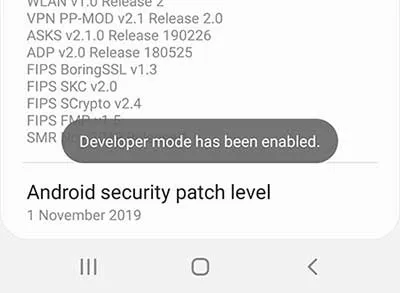
- Continuously tap on the “Build number” section until you see “Developer mode has been enabled!” message on the screen.
- Now go to “Settings” > “Developer options”.
- Find “OEM Unlocking” and turn ON the toggle next to it.
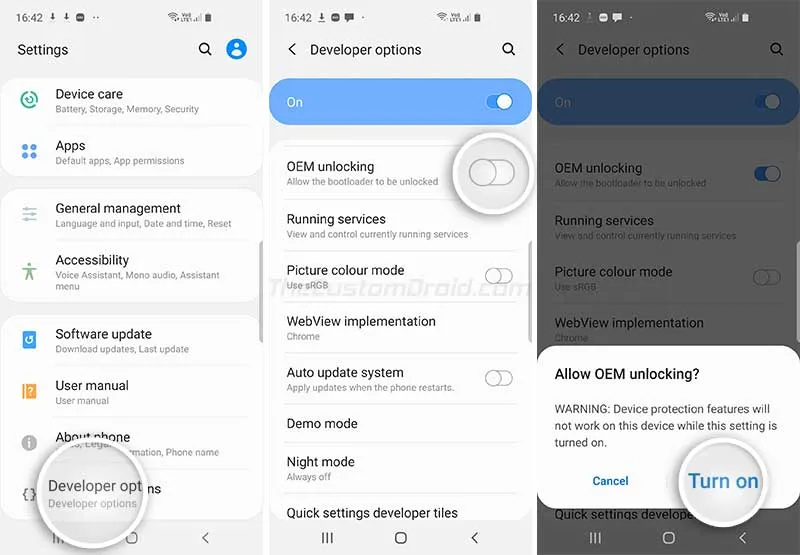
- Select “Turn on” when prompted to enable OEM unlocking on your Note 10/10+.
- Now boot your phone into the Download Mode.
- Long-press the Volume Up button on the Warning screen to enter the “Device unlock mode”.
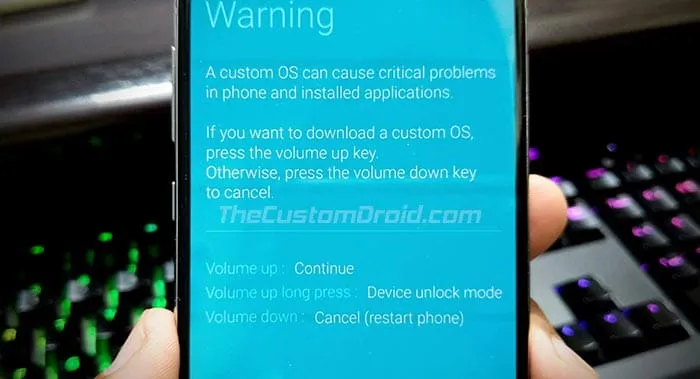
- Finally, press the Volume Up button again to confirm and unlock the bootloader on your Samsung Galaxy Note 10/10+.

- Your phone will automatically reboot and erase all the data.
- Although the bootloader is unlocked, it will not allow you to flash any unofficial/custom binaries until the new “Vaultkeeper” service allows it.
- So, to complete the process, skip through the initial setup and make sure to connect the phone to the internet (via mobile data or WiFi).
- Then go to “Settings” > “Developer options” and ensure that the “OEM Unlocking” toggle is turned ON and greyed out.
If it is, then your phone’s bootloader is now fully unlocked and it can be flashed with custom binaries.
Step 2: Patch the AP Firmware File with Magisk
You will now need to patch the AP firmware file with Magisk, which could be easily done using the Magisk Manager app.
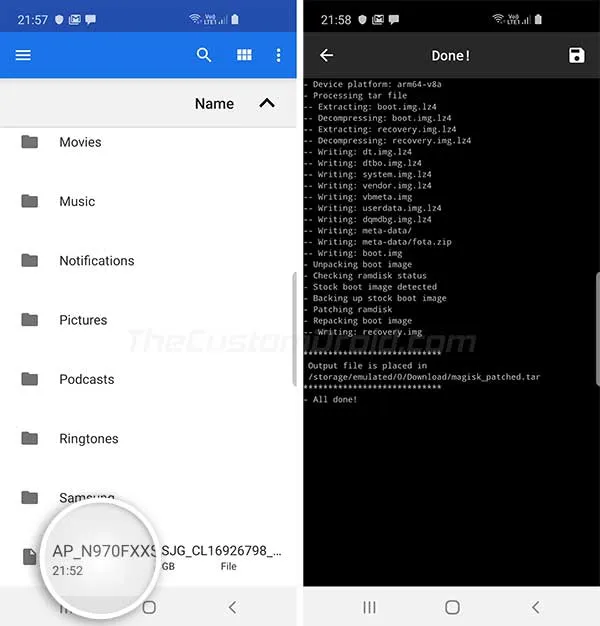
- Copy the extracted AP firmware file (e.g. AP_N97[0 or 5]FXXS1******.tar.md5) to your Note 10’s internal storage.
- Download the latest Magisk Manager APK from here.
- Install the downloaded APK on your Galaxy Note 10/10+.
- Once installed, go to the app drawer and launch “Magisk Manager”.
- Tap on “Install” > “Install” and select the “Select and Patch a File” option.
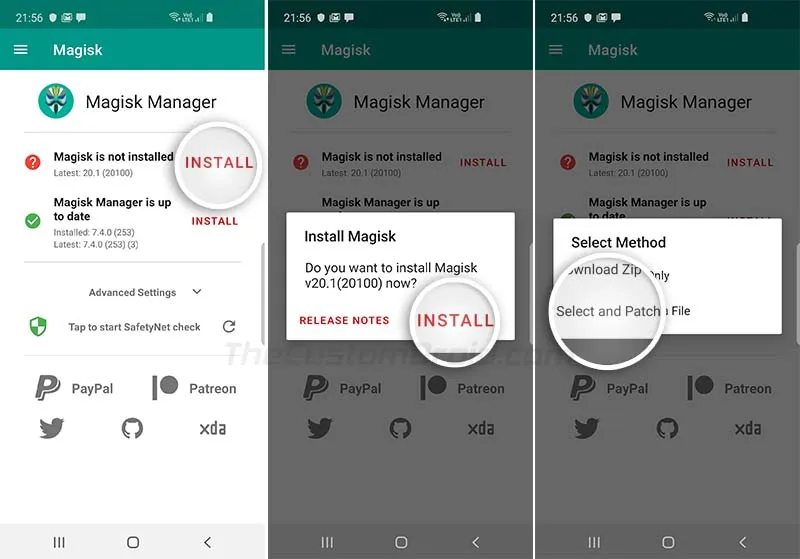
- Navigate to the internal storage and select the AP firmware file that you previously copied to the phone.
- Magisk Manager will now patch the file with the latest version of Magisk.
Once the process finished, the resultant Patched AP firmware file (magisk_patched.tar) will be present in [Internal storage]/Download. Now connect your phone to the PC and copy the file from the “Download” folder of your phone’s internal storage to a suitable location on your PC.
Step 3: Root Galaxy Note 10/Note 10+ by Flashing the Patched AP Firmware
- Power off your Galaxy Note 10/10+ first.
- Connect the phone to the PC via the USB cable, while holding the Volume Up and Volume Down buttons together.
- You shall now see the Warning prompt on the screen.
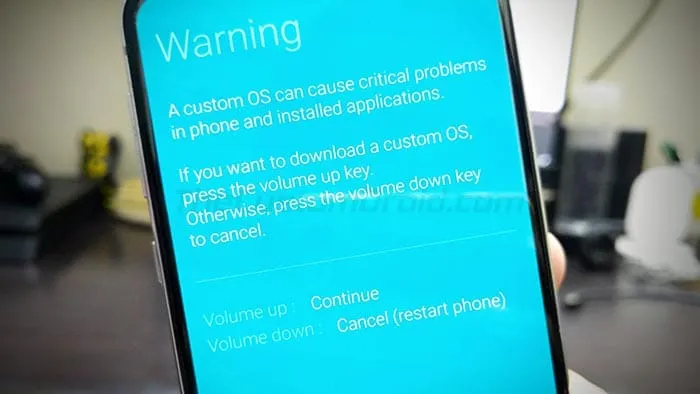
- Press the Volume Up button to confirm and enter Download Mode on your Galaxy Note 10/10+.
- Launch the Odin tool by double-clicking on the “Odin3 V3.13.3.exe” executable file.
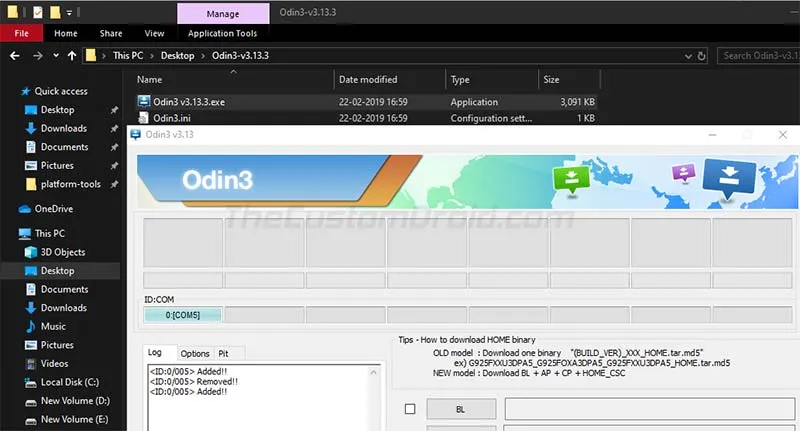
- The Odin tool will detect the phone and the “ID:COM” port will be highlighted.
- Click on the following slot buttons and select the corresponding firmware files:
- BL: Select the firmware file starting “BL”
- AP: Select the Patched AP firmware file (magisk_patched.tar)
- CP: Select the firmware file starting “CP”
- CSC: Select the firmware file starting “HOME_CSC”
- Now, make sure that “Auto Reboot” is unchecked in the “Options” tab of the Odin tool.
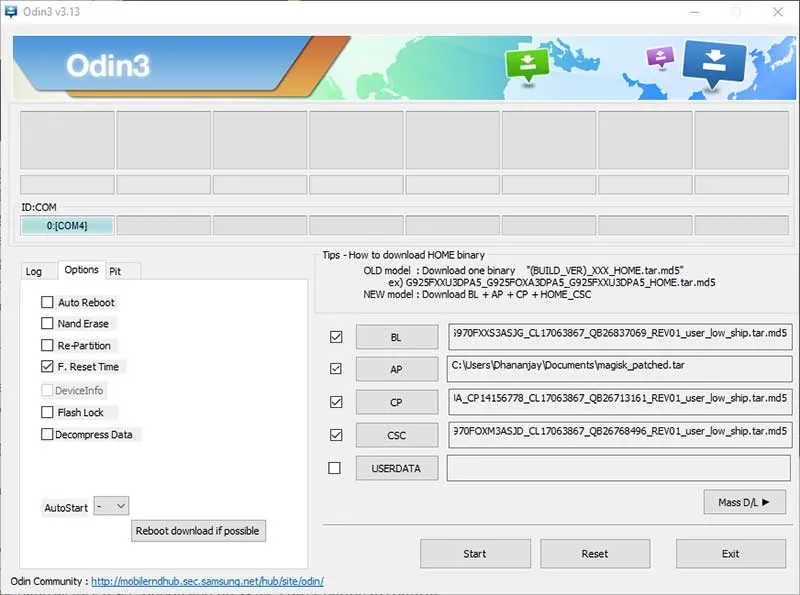
- Finally, click on the “Start” button to flash the files and root Samsung Galaxy Note 10/10+.
Once the flashing process finishes, you should see the “PASS!” message in Odin and your Note 10 should be rooted with Magisk. Wait! Do not reboot your phone into the OS yet. It is very important to perform a factory reset via the stock recovery first and then boot your phone into the OS with Magisk, in a specific way.
Step 4: Perform a Factory Reset & Reboot into System
With your Note 10/10+ in Download Mode, follow the instructions below to boot it into the stock recovery and perform a factory reset.
- Disconnect the phone from PC.
- Now hold the Volume Down and Power keys together to exit Download Mode.
- Very Important: As soon as the screen turns off, quickly release buttons and hold the Volume Up and Power keys. Keep holding the buttons until you see the stock recovery screen.
- Use the Volume keys to highlight the “Wipe data/factory reset” option and press the Power button to confirm.
- Select “Yes” to confirm and factory reset your Note 10/10+.
- Once the process finishes, select the “Reboot system now” option in stock recovery and immediately press the Volume Up and Power keys.
- Release the keys once you see the bootloader warning message on the screen.
Your Samsung Galaxy Note 10 or Note 10+ will now boot into the system (OS) rooted with Magisk. Go through the on-screen instructions and set up your phone. Once done, you shall see the Magisk Manager stub in the app drawer. Simply launch the app and it will install the full Magisk Manager on your phone, followed by an additional setup and reboot.
How to Boot Galaxy Note 10/10+ into Different Modes
Since Magisk is installed to the /recovery partition of your device, from now onwards, you will need to use specific ways to enter the stock recovery, unrooted or rooted system (OS). These are as follows:
- To boot into the unrooted system: Simply power ON your phone using the Power button
- To boot into the rooted system with Magisk: Hold the Volume Up and Power buttons to boot and release all the buttons once you see the bootloader warning message.
- To boot into the Stock Recovery: Hold the Volume Up and Power buttons to boot. Then release the Power button and keep holding the Volume Up once you see the bootloader warning message
Frequently Asked Questions (F.A.Q)
The process can be a bit confusing at first, so we have tried to answer some of the most frequently asked questions below.
- A new update for Magisk is now available, how can I update?
- Easy, just open Magisk Manager, tap on the ‘Update’ button and let it do the rest for you. According to the developer, you can only upgrade Magisk from within the Magisk Manager app, for now.
- After performing this procedure and rooting my Galaxy Note 10/10+, I am not able to use apps like Samsung Pay, Secure Folder, etc. What should I do?
- You were already warned about this before! Rooting/flashing any custom binaries trips the KNOX counter, which means you cannot use any apps that rely on its integrity. And no, restoring the stock firmware will not restore KNOX back to stock.
- Can I flash Magisk using a custom recovery like TWRP to root my Galaxy Note 10/10+?
- No, you cannot. The developer has not yet figured out a way to flash Magisk to the recovery partition in custom recoveries like TWRP.
- A new software update has arrived for my device, can I restore the stock AP tar file or upgrade by simply flashing the full firmware via Odin?
- Restoring the stock AP file will ultimately lead to soft brick. In which case, you will first need to do a full restore via Odin and then factory reset (wipe) the device. So, when an update arrives, simply download the updated stock firmware from SamMobile, SamFrew, or using the SamFirm tool. Once done, grab the new AP firmware file, patch it using Magisk (Step 2) and flash the updated patched AP firmware file on your phone (Step 3). This will allow you to update your phone to the latest firmware without losing root.
I understand that the procedure could be confusing at first, but once you get your head around it, it is actually quite easy. We would like to thank Magisk creator topjohnwu, without whom, rooting the newer Galaxy smartphones would not be possible in the first place.
So, you have just been able to root Samsung Galaxy Note 10/Note 10+ using Magisk. If you have any questions regarding the rooting procedure, please let us know via the comments.
Special thanks to topjohnwu for the instructions!
Comments
Comments are moderated, and published only if they are relevant to the topic and add value in a constructive way. If you disagree with something, please be polite and respectful. We suggest you read our comment policy before commenting.