In this step-by-step guide, you will learn how to unlock the bootloader, install TWRP recovery, disable forced-encryption, and simultaneously root the Infinix Hot 8 (X650C) using Magisk.
Advertisement
If you are thinking of modifying the software on your Infinix Hot 8, then TWRP recovery and Magisk are two important tools that you should have in your arsenal.
The former is a reputed custom recovery that will allow you to flash custom ROMs, mods, kernels, and also take and restore NANDroid backups of the complete OS. The latter on the other hand is what you would use to root your phone, administer root permissions, and install Magisk Modules to gain additional features or perform modifications systemless-ly.
The Infinix Hot 8 may not have its dedicated modding section on the XDA-Developers forum like other major Android OEM devices, but it surely has received its due attention from independent developers on the matter. XDA Senior Member/developer contactwajeeh has been able to compile a fully working build of TWRP recovery for the Infinix Hot 8. With that installed, you can easily flash the Magisk installer ZIP file to root your phone.
Advertisement
This guide will take you through the complete process in a step-by-step manner, starting from unlocking the phone’s bootloader to rooting it.
Page Contents
Before You Begin
- You will need a microSD card compatible with your phone. You will be using it to store the files that need to flash during the process.
- All the data on your phone will be erased during this process, even multiple times. So, make sure that you have taken a full backup of all your important data before you proceed. If you want, you can refer to this detailed guide on how to take full backups.
- Charge your Inifinix Hot 8 to a sufficient battery level. This will prevent your phone from accidentally shutting down in the middle of the process.
- You will be using ADB and Fastboot tools to flash files to your phone. So, download the latest Android SDK platform-tools package from here and install them on your PC using this guide.
- Enable USB Debugging on your Infinix Hot 8 using the instructions in this guide.
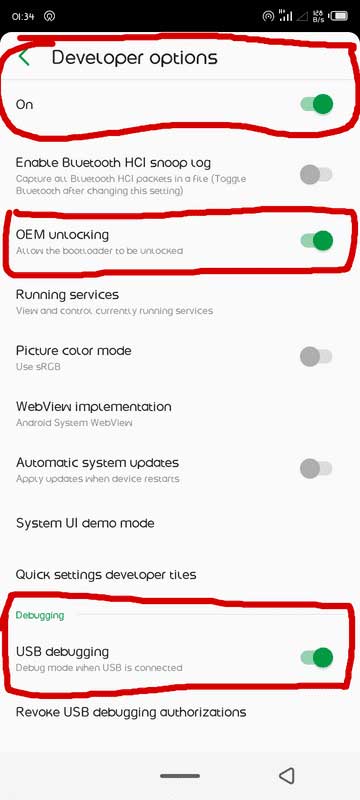
- Also, enable the ‘OEM unlocking’ toggle on your phone.
- When asked to launch the command-line window on your PC, do the following:
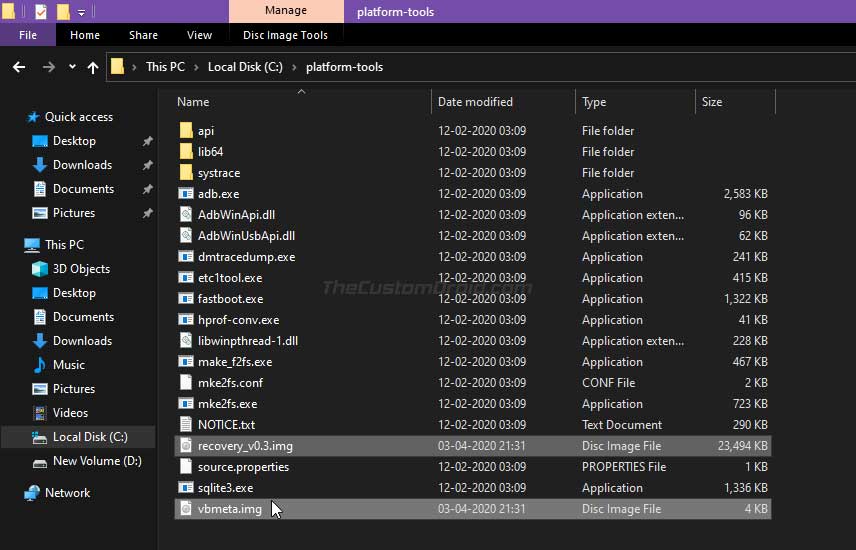
- On Windows PC: Open the folder where the Android platform-tools are installed (e.g. C:\platform-tools). Then hold the SHIFT key of the keyboard and right-click on an empty space inside this folder. Select the ‘Open PowerShell window here’ option.
- On macOS/Linux PC: Open the ‘Terminal’ and change its directory to the folder where the Android platform-tools are installed. For example, if the tools are installed to /Documents/platform-tools, then enter the following command:
cd Documents/platform-tools
- All the commands in this guide are to be preceded with “.\” (dot and backward slash) when entering on a Windows PC, or with “./” (dot and a forward slash) when entering on a macOS/Linux PC.
- It is recommended for your Infinix Hot 8 to be running V224 software or above, as the instructions have been tested against the same. If your phone is running a previous software version, you can update it over-the-air, or download the V224 OTA package from here and sideload it using ADB.
Downloads
Below, you will find links to download all the files that will be required for this procedure.
- TWRP Recovery, modified vbmeta.img, and flashable system mounting zip: Download link
- Flashable Orange State Disabler zip for MediaTek devices: orange_state_disabler_MTK_Only.zip
- Latest Magisk Installer ZIP: Magisk-v20.4.zip
- Forced-Encryption Disabler ZIP: Disable_Dm-Verity_ForceEncrypt_03.04.2020.zip
Note: Download the Mount System, Orange State Disabler, Forced-Encryption Disabler, and Magisk ZIP files and transfer them to your phone’s external storage (microSD) card before you start following the instructions.
Instructions
For your convenience and easy understanding, I have split this guide and its instructions into four major steps.
You will start by first unlocking your phone’s bootloader, which is a prerequisite to install TWRP, root, or perform any sort of modification to the software. The second step is to flash the modified vbmeta.img and install TWRP recovery on your Infinix Hot 8. The third step is to boot into TWRP recovery mode, flash the Orange State Disabler, and format the /data partition. At last, the fourth and final step is to flash the Magisk and Forced-Encryption Disabler ZIP files to disable encryption and simultaneously root your Infninix Hot 8 using Magisk.
Don’t worry, performing these things is way easier than it appears right now. So without any ado, let us start with the instructions.
Step 1: Unlock the Bootloader
First, go to ‘Settings‘ > ‘About phone‘ on your phone. Continuously tap for 7 times on the ‘Build number‘ section to enable the hidden Developer Options. Then go to ‘Settings‘ > ‘Developer options‘ and turn on the toggles next to ‘OEM Unlocking‘ and ‘USB Debugging‘. Make sure to accept any prompts that are shown on the screen while doing this.

Now, make sure that you have the Android platform-tools installed on your PC. Then launch the command-line window (PowerShell or Terminal) in the same folder where the tools are installed. Refer to pointer #4 in the ‘Before you begin’ section above.
Once you have done that, connect your Infinix Hot 8 to the PC using a USB cable. Once again, ensure that USB debugging has been enabled on your phone. Then enter the following command in the PowerShell/Terminal window:
adb reboot bootloader
This command will automatically boot your phone into Fastboot Mode. When it does, you should see a USB icon and ‘FASTBOOT’ text on the phone’s screen. Now execute the following command to ensure that your PC can communicate with your phone over the fastboot interface:
fastboot devices
The command should return your phone’s unique device ID. Now, enter the following command to unlock the bootloader on your Infinix Hot 8:
fastboot flashing unlock
As soon as the command is executed, you should see a confirmation prompt on your phone’s screen. Simply press the Volume Up button to confirm and unlock the bootloader.
Advertisement
With your phone’s bootloader now unlocked, you can now easily install TWRP recovery on it. Do not reboot the phone yet and follow the steps in the next section.
Step 2: Flash Modified VBMeta and Install TWRP Recovery on Infinix Hot 8
Now before you flash TWRP, it is important to flash the modified VBMeta. It is a part of the Android Verified Boot that checks the device partitions for any modifications. Since you will be flashing TWRP to the /recovery partition and modifying it, the stock VBMeta will prevent your phone from booting. To overcome this, the developer has modified the vbmeta.img file to disable these checks.
So, download the modified VBMeta (vbmeta.img) and TWRP recovery (recovery_v0.3.img) image files from the ‘Downloads’ section and copy the files to the same folder where the Android platform-tools are installed (e.g. C:\platform-tools).
Flash the modified vbmeta.img to your Infinix Hot 8 by entering the following command in the PowerShell/Terminal:
fastboot --disable-verity --disable-verification flash vbmeta vbmeta.img
Once done, flash and install TWRP recovery on your Infinix Hot 8 by entering the following command:
fastboot flash recovery recovery_v0.3.img
Step 3: Boot into TWRP Recovery and Format Data Partition
TWRP has been successfully installed on your phone now. Do not disconnect the phone from the PC or reboot it yet. The next thing to do now is to boot your Infinix Hot 8 into TWRP recovery mode. To do this, hold the Volume Up and Power buttons simultaneously. The phone’s screen will turn off and it will reboot. Release the buttons when you see the Infinix boot logo on your phone’s screen.
Advertisement
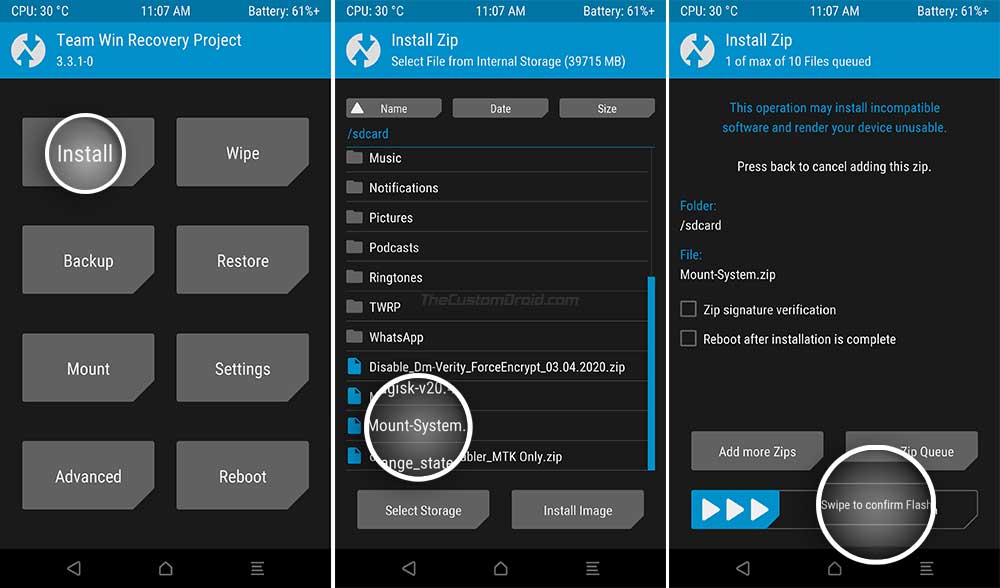
Once your phone is in TWRP recovery, tap on ‘Install‘. Navigate to the storage, select the ‘Mount-System.zip‘ file, and flash it by swiping the button on the screen. This will mount the /system partition for further flashing. Now, go to the ‘Install‘ menu again, select the ‘orange_state_disabler_MTK_Only.zip‘ file and flash it.
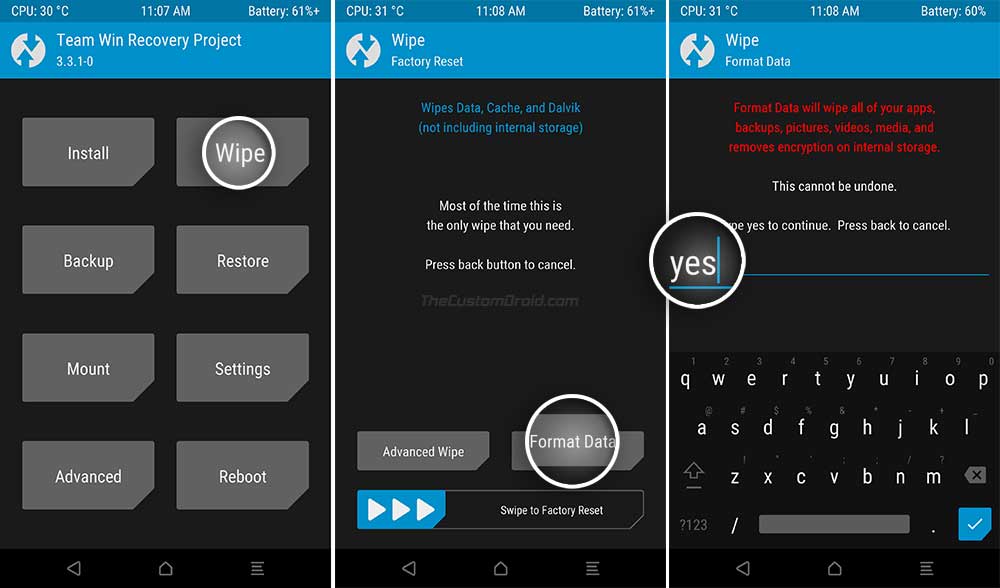
Now, go to ‘Wipe‘ > ‘Format Data‘ and enter ‘yes‘ in the provided field to format the data partition of your phone. This will erase all the data on your phone and decrypt the data partition (including internal storage).
Now, although you have decrypted the data partition, it will automatically encrypt again when you boot. In order to completely disable encryption, you must flash the disabler ZIP file. So, head to the fourth and final step below to do this and to root your Infinix Hot 8.
Step 4: Flash Encryption Disabler and Magisk to Root Infinix Hot 8
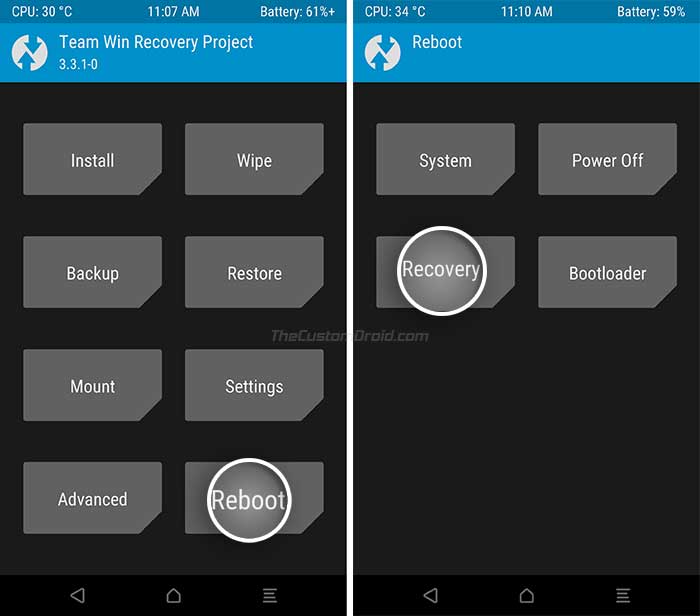
Go to the ‘Reboot‘ menu of TWRP and tap on ‘Recovery‘ to reboot your phone into recovery mode. This has to be done in order for the recovery to properly decrypt and access your phone’s internal storage.
Advertisement
Now, go the ‘Install‘ menu in TWRP, select the ‘Mount-System.zip‘ file and swipe the button to flash it. Again, this will mount your phone’s /system partition in TWRP to flash the rest of the files.
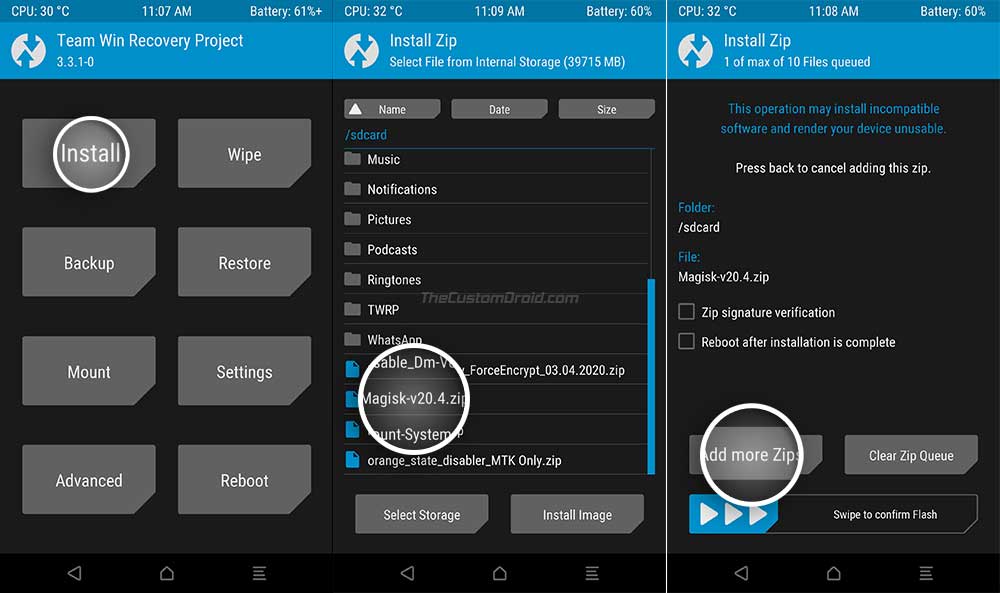
Go back to the TWRP main screen and tap on ‘Install‘ again. Navigate to the storage and select the Magisk Installer ZIP file (Magisk-v20.4.zip), then tap on ‘Add More Zips‘ and select the Encryption Disabler ZIP file (Disable_Dm-Verity_ForceEncrypt_03.04.2020.zip) to add it to the flashing queue.
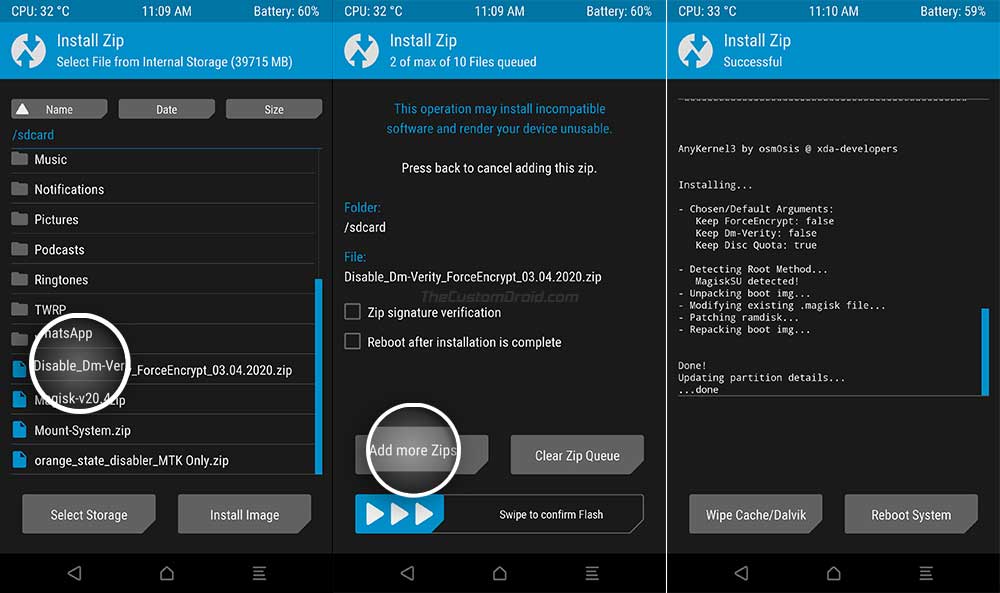
Finally, swipe the button on the screen to flash the files and finally root your Infinix Hot 8 using Magisk. Once the flashing process finishes, tap on the ‘Reboot System‘ button.
Your phone will now boot into the OS and should be rooted with Magisk. To verify that the rooting process was successful, you can go to the app drawer and launch the ‘Magisk Manager’ application. Not only can you use root applications now but you can also install Magisk Modules to gain additional features. Moreover, you can also install mods like ViPER4Android, Dolby Atmos, EdXposed Framework, and much more.
Important: Do not uninstall the pre-installed system apps on your Infinix Hot 8. Doing so will end up your phone in a soft-brick state. You can refer to AshhRED’s safe-to-disable list here and only disable (not uninstall) the apps.
If you face any trouble while performing this procedure or have any questions regarding rooting or other modifications involved, please feel free to ask me by commenting below. I would try my best to help you out.
Source: XDA | A huge thanks XDA Senior Member AshhRED for compiling the guide and for the screenshots! Please visit the thread and thank him.
Comments 9 Comments
Comments are moderated, and published only if they are relevant to the topic and add value in a constructive way. If you disagree with something, please be polite and respectful. We suggest you read our comment policy before commenting.
Can we downgrade from v294 firmware to v172 firmware? Please help my phone is stuck in a bootloop after editing the
build.propfile.Hi Rishav. I am not entirely sure about downgrading. But you can still flash V294 firmware to unbrick the device. The firmware could be downloaded from this link. Once you have downloaded it, please take a look at the “Unbricking” instructions in this thread.
Hi Peter. You’re welcome and thanks for the kind words.
The guide is specifically for the X650C model. I did do a search on XDA and found the following file: https://androidfilehost.com/?fid=4349826312261627248
Now, I do not have any confirmation if it worked or not. But it would be worth a try if you’re willing to. The ZIP file contains both the TWRP recovery image and encryption disabler.
The instructions should be very similar to what we have posted here, except for the VBMeta part. The ZIP also includes a readme file with the corresponding instructions, so you might want to check it out beforehand.
It won’t show any icon etc just type command “adb devices” if it shows ur phone thn u are ready to go
Thanks, Ziyaul for taking the time to comment and assist others. 🙂
Hey you mean this guide works on X650B or the other linked file?
Thanks for your time
Hi Cres. Nobody that I know of on XDA has confirmed that it works on the X650B. But you can try if you want. Just make sure that you download the stock ROM for your X650B from here and keep it with you. If it doesn’t work, you can easily revert to the stock ROM.
Hi Shah Zain, may I know at what step does it get stuck?
I think he should use minimal adb driver