Tweak your Android phone’s audio output for a better, more clear, and boasted sound experience. This tutorial will take you through the concise steps on how to install Dolby Atmos on Android Oreo 8.0 and 8.1 devices.
Advertisement
Android smartphones and tablets come with tons of features, of which many are often specific to an OEM. Well, apart from the hardware and design, the software and the features it offers is what creates a definitive line between various manufacturers and their devices. One such software feature that comes along a few mobile devices is support for “Dolby Atmos” audio. In the Android sub-universe, only a handful of phones come with official support. Recently-announced Samsung Galaxy S9, Nokia 6, and ZTE Axon 7 are a few to name.
But what about the rest? There’s no doubt that having Dolby Atmos on your phone will carve the way to a great audio experience. So here we are, bringing you unofficial Dolby Atmos for Oreo smartphones.
Before you even get to the instructions and install Dolby Atmos on Android Oreo, let us sweep through the basic functionality of this feature/mod.
Advertisement
Page Contents
What is Dolby Atmos Audio?
Dolby Atmos™ is a surround sound technology available across various digital platforms. It works on providing an amazing and powerful mobile entertainment experience. Irrespective of the headphones you use, it works efficiently to fine-tune the audio system. On the mobile devices, the technology makes use of the available two-channel stereo systems and creates the sound in such a way that they reach our ears in a different manner from different directions. It is often known as HRTF (head-related transfer function) or HAAS effect. You may further check this detailed explanation on how this effect is created.
While there are already other established ways to achieve such effects on mobile devices, like ViPER4Android. The only downside is that it is quite technical for a novice user. So operating all the manual audio functions could be confusing. On the other hand, Dolby is more suited for those who want to get the job done easily and efficiently. It is not actually a sound boosting mechanism like ViPER4Android, but a virtual sound effect environment. Over the past few years, it has gained a tremendous amount of recognition among users. Fortunately, Dolby Atmos Oreo support is now available through an easily flashable mod.
Now that you’re aware of the benefits of using Dolby Atmos on Android Oreo, go ahead and walk yourself through the instructions.
Advertisement
Dolby Atmos for Android Oreo – ZTE Axon 7 Port
XDA community comes no short of brilliant members who are constantly dipping their hands in unofficial development to make the software experience much better and more user-oriented. Recognized contributor guitardedhero has ported Dolby Atmos directly from ZTE Axon 7 firmware. Which means devices running Android 8.0 Oreo and Android 8.1 Oreo are now supported.
Advertisement
Below are the major highlights of the Dolby Atmos Android Oreo port:
- Supports two most widely adapted root solutions – SuperSU and Magisk.
- Also supports Enforcing SELinux mode.
- System and system-less installation modes depending upon the root method.
- Hassle-free installation and no deep adjustments needed.
These are just a few perks to mention. Once you install Dolby Atmos on Android Oreo, you will surely feel a huge adjustment and improvement in flowing sound. There are two different Dolby Atmos Oreo flashable ZIPs available – Standard and Unity. The former is what you would use under the normal scenario. The latter is an independent version maintained by XDA community member Zackptg5.
Prerequisites
- Your Android Oreo device must have TWRP recovery installed.
- Important: Take a Nandroid backup of your current ROM.
- Boot into TWRP.
- Go to “Backup” menu and swipe the “Swipe to Backup” button.
- Charge your phone to at least 50-60% battery level to avoid any disruptions during the process.
Once your have fulfilled the requirements, follow the instructions below to install Dolby Atmos on Android Oreo.
Advertisement
Download Dolby Atmos Oreo Flashable ZIP
- Standard: DolbyAtmos_for_Oreo_20180219.zip (guitardedhero)
- Unity: DolbyAtmos_Axon7_Oreo_Unity_2.20.18.zip (Zackptg5)
Keep an eye on the original XDA thread for downloading the latest version as it is available. Dolby Atmos Oreo mod is updated quite frequently, so make sure that you are downloading the latest build.
Steps to Install Dolby Atmos on Android Oreo 8.0 and 8.1
- Download Dolby Atmos Oreo flashable ZIP:
- Connect your phone to the PC using the USB cable.
- Copy the downloaded Dolby Atmos Oreo ZIP package to your device’s storage or SD card.
- Disconnect the device and power it off completely.
- Next, use the special buttons combination to boot into TWRP recovery mode. You can also use the following ADB command with USB debugging enabled:
adb reboot recovery
- In TWRP, go to “Install”.
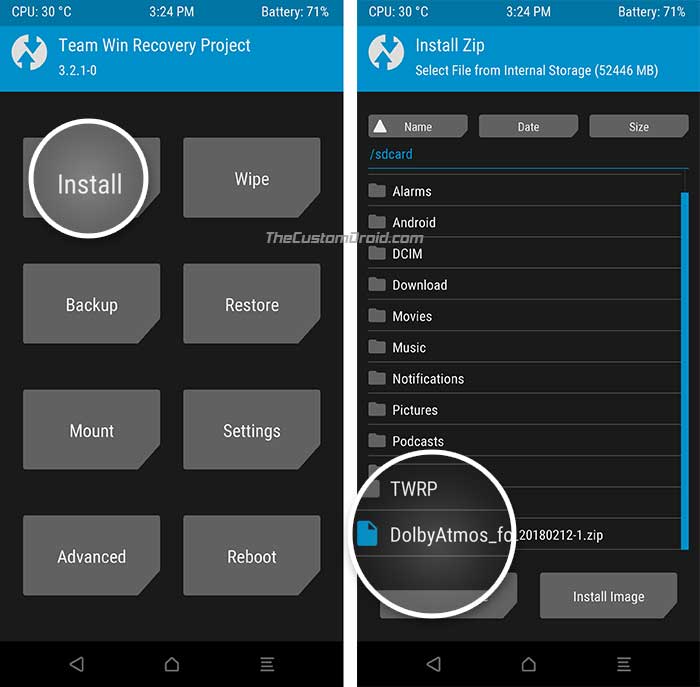
- Go to the location where the installer ZIP is located.
- Select the standard/unity flashable zip file (e.g. DolbyAtmos_for_Oreo_20180219.zip).
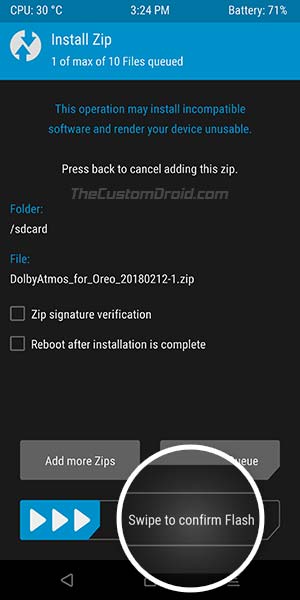
- Finally, swipe the button on the screen to install Dolby Atmos on Android Oreo 8.0 and 8.1.
- The flashing process will finish in a few seconds.
- Then hit the “Reboot System” button.
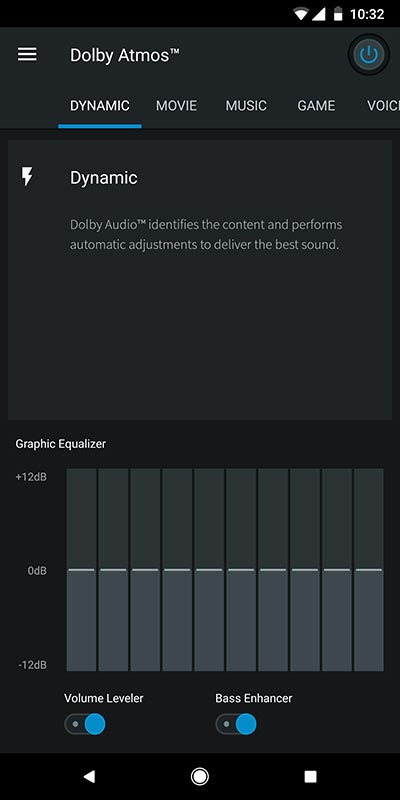
Once your device boots, go to the app drawer and launch the app. Simply tap on the toggle on the top-right to enable. Make sure to keep a check on the original XDA thread for updates and discussions. If you wish to use it along with ViPER4Android, follow the steps here laid down by XDA member docnok63.
So this was the easiest method to install Dolby Atmos on Android Oreo 8.0 and 8.1. If you have any questions, leave them down in the comments.
Comments 2 Comments
Comments are moderated, and published only if they are relevant to the topic and add value in a constructive way. If you disagree with something, please be polite and respectful. We suggest you read our comment policy before commenting.
it is showing dolby is stoped on my aosp extended -v5.5 oreo in redmi note 4
Hi Arjun, please make sure that no other sound mod/equalizer is enabled on the ROM. AOSPExtended includes the Retro Music Player app, check that if the equalizer is enabled.
You can also go to Settings > Apps & notifications > All apps > View System apps, and disable AudioFX/MusicFX if it is present. Then reboot and try again.