The infamous TWRP recovery now officially supports the Google Pixel 3a devices. Through this post, you can download and install TWRP recovery on Google Pixel 3a and Pixel 3a XL easily.
Advertisement
A while ago, we published a tutorial on how to root Google Pixel 3a (XL) using Magisk. The tutorial was simple and didn’t involve installing a custom recovery like TWRP first. However, users who would also like to flash custom ROMs, kernels, or flashable mods would need TWRP recovery installed. Furthermore, it can even be used to flash Magisk for root.
Before you get to the instructions below, there are a few key things you should know of to be able to successfully use TWRP on your Google Pixel 3a/Pixel 3a XL. According to the recovery’s developer/maintainer (ZVNexus) TWRP can only be installed and used on a ROM (Stock or Custom) whose kernel has support for LZMA compression.
The stock kernel that comes preinstalled on the phones does not meet this requirement. And hence, you must first flash a custom kernel with LZMA compression support before you can flash the installer zip to permanently install TWRP on Google Pixel 3a and Pixel 3a XL. Currently, flar2’s ElementalX kernel and stebomurkn420’s Dank Kernel support it.
Advertisement
The whole process is detailed below in a step-by-step manner. So now without any further ado, let’s get to the instructions.
Advertisement
Page Contents
Prerequisites
- You must first unlock your phone’s bootloader. If you haven’t done it yet, then you might want to follow our guide to unlock bootloader on Google Pixel 3a (XL).
- Although installing TWRP will not wipe any data stored on the phone, it is still strongly recommended that you take a full backup.
- You must also install the Android SDK Platform-Tools on your Windows, macOS, or Linux PC. In the instructions below, we will be referring to ‘C:\adb’. This is the location where you have the Android SDK Platform-Tools installed on your PC, should you have followed our guide. If the location is different, then omit it accordingly.
- Ensure that your Pixel device is charged to a sufficient battery level to avoid any sudden shutdowns during the process.
Downloads
- Google Pixel 3a (codename: sargo)
- TWRP Recovery Image: twrp-3.3.1-1-sargo.img
- TWRP Installer zip: twrp-installer-3.3.1-1-sargo.zip
- Google Pixel 3a XL (codename: bonito)
- TWRP Recovery Image: twrp-3.3.1-1-bonito.img
- TWRP Installer zip: twrp-installer-3.3.1-1-bonito.zip
- ElementalX Kernel: ElementalX-P3a-1.05.zip
- Dank Kernel: Sarnito.V80.zip
The files provided above are the latest at the time of publishing this article. We suggest that you check for the latest TWRP recovery available here, for the Google Pixel 3a and here, for the Google Pixel 3a XL.
How to Install TWRP Recovery on Google Pixel 3a and Pixel 3a XL
Installing TWRP recovery on Google Pixel 3a/3a XL is a two-step process since the phones support the A/B partition scheme. The first step is to temporarily boot the TWRP recovery image using fastboot. Following which the second step is to flash a kernel with LZMA compression support and then the TWRP installer zip file to permanently install the custom recovery on the phone.
If the process sounds confusing, don’t worry, it has been covered in full detail below.
Advertisement
Step 1: Temporarily Boot TWRP Recovery Image using Fastboot
- Download TWRP recovery image file for your Google Pixel 3a and Pixel 3a XL
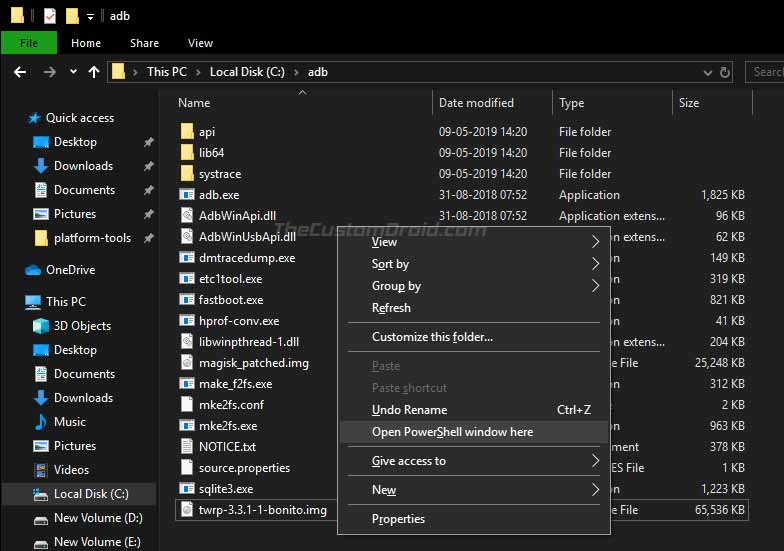
- Copy the download image file to the folder where the ADB and Fastboot binaries are present (e.g. C:\adb)
- Hold the SHIFT key and right-click on an empty space inside this folder
- Select ‘Open PowerShell window here’ from the menu that appears

- Now, power off your phone completely
- Hold the Volume Down and Power buttons together to boot your Google Pixel 3a/Pixel 3a XL into Fastboot Mode
- While your phone is in fastboot mode, connect it to the PC using the USB cable
- Enter the following command in the PowerShell window to ensure that your phone is being successfully detected over fastboot:
fastboot devices
- The command should return a device ID. If it does not, then make sure that you installed the proper USB drivers for your phone
- Now, enter the following command to temporarily boot the TWRP recovery image:
- On Google Pixel 3a:
.\fastboot boot twrp-3.3.1-1-sargo.img
- On Google Pixel 3a XL:
.\fastboot boot twrp-3.3.1-1-bonito.img
- On Google Pixel 3a:
As soon as the command is executed, your phone will boot into TWRP recovery mode and you should see the ‘Unmodified System Partition’ message. Simply swipe the ‘Swipe to Allow Modifications’ button. Also, if you have a lockscreen PIN/Password set, you will be prompted to enter it so that TWRP can successfully decrypt the /data partition of the phone.
Now that you have successfully booted into TWRP, follow the next step to flash the kernel and permanently install TWRP recovery on Google Pixel 3a/Pixel 3a XL.
Advertisement
Step 2: Flash Kernel with LZMA Compression Support and TWRP Installer ZIP
- Download the Kernel with LZMA compression support and TWRP Installer zip files on the PC
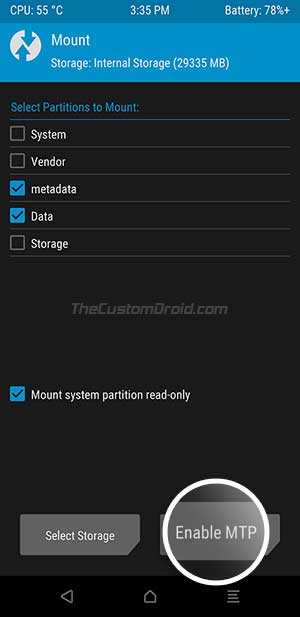
- Go to the ‘Mount’ menu in TWRP and tap on the ‘Enable MTP’ button

- Connect your Google Pixel 3a (XL) to the PC using the USB cable
- Transfer the downloaded Kernel and TWRP Installer zip files to the phone’s internal storage
- Disconnect the phone from the PC
- Go to the main menu of the TWRP recovery on your Pixel 3a/Pixel 3a XL
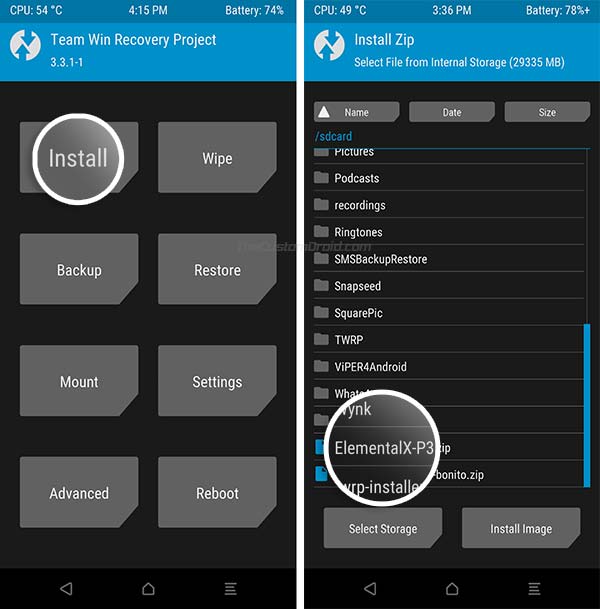
- Press the ‘Install’ button and navigate to the phone’s internal storage (/sdcard)

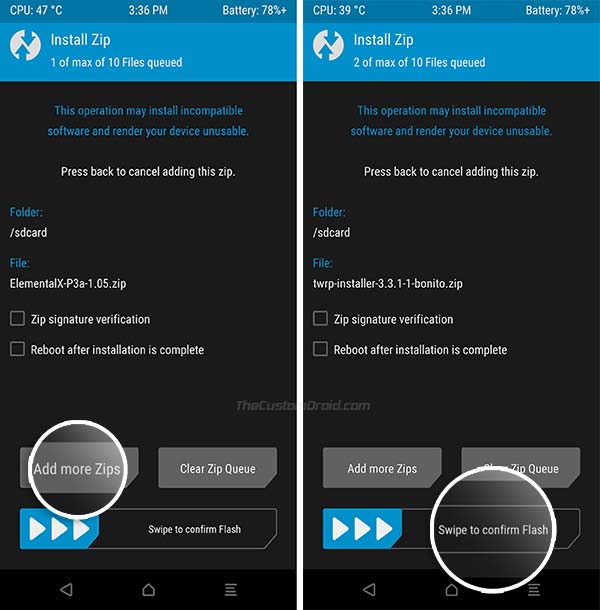
- First, select the Kernel zip file (e.g. ElementalX-P3a-1.05.zip if you chose ElementalX kernel) and then tap on the ‘Add More ZIPs’ button
- Now select the TWRP Installer zip file

- Finally, swipe the button on the bottom of the screen to flash the kernel and permanently install TWRP on your Google Pixel 3a/Pixel 3a XL.
Optional: Want to root your Google Pixel 3a/Pixel 3a XL using TWRP? Just download the latest Magisk Installer zip and flash it via TWRP recovery.
Once the flashing process finishes, tap on the ‘Reboot System’ button to boot your Pixel 3a device back into the OS.
Now that you have installed TWRP, you can go ahead and use it to flash custom ROMs, kernels, mods like ViPER4Android, Dolby Atmos, etc. Note that you will need to re-flash the Installer zip file every time you flash a custom ROM or kernel to retain TWRP recovery.
So, this was our step-by-step guide on how to install TWRP recovery on Google Pixel 3a (XL) easily. If you have any doubts or questions regarding the procedure mentioned here, please feel free to drop a comment below.