Moto G7/G7 Plus Guide: Unlock Bootloader, Install TWRP, and Root with Magisk
In this guide, we will show you how to unlock the bootloader, install TWRP recovery, and subsequently root the Moto G7 and Moto G7 Plus using Magisk.

On this page
In this guide, we will show you how to unlock the bootloader, install TWRP recovery, and subsequently root the Moto G7 and Moto G7 Plus using Magisk. The instructions will work on any Moto G7 or G7 Plus running Android 10 and Android 9 Pie.
Motorola Android devices, like the Moto G7 and G7 Plus, in this case, aren’t best known for their software. The manufacturer is long known for irregular and delayed support when it comes to software updates. Also, the stock firmware that comes pre-installed on these phones isn’t a stronghold when it comes to customization. It is all but basically stock AOSP software with Motorola’s proprietary apps sitting atop.
And that’s where things like custom ROMs and rooting could help. If you’re not a fan of the stock software, you have a variety of custom ROMs to try that offers a lot of features for customizations and also the latest Android security patches.
On the other hand, if you do wish to stick with the clean stock software, you could root your Moto G7 and have the benefits of apply modifications to the software systemless-ly with Magisk. Further, Magisk can also help you hide root from certain applications that might stop working if root access is detected, along with other features.
But to do either of these things, you must first have a custom recovery such as TWRP installed on your phone. The good news is, TWRP for both the Moto G7 and Moto G7 Plus is now available. Thanks to the respective XDA developers Alberto97 and Jleeblanch.
Before everything, you must also unlock your Motorola device’s bootloader, which is quite easy. The instructions below will take you through the complete process in a comprehensive manner.
- Note: If you’re looking for the instructions for Moto G7 Power, then refer to this tutorial instead.
Requirements
Before you head over to the instructions, make sure that you fulfill all the requirements stated below.
- Take a Backup: Unlocking the bootloader will erase all the data stored on your phone, including that on the internal storage. So, make sure that you take a complete backup of all your important files and data before you begin. You could also refer to our guide for this purpose. Installing TWRP and rooting will not wipe any data, however, it is strongly recommend taking a backup in case anything goes wrong.
- Install Motorola USB drivers: If you’re going to operate on a Windows computer, make sure that you download and install the latest Motorola USB drivers as well. Mac/Linux users should not need any additional drivers at all.
- Download Android SDK platform-tools: Windows | macOS | Linux.
- Set up Android SDK platform-tools: Once downloaded, extract the contents of the ZIP package to get the “platform-tools” folder. This folder should contain the binary files of the required tools, such as ADB and Fastboot. For easier access and for our demonstration as well, we suggest you move the “platform-tools” folder to the root of the C:\ drive if you’re using a Windows computer. If you’re using a macOS/Linux PC, move the “platform-tools” inside the “Documents” directory.
- Launch command-line window on the PC: Once the SDK tools are installed, launch the command window inside the Platform-Tools folder. Here’s a quick guide on how to do it.
Tip for command-line usage: When entering the commands while following the instructions, make sure to prepend them with a dot and backslash [.\] in Windows PowerShell or a dot and forward slash [./] on Mac/Linux Terminal.
Note: If you’re experienced enough, you could also add these tools to your computer’s PATH.
Important requirement: On the regular Moto G7, TWRP can only decrypt the internal storage after the permanent installation, that is after you finish up with this guide. So, you will require external storage (micro SD card) for storing the TWRP installer and Magisk ZIP files for this process. (Thanks to Mark for the tip!)
Downloads
Below, you will find the links to download all the files you’ll require while following the instructions.
- TWRP for Moto G7 (codename: river)
- Recovery image: twrp-3.5.2_10-0-river.img
- Installer ZIP: twrp-installer-3.5.2_10-0-river.zip
- TWRP for Moto G7 Plus (codename: lake)
- Recovery image: twrp-3.5.0-lake-v2.img
- Installer ZIP: twrp-installer-3.5.0-lake-v2.zip
- Latest Magisk installer ZIP package: Magisk v23 or newer available on the official Github repository
Important Note: The bootloader on the regular Moto G7 (river) only comes installed to the active slot. So, DO NOT SWITCH SLOTS until you flash the “copy-partitions-AB.zip” file. This file will automatically install a copy of the bootloader from the active slot (say “a”) to the inactive slot (say “b”).
The instructions for the same have been combined with the rooting instructions (Step #3) of this tutorial.
While we will try our best to keep the download links up-to-date with the latest TWRP builds, we suggest that you always make sure that you check for the latest version for Moto G7 (river) here and Moto G7 Plus (lake) here.
Instructions
To help you get a better understanding of the whole process, we have split the instructions into three major steps.
Step 1: Unlock the Phone’s Bootloader
Like most other Android devices, the bootloader on your device is locked and will prevent flashing the device partitions. So, the first step is to unlock the bootloader on your Moto G7/Moto G7 Plus using the official method provided by Motorola itself. To do this, follow the instructions as follows:
-
Power off your phone first. Then hold the Volume Down and Power keys together to enter Bootloader Mode.
-
Once in Bootloader Mode, connect your Moto G7/G7 Plus to the computer using the USB cable.
-
Enter the following command in the command-line to retrieve your phone’s unique unlock data:
fastboot oem get_unlock_data -
The command should return a string in a similar format as shown below:
-
On Windows:
(bootloader) 0A40040192024205#4C4D3556313230 (bootloader) 30373731363031303332323239#BD00 (bootloader) 8A672BA4746C2CE02328A2AC0C39F95 (bootloader) 1A3E5#1F53280002000000000000000 (bootloader) 0000000 -
On MacOS/Linux:
INFO0A40040192024205#4C4D3556313230
INFO30373731363031303332323239#BD00
INFO8A672BA4746C2CE02328A2AC0C39F95
INFO1A3E5#1F53280002000000000000000
INFO0000000
-
-
Copy the 5 lines of the string shown in the ouput to a text editor on your computer. Then remove all line breaks and whitespaces to convert it into a one-line string, like so:
0A40040192024205#4C4D355631323030373731363031303332323239#BD008A672BA4746C2CE02328A2AC0C39F951A3E5#1F532800020000000000000000000000 -
Now that you have the required unlock data, visit the official Motorola bootloader unlocking portal in your PC’s browser. It’s worth going through the information published on the page. Once you have gone through it, scroll down to the very bottom and click “NEXT”.
-
The portal will now prompt you to login with your Motorola account. Once you have logged in, it should show you the next step as “GET YOUR DEVICE ID & UNLOCK CODE”.
-
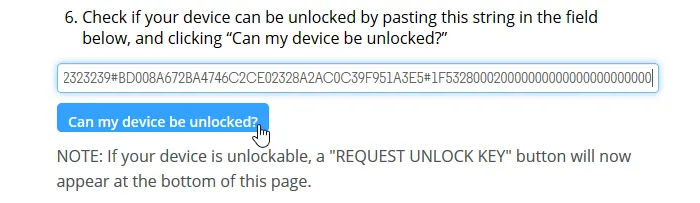
Scroll through the page and find pointer #6 where it asks you to enter the device unlock key. Copy your Moto G7’s unlock key (retrieved in pointer #5 above), paste it in the input field, and click the blue-colored “Can my device be unlocked?” button.
-
After the key is validated, scroll down further through the page and select “I Agree” to agree to Motorola’s terms. Finally, click the blue “REQUEST UNLOCK KEY”.
-
You should now receive your phone’s unique bootloader unlock key in your registered email address.
-
Now, enter the following command to finally unlock the bootloader of your Moto G7/Moto G7 Plus:
fastboot oem unlock <bootloader-unlock-key> -
You will have to replace “<bootloader-unlock-key>” with the unique 20-character unlock key you received in your email.
That’s it! Your phone’s bootloader should now be fully unlocked. You should now boot the phone and set it up.
Step 2: Install TWRP Recovery
With the bootloader now unlocked, the second step is to install TWRP recovery on your Moto G7/Moto G7 Plus.
Since the phone supports the new A/B partition scheme, installing TWRP on it is a two-step process. You will first need to temporarily boot the recovery image using Fastboot and then install the recovery installer ZIP package through the booted recovery itself.
- First, download the TWRP recovery image and installer ZIP file for your Moto G7 or Moto G7 Plus.
- Copy the TWRP recovery image file inside the ‘platform-tools’ folder on your computer.
- Connect your phone to the PC and enable the File Transfer mode.
- Copy the TWRP installer ZIP file to your phone’s internal storage.
- If you’re using the regular G7, the recovery ZIP needs to be copied to the external storage (micro SD card) since TWRP will not be able to decrypt the internal storage initially.
- Now, power off your phone and boot it into Bootloader Mode by holding the Volume Down and Power keys together.
- Connect the phone to the PC using the USB cable while it is in Bootloader Mode.
- Now, enter the command below to temporarily boot the TWRP recovery image:
-
On Moto G7:
twrp-3.5.2_10-0-river.img -
On Moto G7 Plus:
twrp-3.5.0-lake-v2.img
-
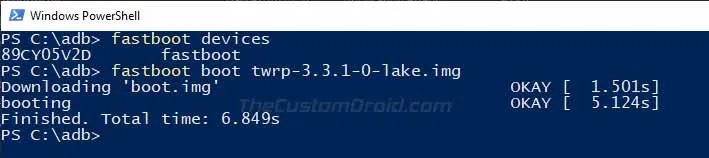
- Your phone should now reboot and enter the TWRP recovery mode.
- Press the “Install” button and navigate to the location where the TWRP recovery ZIP was copied and select it.
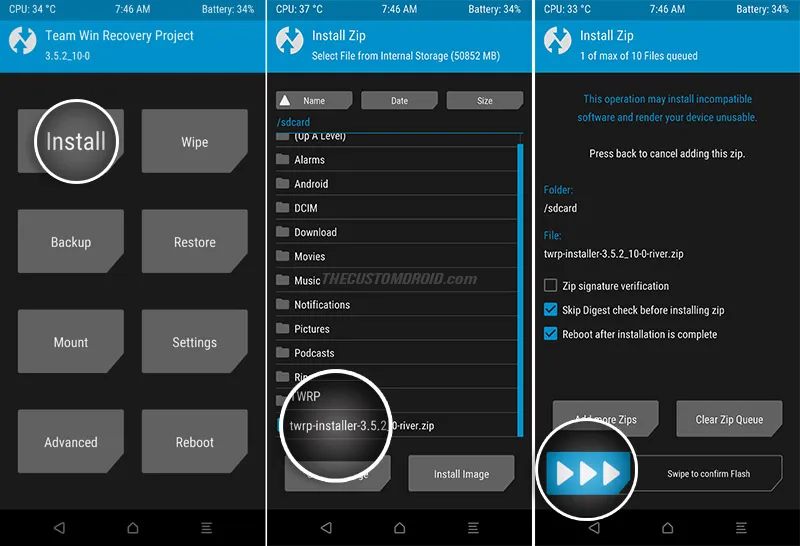
- Finally, swipe the button to permanently install TWRP recovery on your Moto G7/Moto G7 Plus.
Do not reboot your phone into the system yet. Permanently installing TWRP modifies the boot partition and will trigger DM-Verity when the device boots. And thus cause a boot loop. To fix this, head to the next section to flash the Magisk installer zip, which will deal with DM-Verity on its own.
Step 3: Root Moto G7/G7 Plus using Magisk
With TWRP installed, the third and last step is to flash the Magisk installer zip and finally root your Moto G7/G7 Plus.
- First, download the latest Magisk installer ZIP file (Magisk-v21.2.zip) on your computer.
- For the regular Moto G7, also download the additional “copy-partitions-AB.zip” file.
- Then connect your phone to the computer using the USB cable.
- Go to the “Mount” menu in TWRP and press the “Enable MTP” button. If it shows “Disable MTP” instead, then MTP is already enabled.
- Copy the Magisk ZIP to your phone’s storage.
- For the regular Moto G7, also copy the “copy-partitions-AB.zip” file along with the Magisk ZIP. Again, these files should be copied to the external storage (micro SD card).
- Once the files have been transferred, disconnect the phone from the PC.
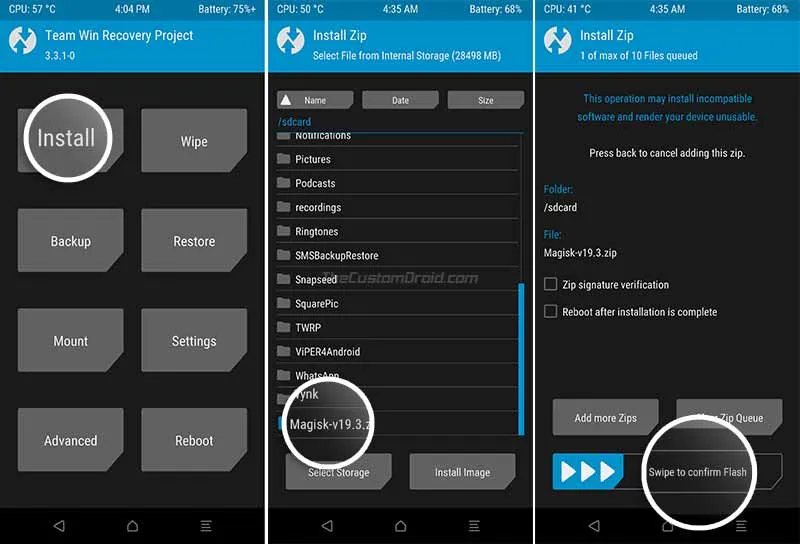
- Go to the TWRP main screen and press “Install”.
- Navigate to the storage and select the “Magisk-v21.2.zip” file.
- For regular Moto G7 only: Tap on the “Add more Zips” button and select the “copy-partitions-AB.zip” file to add it to the flashing queue.
- Finally, swipe the button on the bottom of the screen to install Magisk and root your Moto G7/Moto G7 Plus.
Once the flashing process finishes, hit the “Reboot System” button.
Wrapping Up
Your Moto G7/G7 Plus should now be rooted using Magisk. To verify, you can launch the Magisk app on your phone and check the installation status. You can also use the app to manage superuser permissions for apps that require root and install Magisk Modules for additional features. With root access, you can further install famous mods like EdXposed Framework, LSPosed Franework, Dolby Atmos, and ViPER4Android.
With Magisk, you also get the ability to hide root on a per-app basis. This should help you run banking & security apps, along with games like Pokemon Go on your rooted phone.
You could also verify the SafetyNet status to see if it passes the CTS Profile and BasicIntegrity checks. It’s worth noting that Google has rolled out hardware-based SafetyNet attestation. Fortunately, you can install the Universal SafetyNet Fix module to fully bypass hardware-based SN attestation.
There you go! By now, you have learned how to unlock the bootloader, install TWRP custom recovery, and simultaneously root the Moto G7/G7 Plus using Magisk. If you face any issues while performing the instructions or have any questions regarding the topic, let us know.
Comments
Comments are moderated, and published only if they are relevant to the topic and add value in a constructive way. If you disagree with something, please be polite and respectful. We suggest you read our comment policy before commenting.