In this guide, we will show you how to unlock the bootloader, install TWRP recovery, and subsequently root the Moto G7 and Moto G7 Plus using Magisk. The instructions will work on any Moto G7 or G7 Plus running Android 10 and Android 9 Pie.
Advertisement
Motorola Android devices, like the Moto G7 and G7 Plus, in this case, aren’t best known for their software. The manufacturer is long known for irregular and delayed support when it comes to software updates. Also, the stock firmware that comes pre-installed on these phones isn’t a stronghold when it comes to customization. It is all but basically stock AOSP software with Motorola’s proprietary apps sitting atop.
And that’s where things like custom ROMs and rooting could help. If you’re not a fan of the stock software, you have a variety of custom ROMs to try that offers a lot of features for customizations and also the latest Android security patches.
On the other hand, if you do wish to stick with the clean stock software, you could root your Moto G7 and have the benefits of apply modifications to the software systemless-ly with Magisk. Further, Magisk can also help you hide root from certain applications that might stop working if root access is detected, along with other features.
Advertisement
But to do either of these things, you must first have a custom recovery such as TWRP installed on your phone. The good news is, TWRP for both the Moto G7 and Moto G7 Plus is now available. Thanks to the respective XDA developers Alberto97 and Jleeblanch.
Before everything, you must also unlock your Motorola device’s bootloader, which is quite easy. The instructions below will take you through the complete process in a comprehensive manner.
- Note: If you’re looking for the instructions for Moto G7 Power, then refer to this tutorial instead.
Page Contents
Requirements
Before you head over to the instructions, make sure that you fulfill all the requirements stated below.
- Take a Backup: Unlocking the bootloader will erase all the data stored on your phone, including that on the internal storage. So, make sure that you take a complete backup of all your important files and data before you begin. You could also refer to our guide for this purpose.
Installing TWRP and rooting will not wipe any data, however, it is strongly recommend taking a backup in case anything goes wrong. - Install Motorola USB drivers: If you’re going to operate on a Windows computer, make sure that you download and install the latest Motorola USB drivers as well. Mac/Linux users should not need any additional drivers at all.
- Download Android SDK platform-tools: Windows | macOS | Linux.
- Set up Android SDK platform-tools: Once downloaded, extract the contents of the ZIP package to get the “platform-tools” folder. This folder should contain the binary files of the required tools, such as ADB and Fastboot. For easier access and for our demonstration as well, we suggest you move the “platform-tools” folder to the root of the C:\ drive if you’re using a Windows computer. If you’re using a macOS/Linux PC, move the “platform-tools” inside the “Documents” directory.
- Launch command-line window on the PC: Once the SDK tools are installed, launch the command window inside the Platform-Tools folder. Here’s a quick guide on how to do it.
Tip for command-line usage: When entering the commands while following the instructions, make sure to prepend them with a dot and backslash [.\] in Windows PowerShell or a dot and forward slash [./] on Mac/Linux Terminal.
Note: If you’re experienced enough, you could also add these tools to your computer’s PATH.
Important requirement: On the regular Moto G7, TWRP can only decrypt the internal storage after the permanent installation, that is after you finish up with this guide. So, you will require external storage (micro SD card) for storing the TWRP installer and Magisk ZIP files for this process. (Thanks to Mark for the tip!)
Downloads
Below, you will find the links to download all the files you’ll require while following the instructions.
Advertisement
- TWRP for Moto G7 (codename: river)
- Recovery image: twrp-3.5.2_10-0-river.img
- Installer ZIP: twrp-installer-3.5.2_10-0-river.zip
- TWRP for Moto G7 Plus (codename: lake)
- Recovery image: twrp-3.5.0-lake-v2.img
- Installer ZIP: twrp-installer-3.5.0-lake-v2.zip
- Latest Magisk installer ZIP package: Magisk v23 or newer available on the official Github repository
Important Note: The bootloader on the regular Moto G7 (river) only comes installed to the active slot. So, DO NOT SWITCH SLOTS until you flash the “copy-partitions-AB.zip” file. This file will automatically install a copy of the bootloader from the active slot (say “a”) to the inactive slot (say “b”).
The instructions for the same have been combined with the rooting instructions (Step #3) of this tutorial.
While we will try our best to keep the download links up-to-date with the latest TWRP builds, we suggest that you always make sure that you check for the latest version for Moto G7 (river) here and Moto G7 Plus (lake) here.
Instructions
To help you get a better understanding of the whole process, we have split the instructions into three major steps.
Step 1: Unlock the Phone’s Bootloader
Like most other Android devices, the bootloader on your device is locked and will prevent flashing the device partitions. So, the first step is to unlock the bootloader on your Moto G7/Moto G7 Plus using the official method provided by Motorola itself. To do this, follow the instructions as follows:
- Power off your phone first. Then hold the Volume Down and Power keys together to enter Bootloader Mode.
- Once in Bootloader Mode, connect your Moto G7/G7 Plus to the computer using the USB cable.
- Enter the following command in the command-line to retrieve your phone’s unique unlock data:
fastboot oem get_unlock_data - The command should return a string in a similar format as shown below:
- On Windows:
(bootloader) 0A40040192024205#4C4D3556313230 (bootloader) 30373731363031303332323239#BD00 (bootloader) 8A672BA4746C2CE02328A2AC0C39F95 (bootloader) 1A3E5#1F53280002000000000000000 (bootloader) 0000000 - On MacOS/Linux:
INFO0A40040192024205#4C4D3556313230
INFO30373731363031303332323239#BD00
INFO8A672BA4746C2CE02328A2AC0C39F95
INFO1A3E5#1F53280002000000000000000
INFO0000000
- On Windows:
- Copy the 5 lines of the string shown in the ouput to a text editor on your computer. Then remove all line breaks and whitespaces to convert it into a one-line string, like so:
0A40040192024205#4C4D355631323030373731363031303332323239#BD008A672BA4746C2CE02328A2AC0C39F951A3E5#1F532800020000000000000000000000 - Now that you have the required unlock data, visit the official Motorola bootloader unlocking portal in your PC’s browser. It’s worth going through the information published on the page. Once you have gone through it, scroll down to the very bottom and click “NEXT”.
- The portal will now prompt you to login with your Motorola account. Once you have logged in, it should show you the next step as “GET YOUR DEVICE ID & UNLOCK CODE”.
- Scroll through the page and find pointer #6 where it asks you to enter the device unlock key. Copy your Moto G7’s unlock key (retrieved in pointer #5 above), paste it in the input field, and click the blue-colored “Can my device be unlocked?” button.
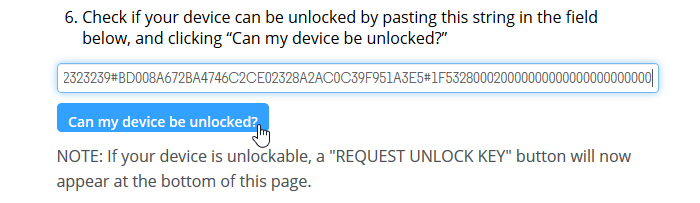
- After the key is validated, scroll down further through the page and select “I Agree” to agree to Motorola’s terms. Finally, click the blue “REQUEST UNLOCK KEY”.
- You should now receive your phone’s unique bootloader unlock key in your registered email address.
- Now, enter the following command to finally unlock the bootloader of your Moto G7/Moto G7 Plus:
fastboot oem unlock <bootloader-unlock-key> - You will have to replace “<bootloader-unlock-key>” with the unique 20-character unlock key you received in your email.
That’s it! Your phone’s bootloader should now be fully unlocked. You should now boot the phone and set it up.
Step 2: Install TWRP Recovery
With the bootloader now unlocked, the second step is to install TWRP recovery on your Moto G7/Moto G7 Plus.
Advertisement
Since the phone supports the new A/B partition scheme, installing TWRP on it is a two-step process. You will first need to temporarily boot the recovery image using Fastboot and then install the recovery installer ZIP package through the booted recovery itself.
- First, download the TWRP recovery image and installer ZIP file for your Moto G7 or Moto G7 Plus.
- Copy the TWRP recovery image file inside the ‘platform-tools’ folder on your computer.
- Connect your phone to the PC and enable the File Transfer mode.
- Copy the TWRP installer ZIP file to your phone’s internal storage.
- If you’re using the regular G7, the recovery ZIP needs to be copied to the external storage (micro SD card) since TWRP will not be able to decrypt the internal storage initially.
- Now, power off your phone and boot it into Bootloader Mode by holding the Volume Down and Power keys together.
- Connect the phone to the PC using the USB cable while it is in Bootloader Mode.
- Now, enter the command below to temporarily boot the TWRP recovery image:
- On Moto G7:
twrp-3.5.2_10-0-river.img - On Moto G7 Plus:
twrp-3.5.0-lake-v2.img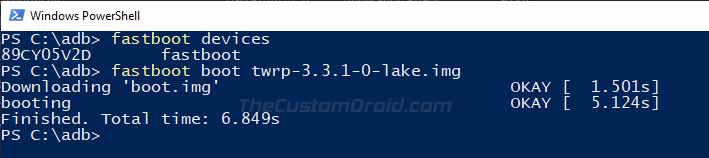
- On Moto G7:
- Your phone should now reboot and enter the TWRP recovery mode.
- Press the “Install” button and navigate to the location where the TWRP recovery ZIP was copied and select it.
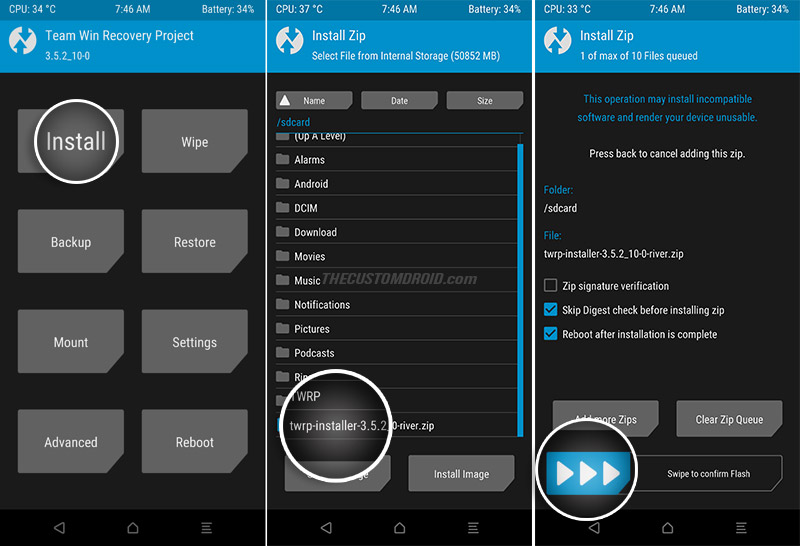
- Finally, swipe the button to permanently install TWRP recovery on your Moto G7/Moto G7 Plus.
Do not reboot your phone into the system yet. Permanently installing TWRP modifies the boot partition and will trigger DM-Verity when the device boots. And thus cause a boot loop. To fix this, head to the next section to flash the Magisk installer zip, which will deal with DM-Verity on its own.
Step 3: Root Moto G7/G7 Plus using Magisk
With TWRP installed, the third and last step is to flash the Magisk installer zip and finally root your Moto G7/G7 Plus.
- First, download the latest Magisk installer ZIP file (Magisk-v21.2.zip) on your computer.
- For the regular Moto G7, also download the additional “copy-partitions-AB.zip” file.
- Then connect your phone to the computer using the USB cable.
- Go to the “Mount” menu in TWRP and press the “Enable MTP” button. If it shows “Disable MTP” instead, then MTP is already enabled.
- Copy the Magisk ZIP to your phone’s storage.
- For the regular Moto G7, also copy the “copy-partitions-AB.zip” file along with the Magisk ZIP. Again, these files should be copied to the external storage (micro SD card).
- Once the files have been transferred, disconnect the phone from the PC.
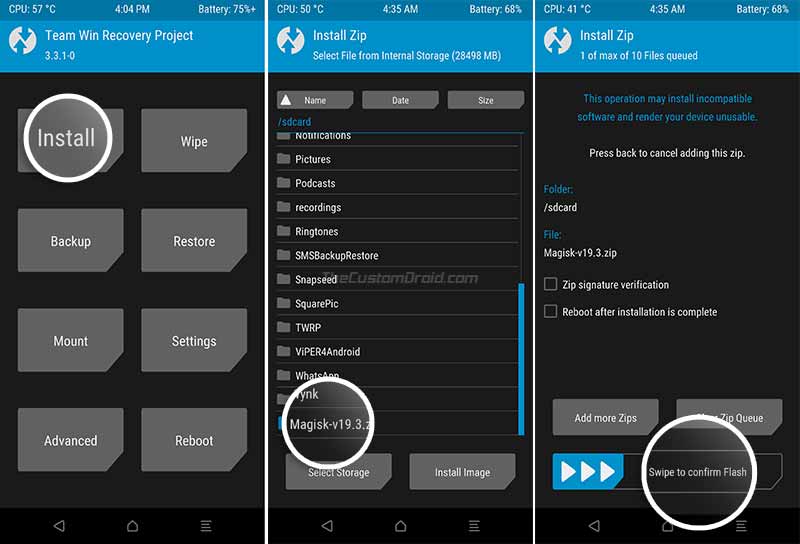
- Go to the TWRP main screen and press “Install”.
- Navigate to the storage and select the “Magisk-v21.2.zip” file.
- For regular Moto G7 only: Tap on the “Add more Zips” button and select the “copy-partitions-AB.zip” file to add it to the flashing queue.
- Finally, swipe the button on the bottom of the screen to install Magisk and root your Moto G7/Moto G7 Plus.
Once the flashing process finishes, hit the “Reboot System” button.
Wrapping Up
Your Moto G7/G7 Plus should now be rooted using Magisk. To verify, you can launch the Magisk app on your phone and check the installation status. You can also use the app to manage superuser permissions for apps that require root and install Magisk Modules for additional features. With root access, you can further install famous mods like EdXposed Framework, LSPosed Franework, Dolby Atmos, and ViPER4Android.
Advertisement
With Magisk, you also get the ability to hide root on a per-app basis. This should help you run banking & security apps, along with games like Pokemon Go on your rooted phone.
You could also verify the SafetyNet status to see if it passes the CTS Profile and BasicIntegrity checks. It’s worth noting that Google has rolled out hardware-based SafetyNet attestation. Fortunately, you can install the Universal SafetyNet Fix module to fully bypass hardware-based SN attestation.
There you go! By now, you have learned how to unlock the bootloader, install TWRP custom recovery, and simultaneously root the Moto G7/G7 Plus using Magisk. If you face any issues while performing the instructions or have any questions regarding the topic, let us know.
Comments 69 Comments
Comments are moderated, and published only if they are relevant to the topic and add value in a constructive way. If you disagree with something, please be polite and respectful. We suggest you read our comment policy before commenting.
Hello, I have a regular Moto G7, and am stuck at the end of Step 2.
After running the latest version of twrp through powershell (twrp-3.5.2_10-0-river), I select Install Recovery Ramdisk, access the external SD card, select the TWRP file I copied to the SD card, and get the following dialog;
Unpacking Boot…
Backing up Boot…
Error opening: ‘ ‘ (No such file or directory)
I can’t find anyone else who has had this specific issue, so I am at a loss of what to do. Thanks in advance.
I figured it out. For anyone else running into the same issue;
After booting into twrp through powershell, I installed the installer zip instead of the recovery image, and that seemed to do the trick. After that the process went without a hitch.
Thanks for the tip, Paul. I suppose the good old installer ZIP way is still a more reliable way.
Moreover, the Install Recovery Ramdisk option seemed to be missing on the Moto G7 Plus, at least on the previous builds.
I have updated the instructions to use the installer ZIP method instead.
So, When setting up twrp, i dont have “Install Recovery Ramdisk” as an option (in advanced), also my folders are all encrypted and stuff (only when in twrp).
Jaysen, it’s a mistake on my part. I completely forgot to update the tutorial. The option does not exist in TWRP build for G7 Plus.
Not to worry, there’s an alternative way as well. Here’s what you will need to do:
1) Go to the Reboot menu in TWRP and press “Bootloader”. This will boot your phone back into Fastboot Mode.
2) Follow step #2 again and boot the TWRP recovery image (
fastboot boot twrp-3.5.2_9-0-lake.img).3) When the phone boots into TWRP, it will prompt you to enter the password/PIN (your lock screen password/PIN) for decrypting the internal storage. I suppose you missed this previously, that’s why all the files and folders in the internal storage were shown encrypted. So, make sure that you input the password/PIN for TWRP to properly decrypt and mount the internal storage.
4) Download the TWRP installer script (ZIP file) from the official link (twrp-installer-3.5.2_9-0-lake.zip). Go to Mount in TWRP, Enable MTP, and connect the phone to the computer via the USB.
5) Transfer the downloaded TWRP zip file, along with the Magisk v22.1 APK file to the phone’s internal storage.
5) Once the files have been transferred, disconnect the phone and go back to the TWRP main screen.
6) Press Install and flash the TWRP installer ZIP file, followed by the Magisk APK file (Yes, you can flash the Magisk APK via TWRP now, starting with TWRP v3.5).
7) After both the files have been flashed, reboot the phone into the OS. Go to Reboot menu in TWRP and press System.
This should do it. Let me know how it goes, or if you encounter any issues.
Hi. This was the best guide I found and I like how much detail you offer us to understand better. Many thanks!
I did run into the same problem on my G7 plus in that there is no ram disk option. Once I read all the comments I could understand how to proceed and although I kept getting errors from TWRP on the zip install, it worked.
For the next people who use your excellent guide, I want to suggest that you bring the new information about how to proceed without the Ram disk option into the tutorial if you have a moment.
I also had some problem because I did not enter a pin when TWRP started. I was not sure if I needed to or if I should. Later I found that this was necessary, so that is some more advice to add: When TWRP asks for your unlock code for decrypting enter the pin you setup for your phone.
Again, thank you!
Steven, thank you for the appreciation.
TWRP prompts you to enter the lock screen PIN/Password (only if one is set) so that it can decrypt the
/datapartition. Without this, you will not be able to access your phone’s internal storage in TWRP.I have queued this tutorial in my to-do list, but I am just not able to find the right time to get to it. Rest assured, I have taken note of both the suggestions and update the instructions accordingly.
Hello, Thank you for your post. I’m a newbie. I have made it trough all the instructions. I have the twrp image installed and the MAGISK zip instaled. When I go to reboot I get this warning message., No OS Installed ! Are You sure you wish to reboot? I may have made a mistake by going into advanced wipe settings and whiped everything except my sd card.
Please help. I’m keeping my phone pluged into the computer.
Joseph, I think you have wiped the OS. Why exactly did you do so?
Anyways. Let me know if it’s the regular Moto G7 or the G7 Plus? I will then share the link to download the corresponding fastboot ROM so that you can install it and restore your device to its working state.
Dhananjay Bhardwaj,
Thanks for the reply! I was able to load linageos on the b drive and reboot for now. My goal was to get google off my phone but it was not the best way to do it!
My phone is a Moto G7 Plus. Please send me the link.
Thank you so much!
Did you try LineageOS with MicroG?
Here’s the link to download factory images for different variants of the Moto G7 Plus.
Hi,
Is this working well with Moto G7, Model – XT1962-6?
Please confirm.
Best!
Kate, yes, it should work for your model. If you have any questions while/after performing the instructions, feel free to reach back.
Heya…
Just read thru your guide….is there no need to download the current stock fw from the correct chan. and patch it and so on?
I just got my unlock key and would much rather root with magisk than install a rom. I’ve read soo many g7 root guides and no 2 are the same…lol
Hi Ken, I can understand the confusion. If you just want to root and not use TWRP, then yes, all you have to do is download the stock firmware, extract the boot image from it, patch the boot image via Magisk Manager, and then flash the resultant patched boot image to your Moto G7 via the “fastboot flash boot magisk_patched.img” command.
Here “magisk_patched.img” is the filename of the patched boot you get from Magisk. The filename should further be suffixed with arbitrary digits, so replace the filename in the command above accordingly.
Your comment is awaiting moderation.
This option does not appear, only 3 searches are:
° Boot
° system image
° Vendor image
* Sorry if my English is not understood very well it is because I speak Spanish *
That’s completely alright Aaron. I appreciate that you took the time and translated your comment.
If that’s the case, then simply download the TWRP installer ZIP file, transfer it to your phone, and flash that as a normal ZIP file via the ‘Install’ menu of TWRP.
To transfer the file, connect the phone to the computer via the USB cable, then go to the ‘Mount’ menu in TWRP and select ‘Enable MTP’. In doing so, your PC will recognize your phone and allow you to transfer files to the storage.
Please help me, the recovery ramdisk option does not appear, I have the normal Moto g7 (river), what can I do? I don’t want to fall into an infinite loop.
Aaron, go to ‘Install’ in TWRP and then press the ‘Install Image’ button on the bottom right of the screen and select the TWRP .img file.
Once you do this, you would be prompted to select the target partition. On that screen, do you see the ‘Recovery Ramdisk’ option?
Hi, I have the same issue it seems, Running twrp-3.5.0-lake-v2.img but the recovery ramdisk option is not available.
I tried to go to go to ‘Install’ in TWRP and then press the ‘Install Image’ button on the bottom right of the screen and select the TWRP .img file but also there it’s not available.
Any ideas?
Hi Berkely, it seems like the G7 Plus* recovery doesn’t have the Ramdisk option.
While your phone is in TWRP, please go to the ‘Install’ menu and see if TWRP could properly read your phone’s internal storage. Do you see all the folders or do you see folders with arbitrary names?
It’s a G7 plus, I do see all the normal names. When TWRP v 3.5.0_10-lake-v2 starts, i need to enter my pincode so it’s able to decrypt the internal memory I guess.
Yes, my bad. It’s the G7+.
Since TWRP is able to decrypt, you could download the installer ZIP file, transfer it to your phone’s internal storage, and flash it directly via the ‘Install’ menu.
While in TWRP, go to ‘Mount’ and press the ‘Enable MTP’ button (if not already enabled). This should allow you to transfer the ZIP package without leaving TWRP at all.
Great, that did the trick. I grabbed twrp-installer-3.5.0-lake-v2.zip and flashed it from TWRP, didn’t need to leave TWRP at all like you said. Rooted and running! Thank you!
Good to know. I will add this information to the article. It’s the G7 then that has the issue with decryption when temporarily booting TWRP. I believe a fix has been merged for the same in the Android 10.0 branch but is yet to be released.
Hi, I’ve gotten hung up on the part of the process where it asks me to Install the recovery ramdisk…. I simply do not have the option available.
Morgan, is it the Moto G7 or the G7 Plus?
Hi Dhananjay,
I have a moto G7 play that was upgraded to version 10 that presently isn’t booting but is able to enter into fastboot. I’ve been trying to get TWRP on it without success. In following the instructions above, this is the result:
PS C:\adb> fastboot devices
ZF6226749Q fastboot
PS C:\adb> fastboot boot twrp-3.4.0-0-river.img
downloading ‘boot.img’…
OKAY [ 0.592s]
booting…
FAILED (status read failed (Too many links))
finished. total time: 2.167s
PS C:\adb>
Do you have any advice?
Andrew, the error indicates a connection issue with fastboot. To fix this, simply restart your computer and try connecting your Moto G7 Play to a different USB port. Moreover, the TWRP recovery image you’re using is for the G7 Plus, not the Play version.
I suggest you check this XDA thread for the G7 Play TWRP.
Hi
I installed TWRP Lake with the instructions for Lineage Recovery:
https://wiki.lineageos.org/devices/lake/install
I used their Partitions file also. I now have TWRP bootloop, & booting B resulted in booting Lineage recovery with a faulty OS, probably a remnant from cludge handedness. Am I screwed?!?
Hi
I think I’ll start from scratch following both guides. Thx! One question:
With TWRP can I allow Lineage OS to apply it’s own updates? I read you have to manually apply via TWRP recovery? I want to install TWRP to create a backup of my phone before updating. However can perform a backup from my Linux PC using ADB? This would potentially be more useful & could run with Lineage Recovery & auto updates instead?
Hi. The Lineage Wiki utilizes the Lineage recovery instead of TWRP. There’s no possible way to use both the recoveries at one.
As far as I know, LineageOS updates could still be applied within the system. If not, then you can always flash the latest build via TWRP itself. Yes, performing backups in TWRP via ADB is possible as well. If you want, I could cover a tutorial on that.
C:\Program Files (x86)\Minimal ADB and Fastboot>fastboot boot twrp-3.3.1-0-lake.img
downloading ‘boot.img’…
OKAY [ 0.614s]
booting…
FAILED (remote failure)
finished. total time: 1.560s
This is the error I keep on getting. Any help?
Hi Danny. Have you unlocked the bootloader of your Moto G7 Plus?
Yes. I unlocked the bootloader.
Hi again, Danny. Instead of Minimal ADB and Fastboot, I’d suggest using the latest version of platform-tools from Google.
First of all, please uninstall Minimal ADB and Fastboot program from your PC completely.
Then download the tools package from here and extract it’s contents to C:\platform-tools.
I implemented everything exactly according to the instructions for my G7 Plus. But now the device has a bootloop and in the upper left corner it always says “Verity mode is set to disabled”, the Motorola logo is displayed, then the device restarts again.
What could be the reason for this?
Hi. Did you flash the copy-partitions zip file as well?
Hi Dhananjay,
Thanks for the instructions on rooting, I have done it successfully. 🙂
Just wanted to make sure that the “copy-partitions-AB.zip” flashing is not necessary for
Moto G7 Plus,
aka: xt1965-2,
aka: lake
I am trying to understand the double partitions, and believe they are used for OTA’s.
Just making sure this will not be an issue when there is an OTA
(apparently my Magisk install, handles this).
I have pasted content of your post :
root Moto G7/Moto G7 Plus and disable DM-Verity subsequently.
Here,do i really need to disable DM-Verity,why can’t I directly boot after flashing magisk and copy A/B zips.If yes,then how do I disable DM-Verity?
moto g7 unlocked
unlocked bootloader but when i follow these instructions exactly i get permission denied? why does it do that?
C:\Program Files (x86)\Minimal ADB and Fastboot>fastboot boot twrp-3.3.1-0-river.img
downloading ‘boot.img’…
OKAY [ 0.642s]
booting…
(bootloader) permission denied!
FAILED (remote failure)
finished. total time: 0.657s
The download link you have for copy-partitions-AB.zip is no longer working. Is this version correct: https://androidfilehost.com/?fid=1899786940962597357
Hi Matthew. I tried again on mobile and PC, and the link works. Maybe a browser problem, or you might need to login to XDA since the link is sourced from there.
Anyhow, the file you linked is correct. You can use it.
The original link is working for me now! Previously it returned an error about the file being removed. Sorry for the false alarm.
Thanks for the tutorial!
It’s alright. Happens sometimes. And you’re welcome, Matthew! I am happy that I was able to help.
Hi Dhananjay , when I originally read your instructions, I don’t think flashing copy-partitions-AB.zip was included. Maybe I missed it but I did not include this step when rooting. I have no issues with the phone but am wondering if I should now flash this zip and what are the consequences of not including this file at the time I installed Magisk – Thanks
Hi Mark. You’re correct, it wasn’t there earlier. I added it only recently when I updated the instructions.
The file is specifically for the Moto G7 (river). By default, the phone comes with Bootloader only installed on one slot (the currently active one). Which means, if you switch the slot manually, you will no longer be able to boot into device because there is no bootloader present.
The file simply copies the BL from the active slot to the inactive slot. So, in case you ever switch slots, you should be out of worries.
Now, what you have to do is: Simply boot into TWRP and flash the file if you’re using the Moto G7 (river). Then reboot back into the OS and forget about it.
Thanks -one more question. Just so I’m understanding correctly, for OTA updates, is it necessary to flash the latest firmware, reinstall TWRP and then root again – I cannot install the latest OTA update from within the Settings.
~Thanks again for all your help
Hi Mark. No, there’s no need for that anymore. Magisk has developed and adapted a more sophisticated way to install OTA updates, thanks to the A/B partition scheme.
Whenever you receive an OTA update, just follow the instructions in this guide. Just make sure that you have disabled “Automatic system updates” in Settings > System > Developer options. This will prevent the update from automatically installing while your device is rooted.
Hi Dhananjay, I’m getting a message “system update unsuccessful”. I inadvertently downloaded TWRP A/B retention prior to uninstalling Magisk, would that make a difference? I uninstalled Magisk and selected Restore Images then tried update which was unsuccessful
Thanks again for your help
Hi Mark. You didn’t have to uninstall Magisk completely, that’s where things went wrong. Just use the Restore images option, then install the OTA, and then before rebooting, install Magisk to the inactive slot via Magisk Manager.
First of all, re-root your phone again. Then follow the steps in the linked guide again, as mentioned.
Sorry, I meant to say that I selected the uninstall option in Magisk, then “restore images”. I did not completely uninstall. After the “restoration done” message, I tried to update but I’m still getting “system update unsuccessful”. Any suggestions on where to trouble shoot this. Would it have anything to do with previously flashing the copy-partitions-AB.zip since the OTA is updating the inactive slot?
~Sorry for all the questions
Hi again, Mark. No, that zip only flashes the bootloader to the second slot (That’s how it should have been in the first place). So, it should hinder in installing the OTA update, as far as my experience tells me. The OTA packages only check the /system, /vendor, and /boot partitions for modifications.
Let’s recap a bit. After rooting, what modifications did you perform to the software? Let me know. These “modifications” include things like Magisk Modules, editing build.prop or any other file in the /system partition, etc.
Actually, I’ve made no modifications to date, only unlocked the bootloader and rooted. I do see that the active partition is B, not sure if that makes a difference or if the phone comes stock like that. If the inactive slot is somehow corrupted, would that prevent an update?
Yes, it could. When you rooted, which slot was active? Was it “a”? In your case, It could be the only possibility of preventing the update.
As previously reported on xda-developers:
We got a new Moto G7 for my wife and following the instructions here https://www.thecustomdroid.com/install-twrp-root-moto-g7-plus-guide/, I successfully rooted the phone. However, there was a security update that needed to be installed, so with some great advice from ptn107, see https://forum.xda-developers.com/moto-g7/help/invalid-zip-file-format-trying-to-t3977463, I flashed the updated ROM onto the phone. (Note that I omitted ‘fastboot erase userdata’. Also note that the warning message ‘is-logical:: not found’ was seen for all flash commands.)
The phone booted properly after the update, so I then went through the exact same rooting steps that had worked previously. However, this time, the phone gets stuck in a boot loop. I reflashed the ROM and can boot successfully, but the phone is no longer rooted. (I have tried this twice, with Magisk 19.3 and 19.4 – same result.)
Any ideas as to what I may be doing incorrectly? More importantly, what is the best way forward?
Hi Gerry. I think you should not have omitted the command (fastboot erase userdata). It is wise to use this command when you want to restore the stock firmware completely.
The first thing to understand here is that your phone uses the AB partition scheme. So, when you install the OTA, it is installed to the other (inactive) slot.
Below, you will be guided to restore the stock firmware on both the slots to prevent any further disruptions.
First check which slot your phone is currently running on. You can do so by issuing the following command while your phone is in Fastboot mode:
fastboot getvar current-slotThis should output the current active slot (a or b).
Once you know which slot your device is currently on, simply follow the same instructions to restore the stock firmware as linked by the XDA member. Do not miss the ‘fastboot erase userdata’ command (Take a backup beforehand, all data including the internal storage will be wiped off). At this point, you will be flashing the firmware to the currently active slot.
Let your phone boot and set it up. When done, reboot back into bootloader/fastboot mode and issue the following command to switch from the current active slot to the inactive slot.
If your current active slot was “a”, then the command would be:
fastboot --set_active=bOr, if it was “b”, then it would be:
fastboot --set_active=aNow, reboot the bootloader to ensure that the slot has been successfully switched:
fastboot reboot-bootloaderIt is now that you have to flash the same stock firmware (like you did previously) to the current active slot (Your now inactive slot was already flashed earlier, right?). Again, do not miss the ‘fastboot erase userdata’ command. Once done, your phone will reboot and you can set it up.
Now, you have the stock firmware on both the slots. There’s no need to switch up any slots now. Just go ahead and install the latest OTA update from within the Settings.
When this all is done, let me know so that I can guide you further and also on how to prevent this from happening again.
Hi Dhananjay, I had just unlocked the bootloader so all internal data was wiped and when I rebooted for the first time I elected not to use a password. I then downloaded TWRP (and Magisk) and placed it in the phone’s internal storage. Booted TWRP from PC, went to Install Recovery Ramdisk but files were encrypted. TWRP did not prompt for a password. Phone is a G7. Thanks for your help!
Hi Mark. It seems like this is a TWRP-related bug. I have seen Mi A1 users face the same earlier when TWRP was based on the Android Pie source code.
Do you have an external SD card?
Yes. I moved both TWRP and Magisk to SD and flashed from there. Rebooted into system and confirmed root. Booted again to recovery and confirmed TWRP is functioning normally. Thanks for your help Dhananjay, I’ve bookmarked your site
Hi Mark! I am glad it worked. I will make sure to add this point to the guide. Could you please confirm two more things? These are:
1) Boot your Moto G7 into TWRP, go to the Install menu and check now if the folder/files are still encrypted? (Without setting a password/PIN/Fingerprint/Pattern)
2) Check the same, but this time, set a PIN in the OS and then boot into TWRP. See if TWRP prompts for a password to decrypt and are the folder/files still encrypted?
Lastly, thank you so much for the appreciated. I am happy to help, you can always reach back to me if you face any issues.
I disabled device security and booted TWRP – files show encrypted. I then set a pin and rebooted TWRP – files still encrypted with no prompt for password. I hope this helps. Thanks again!
-Mark
Great! We can conclude that it’s an issue with TWRP, either there’s a bug or the current version is not compliant with the changes in the latest firmware update for the G7. Thanks!
I have the same issue. Used fastboot command to boot TWRP which was successful but files are encrypted. TWRP did not prompt me to enter a password.
Hi Mark. Please state the exact device that you’re using, is it the Moto G7 or the Moto G7 Plus?
Also, do let me know if you have a PIN/Password set within the OS?
I’m following your thorough instructions to get TWRP Recovery and Magisk on my new G7. Thank you for making them available.
One baffling hangup is the twrp-3.3.1-0-river.img file. I pushed it to internal storage (from macOS if that makes any difference) and have instead a bunch strange files on the G7. Not the concise single file of your example. See this screenshot
Now I’m super concerned about going further and am not sure where TWRP was left.
Hi Don. No need to worry about it. It simply means that your storage is encrypted and is not decrypted by TWRP yet.
During the TWRP installation instructions, after you boot the TWRP image using the ‘fastboot boot’ command, were you prompted to enter a password at any point?
I bricked my phone. Hellllllllp me please
Hi Johnny. Could you please let me know the device name, and also where exactly during the instructions did the phone brick?