
On this page
Update (June 28, 2020): Xposed can now be installed on latest Android versions like Android 10, Android Pie, and below using the EdXposed Framework. Instructions could be found here.
Xposed is now ready for Nougat, as a stable release. This guide will easily help you set up and install the Xposed Framework on Nougat 7.0 and 7.1. Further, we will also demonstrate how you can install modules to add new features to your Android.
The development has taken its course and a lot of things needed to be reworked to bring Xposed to Android Nougat. But you might still wonder - why now? Why so late when we can already install Xposed Framework on Nougat unofficially? There’s a solid reason to it. You will read more about it below and then follow the instructions to install Xposed Framework on Nougat.

Xposed Framework on Nougat, Finally!
Xposed Framework, sometimes simply called “Xposed”, is one of the best and most powerful tools for customizing your rooted Android phone. It has been brought to the public by XDA Recognized Developer - rovo89.
Xposed allows you to inject additional features into your device’s firmware, thus pushing your phone’s capabilities. For the most part, customizing an Android device means installing custom ROMs for the hefty new features that they offer. But not everyone is a big fan of custom ROMs, especially when there’s an increasing number of ROMs to choose from. Several users just favor the stability offered by stock firmware, which overpowers their desires for extra features.
That’s when Xposed kicks in. If you prefer to stick to the stock firmware, you can still customize your Android device on the system-level and add features whenever you feel the need.
These features are added to your device through Xposed Modules. The framework database offers a plethora of modules that offer you to customize each and every aspect of your device, without much hassle. So go ahead and install Xposed Framework on Nougat 7.0 and 7.1.
Also read: Set SELinux Permissive on Android using The SELinux Switch
What took it so long?
We realize that it was a long time for the users to wait, almost more than a year. But trust me when I say - “It was worth it”.
While many of the users shifted their attention to the Systemless modification solution (Magisk), quite a lot like me were eagerly waiting for this release. Magisk might have its benefits, but then Xposed Framework has its own, plus it takes the leverage by the vast list of established modules. There’s no competition here, I am just laying down the facts. Plus, we as users value everything that is developed for the good of our phones.
Back when Android Nougat was released, it brought some serious changes to ART (Android Runtime) including the Just-in-Time compiler. These changes required intense work and time to modify Xposed and make it work on Nougat. It wasn’t much later that the developer (rovo89) started the development to bring Xposed Framework on Nougat.
During this time, several XDA members attempted to run it on Nougat using some modifications and once such user - abforce, came up with a working build. While it did enable users to install Xposed Framework on Nougat and use it, it had its own downside. The development was still not complete, so the unofficial port just disabled the new ART optimizations and made the hook method to work.
Brief roundup:
- Android 7.0 Nougat brought many new changes to ART and Zygote.
- Development of Xposed Framework on Nougat was started by rovo89.
- Unofficial ports were released. But were unstable and disabled several ART optimizations.
- After almost 1 year, stable version of Xposed Framework for Nougat has been released. Cheers rovo89!
But now that rovo89 has completed the project, he brought up a new stable release that not only works flawlessly but also honors the ART optimizations that Nougat brought in the first place.
Now that you’re quite familiar with the idea of what Xposed Framework actually is, you can scroll down and install Xposed Framework on Nougat pretty easily.
Also read: How to Install ViPER4Android on Nougat 7.0 & 7.1
Install Xposed Framework on Nougat 7.0 and 7.1
I think we have talked much about it already! I know are equally hyped as I was when I first saw the news. So without any more delay, let us get on to installing Xposed Framework on Nougat.
Step 1: Installing Xposed Framework
We will start by installing the framework and Installer app itself, which is easy. And after that, we will move to installing different modules and using them.
Xposed can only be installed using a custom recovery such as TWRP and only on a rooted device. So make sure that you have both before proceeding ahead.
- First, download the latest available Xposed Framework installer zip
- Nougat 7.0 (SDK 24): Download Link
- Nougat 7.1 (SDK 25): Download Link
- Make sure to download the installer zip that corresponds to your phone’s architecture. For example, I am going to download arm64 for my Nexus 6P.
- Now, transfer the *.zip installer file to your device’s storage (Internal/SD Card).
- Reboot your device into TWRP recovery mode. We will assume that if you have TWRP installed on your device, you will definitely know how to boot into it, won’t you?
- Once your Android device enters TWRP, tap on the “Install” button.
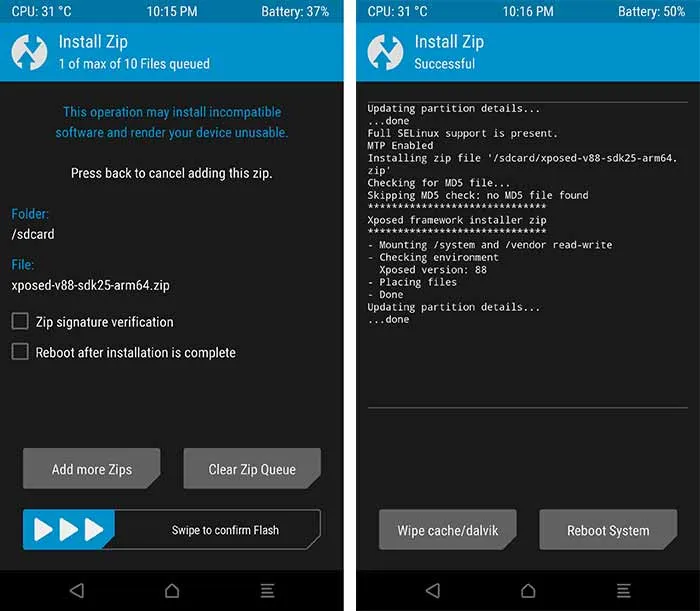
- You shall see the file selection menu. So, browse the storage and select the Xposed Framework installer zip (e.g. xposed-v88-sdk25-arm64.zip).
- Now, swipe the “Swipe to confirm Flash” button on the bottom of the screen to install Xposed Framework on Nougat.
- Once the flashing process is complete, tap on the “Wipe cache/dalvik” button.
- Finally, press the Reboot System button to boot your device back into the ROM with Xposed installed.
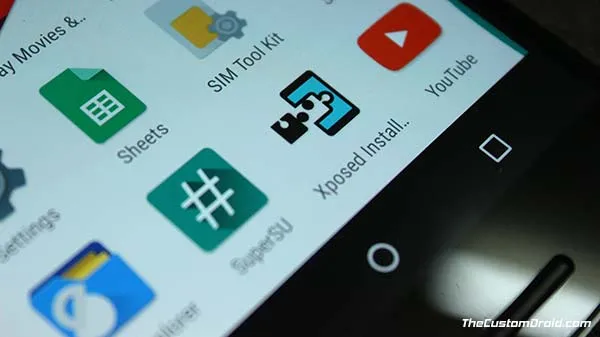
Step 2: Install Xposed Installer App
So you have just installed Xposed Framework on Nougat. But, it will still not be functional without the “Xposed Installer” app, which is the companion app for the framework.
- Download the Xposed Installer app and transfer it to your Android device: XposedInstaller_3.1.2.apk
- If this is the first time you are installing an app manually from an external source, you will need to enable “Unknown sources” option in Settings > Security.
- Now, use a file manager to browse the storage and install the “XposedInstaller_3.1.2.apk” file.
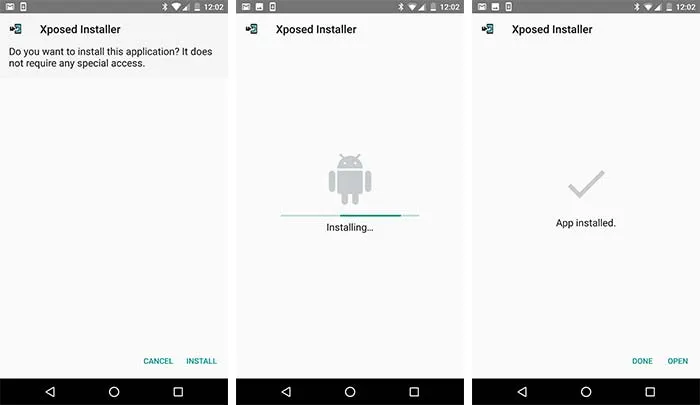
- Once the app is installed, go to the app drawer and launcher “Xposed Installer”.
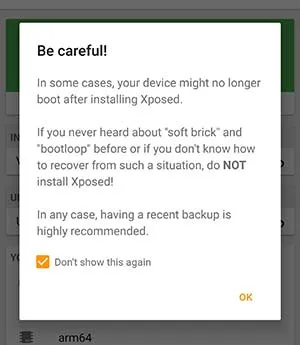
- When you run the app for the first time, you will see a warning message. Just select the “Don’t show this again” box and tap on “OK”.
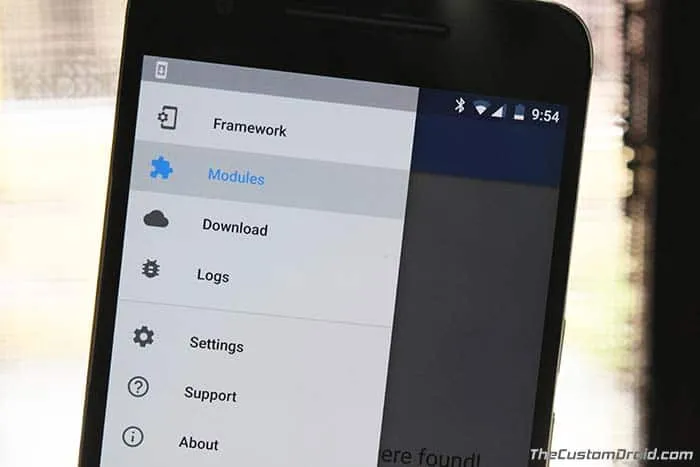
- You shall now see the app’s default “Framework” menu. This is where you can further update, disable, or uninstall Xposed Framework.
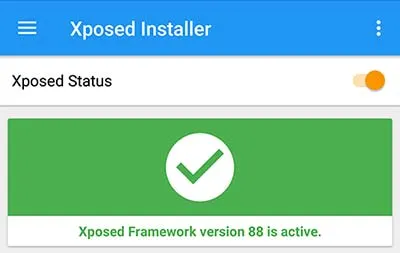
- The first card on the top should show the Xposed Status.
- If you have done everything as stated, you shall see the following message.
Step 3: Downloading and Using Xposed Modules
Now, you are ready to use modules to added new features to your Android Nougat device. In the Installer app, swipe from the left edge of the screen to bring up the menu. Then select the “Download” option.
This is where you can easily download all the available Xposed Modules available directly from the repository.
- Browse through the list of available modules and select the one you want. We prefer GravityBox, it is a complete customization solution for Android and also supports Nougat.
- Since the Xposed Framework on Nougat is a whole new scene, there are chances that the number of supported modules will be less. You can check the complete list of Xposed modules that support Nougat.
- Once you have selected, the module-specific window will open. You can get an overview of the module features in the “DESCRIPTION” tab.
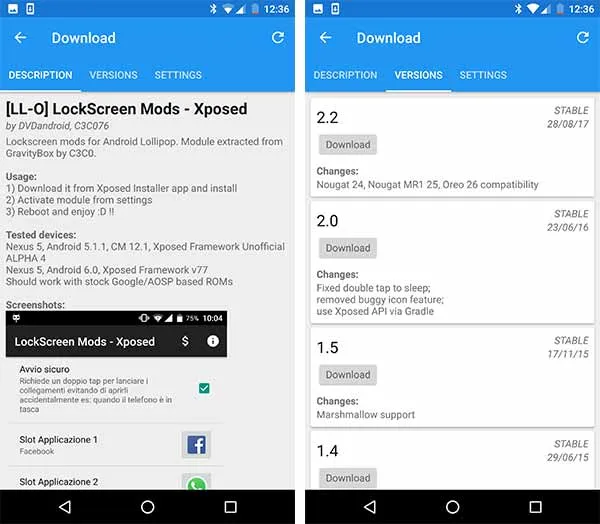
- Swipe right to the “VERSIONS” tab. The available versions will be shown. So, just tap on the “Download” button corresponding to the latest module version.
- The module will be downloaded, then follow the on-screen instructions to install it.
- The module has now been installed but is yet to be activated.
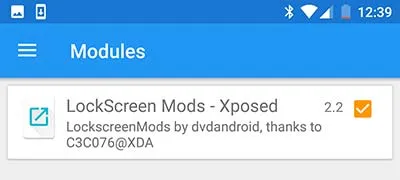
Now, go back to the Installer app main screen, pull out the menu, and select “Modules”. The installed modules will be present here. Toggle the checkbox beside the module you want to activate. Finally, reboot your device for the changes to take effect.
Done! You have just succeeded in setup and install the Xposed Framework on Nougat. Now you may further install as many modules as you want and enjoy the new features.
Discussions regarding the Xposed Framework can be carried out on this XDA thread. You can feel free to ask us any questions regarding the installation process by just commenting below.
Comments
Comments are moderated, and published only if they are relevant to the topic and add value in a constructive way. If you disagree with something, please be polite and respectful. We suggest you read our comment policy before commenting.