Advertisement

You can now root Galaxy Note 8 Snapdragon variant on all US carriers in the US, using the new Extreme Syndicate root method. The instructions in this guide are compatible with any Snapdragon Note 8 with SM-N950U/SM-N950U1 model number and V8 bootloader revision.

Samsung has been readily processing its flagship devices in two different variants – Exynos and Snapdragon. It has been the same since the company launched the S7 and for the Galaxy Note 8 as well in this case. There are several situations where Exynos under-powers the Snapdragon variant in the case of Samsung. But the one we will be talking about today is – rooting the Snapdragon variant of the Galaxy Note 8.

If your phone is on BL V1, V2, or V3, then you can visit an old archived copy of this page for the required files and instructions.

Table of Contents

Rooting the Galaxy Note 8 Snapdragon Variant

Snapdragon Galaxy Note 8 running pre-rooted Nougat ROM

We already have a tutorial published on our blog to root Exynos Note 8, and it is much similar to our day-to-day rooting method that involves installing TWRP recovery first and then flashing the Magisk zip via it.

But things are actually very different, and difficult at the same time when it comes to the Snapdragon variant of the phone. That’s because, unlike the Exynos variants, the bootloader on the Snapdragon variants is not unlock-able. And hence, the generic method of flashing TWRP via ODIN and then rooting through Magisk is bound to fail.

In the past, Recognized Contributor jrkruse brought us a rooting method for the Snapdragon Galaxy S8, S8+, and Note 8. However, the old method used EDL (Emergency Download) mode and was only limited to devices with V5 and V6 bootloaders. With the latest bootloader revisions, that is V7 and V8, the old method didn’t work.

But thanks to some talented minds out there, it is now possible to root the Snapdragon Galaxy Note 8 on the latest V8 bootloader. XDA Recognized Developer elliwigy is the one who found the original exploit and further contributions were made by other members of the team. This is the same group that developed the rooting solution for the Snapdragon Galaxy S9, S9+, and Note 9. Developer jrkruse further adopted the Extreme Syndicate root method to work on the Snapdragon Note 8.

A Few Important Things

Before you go ahead and follow the instructions, take a look at some important information below to debrief yourself with the method that will follow.

  • This root method, the corresponding files, and instructions are only applicable to the Galaxy Note 8 Snapdragon variant with SM-N950U and N950U1 model numbers (sold in the United States).
  • This method will only work if your phone is using version V8 bootloader.
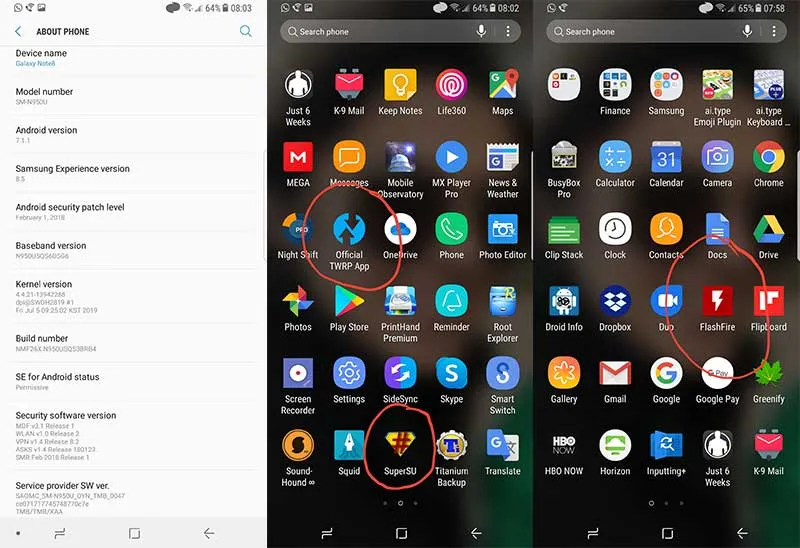
    • To find out your phone’s bootloader version, go to Settings → About phone → Software information and check the information under the ‘Baseband version‘ section. For example, if it says “N950USQS8DTJ1“, then “S8” denotes the bootloader version, which is V8.
  • This will not unlock your phone’s bootloader. It will still be locked.
  • The KNOX counter will not be tripped at all.
  • Root on Android Pie/Oree is not possible. In simpler words, you will not have root permissions on Android Pie or Oreo. So, you have the following two choices:
    • Either stick with the pre-rooted Android Nougat OS, if you really want root access.
    • Or, install the Android Pie ROM with Safestrap recovery. Once that is installed, you can use Safestrap to apply modifications to your phone by flashing zips or making modifications to the system partition.
      This has some additional benefits as well like the ROM is debloated of any useless apps, has features like a native hotspot and multi-user support enabled, and also has Samsung Pay, Secure Folder, Samsung Pass working.

With that information at hand, let us now show you how to root the Snapdragon Galaxy Note 8 with a V8 bootloader, using the new Extreme Syndicate method.

Notes:

  • Make sure that you go through the instructions beforehand and understand what they exactly tell you to do. Do not deviate from them at any point or disconnect/power off your phone during the process until you’re asked to do so.
  • I presume you would have some basic knowledge of the terms associated with software modding.
  • If you do face any problems, you can always download the latest stock firmware using Frija or Samloader, and install the firmware on your Note 8 using Odin. This will allow you to restore your Note 8 back to the official firmware.

Before You Begin

Take a look at some of the things you should do before attempting the instructions.

Take a backup first: All the data stored on your phone, including that on the internal storage, will be erased during the rooting process. So, make sure that you back up all your data beforehand so that you can restore it afterward. If need help, here’s a tutorial on backing up Android devices.

Install the drivers (if required): In most cases, Windows can automatically install the required USB drivers for your phone. But in case your computer fails to identify your phone in Download Mode, you might have to install the latest Samsung mobile USB drivers.

Charge your phone: Make sure that your Note 8 has a sufficient battery charge to prevent it from shutting down in the middle of the rooting process. 40-50% is a good starting point in my opinion.

Upgrade to V8 Bootloader: The developer specifically advises the users to upgrade their phone to V8 bootloader by flashing the firmware through Odin. He suspects that the OTA update from V7 to V8 firmware corrupted a bootloader file, which led to a bricked device when updating through his method.

You can download the latest firmware using Frija and install it on your phone using the instructions here.

How to Root Galaxy Note 8 Snapdragon

For your convenience and better understanding, we have split the complete instructions into 5 different steps. Make sure that you follow them in the mentioned order and do not skip any of the steps.

Step 1: Perform Factory Reset and Enter Download Mode on Galaxy Note 8

The first step of the rooting process is to boot your Note 8 into the stock recovery mode and perform a factory reset through it.

To do this, power off your phone first. Then hold the Volume Up, Bixby, and Power keys simultaneously to boot your phone into the stock recovery mode.
Perform Factory Reset on Snapdragon Galaxy Note 8

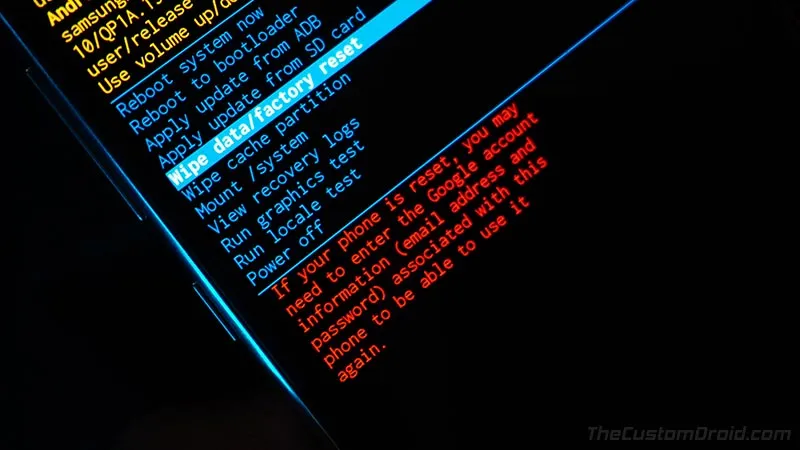
Once in recovery mode, use the Volume buttons to select the ‘Wipe data/factory reset’ and press the power button to confirm the selection. When prompted, select ‘Factory data reset’ to confirm.

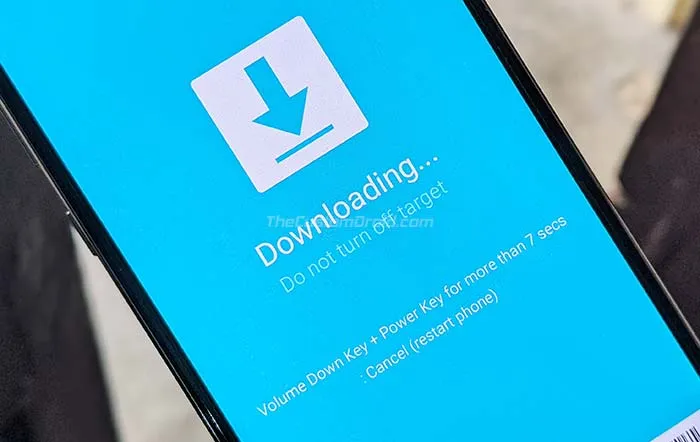
After that, select the ‘Reboot to Bootloader’ option in the stock recovery to boot your Galaxy Note 8 into Download Mode. Connect the phone to the computer while it’s in Download Mode.
Enter Download Mode on Snapdragon Galaxy Note 8

Step 2: Flash Combination Firmware using Odin

Now, you have to flash the combination firmware on your Galaxy Note 8 using the Odin tool. To do this, download the combination firmware package (COMBINATION_FA71_N950USQU8ATF1_CL13942288_QB32228349_REV00_user_mid_noship_MULTI_CERT.tar.md5.zip) to your computer.

Extract the contents of the ZIP file on your computer to get the combination firmware file (COMBINATION_FA71_N950USQU8ATF1_CL13942288_QB32228349_REV00_user_mid_noship_MULTI_CERT.tar.md5).

To flash the combination firmware, you will need the modded Odin v3.13.1 tool by ‘Raymonf’. You can download it from the Odin download repository that I maintain. After downloading, extract the ZIP file and then double-click the ‘Modded Odin v3.13.1 Raymonf.exe‘ executable to launch Odin on your computer.

The Odin tool GUI should now be shown on your PC’s screen and it should display the COM port to which your Note 8 is connected. Click the ‘AP‘ button and select the combination firmware file to load it in the slot for flashing.
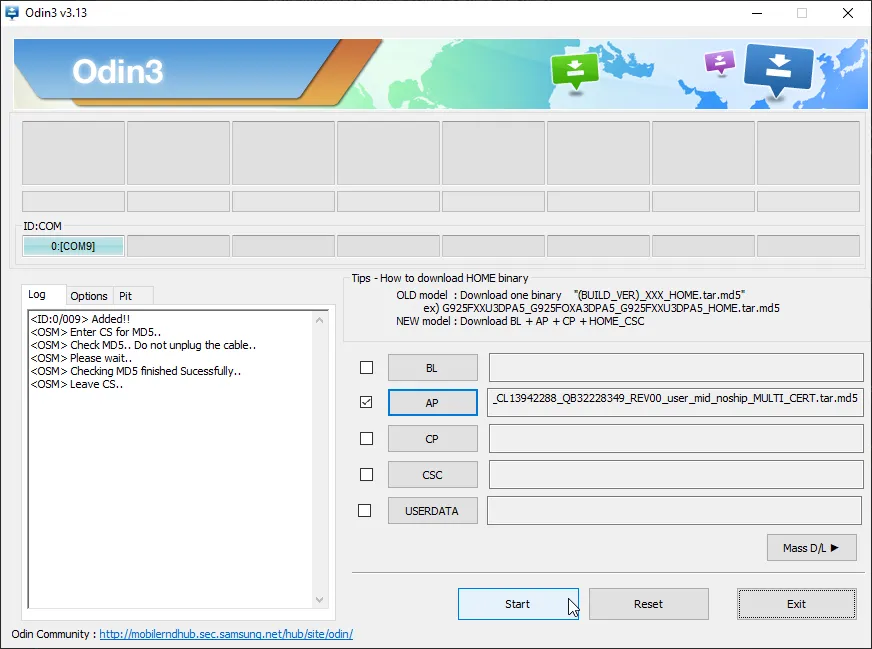
Flash combination firmware on Galaxy Note 8 using Odin

Finally, hit the ‘Start‘ button in Odin to flash the combination firmware on your Snapdragon Note 8. Once the flashing process finishes, you should see a ‘PASS!‘ message in the Odin tool and your phone will automatically reboot into the combination OS. Keep your phone connected to the computer as you’ll need it further.

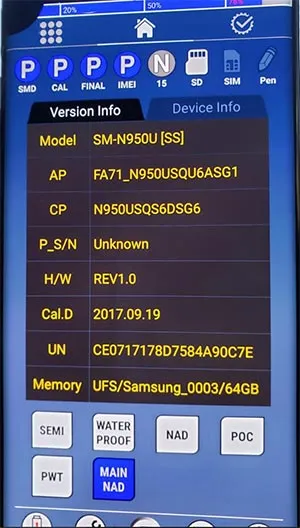
Since this is a low-level testing firmware used by Samsung internally, the UI will differ from the regular software. It should look similar to the one shown in the image below.

Combination OS on Snapdragon Galaxy Note 8

Step 3: Run APPS_INSTALLER.bat and reboot the phone

Now, you have to run a batch file on your computer that will sideload some required apps on your Note 8 to carry on with the rooting procedure.

With your Galaxy Note 8 now in the combination OS, connect it to the PC via the USB cable (if not already). Then download the ‘N8_ROOT.7z‘ file and extract the file on your computer using 7-zip or a similar archive utility. The extracted “N8_ROOT” folder should contain the ADB binaries, a bunch of APK files, and two Windows batch script files namely ‘APPS_INSTALLER.bat’ and ‘ROOT_INSTALLER.bat’.

Run the APP_INSTALLER.bat script on computer

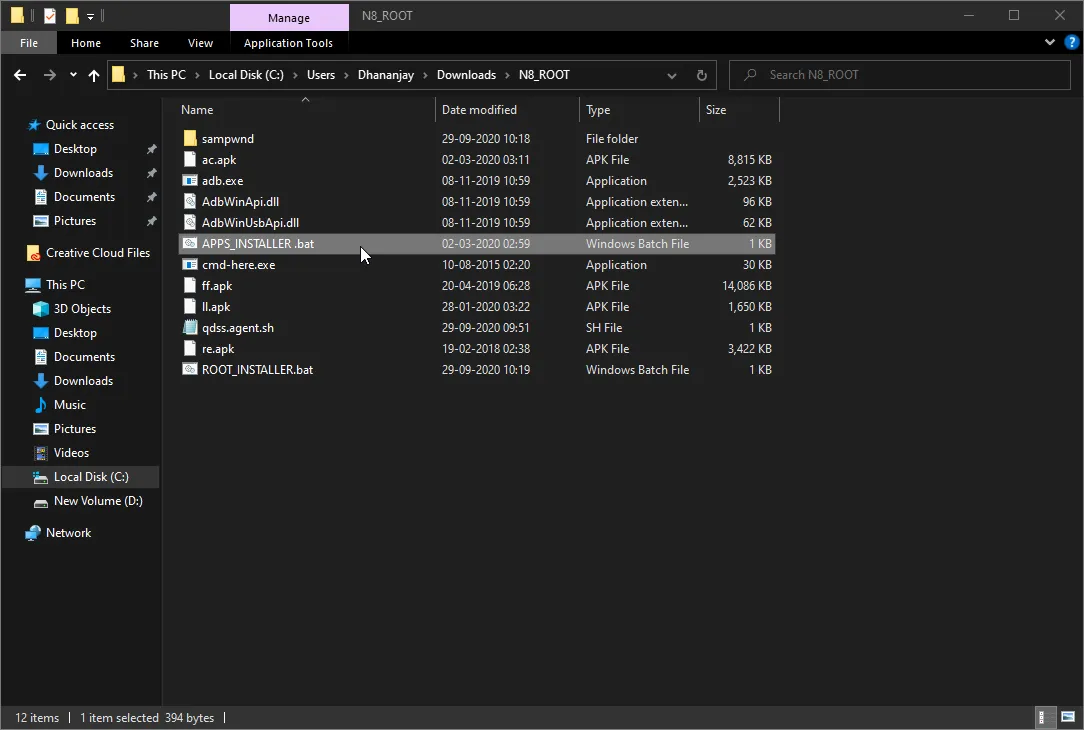
Simply double-click the ‘APPS_INSTALLER.bat’ file to sideload/install the required APK files on your Note 8. Once it finishes, reboot your phone.

Step 4: Grant Read, Write, and Execute permissions to Persist partition

When your phone boots, it should prompt you to select the default launcher application. Choose the ‘Pixel Launcher’ as it would make it easier for you to find the installed apps.
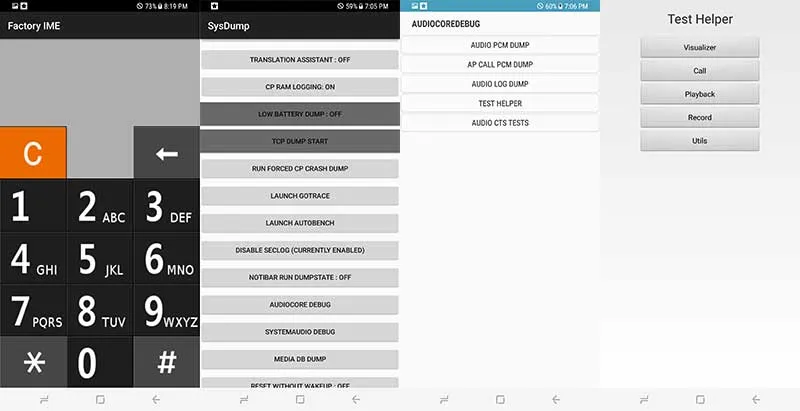
Then launch the ‘Factory IME‘ application from the app drawer and input *#9900# in the dialer. This should open the ‘SysDump‘ screen that will show a lot of different debugging tests. Scroll down, select ‘AUDIOCORE DEBUG‘, then ‘TEST HELPER‘, and finally ‘Utils‘.

Launch Factory IME App on your Snapdragon Galaxy Note 8

You should now see the ‘AUDIOCOREDEBUG‘ screen with a couple of options. Tap on the box that says ‘ADB Commands‘ and type in: chmod -R 0777 /persist. Hit enter on the keyboard and press the ‘SEND‘ button. The command will basically grant read/write/execute permissions to the /persist partition of your Note 8.

Enter ADB Command in AUDIOCOREDEBUG

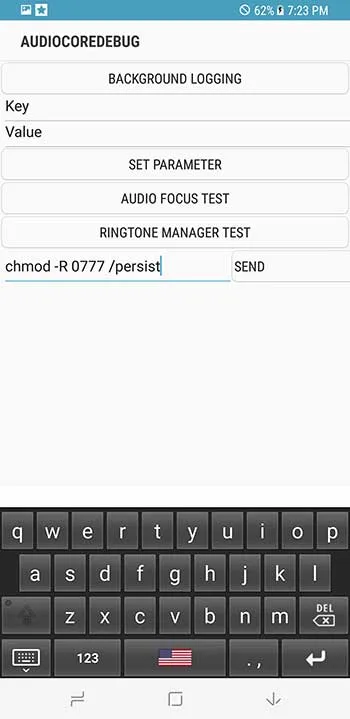
The command will not return output or show a notification to confirm. You just have to make sure that you input the right command and send it over to your device.

Step 5: Run ROOT_INSTALLER.bat to root Galaxy Note 8 Snapdragon

You now have to run the other script on your computer to root your Galaxy Note 8 on the combination firmware. To do this, make sure that your phone is connected to the computer and is recognized by it. Then double-click the ROOT_INSTALLER.bat file.

The script will copy all the required root binaries and reboot your phone automatically. When your Note 8 boots, it should be rooted via SuperSU. Rebooting again will take your phone into SafeStrap Recovery mode. The recovery is based on TWRP and follows the same UI.

Step 6: Install the Pre-Rooted Nougat ROM

The process isn’t over yet. As you may notice, the phone is still running the combination OS. You can now use SafetStrap to flash the pre-rooted Nougat ROM. This ROM comes with both SafetStrap and FlashFire pre-installed. The developer has also removed a bit of bloatware, as well as the KNOX system services.

To install the pre-rooted Nougat ROM on your Galaxy Note 8 Snapdragon, download the following files on your computer first:

Extract the “system_n8_brb4.7z” package to get the Nougat system image. Copy the extracted “system_n8_brb4.img” along with “SuperSU_System.zip” and “Safestrap-4.10-B03-GREATQLTE-NOUGAT.zip” files to the phone’s internal storage.

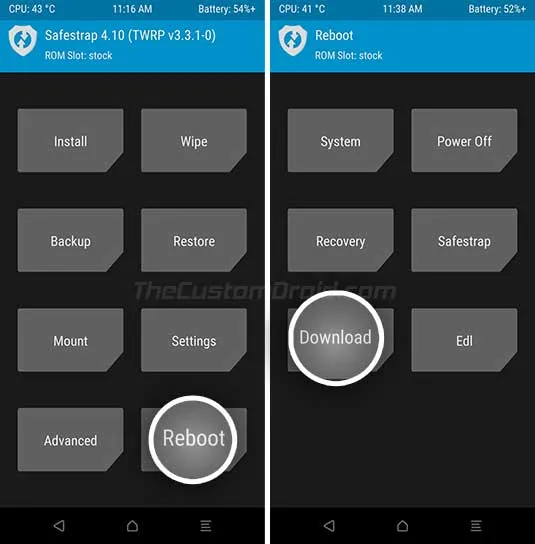
After this, reboot your Note 8 and select ‘Recovery’ from the SafeStrap splash screen. In Safestrap, tap on the “Install” button and then on “Install Image”.

Install Pre-Rooted Nougat System Image on Snapdragon Galaxy Note 8
Screenshot courtesy of Perry Freeman

Navigate to your phone’s internal storage and select the “system_n8_brb4.img” file. When prompted to select the target partition, choose “System Image”. Swipe the button on the bottom to flash the pre-rooted Nougat System Image on your Galaxy Note 8 Snapdragon.

Now go back to the recovery’s main menu and press the “Install” button again. Select the “SuperSU_System.zip” file and flash it.

Once done, go to the “Reboot” menu and tap on “DOWNLOAD”. Your phone should now reboot and enter the Download Mode. Connect your phone to the PC while it is in Download Mode. 

Reboot Galaxy Note 8 Snapdragon into Download Mode using Safestrap Recovery
Screenshots courtesy of Perry Freeman

Then launch the modded version of Odin on your computer and load the “BL_N950U_NOUGAT_V8.tar.md5” file in the “BL” slot. Finally, click on the “Start” button to flash the file.

Flash fingerprint/face unlock fix in BL slot using Odin

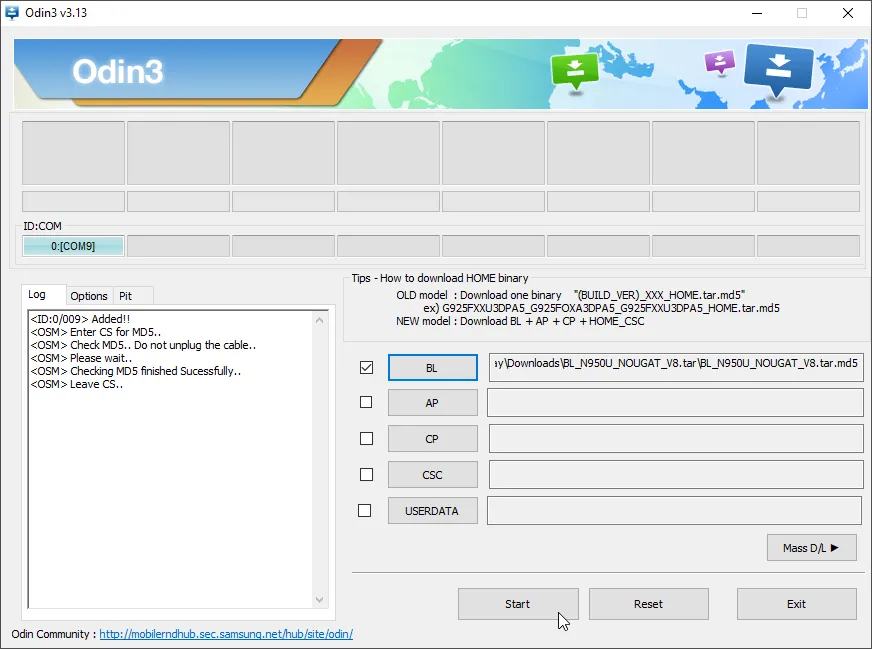
Once the flashing process finishes, your Note 8 will automatically reboot into the pre-rooted Android Nougat OS. You can now start using your favorite root applications or use SafetStrap to flash mods like ViPER4Android, etc.

Additional Notes & Troubleshooting:

  • If the phone keeps looping into SafetStrap mode, then flash the “Safestrap-4.10-B03-GREATQLTE-NOUGAT.zip” via the recovery to fix it.
  • If you face errors while flashing the combination firmware through Odin, make sure that you’re using Raymonf’s modded Odin tool and use USB 2.0 ports (or a hub) to plug in your phone. New-gen USB 3.0/3.1 ports are often the cause of such errors.
  • The step wherein you grant the permissions to the /persist partition is often where things are dodgy. If the ROOT_INSTALLER script fails, you might want to go back and repeat step #4 a couple of times.

So by now, you have learned how to root Snapdragon Galaxy Note 8 on V8 bootloader, using the new Extreme Syndicate method. If you want, you can further install the Android Pie SafeStrap ROM provided by jrkruse over at this XDA thread. But note that you will not have root access. You will only have access to SafeStrap for flashing mods or making other modifications.

If you have any questions or face any problems while performing the instructions, you can comment below. Make sure that you provide as many details as possible about the device.

We couldn’t end this post without thanks XDA RC jrkruse and all other developers who are associated with the project. Also, a huge thanks to one of our readers, Perry Freeman for sharing the Safestrap screenshots.

Source: XDA-Developers Forum

Comments

  1. Hello,

    I followed the instructions and they work like a charm. Once my phone is rooted, how can I run Android 10 on my N950U?

    Thanks!

    1. Colin, I am glad that the instructions worked for your Note 8. The method used here is based on an exploit found in the Android Nougat firmware. So, you cannot upgrade back to Android 10 and still have root access.

  2. Hello my good frnd
    I am on ur rooted naugat rom and I am unable to use xpose framework and as soon as I flash the xpose file in twrp the rom stops working and hold it self on Samsung logo..pls can you help me out here thanks..

    1. Xposed does not work on Snapdragon Note 8 Nougat ROM. This was confirmed by a lot of XDA users, as well as developer jrkruse himself here.

      Now, to get your phone out of the soft brick, you could do two things:
      1) Flash the Xposed uninstaller ZIP via Safestrap recovery.
      2) Or, if the above fails, then download the latest stock firmware using Frija and flash the ROM by following the instructions in this tutorial.

      If it comes down to the second option, you will have to reform the rooting process from start.

  3. Completely stuck: Was at 9.0, now at 7.1.1 and cannot figure out how to move forward to 10 before having to give up and reinstall 9.0.

    Let me start by saying I apologize in advance if my exasperation comes through in my writing. I truly appreciate all the great work you guys put into these instructions for those of us that do not have a background in, knowledge of, or half of a grasp on how these devices work.
    My frustration comes into play when extremely intelligent and knowledgeable people are trying to explain to us less knowledgeable folks how to do things, and use verbiage, nomenclature, and phrasing that one does not come across unless well-versed in this kind of device manipulation.

    So if this gets into the weeds, then I apologize ahead of time. My inquiring (and very frustrated) mind needs very broken down instructions.

    I suck, you rule, please help!

    Followed all instructions to the letter… until instructions did not match what was on my phone.

    It now says:
    Model: SM-N950U
    Version: 7.1.1
    Samsung Experience: 8.5
    And Sec Pat Lev: Feb1, 2018
    Baseband: N950USQU8ATF1
    Kernel :4.4.21-13942288
    Build: NMF26X.N950USQS3BRB4
    SE for Android: Permissive

    Not sure what else you need.

    Was on a Sprint SIM, now on a T-Mobile.
    While in recovery, noted that phone identified as Verizon.

    Did EVERYTHING noted above starting with getting TRWP from Play Store, downloading Samsung Mobile Drivers and was able to use Frija and ODIN to re-install V8 firmware (did the Taiwanese version since I wasn’t sure and that is the phones origin) before starting to ensure a clean process.

    PS: The next statement “all the files you’ll need to perform the instructions below” is a bit misleading as steps 2, 3 & 6 require a bunch more files/programs to be downloaded.

    Step 1: no issues
    Step 2: ran into the USB 3.0 issue and switched to older Windows Surface to continue. But otherwise, worked.
    Step 3: The last time I rooted anything was my S5 so I am not familiar with the terms “sideload” or “batch file.” It took me a
    moment to understand that I did not need to move these files from my computer to my phone in order to make
    them work. Anytime I see the word “simply” I get concerned because your “simply” does not always (or often)
    match my “simply.” [From windows explorer, double-click to run…] Just a suggestion.
    Anyway, finally just tapped on them and it worked.
    Step 4: I know you mentioned that this has caused a lot of issues but I followed the instructions EXACTLY as written and it
    seemed to perform as you described. Is there anyway to check if this part is done correctly before going all
    the way through step 6 only to discover that it didn’t work? ALSO, is it mandatory to hit the enter on the keyboard
    for this to work? I have tried this step 3 times now; twice times I hit the enter, once I just hit Send. Did not make a
    difference that I could tell.
    Step 5: Here is where my confusion lies, though I don’t know if it made any difference. Double-clicked
    ROOT_INSTALLER.bat in Windows explorer with phone connected and ODIN window up, left in it’s last
    configuration.
    (A) At no time does anyone say to close, exit, or reset ODIN or not to. It is not mentioned at all after it runs
    the specific program so not sure if it makes a difference being up or not.
    OCD minds want to know…
    (B) “The script will copy…and reboot your phone automatically. When your Note 8 boots, it should be rooted via
    SuperSU.” How do I check that? I am assuming it is important since you mention it but how do we know if that
    last operation worked?
    (C) “Rebooting again will take your phone into SafeStrap Recovery mode.” Are you saying we NEED to reboot or is
    this just a comment?
    (D) “The recovery is based on TWRP and follows the same UI.” I have now done this root procedure 3 times and still
    have no idea what TWRP is or if I should care.
    How do we verify that this step is complete? I believe I have gotten here only because I am running on 7.1.1 of
    what looks like a stripped down Pixel version of the OS, but I still do not know if the phone is properly
    configured to take on the next steps or the version 10 Nougat ROM.
    [And yes, I used the name & number because I often loose track of what confection Android decided to
    randomly apply to its versions. It would be of great help when awesome folks like you guys write these
    instructions to note both as most of us won’t memorize these.]
    Step 6: I have tried to follow these instructions to the letter even though I don’t understand what half of it means.
    (A) Downloaded all the files mentioned
    (B) Used 7-zip to unpack the system image.
    (C) Did a straight drag & drop from Download folder onto the phone icon in windows explorer. There is no mention
    as to WHERE on the phone directory these files should go so I went to only icon that shows up when I plug in
    the phone. Is that correct? I assume so as the screenshot you have next is what I get.
    It goes a little astray here.
    (D) I restart and hit Recovery. On the computer, a window pops up with TWO versions of my phone showing
    internal storage. IS that normal?
    I hit Install, then Install Image, scroll to find image, tap on it System Image radio button and swipe to confirm. It
    does it’s thing and stops at “Image Flashed” and gives a Back button and Reboot System button.
    (E) You say “go back to the recovery’s main menu” so I tap the Back button, but that only takes me back to the
    Install Image page so I use the Back hard key until I cannot go any further back, then tap the Install button and
    the SuperSU_System.zip. This seems to go fine. Until…
    (F) The phone reboots on it’s own which is not mentioned in the instructions.
    (G) Again with the two separate but equal Internal Memory icons showing up on the computer.
    (H) I am able to tap on the Recovery button again from the “Splash Screen” and then…
    (I) I hit the Reboot key, and tap Download key.
    Previously, the phone would send me to a different menu that asked if I wanted to Install TWRP. I thought TWRP was already installed and this was very frustrating.
    (J) This the 4th Time I am going through these steps, the phone does exactly what you say it will and goes into
    Download mode.
    I used the modified version of ODIN and load up the BL_N950U_Nougat_V*.tar.md5 and hit start.
    I get a FAIL! SHA256
    The phone sits in “Downloading…” mode with the first start of the white status bar but never moves and has to
    be power-cycled to get out of Downloader screen.
    When it comes up initially, I get Upload Error and has to be power-cycled again to get back to SafeStrap Splash
    Screen and Continue to get to usable phone (barely… how did we ever live on 7.1.1… there isn’t even a dark
    mode!)

    What is going wrong?

    Thank you in advance for any help.

    1. Hi Michael. First off, thank you for the complete detailed explanation of what exactly you did at each step and where you faced errors/confusion.

      I tried my best to make the instructions as descriptive as possible, with an expectation that the readers would have the basic knowledge of how things work around when modding the software and involved terms. This is something I have to presume with these types of tutorials, which require a bit more expertise than the regular approach, which is generally followed for devices that can be bootloader unlocked.

      This page was originally published in 2017 when the phone just came in. Over time, I have tried to keep it updated with new methods and files that are released by the developers. And it is sometimes hard for me to do so, as I work alone to push new tutorials on the blog, update the old ones, provide support through comments, social media, and emails, and so on.

      I hope you will understand this part. I will make sure to apply what changes you have suggested making the instructions more newbie-friendly.

      Like I mentioned initially in the article, this method does not root the device while it’s running Android Pie or Android Oreo for that matter. This method uses an exploit found in Android Nougat-based combination firmware to gain root access. So, it’s not expected to be stable, to say the least.

      If you wish to have root access, you will have to continue using Nougat. This also means that you will miss all the new features and improvements that came in Oreo and Pie.

      Now, let me try to provide you with some answers following the same way you structured your comment.

      Step 3: ‘Sideload’ is a pretty common term since the beginning of Android. To put it simply, it’s the process of manually installing stuff, like OTA packages or APK files. A ‘Batch’ file is a script file exclusive to Windows and DOS systems, more on that here. I will add that you have to double-click the APPS_INSTALLER.bat in Windows Explorer just like you suggested.

      Step 4: Pressing the Enter key on the keyboard is just for closing it down from the window, it’s not something mandatory, but just convenient. The ‘Send’ part is important, as that is what will do the actual job. There’s no way to verify if this step worked unless you try Step #5. However, if you do enter the right command and hit the Send button, there’s no reason for it not to work.

      Step 5: Yes, the configuration stays the same. Running the ROOT_INSTALLER.bat basically injects the root (superuser) binaries into the combination firmware. This isn’t something you’ll notice on the front-end on your phone.

      a) Odin once used to flash a firmware file needs to be closed and reponed. I will add this.
      b) You can verify by running the Flashfire app from the app drawer. This app should be installed when you ran the ‘APPS_INSTALLER’. It’s just that the app won’t operate until Step 5 is finished.
      c) It’s just a comment. When you reboot, you should see the Safestrap splash screen to choose if you want to boot into the recovery or want to continue booting into the system.
      d) TWRP is a custom recovery for Android. You can Google more about it. The Safetstrap recovery used here is built upon the same but is only exclusive for Galaxy devices with Snapdragon SoC.

      The verification can be done two ways – (1) by running FlashFire, which will prompt for Superuser access via SuperSU, and (2) By rebooting the phone, and seeing if the Safestrap splash screen is present.

      Step 6:

      c) When asked to copy anything to the phone, it should be copied inside the Internal Storage. You can copy it to the root directory of the internal storage, or inside a folder, depending on your convenience.
      d) It is normal
      i) If prompted to install TWRP, deny it.
      j) From what I can gather, this is the step where things didn’t go planned. Did you extract the contents of the ‘BL_N950U_NOUGAT_V8.tar.7z’ file to get ‘BL_N950U_NOUGAT_V8.tar.md5’? Or did you simply rename it?

      Right now, here’s what I want you to try and finish the process. Download the modded Odin from this link and launch it. Then flash the BL_N950U_Nougat_V*.tar.md5 file through it. For this, you will need to get your phone into Download Mode. You can do so by using SafetStrap > Reboot > Download.

      Again, thank you Michael for going into great depths to explain what exactly you did. I really appreciate it. I will make sure to make amends to the article where applicable.

      At last, I would like to ask if you really want to use this method to root. To be honest, it’s directed over to users who really do not care about new features or software, but just gaining root access. To add, it is still not a properly rooting solution. Yes, you will be able to use apps that require superuser/root permissions, install a couple of mods, but nothing more or like what could be done on most other OEM devices or the Exynos variants of the Galaxy devices.

  4. Thank you, team and associates for incredible work to get this particular Note 8 in a rootable fashion. The download link for the Modded Odin3 processed the final step for the pre-install Nougat platform.

    If at any point I desire to unroot/restore the Note 8 to factory OS. Is there guidance on how this can be accomplished?

    Please advise where I can link to provide a donation. All of this takes a lot of hard work and testing. Contributing is the least we or I can do to keep this platform supporting us Rooters. Thanks.

    1. Hi and thanks for the kind words. The credits go to the developers alone. I just tried to break down the instructions in a more newbie-friendly manner.

      If you want to revert anytime, you can download the latest official stock firmware using tools like Frija and then follow this tutorial to flash the firmware on your Note 8 using Odin.

      If you would like to donate, you can find the information at the original XDA thread right here.

  5. Hi, thanks for this, so far I got up to step 6.1, installed nougat. Now Im wondering, DO i HAVE to install the pie rom? is that optional? any real benefits? ( my main reason for rooting, is so that I can use tethering with my PC for internet access, with out ATT charging me (which I have done successfully with my Galaxy S4 for about 6 years now! after I rooted it!)

    However this was/is a sprint phone (which I would like to use @ATT)

    any advice please.

    Thanks Again!!!

    1. Hi MikeD. If you install Pie, you will not be able to have root permissions, which is the first thing to keep in mind. If tethering is only possible with root, you will need to keep your phone on pre-rooted Nougat ROM.

      Installing Pie will give you a recent security patch and Android Pie + One UI features.

    2. Hello Dhananjay, your guide is very interesting and very understandable, I thank you for that immense contribution, thank you very much ….. my question is if I have the recovery of safestrap installed with android 9 (foot), could I root it with magisk manager? … I would appreciate your answer

    3. Hi Jose. Many thanks for such kind words. I tried my best to elaborate on the original instructions provided by the developers.

      As for your question, I am afraid but it’s not possible to install Magisk and gain root access on Android Pie. Adding further, it’s not possible to root Android Pie on the Note 8 at all.

      The method described here uses an exploit in the Nougat firmware to establish root access. The exploit was patched in the firmware/Android versions that followed.

      I hope I was able to answer your question. If you do have any more, please let me know.

  6. Oh. I am sorry that I couldn’t help you successfully root your phone.

    Could you please contact me via Facebook or Twitter? I would like to examine the situation and finally deduce what exactly went wrong.

  7. Hi again. Have you tried re-doing the instructions from step #1?

    Right after flashing the combination firmware, make sure to perform a factory reset using stock recovery. Once done, follow with Step #2 and so on.

    1. Yes, I tried many times since the first step and the same error continues. I already tried with different USB, different ports, different computer, download the files again and nothing.

  8. Hey Dhananjay

    I don’t know what to do now. I can’t even flash the the legit android 7.1.1 to my phone. Odin always fails. I really need my phone. If you could please, please help me get my phone running again, that would be much appreciated. I’ve been up all night trying to get things figured out and have failed miserably. I’m sorry If I’ve posted too much.

    Thanks.

    1. Hi Brock. Don’t worry, first of all, relax. I can understand the situation. I have been there years ago.

      Before performing this procedure, you were on Android Pie, right?

    2. Yes, I was. I ended up taking it to the Samsung place and they reset it for me. I still want to root but now I’m kinda apprehensive about it. I don’t want to go to that screen again and be out of a phone.

    3. Hi again Brock. Don’t worry about that. As long as you can boot your phone into Download mode, it is safe and can always be recovered by installing the stock firmware.

      Now, before you repeat the process, make sure that you use a USB 2.0 port of your PC when connecting your device. See the image attached below, as confirmed by another member on XDA.

      Also, the Factory Binary screen is sort of a boot animation and could take some time before your phone boots. If it takes more than 5-10 minutes, then simply boot into stock recovery, perform a factory reset and then reboot your phone into the OS. The phone will boot into a Nougat-based test OS.

    4. Well I could even access settings and all that. But if I kept waiting, it would actually boot and the device would eventually show the set up screen? So I was doing it right all along? I tried the USB 3 port and the 2 port. Got the same results each time.

      Well let me ask you this.. Why couldn’t I flash the stock firmware to my phone? Why would Odin fail?

      Also I definitely think you should mention something about the factory binary screen in the instructions.. just so people don’t think they have messed something up. Just a small recommendation. 🙂

    5. Hi again, Brock. Let me break it down for you.

      You wouldn’t have to wait for any more than 5, at most 10 minutes. And then, you should see this screen. Is that what you saw after flashing the combo firmware? If yes, then you were doing it right. Just try swiping from the top of the screen, you will see the notification panel, from where you could access the Settings and then enable USB debugging and finally proceed with step #2 and further.

      As for flashing stock firmware via Odin, which firmware did you try installing? And which version of Odin did you use to flash the stock firmware?

      Oh, and your recommendation, I think it is must to include it in the post. Since I don’t own the Note 8 anymore, I couldn’t have got the pictures by myself. So if you could, would you please share a proper image of the test OS, so that i can link it in the post for reference?

    6. Gotcha, cool. I’m sorry for being kinda high maintenance. Thanks for being so helpful and understand so far.

      Anyways, I was flashing the right firmware meant for my device. I flashed the ATT one and the T-Mobile one. The people at the Samsung place said they don’t use Odin but flashed the Verizon firmware. That was kinda confusing.

      But yeah, I could send a picture when I decide to attempt to root. However, I think the one you put on imgur will suffice. The part that got me was at the end of step 1 when you said you didn’t need to sign into the Google and Samsung accounts during setup. That’s honestly why I thought I screwed up. I was expecting a set up screen and not a factory bianary screen.

      So your probably sick of me riddelling you with questions but I do have more. If I wanted to use Android 9, how could I utilize the root? Also, if I use nougut, would I still get security updates?

      Thanks so much

    7. Also, I was using the latest version of Odin. However I tried flashing Android 7 and 8 to the phone. I used different versions of odin but for the most part, I used the latest version. I tried flashing Android 7 and 8 because they downloaded much faster then Android 9. At the time I didn’t have much patience to wait for Android 9 to download.

      It is quite possible that I don’t really know what I’m doing when it comes to Odin. But from the various tutorials I followed, I feel like I did it correctly.

      Anyways, thanks!

    8. I read further and answered my question about Android 9 and utilizing root. Just so ya know👍

    9. Hi again Brock. It was an error on my part when I mentioned about ‘not logging into Google/Samsung account’ right after the instructions in step #1. That will confuse anyone. I will update the text accordingly, along with the image of the factory binary.

      Now, as for flashing firmware via Odin, you can only flash Android Pie stock firmware. You cannot flash Android 7 Nougat or Android 8 Oreo firmware now, since the bootloader version doesn’t match with the current one installed on your phone.

      Android Pie firmware has V5/V6 BL and Android Nougat/Android Oreo have BL versions ranging from V1 to V3. So, you cannot downgrade by flashing the official Nougat/Oreo firmware.

      And, If you use this method, you won’t get official security updates at all.

    10. You’re welcome, Brock. Let me know if you have any further questions regarding the procedure.

  9. Hello! I’m very excited to see a root for my phone! I was reading through the instructions and have three questions for you…

    1) on step 3, part 5, what exactly is the COM#?

    2) So I’m thinking of going the nougat route. If I decide I want to go back to Android 9, how would I do that? Would a simple reset to factory settings do it? How would I completely unroot?

    3). Does this effect KNOX? If so, what does it effect? Is anything reversable? Will biometrics work normally as well?

    1. Hi Brock. It’s good that readers clear their doubts first, especially because if they are doing things like this for the first time.

      1) In Step #3, the COM port refers to the number shown after “Status of device COM”. For example, in this image, it is “1”. It could be the same number in your case or a different one. You will need to input the one that’s shown on your PC’s screen.

      On the other hand, COM port in step #5 is automatically detected, so there’s nothing there that you’d need to do manually.

      2) No, a factory reset wouldn’t take your phone back to stock firmware. Restoring stock firmware and a factory reset are two different things. If you ever want to go back to Pie stock firmware, you can follow the instructions in this guide.

      3) KNOX will be tripped the very instant as soon as you finish step #1. Once tripped, the phone’s warranty will be lost once and for all, and it is not reversible. KNOX affects applications like Samsung Pay and Secure Folder. So, if you rely on these apps heavily, then don’t proceed.

      As for biometrics, they will work just fine. There’s a fix provided for that as well in the instructions during the last step.

      I hope all your questions have been answered. If you have any further doubts, let me know.

  10. Hi. I can understand. If you want, you can manually upgrade your phone to the latest available firmware (Android Pie-based One UI). Or, are you just looking for root?

  11. Hi Dhananjay,
    Been waiting for my US version (Snapdragon) root for tow years now. I followed SamFail post but didn’t like the downsides of the root. I was about to sell my 2-moths old (like new) phone and loose money to buy a Exynos version. I stopped hoping and let my phone get updates every now and then. The last update was of August, 1, 2019

    Two questions please:
    1. The root method you are posting sounds promising but I discovered it so late that my phone now is on Android 9 which is I think the “Pie” version. Do you think I can do your root method if I downgrade to Nougat?

    2. Besides, my baseband is N950U1UEU6DSH3, do you think I can do the root with this version of baseband?

    Please help, thanks

    1. Hi Alex. First off, let me start with the downgrading part. You cannot do it. That’s because once the bootloader version (Check pointer #2 in “Prerequisites”) is upgraded, the phone could only be downgraded to a firmware that matches your current bootloader. So, no, there’s no way to go from Pie to Nougat by simply using Odin to flash the firmware.

      Now, this method gives you two choices. Check them in the yellow-colored note box right above Step #5. Personally, I think it’s best to use Pie firmware with Safestrap (which allows you to perform modifications to the device). Also, Pie firmware will have the updated security patch version.

      However, if you’re in a dire need of root, you will need to follow all the five steps (Ofcourse, the fifth one is still a work-in-progress). The fifth step will allow you to load a pre-rooted Nougat system image (only the system partition).

      I think the above information would suffice your first question. Over to the second one now.

      Yes, you can root, but you will be forced to stick with Nougat firmware, so no Pie (One UI) or Oreo features. That’s the reason I am re-writing the instructions from scratch.

      If you have any further questions, please feel free to comment further.

    2. i try step 1 thru 4 on my note 8 bootloader v6 three times but no safestrap install please help

    3. Dhananjay,
      I have to tell you man, you are such a good and knowledgeable fella. Thanks for replying so quickly :)))

      Thank you for the explanation about the impossible downgrading process. But you did give me a hope there is a chance for rooting. But I thought you said rooting is not possible if I have Pie on my android (mentioned in the second bullet of the first paragraph above). Otherwise if you meant no root for Pie then i would not care at all. I only care about rotting no matter what software version i have. Please advise

      Thanks for the good news about my rootable BL versions

    4. Thanks for such kind words.

      In simpler words, Pie cannot be rooted on Galaxy devices running Snapdragon chipset (because they have non-unlockable bootloaders). There was a vulnerability in Nougat that was exploited in order to root the phone.

      So, you have two options:
      1) Use Pie + Safestrap (It’s a custom recovery that’s injected into the bootloader) to perform modifications to the device.
      2) Use pre-rooted Nougat system image (only the /system partition)

      It’d be good if you could provide me the reason why you want to root? What exactly do you want to do with the rooted phone? It’ll let me give you a clear answer on which option you should choose.

    5. Oh I do several modifications:
      1. Increase system sounds volume ( I really like it)
      2. Change booting screen logo.
      3. Remove ads
      4. Lucky Patcher works like a champ on rooted device
      5. I used to use Titanium Backup which needs rooted device
      6. Lots of other apps need rooted device
      7. And lots of other stuff

      Kinda think that Flashing a pre-rooted Nougat is better for me right? I don’t think I will need new features from Pie or Oreo. however I would love to here your advice about whichever you feel is best for me

      My device is already out of warranty now, so rooting won’t affect me anyway. I used to root the moment I buy it without hesitation.

      I look for any modification out there and see which one I like or useful for me and i apply it.
      I like to change the device as I want. That’s why I left iPhone in trash long time ago 🙂

      By the way I would love to help for posting images about flashing a pre-rooted Nougat system image if you want, but don’t know how. If you have somebody helping you then never mind sir.

    6. Hi again, Alex. If that’s the case, then I would too recommend rooting your SD Note 8 by further flashing the system image from the pre-rooted Nougat ROM.

      I have just finished updating this guide, along with the screenshots too. Really appreciate your concern about the screenshots, but since they are already done, I wouldn’t need them anymore.

      However, once you have finished, it would be great if you could share some screenshots of the rooted device.

      Like the App drawer, where apps like FlashFire are pre-installed, a screenshot of an app prompting for root permissions, and lastly of the “Software Information” section in the phone’s settings where it shows the Android version and the rest of the details.

    7. Will do,
      So excited man!
      I will probably do it this Sunday, can’t wait.

      Will update you.

      Thank you very much for the advice 🙂

    8. Hi Alex. Sure, let me know how it goes. Just make sure that you follow each and every instruction as stated and do not deviate from them at any point. My advise: Read the complete post from the start.

    9. Hi Dhananjay
      I was reading about the Pre-rooted Nougat yesterday. Is there a possibility of losing some of features like the fingerprint and face recognition? Is that possibility is available in the other method of installing Pie with SafeTrap?

      I guess my question should be: What is the Pros and Cons of each method? What is the difference between them? If you please can help us with this answer when you have the time to answer please 🙂

    10. Hi again. That’s what the instructions in the last step are for, to flash the fix for face unlock and fingerprint sensor.

      The benefit of staying with Android Pie + Safestrap method is that you will have a more recent security patch, will be able to enjoy One UI features. But you won’t be able to use any apps that requires root. You will only be limited to install certain mods that are available for the device.

      As for the Nougat ROM, the first downside is a much older security patch version, plus the same old Samsung Experience (Well, I personally don’t like SE, One UI is much better for me. So you might feel otherwise). And I don’t need to tell you about the benefits of root, right? You already know what you can do with it.

    11. Dhananjay,
      I did it man :)))

      It took a few hours from me with some glitches and trial and error but everything went fine at the end!

      One issue that I still have: When I boot my device, the first black screen (where it shows Galaxy Note 8 in white) still demonstrates some small fonts writings at the top left corner such as build number or serial number which I feel this is odd.

      Any thoughts?

      PS: I would like to send you some pictures about my successfully rooted phone as requested, what would you like me to send please? and how to upload it here?

    12. Hi again Alex. I am glad it did. Did you need to perform a factory reset via stock recovery after step #1? Many users have reported that after flashing the combination firmware, there phone boots into maintenance mode.

      That’s how it’s supposed to be. It is a custom BL screen, nothing to worry about. You can safely ignore it.

      And yeah, it would be nice of you to do that. You can take the screenshots and mail them to me. The email address could be found in the author box just above the comments section.

    13. That what exactly happened to me too after the first step. But I read the comments and did the wipe date/factory reset and rebooted.

      But I just read the comment about the typo using AP instead of BL buttons. I did the AP one!!! Phone is up and running! Could that be the cause of the custom BL screen in the beginning?

      I’m thinking to repeat the whole process all over again just to make sure I got everything right!

      Please advise me

    14. Don’t worry. You got everything right. However, if you have time, you can retry from the beginning. This time, use BL slot for the combination firmware.

      BTW, when you used the combination firmware in AP, did you experience any issues? Or the phone booted straight into the OS without entering any other mode like Maintenance.

Post a Comment

Comment Policy: We welcome relevant and respectable comments. Only input your real first name and valid email address if you want your comment to appear. Read our comment policy fully before posting a comment.