Set SELinux Permissive on Android using The SELinux Switch
Changing SELinux mode on your Android device is no more pain. In this guide, we will show you how to easily set SELinux Permissive on your rooted Android

On this page
Changing SELinux mode on your Android device is no more pain. In this guide, we will show you how to easily set SELinux Permissive on your rooted Android device using The SELinux Switch app.
What is SELinux? – Security-Enhanced Linux, abbreviated as “SELinux” is a security module in the Linux kernel. It provides a safe mechanism to regulate access-control security policies. In simple language, it is a security measure that limits the amount and type of information that could be accessed by user programs/apps, in case of Android.
SELinux was introduced to the general public with Android 4.3, which could easily be toggled from the Settings back then. Later on, with Android 4.4 KitKat, SELinux status was permanently changed from ‘Permissive’ to ‘Enforcing’. Now, if you do wish to set SELinux Permissive (Change SELinux Mode) on Android devices, you shall read the instructions below.
Editor
Set SELinux Permissive using The SELinux Switch
The SELinux Switch is a utility app for Android power-users to help them switch SELinux mode on their devices. Since Android natively comes with SELinux Enforcing, you can use this simple, yet very effective tool/app to set SELinux Permissive. It has been developed by XDA Senior Member - Ibuprophen, who previously brought SELinuxToggler to the public.
So why a new app? SELinuxToggler was self-sufficient and did the job well.
The major reason behind the new app was that SELinuxToggler was using the same package name(com.mrbmic.selinux) as that of SELinuxModeChanger (Developed by MrBIMC). And now since the latter is not under active development anymore, Ibuprophen decided to support the community with his own work from the scratch.
The developer has lately been spending a lot of time in updating the app and making it compatible with the latest Android versions including Android Pie.
The SELinux Switch does not make any permanent alterations to the boot script. So, when your device reboots, the SELinux mode will be changed back to ‘Enforcing’. However, the SELinux Switch app will automatically launch after the boot sequence runs and set SELinux Permissive again, should you wish to do that.
Why would you change SELinux mode to Permissive?
As you read above, SELinux is a security measure implemented in Android to limit the privileges required by apps, so that they wouldn’t be able to attempt any sort of privilege escalation attacks. Such attacks tend to compromise all your personal data on your device. No doubt it was a pretty neat thing to apply and does ensure the safety of our Android devices to a great extent.
But for us, who are more interested in modifying our devices by using root, SELinux often barricades the development with several issues. Of all, the major one being the default Enforcing SELinux mode, which cannot be simply toggled from the device settings. Enforced SELinux creates many problems for root-enabled apps and mods that users operate nowadays, including VIPER4Android, etc.
If one of your favorite root apps is not behaving properly or is not functional, then you might want to set SELinux Permissive.
How to Change SELinux Mode on Android using The SELinux Switch App
Using The SELinux Switch app, it is easier than ever to toggle between Enforcing and Permissive SELinux modes. The app offers a clean and functional UI to get the job done within a few taps.
Step 1: Install “The SELinux Switch” App
In order to change SELinux mode and set SELinux Permissive, you will first have to download and install ‘The SELinux Switch’ app. Unfortunately, the app is not available on the Play Store.
You can install the app through two different methods - by manually installing the APK, which is the easiest. Or, by flashing the installer zip through TWRP. The latter is available in case if the APK installation method fails for some reason.
Via APK
To begin, you must first enable “Unknown sources” (Nougat & below) or “Install unknown apps” (Android Oreo and Android Pie) option in the Settings. This is required if you’re installing an app from sources other than the Play Store.
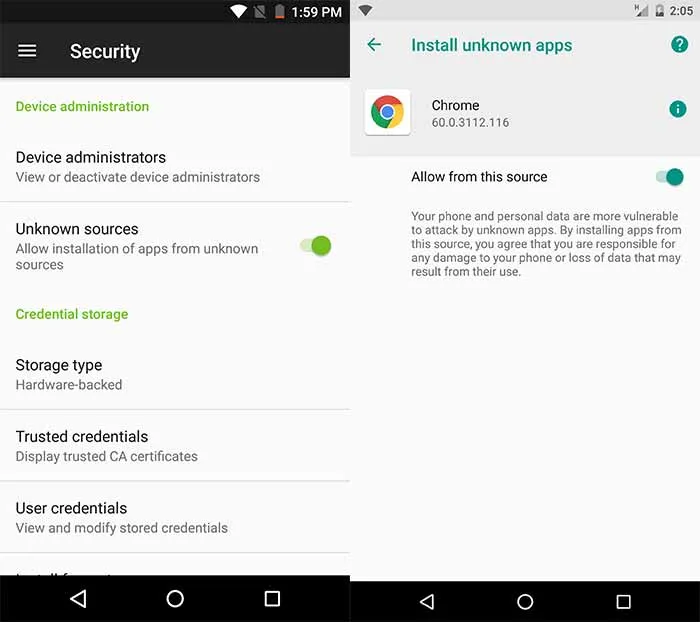
- Android Nougat or below: Go to Settings > Security.
- Android Oreo or Pie: Go to Settings > Apps & notifications > Advanced > Special app access > Install unknown apps.
After you have enabled this option, download the latest “The SELinux Switch” APK: Download Link
Once you have downloaded the APK, use your favorite file manager application to navigate through the storage and install it via the package installer.
Via TWRP (Flashable Installer ZIP)
It is highly unlikely that the APK installation will fail. But in a scenario where it does fail, you opt to install “The SELinux Switch” app by flashing the installer *.zip file.
So first download the Installer ZIP file (e.g. The.SELinux.Switch.ver.6.2.7.build.627.zip) and place it on your device’s storage. Then reboot your Android device into TWRP recovery mode.
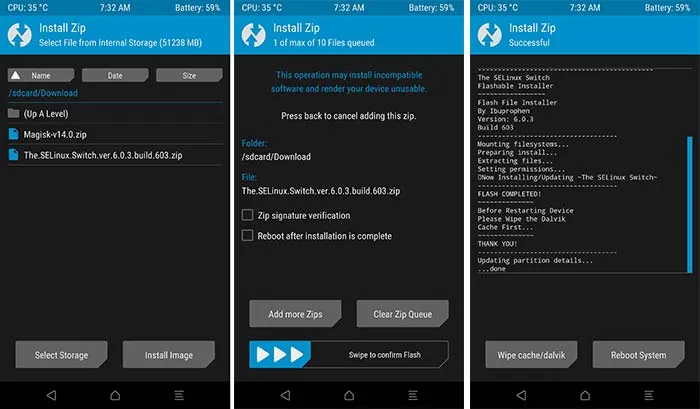
Once your device is in TWRP, tap on the “Install” button. Then, browse the internal storage/SD card of your device and select the installer zip file. Once the file is selected, just swipe the “Swipe to Confirm Flash” button on the bottom.
It shouldn’t take more than a few seconds to install. Once it is complete, tap on the “Reboot System” button.
Step 2: Set SELinux Permissive Using the App
Now that the app is installed on your Android, you can easily use it to enable SELinux Permissive mode. So, go to the app drawer and launch The SELinux Switch app. As soon as the interface initiates, you shall see a prompt for root permissions. Make sure to grant the access.
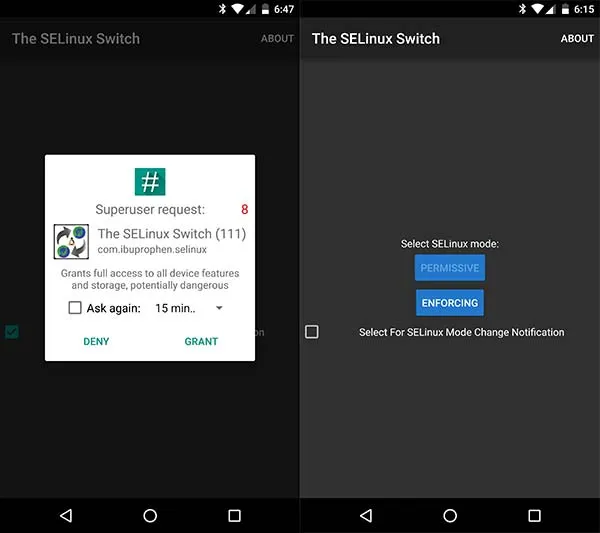
You shall now see the app screen. To set SELinux Permissive, just tap on the “PERMISSIVE” button once. To change back the mode, you can simply launch the app anytime and press the “ENFORCING” button. For your added convenience, you may also select the “Select For SELinux Mode Change Notification” option.
There you have it! You have easily installed The SELinux Switch app on your Android and used it to set SELinux Permissive. This eventually saved you a lot of trouble of installing modified boot scripts or other workarounds.
If you face any problems while installing the app, you can comment below or get direct support from the developer and other users over at the XDA thread.
Comments
Comments are moderated, and published only if they are relevant to the topic and add value in a constructive way. If you disagree with something, please be polite and respectful. We suggest you read our comment policy before commenting.