
On this page
Want to set SELinux to Permissive mode on your Android? This app will help you do that in a matter of seconds.
SELinux is a Linux kernel security module that was implemented to the Android ecosystem in Android 4.3. While it was a huge step towards better Android security, but at the same time also proved to be a hitch for the custom Android universe. It brought problems to root methods and popular mods like Xposed Framework. But with time, the genius minds at XDA community made it possible, and we were again able to enjoy our favorite mods and root (SuperSU).
The “SELinuxToggler” app has been depreciated. The developer - Ibuprophen has started a new app that you can use - “The SELinux Switch”. You can find the new app here.
If you have dealt with SELinux in the past, you would be well acquired with a tool, namely “SELinuxModeChanger”. And as the name suggests, it helped you switch between SELinux permission modes on your Android. The development of the app was soon halted and the developer (XDA member - MrBIMC) finally discarded the project. While the app still works great for Lollipop, and also some devices using Marshmallow, but it has finally reached its end-time with Nougat.
Why would you set SELinux to Permissive?
Since the beginning we have obeyed the old-school mythology, that root permissions on your Android would let you do anything with your device. But with the introduction of SELinux protocol, even root apps could be denied permissions to access certain files or perform several actions. It is one of the reasons that many of you are still not able to get mods like ViPER4Android working correctly.
On every device with Android 5.0 and above, SELinux is fully enforced (Enforcing mode). So to get things in line, the last resort is to change the and set SELinux to Permissive mode. Let us see below how these two modes work.
- Enforcing**:** Any process/service that is not explicitly allowed is not only logged but is also enforced denial of permissions. So even if you have root, you won’t be allowed to perform certain actions.
- Permissive**:** While if you are able to change it and set SELinux to Permissive, those specific processes/services will only be logged and the permission denial will NOT be enforced.
So with the Permissive mode, your root apps or mods will again have full power over your Android device.
Install SELinuxToggler
SELinuxToggler offers to switch SELinux modes through an Android application user-interface. It has been developed by XDA member Ibuprophen, who decided to take over the project and made necessary changes to make it support the latest Android version. It can be installed and used on any device with Android 4.2 or above.
So if you have been using modified boot script mods previously on Nougat, you can just relieve yourself from them and use this app to make things easy again.
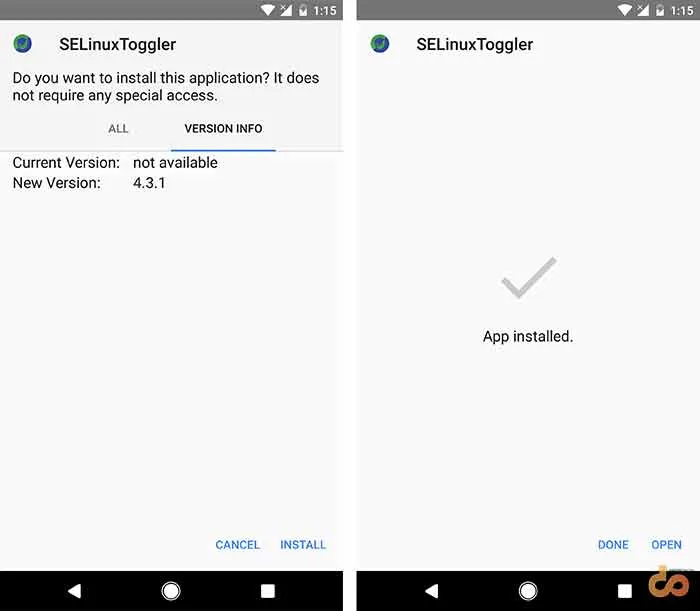
The app could be installed either by simply installing the APK or by flashing a flashable zip through TWRP. So choose your desired method and get your installation file from here. You must also have a proper root method (preferably Magisk or SuperSU) and Busybox installed on your Android.
How to Set SELinux to Permissive
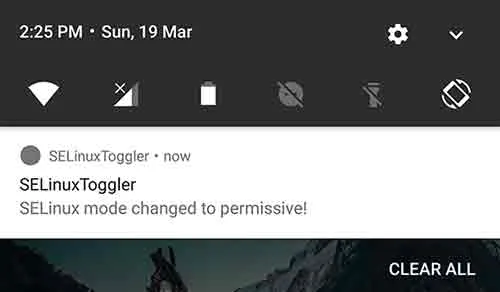
Run the app once it has been installed on the device. If you are prompted for root permissions on the first run, then make sure to grant them. The app’s UI is pretty straightforward with just two buttons. You can simply tap on the Permissive button to change the SELinux status.
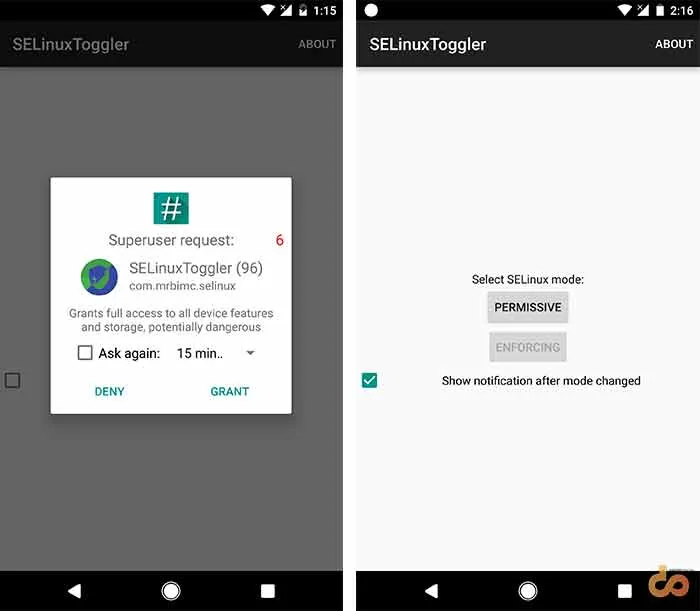
However, the app still has limitations. It will still not be able to make permanent changes to the boot script. So every time you reboot your device, the SELinux status will be rolled back to “Enforcing”. But then, the app will automatically launch (along with the other apps that are set to automatically launch upon boot), and will then set the SELinux back to Permissive. No further action would be required unless you decide to open the app and change the SELinux mode back to Enforcing.
So now, you can easily use mods like ViPER4Android without any issues. If you have any problems or questions, post a comment right away. And don’t forget to share this article on your social profiles by clicking the buttons below.
Comments
Comments are moderated, and published only if they are relevant to the topic and add value in a constructive way. If you disagree with something, please be polite and respectful. We suggest you read our comment policy before commenting.