
On this page
In this guide, we will discuss how to root the Nothing Phone 1 with Magisk. This guide is applicable to both the Global and European (EEA) variants of the phone, running any version of Nothing OS.
Nothing Phone 1 is actively gaining support from the custom development community since its launch. An experimental port of the famous OrangeFox Recovery is already under development, which means that custom ROMs are shouldn’t be far away.
However, shifting to a completely different firmware isn’t the only way to gain new features or modify the phone’s software to your liking.
If you appreciate the simplicity of the stock firmware (Nothing OS), then you can just root the phone with Magisk. It not only enables you to use root applications, but also lets you install modules that can modify the phone’s software systemless-ly. That is without actually mounting or altering the /system partition.
The possibilities with root access are endless. If you’re here reading this tutorial, I would assume you already know why you want to root your Nothing Phone 1. So, let directly jump off to the part where I show you how to do it.
Before You Start
1) Backup your data:
Rooting does not erase any data stored on your phone. However, it is a good practice to always take a full backup of all your data in case things don’t go according to the plan and your data gets corrupted or lost due to a bad flash.
If you need guidance, we already have a guide to backup different kinds of data on Android.
2) Charge your phone:
Having sufficient battery charge in your phone will ensure that it doesn’t power off abruptly during the rooting process.
I advise charging to a minimum of 50% battery level, which will give you enough time to go through the instructions and perform them.
Prerequisite
An unlocked bootloader:
Nothing Phone 1, like most other Android devices, comes with a locked bootloader. The locked state prevents the users from flashing/wiping any of the device partitions.
Rooting the Nothing Phone 1 involves flashing the /boot partition. And in order to do that, you must first unlock your phone’s bootloader. Note that unlocking the bootloader erases all the data on the phone.
If you have already unlocked the bootloader, it doesn’t need to be done again. In that case, you can skip directly to the instructions.
The guide linked below covers the complete bootloader unlocking process. The method is quite easy and very similar to what is used for Google Pixel and OnePlus devices. Follow it and then come back here once you’re done.
How to Root Nothing Phone 1 with Magisk
The process of rooting the Nothing Phone 1 with Magisk is a tried-and-true method. You will start by unlocking the bootloader, patching the stock boot image via the Magisk app, and then flashing the patched boot image to your phone using fastboot.
I have broken down the complete process into several steps so that it’s easy for you to understand.
The only things you will need are:
- Your Nothing Phone 1
- A compatible USB-C cable
- And, a computer with Windows/macOS/Linux operating system
So, let’s get started.
Step 1: Set up Android Platform-Tools on your PC
The Android SDK Platform-Tools contains several useful command-line tools such as adb and fastboot that you will be using throughout these instructions. In fact, their applications extends beyond and you will be using these tools more often than you realize.
Setting up the Android Platform-Tools on your computer is very simple. Use the links below to download the package according to the PC’s operating system.
Once the tools are downloaded, extract the contents of the .zip file by:
- Right-clicking on the file and selecting “Extract all” from the contextual menu on Windows
- Double-clicking on the file on macOS/Linux
The resultant platform-tools folder should contain the binary files of the required command-line tools.
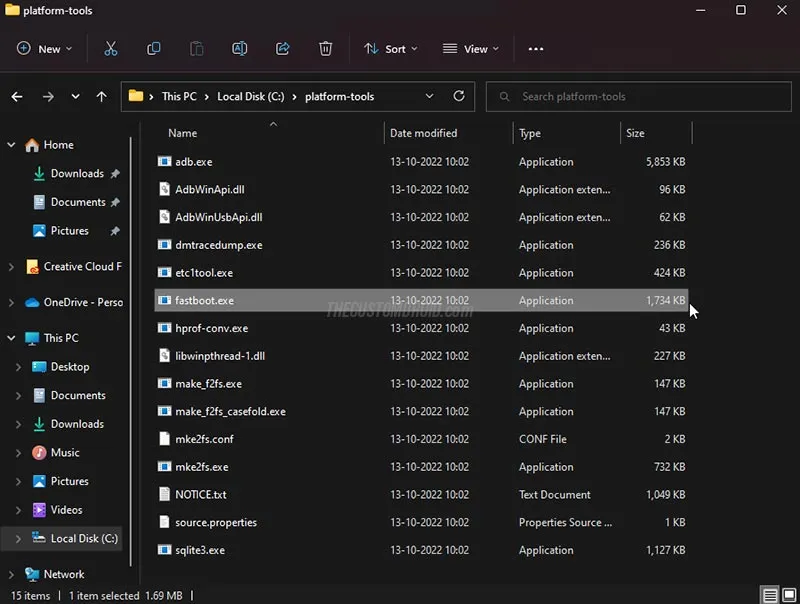
For quick access, move the folder to root of the C:\ directory on a Windows computer or to the Desktop directory on a macOS/Linux computer. Once this is done, the path through which the tools can be accessed should be:
C:\platform-toolson Windows/Desktop/platform-toolson macOS/Linux
Step 2: Launch Command-line Window inside Platform-Tools Folder
Once the required tools are set up, the next step is to launch the command-line window (PowerShell or Terminal) and then change its directory to the platform-tools folder, which will be our current working directory.
I have already covered a short tutorial on how to do this, so I would rather not repeat the same steps here. So, follow the instructions in the guide linked below:
Do not close this command-line window until you’re done with the complete rooting process.
Basic command-line usage:
- Prepend commands with a dot followed immediately by a backslash (
.\) in the Windows PowerShell.- Example: The
fastboot devicescommand should be inputted as.\fastboot devices.
- Example: The
- Prepend commands with a dot followed immediately by a forward-slash (
./) in the macOS/Linux Terminal.- Example: The
fastboot devicescommand should be inputted as./fastboot devices.
- Example: The
Step 3: Extract Boot Image from Nothing OS OTA Update
The next step is acquire the boot image of the software build that’s currently installed on your Nothing Phone 1. To do this, you will need to download the Nothing OS OTA update package, extract the payload from it, and then dump the payload.bin to finally get the boot image.
Important note:
You might find it convenient to download the boot image directly from online forums than extract it yourself. However, I would advise against it.
Self-extracting the boot image will zero down any chances of version mismatch and thus avoid unusual errors such as bootloops, WiFi/Network not working, etc.
Moreover, by doing it yourself, you will learn some new things along the way. And you also wouldn’t need to wait for someone else to extract the boot image and then upload it publicly.
Step 3.1: Verify Nothing OS Version and Regional Variant
First, verify the version of Nothing OS that’s installed on the phone by going to Settings > About phone. Then take note of the version mentioned under Software info. For example, the version installed on my phone is Nothing OS 1.1.4.
Next, you also need to know which regional variant (EEA or Global) of the Nothing Phone 1 you have. The most obvious way to tell this is by verifying the region of purchase:
- If the phone was purchased from an official retailer in one of the European countries, then it’s the EEA variant.
- If the phone was purchased from an official retailer outside the European region (such as Australia, United Kingdom, India, UAE, etc), then it’s the Global variant.
Another, more certain way is by using ADB Shell and the getprop command. Simply install a Terminal Emulator app (such as Termux) on your phone, launch the app and execute the following command:
getprop ro.product.system.nameThe command should return:
spacewarEEAfor the European variant- or
Spacewarfor the Global variant.
Step 3.2: Download Nothing OS OTA Update Package
Now download the full OTA update package corresponding to the installed Nothing OS version and according to your phone’s region from the repository linked below.
Step 3.3: Dump OTA Payload.bin to Get Stock Boot Image
After the update package is downloaded, follow our guide on how to dump payload.bin and extract the stock boot image for rooting your Nothing Phone 1.
Step 4: Transfer Stock Boot Image to your Phone
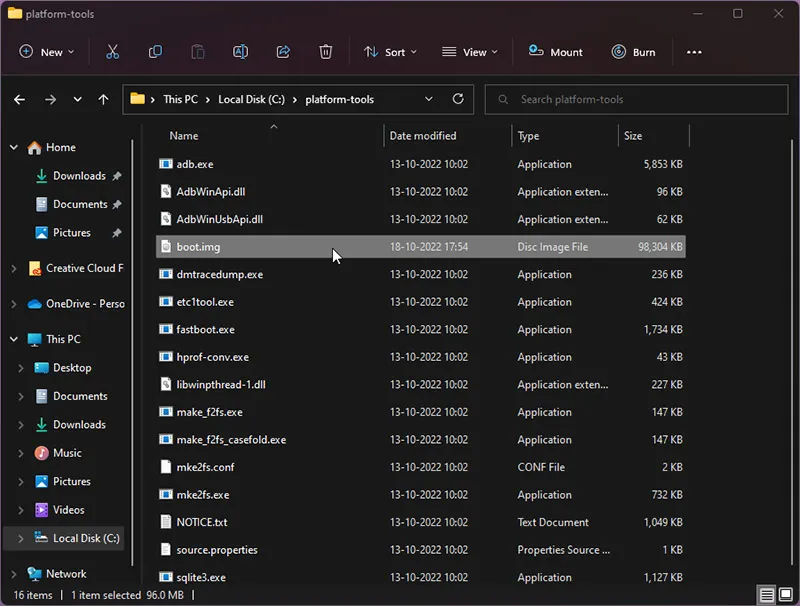
Now you have to transfer the extracted stock boot image to the internal storage of your Nothing Phone 1 for patching.
Transferring disk/partition image files over MTP (File Transfer mode) is known to cause corruption. So, we will be using the ADB Push command instead to avoid any such issues.
To do this:
- First copy the extracted
boot.imgfile inside theplatform-toolsfolder on your computer.
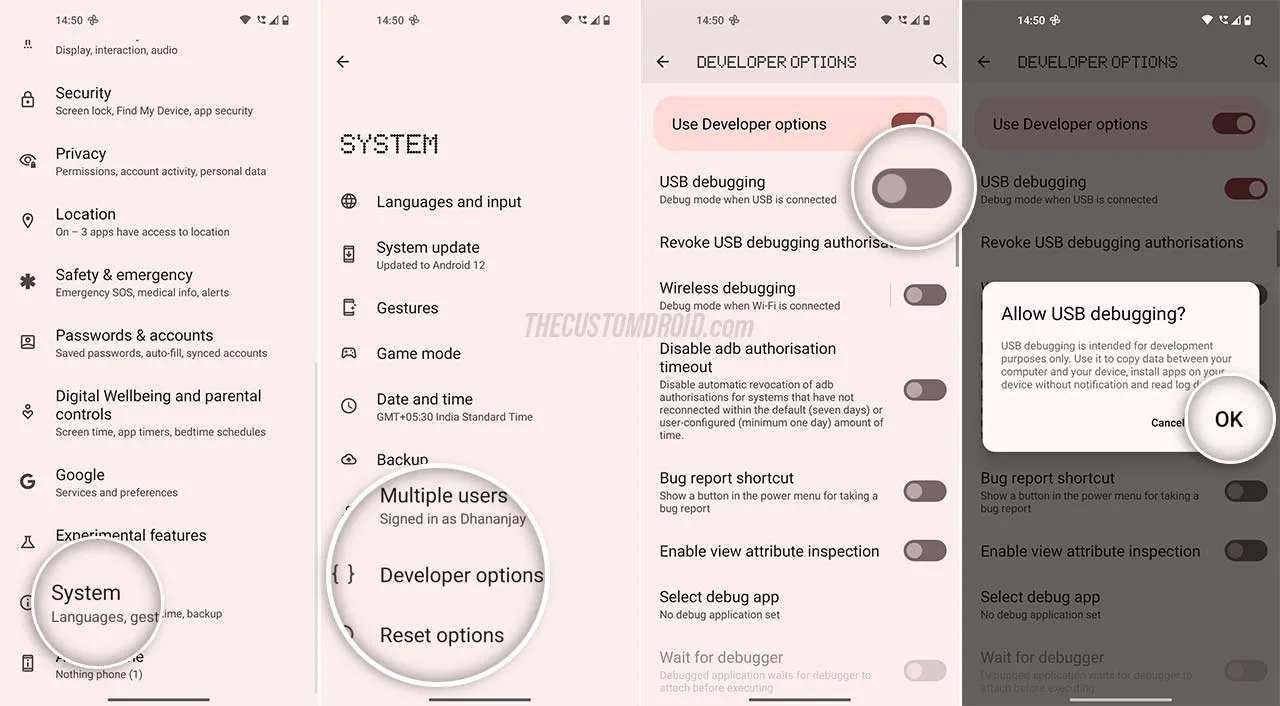
- Then enable USB Debugging on your phone and connect it to the computer through USB.
-
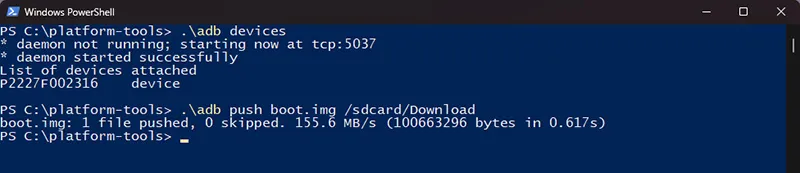
Open the command-line window and enter the following command:
adb devices -
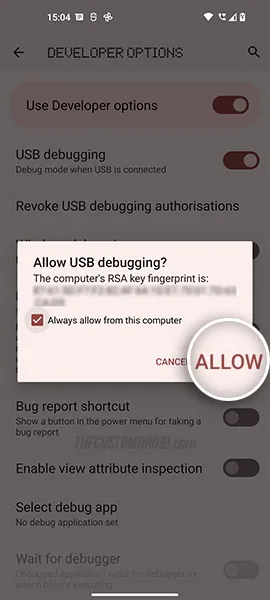
The above command will initiate an ADB connection and you should see a prompt on your phone’s screen to Allow USB debugging. Press Allow.
- The output in the command window should list your phone’s unique ID. Which means that the computer has successfully established a connection with your phone and you can start using ADB commands.

-
Now, execute the following command to transfer the stock boot image to the
Downloaddirectory of your phone’s internal storage:adb push boot.img /sdcard/Download
The output of this command should look similar to what’s shown in the figure below.
Step 5: Patch Stock Boot Image via Magisk App
Download the latest Magisk APK file from GitHub and install it on your phone (Learn: how to install APK).
Once installed, launch the Magisk app on your Nothing Phone 1. Then press the Install button in the Magisk card and choose Select and Patch a File as the installation method.
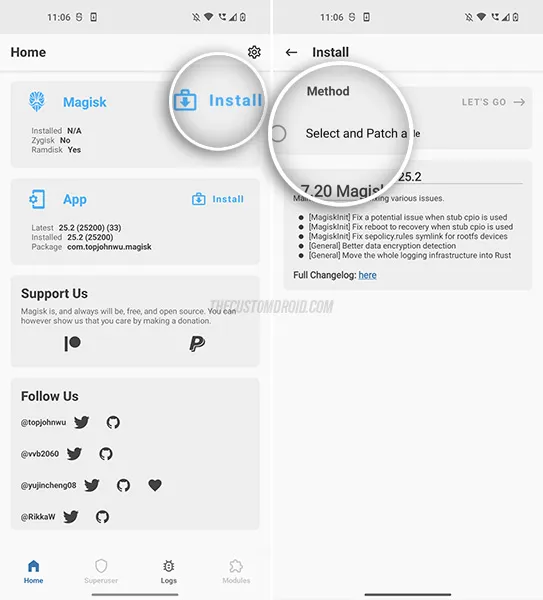
The file selector should open. Navigate to the Download directory of your phone’s internal storage and select the stock boot.img file that was transferred earlier.
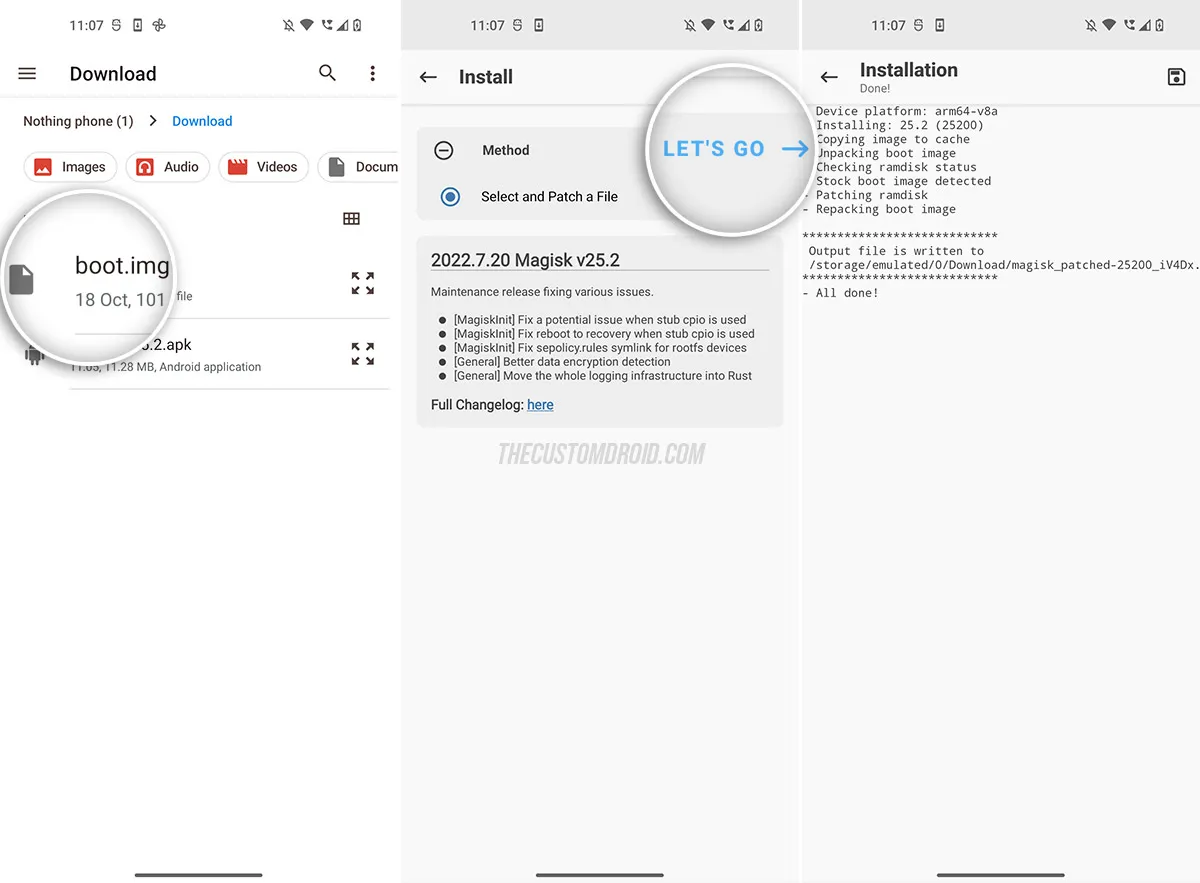
Finally press LET’S GO and let Magisk patch the boot image for rooting.
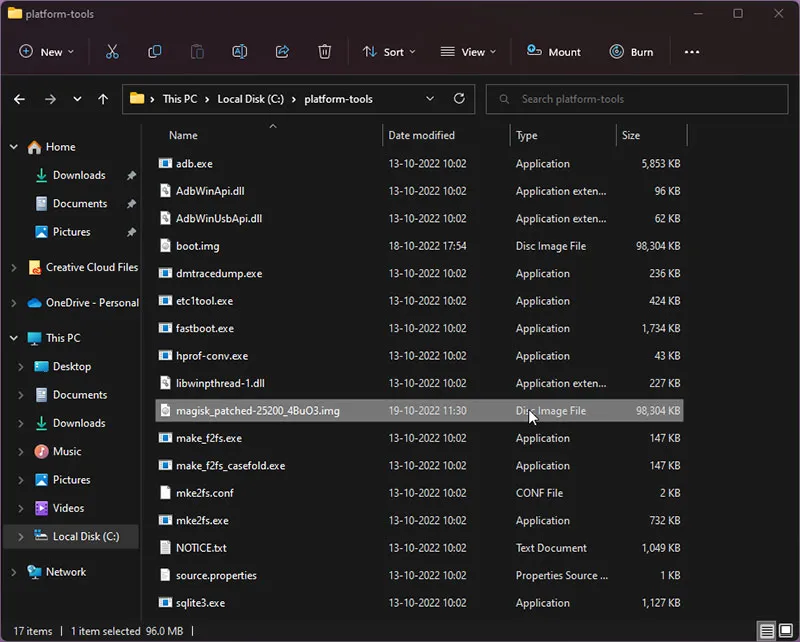
Step 6: Transfer Patched Boot Image to your Computer
The patched boot image should be stored inside the Download directory of your phone’s internal storage. You need to transfer it back to your computer for flashing.
Again, instead of using MTP, we will use ADB Pull to transfer the patched boot image. So make sure that the phone is connected to the computer and use the following command:
adb pull /sdcard/Download/magisk_patched_[random-strings].imgYou have to replace magisk_patched_[random-strings].img with the full filename of your own patched boot image.
For example: If the filename of patched boot image is magisk_patched-25200_4BuO3.img, then the command should be:
adb pull /sdcard/Download/magisk_patched-25200_4BuO3.img
The command will transfer the patched boot image from your phone to the platform-tools folder on your computer.
Step 7: Boot into Fastboot Mode
In order to flash the patched boot image, you must boot the Nothing Phone 1 into Fastboot Mode.
Since you’re already utilizing ADB in the workflow, you can use the following command to quickly enter Fastboot Mode:
adb reboot bootloaderAnother way to do this is by pressing the Volume Down and Power keys together while the phone is powered off. If you need detailed instructions, I have covered both the methods in the tutorial linked below.
Step 8: Flash Patched Boot Image to Root Nothing Phone 1
This brings us down to the final step of the rooting process. Make sure that your phone is in Fastboot Mode and connected to the computer through USB.
Verify that the computer can communicate with your phone over the Fastboot protocol by using the following command:
fastboot devicesThe output of the command will be your phone’s unique ID.

Finally, enter the following command to finally flash the patched boot image and root your Nothing Phone 1 with Magisk:
fastboot flash boot magisk_patched_[random-strings].imgAgain, you must replace magisk_patched_[random-strings].img with the full filename of your own patched boot image.
For example: If the filename of the patched boot image is: magisk_patched-25200_4BuO3.img, then the command should be:
fastboot flash boot magisk_patched-25200_4BuO3.img
Once the boot image has been flashed, reboot your phone into the operating system using:
fastboot reboot
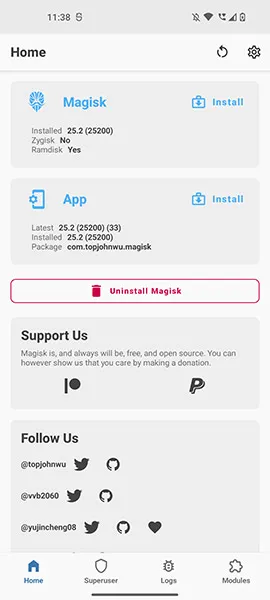
When your phone boots, you can verify the installation by launching the Magisk app. The app should display the installed version in the Magisk card, as well as the Uninstall Magisk button.
That’s it! You have successfully rooted your Nothing Phone 1 with Magisk. You can start using your favorite root applications. My favorite is Franco Kernel Manager, which allows you to optimize the kernel for performance gains and squeeze out more battery life.
You can also install Magisk Modules to customize the UI, tweak the functionality and add more features to the stock Nothing OS software.
That’s all for this tutorial and I truly hope that it was helpful. If you have any suggestions or feedback regarding this guide, please feel free to reach out, or comment.
If you need any help with the instructions, don’t hesitate to ask right away. Just make sure that you don’t miss out on the context and important info such as the installed Nothing OS version and the regional variant in question.
Comments
Comments are moderated, and published only if they are relevant to the topic and add value in a constructive way. If you disagree with something, please be polite and respectful. We suggest you read our comment policy before commenting.