In this guide, I will show you how to restore the stock OxygenOS software on the OnePlus 8 and OnePlus 8 Pro by flashing the factory image/Fastboot ROM.
Advertisement
Things like custom ROMs, TWRP, and Magisk root are pretty solid ways of gaining complete control over your phone’s software and tune it to your own taste and liking. We have already covered tutorials on unlocking the bootloader and installing TWRP on the OnePlus 8 series and another one on rooting the OnePlus 8 and 8 Pro without TWRP.
Why would you want to do it?
As good as these things may sound, there are times you would want to revert back and restore your OnePlus 8/8 Pro back to the stock OxygenOS software.
For instance, you might want to sell your phone or submit it for an RMA claim (repair under official warranty). Or, you would want to receive official OxygenOS OTA updates again, without having to perform any additional instructions. Or maybe, the custom ROM experience wasn’t that satisfactory as you thought initially.
Advertisement
Further, rooting your phone may also trigger SafetyNet warnings and prevent you from using certain applications. While Magisk is pretty accomplished in hiding root from such apps, but Google’s latest hardware-based attestation for SafetyNet makes it impossible to achieve the same results, as it did earlier. So, might want to unroot your phone.
Restoring the OnePlus 8/8 Pro back to Stock OxygenOS Software with Fastboot
In any of the above scenarios, simply performing a factory reset will not help. A factory reset only formats the /data partition. Since modifications like custom ROMs, TWRP, and root are applied to the device partitions (including the system, vendor, or boot partitions), a factory reset will be of no use.
And that’s when you’d want to manually restore your OnePlus 8/OnePlus 8 Pro back to the stock OxygenOS software. Luckily, XDA Recognized Developer mauronofrio has compiled and provided fastboot ROMs for the OnePlus 8 and OnePlus 8 Pro on the XDA forums. These are essentially factory images that you could flash using fastboot and easily restore the stock firmware.
It’s worth noting that the fastboot ROMs provided by mauronofrio only include a flashing script for Windows computers. If you are operating on a Linux or Mac computer, you will need to manually flash each device partition using fastboot commands. I have the instructions laid down for that as well.
Tip: If you have just rooted your OnePlus 8/8 Pro using Magisk and are sure that you have not applied any other sort of modifications, you could simply unroot by using the built-in option in the Magisk Manager app.
Or, you could download the stock boot image for the installed OxygenOS version and flash it to your phone using the fastboot flash boot boot.img command.
If you’re unsure, you’d be better off performing the instructions in this guide. This will make sure that no single trace of Root (or any other modification) is left over.
Page Contents
Before You Begin
In order to restore the stock firmware, there are a couple of things I would suggest you do first.
1. Take a Backup: This is something I have always greatly emphasized. Take a backup of all your important data on the phone.
While not mandatory, it is advised to wipe your OnePlus 8 clean when flashing the fastboot ROM. This should reduce the scope of any unusual errors from popping up later on. It’s also a valid choice if you wish to start afresh.
Data like installed apps, configured settings, documents, music, photos, contacts, messages, etc will be erased when you opt for a factory reset during the flash. If you’re looking for a resource to help you backup all the different kinds of files/data, you could refer to our tutorial.
2. Install Required USB Drivers: If you’re operating on a Windows computer, it will most probably install the required USB drivers for your phone. But that is not always the case. If you face issues with the flashing script not detecting your OnePlus 8, you’d want to download and manually install the latest OnePlus USB drivers on your PC.
On the other hand, if you’re using a macOS/Linux PC, you shouldn’t need any additional drivers at all.
3. Charge your OnePlus phone: Charge your phone to a minimum of 40-50% battery level. This will ensure that your OnePlus 8 device doesn’t suddenly power off while performing the software restoration due to low battery.
How to Restore Stock OxygenOS Software on OnePlus 8/8 Pro
The process of flashing the fastboot ROM (Factory image) on your OnePlus 8/8 Pro and restoring the stock OxygenOS software is quite easy. We have broken down the instructions into four major steps so that it’s easy for you to understand how it works.
Requirements:
The only things you’ll need to perform this procedure are:
- Your OnePlus 8/OnePlus 8 Pro with an unlocked bootloader.
- A Windows, macOS, or Linux computer
- A compatible USB-C cable
- Android Platform-tools installed on your computer (only for Linux/macOS)
Now without any further ado, follow the instructions below.
Step 1: Download the OxygenOS Factory Image
The first step is to download the OxygenOS factory image (fastboot ROM) for your OnePlus 8 or OnePlus 8 Pro on your computer. In the table below, you will find the direct download links of fastboot ROMs for the latest OxygenOS 11.0.0 software, as well as all the previous ones for all the variants of the OP8 and OP8 Pro.
For OnePlus 8
| Global (IN2015) | OxygenOS 10.5.3 |
| – | OxygenOS 10.5.4 |
| – | OxygenOS 10.5.5 |
| – | OxygenOS 10.5.7 |
| – | OxygenOS 10.5.9 |
| – | OxygenOS 10.5.10 |
| – | OxygenOS 10.5.11 |
| – | OxygenOS 10.5.12 |
| – | OxygenOS 11.0.0 |
| Europe (IN2013) | OxygenOS 10.5.1 |
| – | OxygenOS 10.5.2 |
| – | OxygenOS 10.5.3 |
| – | OxygenOS 10.5.4 |
| – | OxygenOS 10.5.6 |
| – | OxygenOS 10.5.7 |
| – | OxygenOS 10.5.8 |
| – | OxygenOS 10.5.9 |
| – | OxygenOS 10.5.10 |
| – | OxygenOS 11.0.0 |
| India (IN2011) | OxygenOS 10.5.3 |
| – | OxygenOS 10.5.4 |
| – | OxygenOS 10.5.5 |
| – | OxygenOS 10.5.7 |
| – | OxygenOS 10.5.8 |
| – | OxygenOS 10.5.9 |
| – | OxygenOS 10.5.10 |
| – | OxygenOS 10.5.11 |
| – | OxygenOS 11.0.0 |
For OnePlus 8 Pro
| Global (IN2025) | OxygenOS 10.5.4 |
| – | OxygenOS 10.5.5 |
| – | OxygenOS 10.5.6 |
| – | OxygenOS 10.5.8 |
| – | OxygenOS 10.5.9 |
| – | OxygenOS 10.5.10 |
| – | OxygenOS 10.5.11 |
| – | OxygenOS 10.5.12 |
| – | OxygenOS 10.5.13 |
| – | OxygenOS 11.0.0 |
| Europe (IN2023) | OxygenOS 10.5.4 |
| – | OxygenOS 10.5.5 |
| – | OxygenOS 10.5.6 |
| – | OxygenOS 10.5.8 |
| – | OxygenOS 10.5.9 |
| – | OxygenOS 10.5.10 |
| — | OxygenOS 10.5.11 |
| – | OxygenOS 10.5.12 |
| – | OxygenOS 11.0.0 |
| India (IN2021) | OxygenOS 10.5.4 |
| – | OxygenOS 10.5.5 |
| – | OxygenOS 10.5.6 |
| – | OxygenOS 10.5.8 |
| – | OxygenOS 10.5.9 |
| – | OxygenOS 10.5.10 |
| – | OxygenOS 10.5.11 |
| – | OxygenOS 10.5.12 |
| – | OxygenOS 10.5.13 |
| – | OxygenOS 11.0.0 |
Step 2: Extract the Factory Image on your Computer
The factory image you have downloaded should be the .zip file format (e.g. 11.0.0-GLOBAL-OnePlus8Oxygen_15.O.30_OTA_0300_all_2010031624_c5e68b42b3325-FASTBOOT.zip).
Advertisement
Once the download is complete, you will need to extract the contents of the ZIP package to your computer using an archive utility like 7-Zip. To do this, go to the folder where the ROM was downloaded, right-click on it, select “7-Zip” and then select the option to extract to a folder.
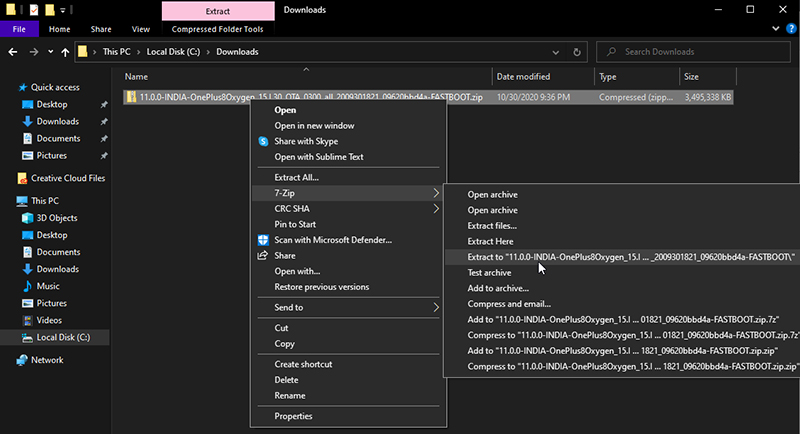
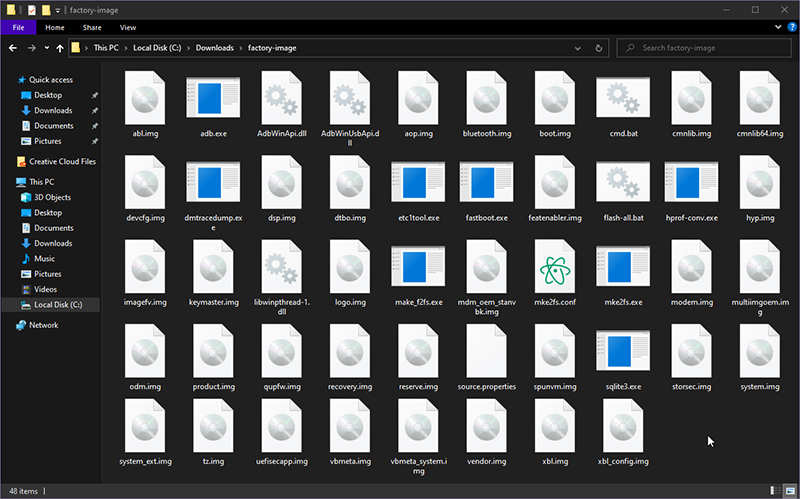
The extracted folder should contain the individual device partition images (like abl.img, boot.img, system.img, etc), a few DLLs, and the ‘flash-all.bat’ flashing script.
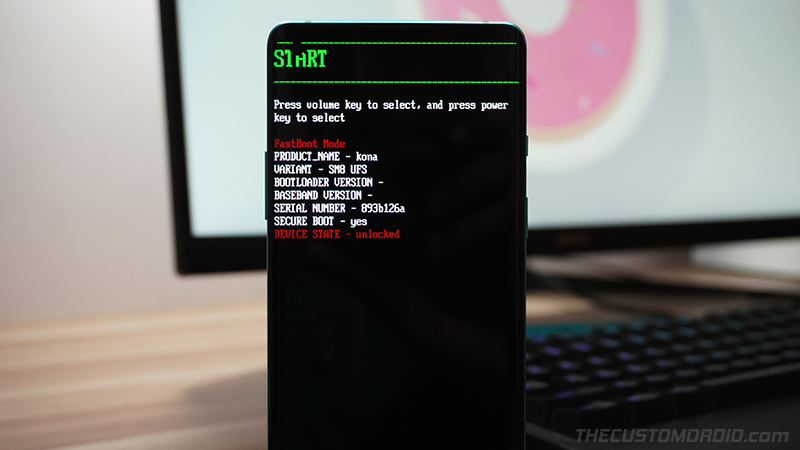
Step 3: Boot your phone into Fastboot Mode
Flashing your phone’s partitions can only be done over a special interface known as Fastboot Mode (also otherwise mentioned as “Bootloader Mode”).
So now that you have the required firmware, the next step is to boot your OnePlus 8/8 Pro into Fastboot Mode. To do this, hold the Power key of your phone to bring up the Power menu. Then select ‘Power’ to completely turn off your phone.
While the phone is turned off, hold the Volume Up, Volume Down, and Power keys together to boot it into Fastboot Mode. Now connect your phone to your computer using the USB cable.
Step 4: Flash the Factory Image on your OnePlus 8/8 Pro
With everything ready, the last step is to flash the factory image to your OnePlus 8/OnePlus 8 Pro using Fastboot. So depending upon if you have a Windows or a macOS/Linux computer, follow the instructions below.
On a Windows Computer
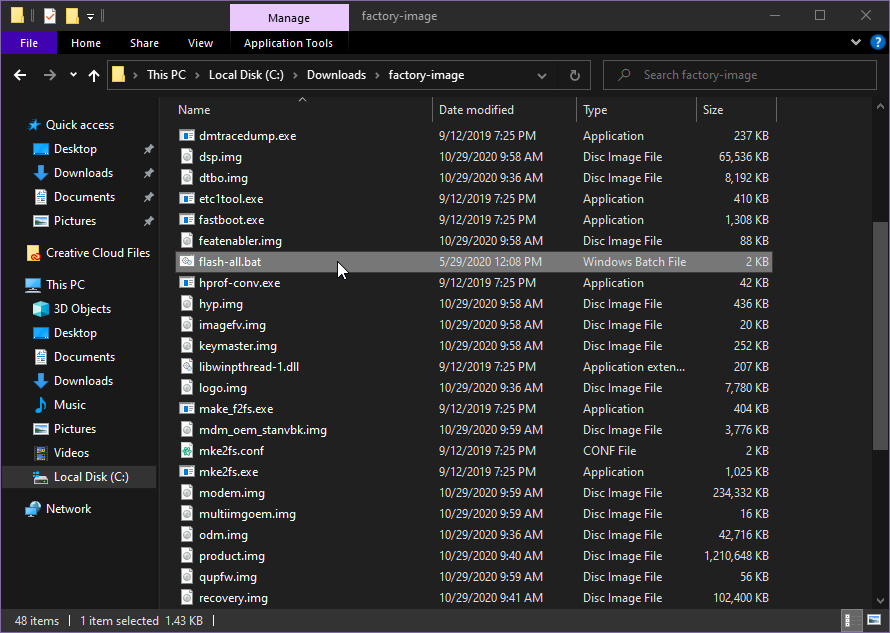
Flashing the factory image is the easiest on a Windows PC since there’s a flashing script available that will automate the whole process for you. To begin flashing, open the folder on your computer where the Factory Image was extracted and double-click the ‘flash-all.bat’ file.
Advertisement
This should bring up the command prompt on the screen, prompting you to choose if you wish to perform a factory reset whilst flashing, or not. Simply input “Y” or “N” depending on what you want to do and hit Enter to finally install the factory image to your OnePlus 8/8 Pro.

The script will basically flash the individual partitions of your device and the progress for the same could be viewed in the command prompt. During this time, your phone will also reboot and enter userspace fastboot mode (what is referenced to as “fastbootd“). So be patient and sit back for a while.
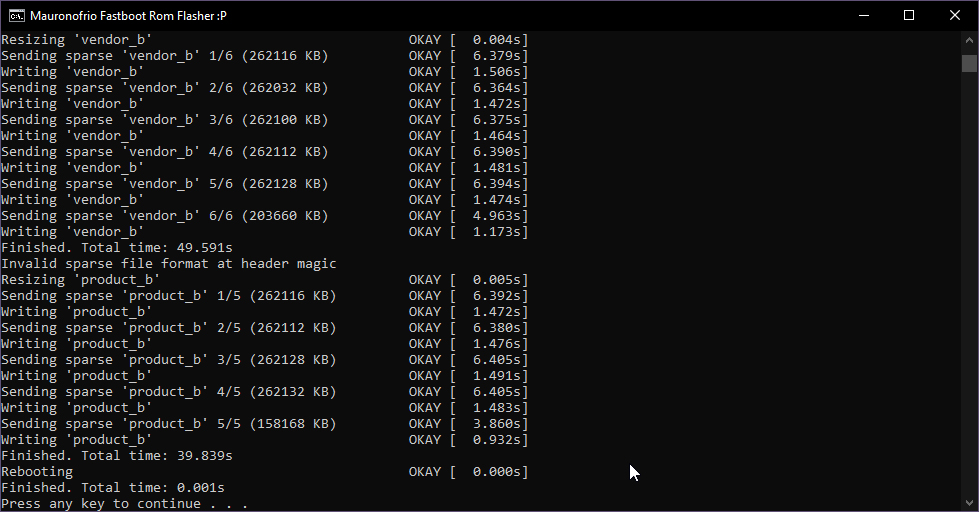
After the flash is complete, your phone will reboot automatically and should enter the newly flash stock OxygenOS software.
On a macOS/Linux Computer
If you’re using a macOS and Linux computer, you will need to manually flash the partition images from the factory image to your OnePlus 8/8 Pro. This is pretty as well.
Before you can flash, you will need to open the Terminal inside the working directory, that is the folder where the factory image was extracted. To do this, launch the Terminal on your macOS/Linux computer and change its directory using the cd command. For example, if the extracted folder is placed inside the ‘Documents’ directory, then the command should look like:
cd Documents/factory-image
Of course, “factory-image” in the above command should be replaced with the actual name of the folder in your case.
Once you have successfully opened the Terminal in the right directory, verify that your computer can identify your OnePlus 8 over fastboot mode using:
./fastboot devices
The command should return your phone’s unique identifier, like so.
Advertisement
You’re now ready for flashing!
First, perform a data wipe by issuing the following command through the Terminal (again, this is not mandatory):
./fastboot -w
Now enter the following commands one-after-the-other to flash the individual device partitions:
./fastboot flash aop aop.img
./fastboot flash bluetooth bluetooth.img
./fastboot flash boot boot.img
./fastboot flash dsp dsp.img
./fastboot flash dtbo dtbo.img
./fastboot flash LOGO LOGO.img
./fastboot flash modem modem.img
./fastboot flash oem_stanvbk oem_stanvbk.img
./fastboot flash qupfw qupfw.img
./fastboot flash storsec storsec.img
./fastboot flash multiimgoem multiimgoem.img
./fastboot flash uefisecapp uefisecapp.img
./fastboot flash recovery recovery.img
./fastboot --disable-verity flash vbmeta vbmeta.img
./fastboot --disable-verity flash vbmeta_system vbmeta_system.img
./fastboot flash opproduct opproduct.img
./fastboot reboot fastboot
./fastboot flash system system.img
./fastboot flash vendor vendor.img
./fastboot flash product product.img
./fastboot reboot
Once you’re finished executing the commands, your OnePlus 8/8 Pro will reboot into the restored stock OxygenOS software.
A Few Important Things to Note
- If you see a message that reads “Invalid sparse file format at header magic” during the flash, simply ignore it. It’s not an error, but a normal part of the flashing process.
- If your OnePlus 8 boots into a screen that looks very similar to the stock recovery, do not power it off or reboot it forcibly. The screen is called userspace fastboot mode as we explained during the instructions.
- If your phone enters a bootloop after the flash is complete, perform a factory reset via the stock OxygenOS recovery. This was the reason I recommended performing a wipe during the instructions.
Wrapping Up
There you go! By now, you have learned how to restore the OnePlus 8/OnePlus 8 Pro back to the stock OxygenOS software by flashing the factory image. This should allow you to unroot your phone, get rid of custom ROMs, and should also be very useful for unbricking the phone in case you flashed a wrong file.
It is worth noting that a factory image can only be used for unbricking as long as your phone could enter Fastboot Mode, which is generally possible with a soft-brick. In case it’s a hard-brick, you will need to use the MSMDownload Tool to unbrick your OnePlus 8/8 Pro.
Did you know? You can self-create a factory image for the OnePlus 8/8 Pro. To know more, refer to this article.
That’s all for this tutorial. If you have any questions regarding the instructions or find yourself in a difficult situation, feel free to let me know.
*A huge thanks to mauronofrio for generously providing the fastboot ROMs for both phones.
Comments 12 Comments
Comments are moderated, and published only if they are relevant to the topic and add value in a constructive way. If you disagree with something, please be polite and respectful. We suggest you read our comment policy before commenting.
Hello. I just want to know if this works for OnePlus 8T as well. Are there additional commands, as the payload.bin file extracted more than this list presents?
Frank, if you’re trying to restore back to stock OxygenOS, I suggest using the MSM Tool for the OnePlus 8T.
The fastboot method has been quite prone to errors and has shown unexpected results recently. Hence, I suggest using the MSM Download Tool for the restoration purpose now.
Stuck on fastbootd. CMD window says . Do I need to interact with the fastbootd?
Juho, no need to interact with fastbootd. The script automatically boots your OnePlus 8/8 Pro into userpsace fastboot (known as fastbootd) and carries on the flashing process by itself.
Just curious, are you trying to use the fastboot ROM for downgrading the OxygenOS version?
I’m having the same issue… My phone boots on fastbood and the process doesn’t go any further (the command says “waiting for fastboot device). From fastbootd, I can boot into fastboot but every next step fails. I tried it from several ROMs. Same issue.
Antoine, if you’re facing problems with the fastboot method, use the OnePlus 8 MSM tool to restore your device to the stock firmware.
I have followed all thre steps and the process finished as usual. However my oneplus 8 pro (eu) only boots into fastboot mode now. done a factory reset and wiped cache from the stock recovery but only boots into fastboot. any help please? Thanks
Mizan, in that case, try restoring the firmware through the MSM Download Tool for the OnePlus 8 Pro.
I have OnePlus 8 Model IN2010 (Build number Oxygen OS 10.5.9.IN21AA).
To move on (in experiments), I need to learn how to restore the preset Oxygen OS.
Нere for OnePlus 8 Factory Image only for models: Global (IN2015), Europe (IN2013) & India (IN2011).
But I have a Model IN2010.
Hmm… I’m asking myself why not a IN2010? I do not know the answer.
Maybe you know why?
Hello, IN2010, from what I know, is the Chinese model that comes with HydrogenOS, am I right?
You also mentioned that your particular OnePlus 8 (IN2010) is running OxygenOS 10.5.9.IN21AA, which is basically the firmware found on the Global variant (IN2015). I suppose you converted the unit from HydrogenOS to OxygenOS, right?
If you have done this, you will need to download and use the factory image for the IN2015 model.
If you do want to rollback to HydrogenOS, you could simply install the HydrogenOS full OTA via the Local Upgrade option in the Settings.
Cancel my prior question. There was a problem with my phone communicating with my PC which I fixed. I was able to flash the OS to 11.0.0 and the phone did restart but with many problems. I did do the factory reset as recommended. I think I may not have let the fastbootd mode to completely finish. Anyway, I downloaded the full OTA from the OnePlus site to the phone and used the local update to install. Now the phone is functioning normally. Your various guides have been a tremendous help.
Jason, I am glad you were able to sort it out on your own. Yes, fastbootd is something users are generally not aware of. That’s equally essential for flashing the full factory image.
It was clever of you to flash the OTA package using Local Upgrade after that. So kudos on that!
At last, thank you for the kind words. I am happy that my tutorials are proving useful to the readers.