How to Root Samsung Galaxy A8/A8+ (2018) and Install TWRP Recovery
Through this tutorial, we will show you how to install TWRP recovery and root Samsung Galaxy A8/A8+ (2018) running Android Pie and Oreo.

On this page
Through this tutorial, we will show you how to install TWRP recovery and root Samsung Galaxy A8/A8+ (2018) running Android Pie and Oreo. The steps below will take you through the complete process in detail.
The Samsung Galaxy A8/A8+ is arguably the most exciting mid-range phones Samsung has to offer in 2018 (so far). They promise the headline features and design elements of the flagship S8/S8+ devices, but at mid-range pricing. Both devices sport the Infinity display that came with the S8 series, with a 2220 x 1080 resolution, a powerful Exynos 7885 chipset, coupled with 4GB/6GB (A8+) RAM.
Needless to say, prolific XDA Developer BlackMesa123 has wasted no time in releasing official TWRP recovery for Galaxy A8/A8+. With both phones having recently gotten the update to Android Pie, we have put together a step-by-step guide on how to install TWRP Recovery and root Samsung Galaxy A8/A8+ (2018).
Without further ado, let us get to the process.
Important Notes
- This guide is intended for the Samsung Galaxy A8 and A8+ with model numbers SM-A530F and SM-A730F, respectively. Do not attempt to follow this guide or use the provided files for any other model number.
- Rooting will trip the KNOX counter and apps like Samsung Pay and Secure Folder will no longer function thereafter, even if the device is unrooted/flashed back to stock later.
Before You Begin
Make sure to fulfill all the requirements stated below before you head on to the instructions.
- First and foremost, ensure that you take a full backup of all the data on your phone. This includes messages, contacts, and everything else that you feel necessary. We also have a tutorial that will help you backup your data with ease.
- Charge the battery to at least 70%, so as to avoid the device shutting down during the process.
- Download and install the latest Samsung USB drivers.
- In ‘Settings’ > ‘Developer options’, enable ‘OEM Unlock’. You can use our tutorial on How to enable OEM Unlocking.
- Download and extract latest Odin flash tool (v3.13.1 or above) to an easily accessible location on the PC.
Downloads
- TWRP Recovery for Galaxy A8 (A530F): twrp-3.4.0-0-jackpotlte.img.tar (Check here for latest build)
- TWRP Recovery for Galaxy A8+ (A730F): twrp-3.4.0-0-jackpot2lte.img.tar (Check here for latest build)
- RMM Bypass: RMM_Bypass_v3_corsicanu.zip (This fixes the Prenormal KG/RMM State issue and prevents your device from getting locked again)
- Encryption Disabler: no-verity-opt-encrypt-6.1.zip
- Latest Magisk Installer zip: Magisk-v21.0.zip
Install TWRP Recovery on Samsung Galaxy A8/A8+
In order to root, you must first install TWRP on your Galaxy A8/A8+. To do so, simply follow the instructions laid below.
- Download TWRP recovery for your Samsung Galaxy A8 or A8+ on your PC.
- Switch off your phone completely.
- Press and hold the Volume Down, Volume Up, Power buttons together until you see the warning screen.
- Then press the Volume Up button once to enter Download Mode on your Galaxy A8/A8+.

- Connect the phone to your PC using the USB cable.
- Launch the Odin Flash tool on your PC by double-clicking the ‘Odin3 v3.13.1.exe’ executable.
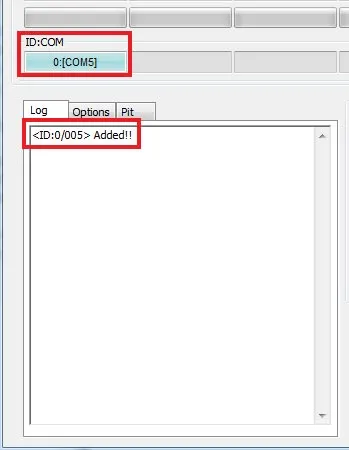
- The ‘ID:COM’ port box at the top-left of the Odin tool should light up. If not, then make sure that you have the proper USB drivers installed on the your PC.
- Click on the ‘AP’ button and select the ‘twrp-3.4.0-0-jackpotlte.img.tar’ for the Galaxy A8 or ‘twrp-3.4.1-0-jackpot2lte.img.tar’ for the Galaxy A8+.
- Click the ‘Options’ tab in Odin and uncheck the ‘Auto-Reboot’ option.
- Finally, click the ‘Start’ button to install TWRP recovery on Samsung Galaxy A8/A8+.
Once the flashing process finishes, Odin should show the ‘PASS!’ message. You can disconnect your phone from the PC now.
Very Important:
It is imperative that you boot your phone directly into the TWRP recovery now. Failing to do so will trigger the Prenormal RMM/KG state to kick in and you will need to wait for 7 days until you begin with this procedure again.
To boot your Galaxy A8/A8+ into TWRP, simply hold the Volume Down and Power buttons together. As soon as the screen goes black, quickly release the buttons and hold the Volume Up and Power buttons until you see the TWRP splash screen.
When prompted with the ‘Unmodified System Partition’ message in TWRP, just swipe the button to allow modifications.
Once your phone is in TWRP recovery mode, follow the steps below to finally root it using Magisk.
Instructions to Root Samsung Galaxy A8/A8+ (2018)
- First, go to the ‘Wipe’ menu in TWRP and select ‘Format Data’.
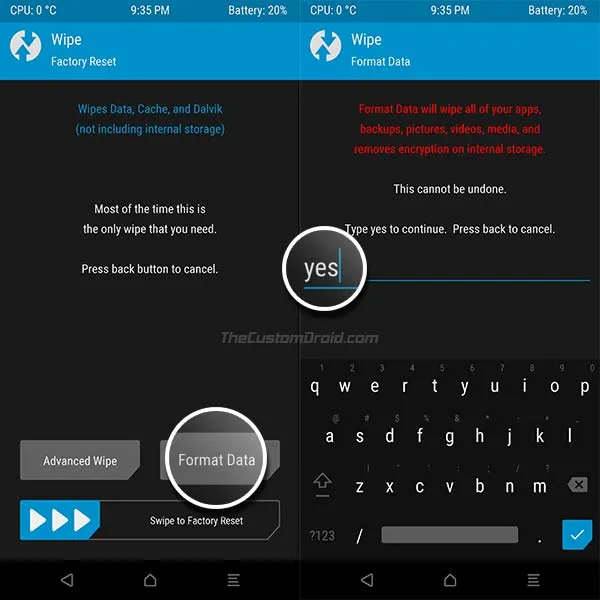
- Enter ‘yes‘ in the provided field to confirm the erase process. This will completely erase all the data on the phone including the internal storage.
- Go back to the TWRP home screen, then tap on ‘Reboot‘, and select ‘Recovery‘.
- Once the phone reboots back into TWRP, go to ‘Mount’ and press the ‘Enable MTP’ button.
- Now, connect the phone to the PC via the USB cable.
- Transfer the RMM Bypass v3, Encryption Disabler, and the latest Magisk installer ZIP files to the phone’s internal storage.
- Now go back to the TWRP main screen and press ‘Install’.
- Locate the ‘RMM_Bypass_v3_corsicanu.zip’ file and swipe to confirm the installation.
- Following the same steps, flash the ‘no-verity-opt-encrypt.zip-6.1.zip’ and ‘Magisk-v21.0.zip’ files (In that order) to root Samsung Galaxy A8/A8+.
- When the flashing process finishes, tap on the ‘Reboot System’ button.
After your phone boots up, set it up by following the on-screen instructions. You should also see the Magisk Manager app among other apps in the app drawer. If you don’t see it on your device, then just download the latest APK from here and install it manually. You can run it to verify if your phone has successfully been rooted or not.
Now that you have root access, you can start using root apps. You can also install Magisk Modules to add extra features or customize your phone’s software systemless-ly. Even more, you can use Magisk Hide to hide root from apps that might detect it and stop working, like Google Pay, Pokemon Go, etc.
So, you have just been demonstrated how to install TWRP and root Samsung Galaxy A8/A8+ (2018) running Android Pie and Oreo. If have any questions or if you get stuck during any stage of the process, do let us know via the comments section below, and we would be more than happy to help you out.
Comments
Comments are moderated, and published only if they are relevant to the topic and add value in a constructive way. If you disagree with something, please be polite and respectful. We suggest you read our comment policy before commenting.