Is your Nexus 6P not booting at all? It might be more than just a soft brick. This tutorial will try and help you fix the Nexus 6P/5X bootloop issue. If your device is affected too, then we have some good news for you. You can finally bid goodbye to the bootloop of death because XDA member XCnathan32 has come up with a solution to fix the dreaded bootloop problem on both the Nexus 6P and 5X.
Advertisement
Page Contents
What is Bootloop of Death?
The dreaded “bootloop of death” or “BLOD” has cursed a notable amount of device owners using the Nexus 6P and Nexus 5X. The issue first came to notice during the fall of 2016, when users started reporting that their device abruptly entered a bootloop state and refused to boot at all. The affected users immediately rushed to online portals including Reddit and XDA for help but came around no possible solution.

It wasn’t much later, that Google finally recognized the problem and made a statement on Reddit regarding the problem. The Google representative clearly mentioned that “For those of you that are currently experiencing this, please contact your place of purchase for warranty or repair options.”, which was definitely good news for those who had their devices covered under warranty.
Advertisement
Unfortunately, others were left in despair and had no choice but to use their expensive piece of technology as a mere paperweight. The problem was also escalated to the Google Issue Tracker but has since been tagged as “Assigned” and hasn’t received the deserved attention till now. The issue is not a minor one and has led the customers to doubt Google’s quality and customer support.
Fixing the Nexus 5X and Nexus 6P Bootloop Issue
While Google still fails to address the issue, XDA member XCnathan32, along with the help of another fellow member rchtk, has finally found a solution to fix Nexus 6P bootloop issue. While it won’t help you to fix the hardware issue itself but would help you bypass the BLOD and allow you to boot your ROM and Recovery again, at the expense of bit lost performance. Don’t worry, you will still be able to use the device as is.
Advertisement
Later on, XDA senior member squabbi improvised the solution and provided an easier method that would allow you to simply patch the current boot/kernel with the fix. The workaround injector was provided by XDA Recognized Developer/Contributor osm0sis. We highly appreciate their contribution.
What the fix does is, it disables the A57 cores of the SoC, which are the reason for the BLOD. So your device now will run on only the A53 cores, which may force you to compromise on the performance part (a bit!). It consists of a modified kernel file, that will boot your phone with only the dedicated A53 cores and thus fix Nexus 6P bootloop issue. If you further plan on flashing a ROM/kernel/root package, you can also flash the modified TWRP recovery image.
Advertisement
The solution will also work for any 5X suffering from the same problem. Make sure to use only the files for your device.
Requirements
Make sure to fulfill all the requirements stated below before you head to the instructions to fix Nexus 6P bootloop issue.
- Make sure that your phone is sufficiently charged.
- Download and set up ADB and Fastboot tools on the PC.
- Install appropriate USB drivers for your device. You can find them here.
- Make sure that you have enabled OEM Unlock in ‘Settings’ > ‘System’ > ‘Developer options’. If you haven’t been able to enable the OEM Unlock toggle, then below are a few workarounds to give you enough time to boot the phone so that you can enable it.
- Supercooling the device in a freezer in a ziplock bag to keep out moisture,
- Superheating around the camera, and
- Letting the battery run all the way down before trying to boot
Downloads
- Modified 4 Core TWRP for Nexus 6P: twrp-3.2.1-0-fbe-4core-angler.img
- Modified 4 Core TWRP for Nexus 5X: twrp-3.2.1-0-fbe-4core-bullhead.img
- Workaround Injector: N5X-6P_BLOD_Workaround_Injector_Addon-AK2-signed.zip
Instructions
- Download the modified TWRP for your Nexus 6P or 5X, as well as the workaround injector ZIP file.
- Copy both the files to the folder on your PC where the Android SDK platform-tools are installed (e.g. C:\platform-tools).
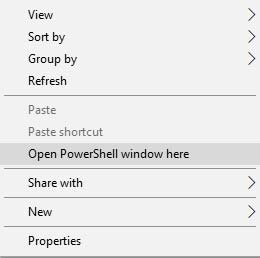
- Open a PowerShell window in the same location. To do this, hold the SHIFT key on the keyboard and right-click on an empty space inside the folder.
- Select the ‘Open PowerShell window here’ option from the contextual menu.
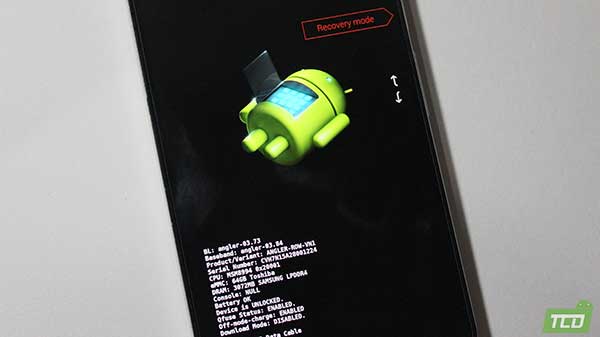
- Boot Nexus 6P/5X into the Bootloader Mode.
- Simply, press and hold the Volume Down and Power keys until you see the designated screen.
- Connect the phone to the PC using a USB cable.
- Enter the command below to make sure that your device is being recognized by fastboot:
fastboot devices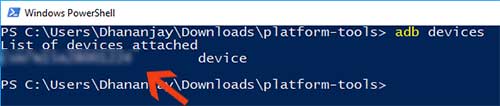
- The command should return a device ID. In case it doesn’t, make sure that you download and install the USB drivers properly.
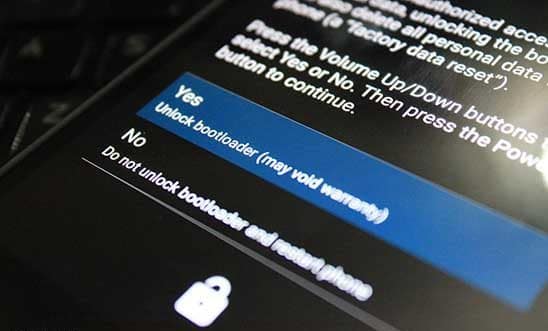
- Your device’s bootloader must be unlocked in order for this method to work. If you already have it unlocked, then skip to step #14.
- Unlock your phone’s bootloader using the following command:
fastboot flashing unlock - As soon as you enter the command, your device will prompt with a message. Press either of the Volume keys to highlight “Yes” and then the power button to confirm bootloader unlocking.
- Flash the modified TWRP recovery:
- Nexus 6P:
fastboot flash recovery twrp-3.2.1-0-fbe-4core-angler.img
- Nexus 5X:
fastboot flash recovery twrp-3.2.1-0-fbe-4core-bullhead.img
- Nexus 6P:
- Do not disconnect the phone from the PC yet.
- Once flashed, tap the Volume keys until ‘Recovery mode’ appears on the bootloader screen.
- Press the Power button to confirm and boot into TWRP recovery.
- In TWRP, go to ‘Advanced’ > ‘ADB Sideload’ and swipe the button on the screen.
- Finally, enter the following command to install the workaround injector and fix Nexus 6P bootloop issue:
adb sideload N5X-6P_BLOD_Workaround_Injector_Addon-AK2-signed.zip
- When flashed, reboot the phone by tapping the ‘Reboot System’ button.
Important Note: Always make sure to flash the BLOD fix (workaround injector) zip file at last if you install a custom ROM/kernel, re-install the stock firmware, or root packages like Magisk. That is because, in most of these cases, the boot image will be replaced and thus the applied fix too.
The first boot might take some time, so be patient. The Nexus 6P/5X should boot back to normal and you would be able to use it like before. That was easy and evenly satisfying, right? It feels so good that your money didn’t go in vain, after all. We sincerely hope that Google addresses the issue officially and gives it the attention it deserves. But until then, the exquisite XDA community has got your back.
Advertisement
For any help or questions, drop a comment below. Don’t forget to share this article on your social media and help others to fix Nexus 6P bootloop issue too.
Comments 37 Comments
Comments are moderated, and published only if they are relevant to the topic and add value in a constructive way. If you disagree with something, please be polite and respectful. We suggest you read our comment policy before commenting.
Thank You very much for the instruction. My Nexus 5X was also a mere paperweight – now I have a cellphone again. Thank also to all mentioned XDA members. Great work.
Peter, I am glad this guide worked out and allowed you to fix the issue on your Nexus 5X. Of course, the whole credit goes to the respective developers over at XDA.
Hi Dhananjay, after flashing twrp I try to enter in the recovery, I see the teamwin screen, then I see this:
Running OpenRecoveryScript
Could not mount /data and unable to find crypto footer.
Failed to mount ‘/data’ (Invalid agrument)
Unable to recreate /data/media folder.
Updating partition details…
Failed to mount ‘/data’ (invalid agruments)
…done
Unable to mount storage
Failed to mount ‘/data’ (invalid agruments)
Full SELinux support is present.
wipe_data_via_recovery
Unable to mount /data/media/TWRP/.twrps
Running Recovery Commands
Failed to mount ‘/data’ (invalid agruments)
Formatting cache using make_ext4fs…
Done processing script file
Renamed stock recovery file in /system to prevent replacing.
then the device reboots.
(On boot, when bootloader is locked, I see “your device is corrupt. It can’t be trusted and and may not work properly” message, than stuck on Google logo)
Hi Nicoo. First of all, please let me know if your phone’s bootloader is locked or unlocked?
Hi Dhan, Thank you for the reply.
The bootloader is unlocked as you explain in step #12
(I enabled OEM Unlock just minutes before the device rebooted for the last time)
Great! Keep it enabled, or none of the flashing will work.
Now, here’s what I want you to do:
1) Boot your phone into TWRP. Go to the ‘Wipe’ section and tap on ‘Format Data’. Then enter ‘Yes’ in the provided field to wipe the /data partition. Note that this will erase all the data on the phone, so make sure that you have a backup.
2) Go to TWRP > Reboot and tap on ‘Recovery’. This will reboot your phone back into TWRP.
3) Download the BLOD fix zip from above.
4) Connect your phone to the PC while it’s in TWRP. Then go to the ‘Mount’ section and tap on the ‘Enable MTP’ button (if it’s disabled).
5) Transfer the BLOD fix zip to the phone’s storage.
6) Disconnect the phone and flash the BLOD fix zip file using the ‘Install’ menu of TWRP.
Finally, reboot your phone into the OS and see if it successfully boots.
HI, my phone just went in a bootloop on its own few days ago, ever time I flash the BLOD it workd fine that day , but the next day its in a bootloop again, now I even tried the android 10 pixel, same thing it works fine the same day and next day its in a bootloop, the new problem today is it does not start in recovery no matter how many times I flashed it in fastboot , I did a clean install factory image and all, and then installed the twrp and BLod for both times old (Andr.9)and new blod (Andr.10), it just will not boot in recovery, it works fine in bootloader, but recovery I tried 4 different twrp FDE & FBE 3.2 or 3.3 nothing it just will not boot in recovery, is my phone dead ?
Hi Samad. I am afraid, the device might be completely bricked. I am quoting a section of osm0sis’s BLOD XDA thread below, please go through it. I believe it will be more explanatory.
Some important notes before going any further:
1) Freezing at the Google logo likely points to it being perf cluster separation, but this could also be caused by other components separating.
2) Freezing at the boot animation suggests ROM/ROM data problem or could also potentially be a BLOD with other components now beginning to separate and that’s what people have reported when the 4core mods suddenly stop working with no configuration changes – if you’ve tried the default boot.img for your ROM, patched with the BLOD AK2 and it still doesn’t work, sorry but your device is a brick.
3) If no 4core recovery boots for you then you definitely have more components than just the performance cores separated, sorry but your device is a brick.
4) I haven’t seen anyone say their devices only worked using a “1core” modification who had tried a proper 4core patched setup; 4core makes sense because it’s the separate perf cores cluster becoming unsoldered, but if the low power cores cluster also starts to come unsoldered logically not even a single core would work.. I think that’s where the “Green Screen Of Death” comes into it.
5) DemiGod = Green Screen Of Death; unfortunately this (more components separating given more time – maybe the flash memory chip?) is why many call the 4core workaround only temporary.. there’s not much that can be done after that from what I’ve read.
6) EX Kernel does not support FBE on these devices because the EX zip patches the fstab forcefdeorfbe flag to encryptable.
Your number 6 says to turn on nexus 6p in bootloader mode, it won’t come on, any suggestion. phone completely dead except when the red light comes on to charge it.
Hi Joe. It may not be a BLOD after all. It’s a rare case of negative charge, that I have faced once on my Nexus 6P too. Try performing the steps mentioned here, it has helped others as well. You might need to do a couple of retries.
I followed a similar procedure with an extra step.
1. recovery flash twrp-3.2.1-0-fbe-4core-bullhead
2. Google stock image (bullhead-opm7.181105.004-factory-37df0288) installation
3. Side load N5X-6P_BLOD
Now I can see that animation of boot (4 circles with Google colors) on N5X. This animation is there for more than 40 minutes. Phone seems stuck in the animation loop. Not sure if I have to wait any longer.
Hi Ramesh. I’ll quote my own reply that I did to another user with a similar problem.
Hi, here’s what you should try.
1) Go to the bootloader mode and connect the phone to the PC.
2) Flash the factory image, but make sure to not let the phone boot into the OS.
3) Flash the TWRP image and sideload the injector as stated above.
Make sure that you don’t boot your phone into the OS until all the instructions are complete. The reason: As soon as the phone starts to boot, it will start to encrypt the /data partition.
Once you do this, let me know if it works.
I did the injection and it’s still stuck on the google screen what to do?
Hi Jonathan. That depends on a few things:
1) DM-Verity was triggered when you flashed the injector (You can try formatting data in TWRP and then flashing the injector again)
2) The bootloop is beyond recovery (Very slight chance of this)
In most cases, the first point is the reason. So, please give that a try.
Alright , i did
Thank you so much! I’ve tried other forums including the XDA one with no luck. Luckily I found this page and followed your steps and my Nexus 6P has been restored and works well so far. Hopefully the problem won’t pop up again. What are the chances of the problem recurring? Has anyone had the problem come back after successfully applying the fix?
Hi Tom! Thanks for your kind words and I am glad it all worked out for you.
As for your questions, there’s really no way to know if the problem to reoccur by itself. 90% it won’t unless you change the boot img (kernel). And even if it does, you can simply boot into the modified TWRP and flash the injector again.
Thanks it WORKED!!!!! ReFlashing before adding the recovery file & adb sideload changed everything for me! the TWRP interface also really looks cool!
This is one of the best articles!! Thank you for writing it and updating it! Very much appreciated!! Got my 6p working again this weekend! Other than a crappy battery, it works like a charm!!
Thank you so much for the appreciation! I am glad you got it working again.
Dhananjay,
Just wanted to thank you for the excellent article. There are numerous BLOD articles out there, but yours was by far the clearest and most helpful (not to mention the most up-to-date, as most of the others were devoted to previous Android versions).
Here are a few comments that may help other users:
* Like many Nexus 6P users, mine was quite stock when the BLOD hit. This meant my bootloader was locked and “OEM unlocking” in Developer Options was not toggled. I was able to get my phone temporarily booted by using a heat gun on the back of the phone for a few minutes (keeping it far enough away to make sure it didn’t get too hot) until it booted and I was able to toggle “OEM unlocked” and “USB debugging” in Developer Options. After that I shutdown and followed your steps exactly.
* I had the same issue that MMK had where it initially said “Decryption Unsuccesful” and wouldn’t boot. I followed your advice and used TWRP to Wipe->Format Data, but I did NOT flash the ElementalX kernal. I believe my data is still encrypted (though could potentially be accessed due to the unlocked bootloader), but the phone has worked fine since.
* I’ve disabled Automatic Updates (also in Developer Options), as I assume we want to avoid automatic security updates? I wasn’t sure if one of these would screw with the workaround injector. The 6P won’t be receiving these updates much longer anyway. The first (and only) time I tried to allow the system update, it took me to TWRP and I wasn’t sure where to proceed from there. Please let me know if I’m wrong here.
Anyway, hope these help. Thanks again for saving my phone.
Hey SteveO. Thank you for two things – (1) For the appreciation, means a lot, and helps me keep going, and (2) For providing your insight on how the method worked for you. I believe it will aid several readers looking for the answer to their questions.
Switching back to 8 cores will simply be the start of the problem again, the phone won’t boot. To deal with performance issues, I suggest that you flash Franco’s kernel on your phone.
Greetings,
Thank you for your steps, they seem to be promising for me. I tried to follow your steps, and you mentioned that the start up (booting) after this takes a while. I just see a “Google” on my screen with an “unlock” icon in the bottom. I waited for 15 -20 minutes, nothing happened. How long can this take? Thanks1
Hi, in most cases, this could be an encryption issue. Please see my reply below for “MMK”. Try that and please get back after it.
I just followed the following step during the initial setup
“In TWRP, go to ‘Wipe’ -> ‘Format Data’ and enter ‘yes’ in the provided field. This will format the /data partition.”
But I didn’t follow the remaining, just because I didn’t know what those meant, or what I needed to do. Do I need to do do anything for those steps?
Safder,
I did the same thing you did (followed all of Dhananjay’s steps in the article, then formatted my data through TWRP). However I also stopped there and did NOT flash the ElementalX kernal. Everything has been working great for me so far (~3 weeks or so).
Thanks again, Dhananjay, for the excellent article! There are numerous “fix your BLOD Nexus 6P” articles out there, but yours was by far the clearest (and most up-to-date, as most of the others were for previous Android versions).
Thanks,
SteveO
hello sir. i followed the above steps.
1) my device was visible when i did fastboot
2) i unlocked the boot loader.
3)i used those images twrp and sideloaded the injector in twrp as mentioned. everything went successfully.
previously the google image used to blink but now it got stuck there and nothing is happening. please help me. im bit poor in this software terminology. i want my nexus 6p back 🙁
Hi, here’s what you should try.
1) Go to the bootloader mode and connect the phone to the PC.
2) Use the following two commands without inverted commas: “fastboot format userdata” and “fastboot format cache”
3) Once done, reboot the bootloader: fastboot reboot-bootloader
4) Flash the TWRP and sideload the injector as stated above.
Make sure that you don’t boot your phone into the OS until all the instructions are complete. The reason: As soon as the phone starts to boot, it will start to encrypt the /data partition.
Do let me know the result.
May I say thank you for the above guide, after getting lost for a couple of days looking at other guides I found this and its nice and easy to follow. I had my phone on OEM lock but blasting the phone with a hairdryer and starting it from fully off broke bootloop for 10 mins allowing me to get to the developer options and switch off OEM lock. The rest is simple, thank you once again!
You’re welcome, Luke! I can see that the hairdryer trick is working for many out here.
I am glad that it worked for you! Thanks for your kind words.
Thank you so much for this bit. I was scouring through the internet to find a fix for Android O 8.1. Managed to somehow boot into the device to turn on OEM unlocking, post which I flashed the 8.1 May 2018 factory image, applied the TWRP and then sideloaded the boot patch.
Carrying on from the original thread where this all started (https://forum.xda-developers.com/nexus-6p/general/guide-fix-nexus-6p-bootloop-death-blod-t3640279 ), just wanted to know if the N5X-6P_BLOD_Workaround_Injector_Addon-AK2-signed.zip patch not only disables the BIG cluster, but also optimizes the LITTLE cluster that all the remaining 4 are used by the CPU i.e. instead of using 1 core for all foreground tasks, does the patch modify the ramdisk to utilize all 4 cores more effectively? Really appreciate if you could clarify or let me know if there is another patch down the line to do so
Also, any idea how OTA updates work after this? Would OTA updates come down? And if updated, would I need to repeat the process all over again?
Hi Prasanna. First off, I am glad that you got to fix your device with this. From what I have seen only a few people were able to boot into the OS for enabling OEM unlocking. If you don’t mind, could you please share how you did it? Is there any specific trick that did it? It would be really helpful for other users here.
Over to your question. The injector ZIP does the same patches as implemented by XCnathan32. Which means, all the 4 cores are used efficiently. But just in case you want to tweak it by yourself or want to improve performance, you can simply install a custom kernel via TWRP and flash this patch over it.
Next, the OTA. If your phone is completely stock, without root, custom kernel, TWRP, etc, then yes you shall be able to take OTAs normally. But then again the device wouldn’t boot after that. Which means, you will need to flash the custom kernel (optional) and BLOD patched again after installing the OTA.
What I would recommend is, make use of apps like Flashfire. You can simply download the OTA ZIP, Magisk ZIP (optional), custom kernel (optional), and BLOD patcher (Mandatory) and add them to the flashing queue in Flashfire. This will automate everything for you.
Sorry for the delayed comment. I am glad it worked out for you. I will update this post with the new links and steps.
Hi,
It does not work for me since it shows me that OEM unlock is not allowed.
Any idea of what to do?
In that case, you will not be able to unlock the bootloader. Thus you cannot flash any of the workaround files.
Do you have TWRP installed on your device by any chance?
It seems like the solution has been revised and standardized across most builds. Please give a try to the steps below and let me know of the results so that I can update this post.
1) Download this modified TWRP and boot into it using:
fastboot boot twrp-3.2.1-0-fbe-4core-angler.img
2) Then flash the following ZIP file using TWRP: N5X-6P_BLOD_Workaround_Injector_Addon-AK2-signed.zip