Restoring the stock firmware can help you unroot and unbrick the device, fix software issues, and manually upgrade the software. In this guide, we will show you how to restore Samsung Galaxy Tab A7 10.4 (2020) back to the stock firmware. This could be easily done by downloading and then flashing the stock Samsung firmware using the Odin tool.
Advertisement
Why would you want to do it?
Things like custom ROMs, TWRP, and Magisk root are pretty solid ways of gaining complete control over your tab’s software and tune it to your own taste and liking. We have already covered a tutorial on unlocking the bootloader and rooting the Galaxy Tab A7 10.4.
As good as these things may sound, there are times you would want to revert back and restore your Galaxy Tab A7 10.4 back to the stock/official Samsung firmware.
For instance, you might want to sell your tab or you would want to receive official OTA software updates again, without having to perform any additional instructions. Or maybe, the custom ROM experience wasn’t that satisfactory as you thought initially.
Advertisement
Further, rooting your tablet may also trigger SafetyNet warnings and prevent you from using certain applications. While Magisk is pretty accomplished in hiding root from such apps, but Google’s latest hardware-based attestation for SafetyNet makes it impossible to achieve the same results, as it did earlier. So, you might want to unroot your tablet.
Did you know? Restoring/re-installing the stock firmware can also help you fix software issues like bootloops, failed OTA updates, performance degradation, and more.
Restoring Galaxy Tab A7 10.4 by Flashing Stock Firmware using Odin
In any of the above scenarios, simply performing a factory reset will not help. A factory reset only formats the /data partition. Since modifications like custom ROMs, TWRP, and root are applied to the device partitions (including the system, vendor, or boot partitions), a factory reset will be of no use.
And that’s when you’d want to manually restore your Galaxy Tab A7 10.4 back to the stock firmware. This could be easily done by manually installing/flashing the stock firmware to your tablet using the Odin tool.
Sounds like a lot of work? Don’t worry! The instructions below will take you through the complete process in a step-by-step and comprehensive manner.
Page Contents
Prerequisites
Before you start following the instructions, there are a couple of things you should do first.
1. Take a Backup
The first and foremost thing you should do is take a complete backup of all your important data stored on the tablet. Flashing the stock firmware will completely erase all the data, including installed apps, messages, contacts, and everything stored in the internal storage.
You could take a look at our article here on backing up different types of data stored on Android devices.
2. Install Required USB Drivers
While your Windows computer will generally install the required USB drivers automatically. There are times it might not and Odin may fail to recognize your Galaxy Tab A7 in Download Mode. In that case, it’s best that you download and manually install the latest Samsung USB drivers on your Windows computer.
3. Charge your Tab’s Battery
Charge your tablet to a minimum of 40-50% battery level. This will ensure that it doesn’t suddenly power off due to low battery while you’re performing the software restoration.
How to Restore Stock Firmware on Samsung Galaxy Tab A7 10.4
The process of flashing the stock firmware on Galaxy Tab A7 and restoring it to its original software is a tried and true method. We have broken down the instructions into five major steps so that it’s easy for you to understand the process and perform it.
Requirements
The only things you’ll need to perform this procedure are:
- Your Galaxy Tab A7 10.4 (2020)
- A Windows computer (Odin only works on Windows. For macOS/Linux, use Heimdall)
- And, a compatible USB-C cable
Now without any further ado, follow the instructions below.
Step 1: Download the Stock Firmware Package
The first step is to download the stock Odin-flashable firmware package for your Galaxy Tab A7 10.4. Unlike Google, which provides Factory Images for all its Pixel devices, Samsung does not publish any sort of firmware or utilities to help users restore the stock firmware on their devices.
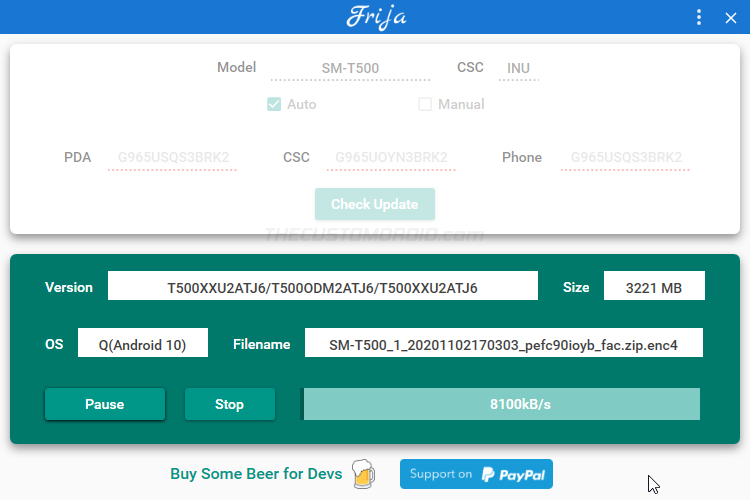
So, where can you download the stock firmware for your Galaxy Tab A7? It’s easy! You use tools like Frija and Samloader. These tools can download the firmware directly from official Samsung update servers without any data speed caps. In order to use them, you will need your Galaxy Tab’s model number and CSC/regional code.
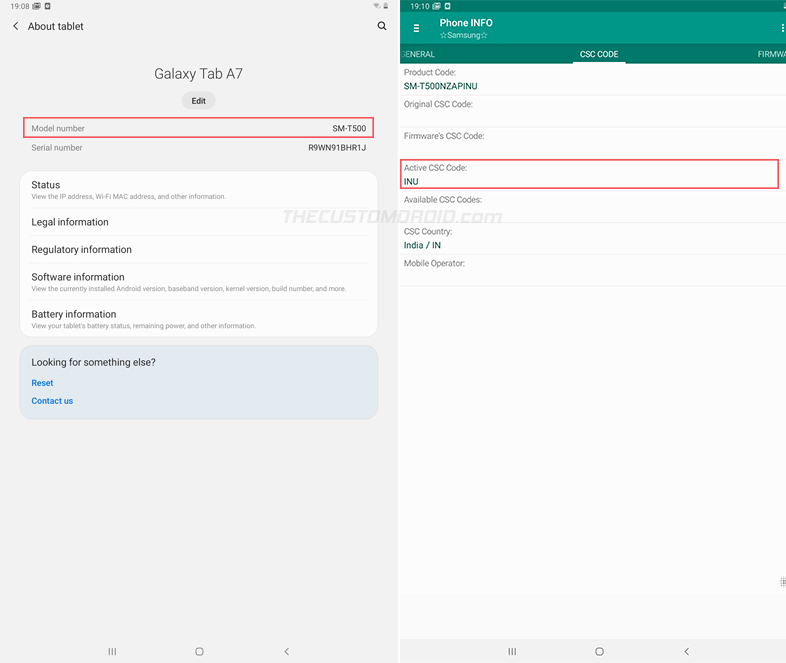
The model number should be ‘SM-T500’ or ‘SM-T505’ depending on if you have the WiFi or LTE variant of the Galaxy Tab A7, respectively. You can also verify the same by going to ‘Settings’ → ‘About tablet’. As for your tab’s CSC code, you can view it by downloading and using the ‘Phone Info SAM‘ app from the Play Store.
Once you have the information, you can launch the Frija tool, input the required data in the fields, and download the stock firmware package for your Galaxy Tab A7 to your computer.
Advertisement
Step 2: Extract the Firmware Binaries on your Computer
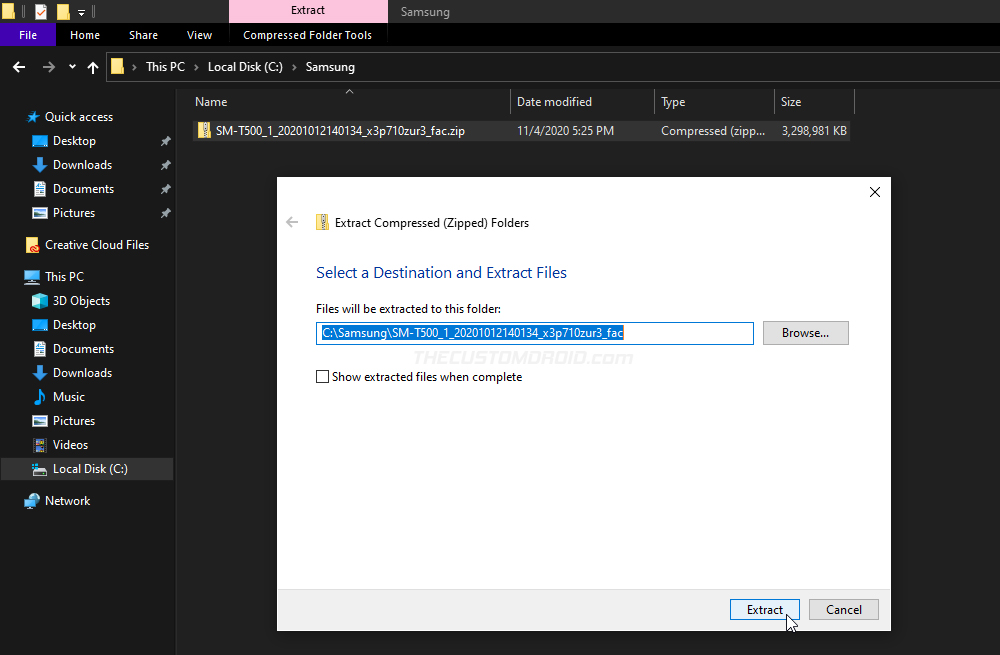
The downloaded stock firmware package will be in .zip file format. So, the second step is to extract the contents of the ZIP file to get individual firmware binaries. To do this, go to the location on your computer where the firmware package was downloaded/saved. Then right-click on the firmware ZIP file, select ‘Extract All’ and then ‘Extract’.
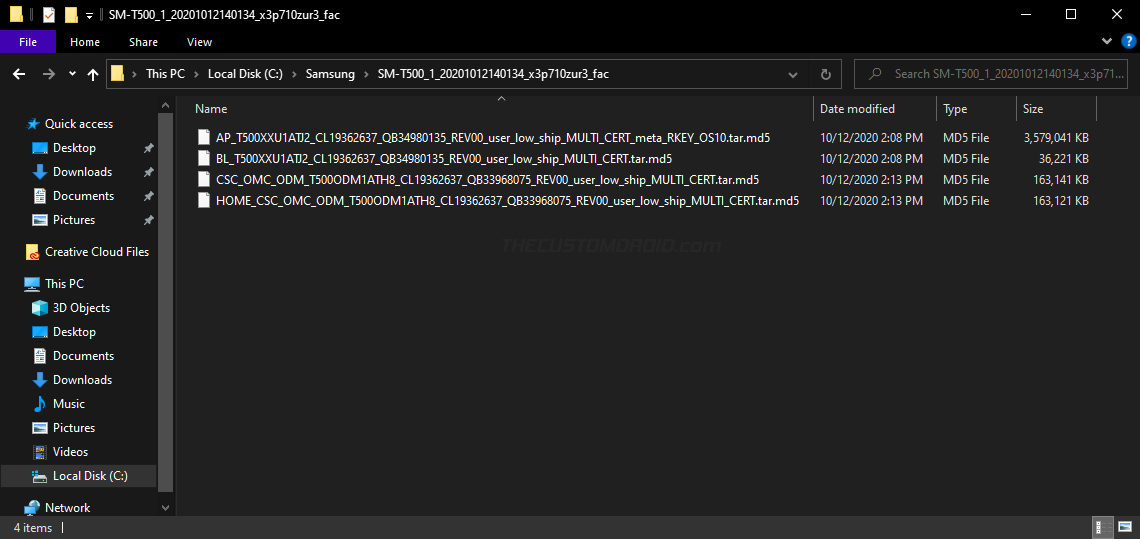
The extracted folder will contain the AP, BL, CP, CSC, and HOME_CSC firmware binaries in .tar.md5 file format (See the figure below for reference). These binaries are what you’ll be flashing to your Galaxy Tab A7 in the steps that follow.
Important Notes:
- The ‘CP’ binary holds the modem information and is only applicable for the LTE variant of the Galaxy Tab A7 with SM-T505 model number. There will be no CP binary in the firmware package for the WiFi variant (SM-T500).
- ‘CSC’ and ‘HOME_CSC’ are essentially the same. The only difference is that the regular CSC erases all the data during the flash, while the HOME_CSC will preserve the data.
- When restoring your device, it’s generally best to use the regular CSC and wipe off all the data.
- If you’re using this tutorial to manually upgrade the software of your Galaxy Tab A7, you could use the HOME_CSC instead.
Step 3: Boot your Galaxy Tab A7 into Download Mode
The Odin tool can only recognize and flash devices while they are in a special boot mode known as Download Mode.
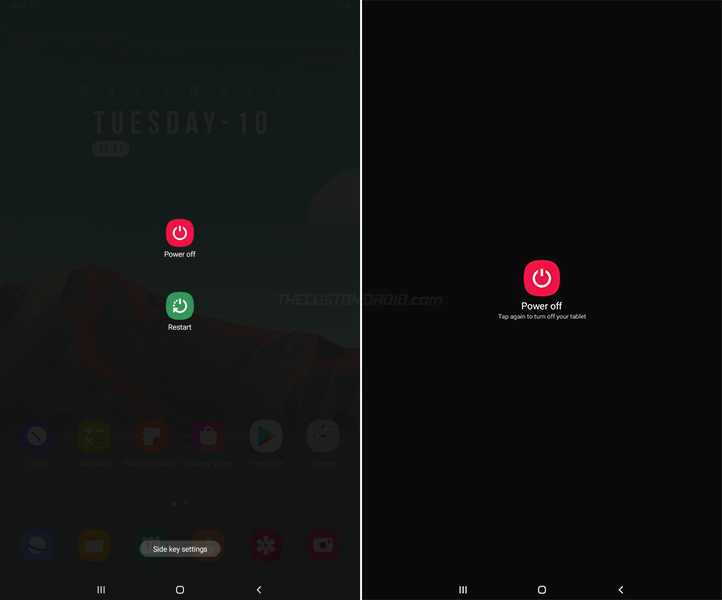
So, the third step is to boot your Samsung Galaxy Tab A7 into Download Mode. To do this, hold the Power key of your tab until you see the Power menu on the screen. Then select “Power Off” and press “Power off” again.
Once your tab is completely shut down, connect it to the computer via the USB cable while holding the Volume Up and Volume Down keys together. Release the keys when you see the blue-colored Bootloader screen.
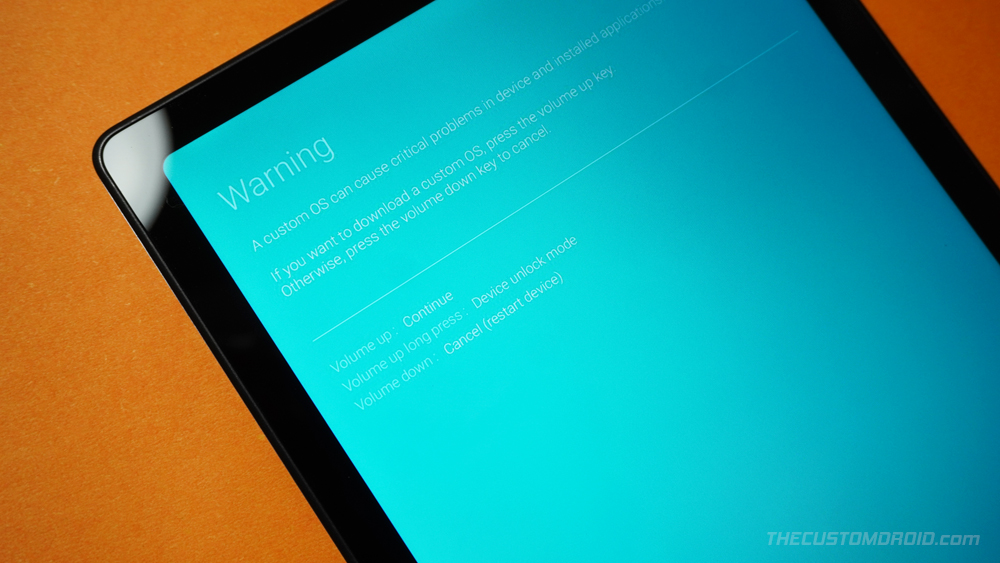
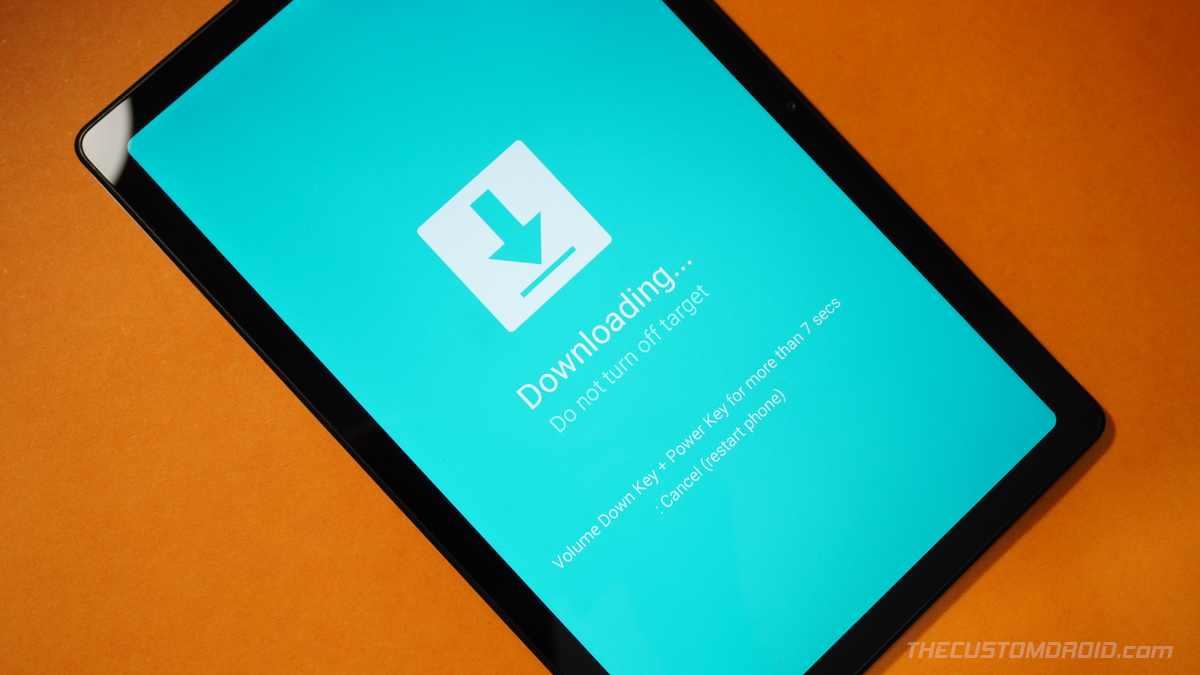
Finally, tap the Volume Up key to enter Download Mode. Here’s what it looks like:
Advertisement
Want detailed instructions? See: How to Enter Download and Recovery Modes on Galaxy Tab A7
Step 4: Download and Launch the Odin Tool
Now that the tab is in Download Mode, it’s time to launch the Odin Flash Tool on your computer.
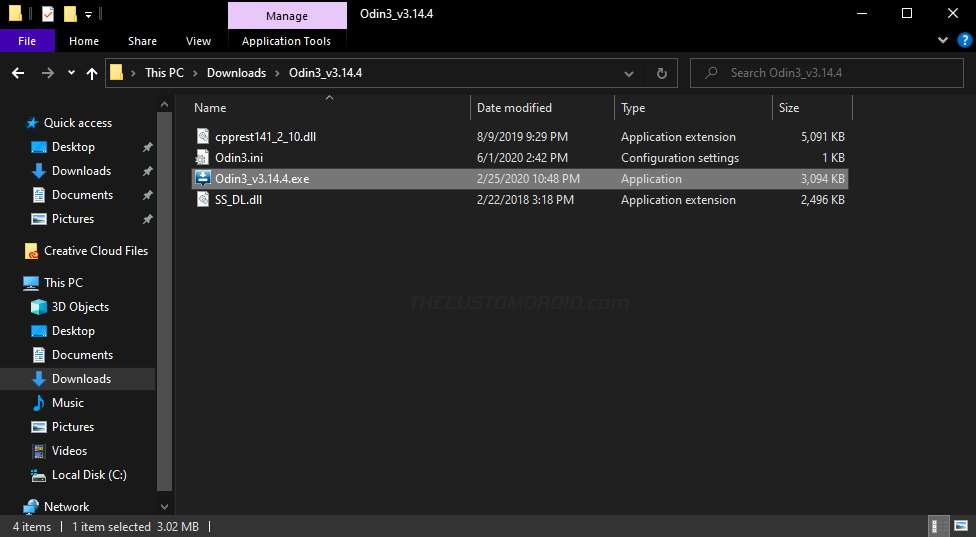
So, begin by downloading the latest version of Odin from this page and save the ZIP file to your computer. Then navigate to the folder where the Odin ZIP package was downloaded, right-click on it, select ‘Extract All’ and then ‘Extract’.
The extracted folder should contain the Odin binary, along with a couple of libraries, a configuration file. Now launch the Odin tool by double-clicking the ‘Odin3 v3.14.4.exe‘ executable.
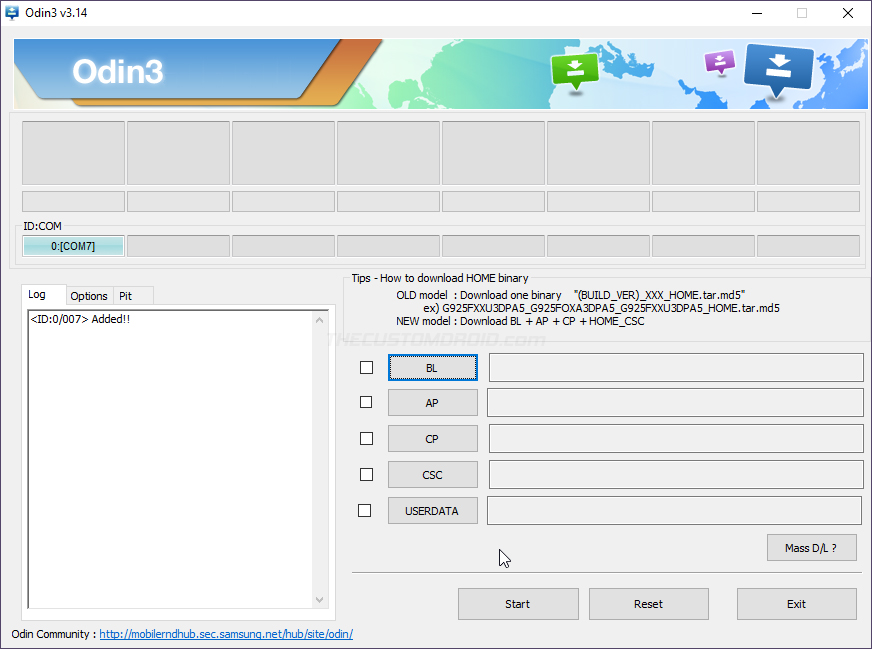
You should now see the tool’s interface on your computer screen. Odin will automatically recognize your Galaxy Tab A7 in Download Mode and display the corresponding COM port number on the top-left of the interface.
Step 5: Flash the Stock Firmware on Galaxy Tab A7
With everything ready, it’s finally time to flash the stock firmware on your Galaxy Tab A7 using Odin.
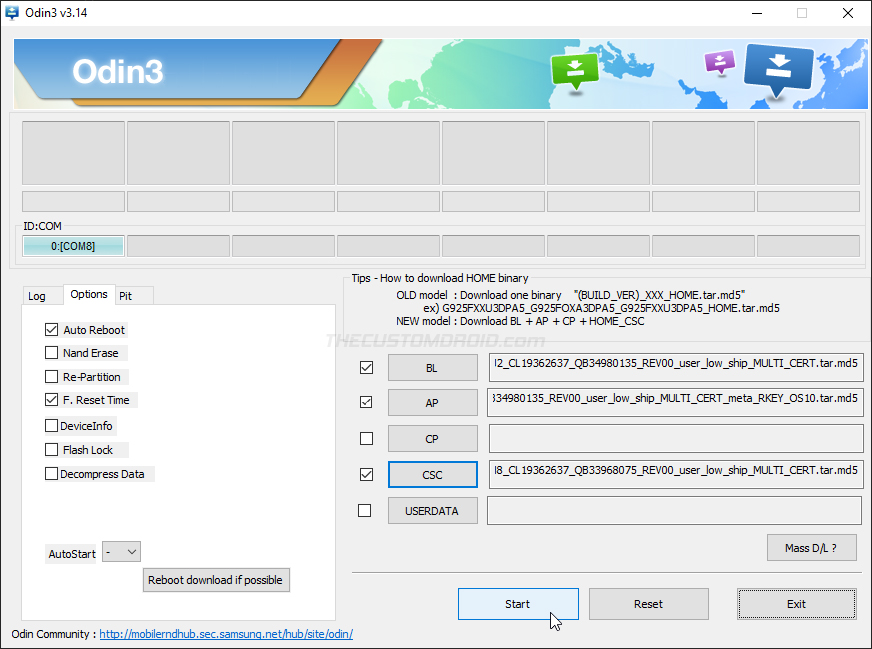
To flash, first load the firmware binaries in their corresponding slots in Odin as instructed below:
- First, click ‘BL‘ and select the BL firmware file (BL_xxxxxxxxxxx.tar.md5)
- Click ‘AP‘ and select the AP firmware file (AP_xxxxxxxxxxx.tar.md5)
- Next, click ‘CP‘ and select the CP firmware file (CP_xxxxxxxxxxx.tar.md5)
- Finally, click ‘CSC‘ and select the CSC firmware file (CSC_xxxxxxxxxxx.tar.md5)
Again, remember that the CP binary is only applicable for the LTE variant with the SM-T505 model number.
Advertisement
Once all the firmware binaries are loaded, click the ‘Options‘ tab in Odin and make sure that ‘Auto Reboot‘ and ‘F.Reset Time‘ options are checked. Finally, click ‘Start‘ to begin the flashing process and restore your Galaxy Tab A7 back to stock firmware.
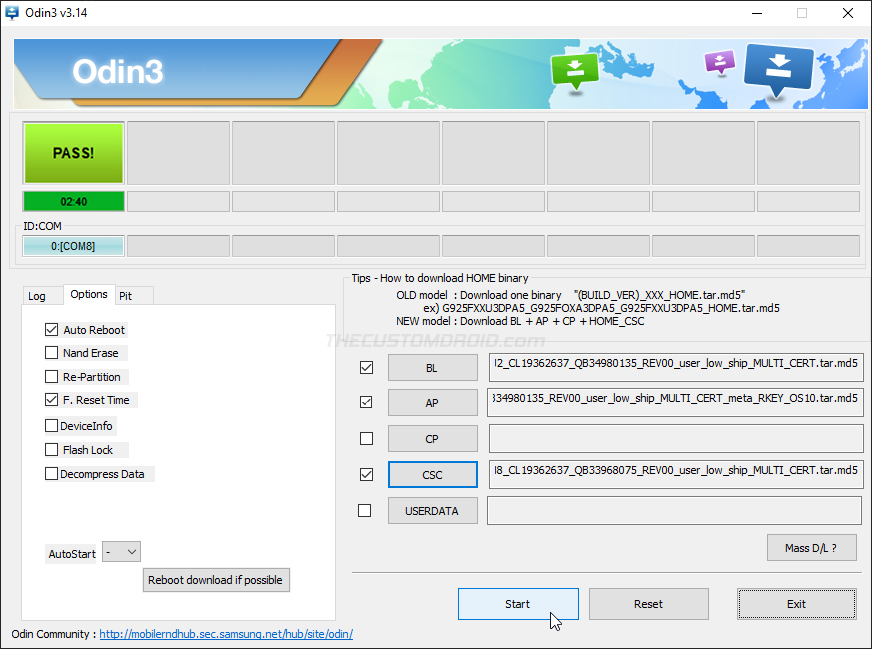
The process could take a few minutes to complete, so hold back and do not disrupt the USB connection. After it finishes, Odin will display the ‘PASS!‘ message and your tab will automatically reboot. You can safely disconnect it from the computer and close the Odin tool now.
Once your tab boots, you can go through the initial setup, log into your Google/Samsung accounts, and restore your backup.
Common Issues
Below are some of the most common issues/errors you might face when flashing firmware via Odin, along with their potential solutions.
Issue #1: The device is not detected by Odin and COM port doesn’t lighten up
- If you have Samsung’s Smart Switch software running on the computer, close it. Also, make sure that your tablet is recognized as ‘SAMSUNG Mobile USB CDC Composite Device‘ under ‘Control Panel‘ → ‘Device Manager‘ on your computer. In case it doesn’t, you might need to install the latest USB drivers from here.
Issue #2: Odin shows the ‘FAIL!’ message
- This could be due to multiple reasons. You may not be using the correct firmware/Odin tool, or the USB connection could be faulty. Simply force shut down the device by holding the Power key for 15-20 seconds, boot into Download Mode again, and attempt to reflash the firmware.
Issue #3: The device enters a bootloop and doesn’t boot past the Samsung logo
- In case you face a bootloop after the installation or any other type of abnormal software behavior, simply reboot into the stock recovery and perform a factory data reset. For the instructions, refer to this tutorial.
Wrapping Up
That’s it! By now, you have learned how to restore the Galaxy Tab A7 10.4 (2020) back to the stock firmware using Odin. This should allow you to unroot your tab, get rid of custom ROMs, and should also be very useful for unbricking in case you flashed a wrong file.
While flashing firmware could seem like a daunting task at first, it’s quite easy once you get a hold of it. We tried our best to break down the process for you and hope that it was simple enough to understand and follow.
If you have any questions at all or find yourself in a difficult position, let us know. We’ll try the best to our knowledge to help you.