How to Install Generic System Images on Razer Phone
Google's Project Treble has got some real attention from the members and developers of the Android community.

On this page
Google’s Project Treble has got some real attention from the members and developers of the Android community. In this post, you will learn how to install Generic System Images on Razer Phone. This covers GSIs of some popular Project Treble ROMs including AOSP, LineageOS 15.1, and Resurrection Remix 6.0.
Razer Phone is the first smartphone from the popular gaming component manufacturer that runs the Android OS. Ever since its release, the Phone has received appreciations on several occasions and due to various reasons. The Razer Phone also received Android 8.1 Oreo update right on time and earlier than many other OEM flagships out there. It not only brought new features but also support for Project Treble. That not only means faster OS updates in the future but also enormous scope for third-party development such as custom ROMs.
Razer Phone isn’t a device that has got massive support for dedicated custom ROMs at the moment. Honestly, it doesn’t any custom ROMs to be compiled specifically. Having support for Project Treble since the Android 8.1 Oreo update enables the device to run Generic System Images of some popular ROMs. Ever since the availability of the new update, third-party developers started diving into the scene. XDA Recognized Contributor linuxct started he own testing, trying to install Generic System Images on Razer Phone. After thorough testing and establishing a base method, the community member published a guide on the forum that would allow you to easily install Project Treble ROMs on the said device.
Following the procedure, you can easily install some of the most renowned custom ROMs including AOSP 8.1, Resurrection Remix 6.0, and LineageOS 15.1 on the Razer Phone.
Guide to Install Generic System Images on Razer Phone
The complete method is split into three simple steps. The first step will take you through all the requirements. The second step will help you permanently install TWRP and flash Magisk to ensure that DM-verity is disabled. The third and final step will help you flash Generic System Images on Razer Phone using fastboot.
Requirements
- Ensure that the bootloader on your device is unlocked. If you haven’t done it yet, then follow our guide to enable OEM unlocking and unlock Razer Phone bootloader.
- Take a complete backup of your personal data. You’d need it if anything goes sideways. You can follow our Android backup guide for the same.
- This guide will not work on Nougat. So, make sure to update your Razer Phone to Android 8.1 Oreo first.
- Install Android SDK tools on the PC.
- Download TWRP recovery image (twrp-3.2.1-0-cheryl.img) and copy it to C:\adb, where the Android Platform-tools (ADB and Fastboot) are installed.
- Download the following files and transfer them to the phone’s internal storage:
Once you have fulfilled the requirements, head down to the instructions below to install Generic System Images on Razer Phone.
Install TWRP and Magisk
- Open the C:\adb folder, where ADB and Fastboot binaries are present.
- Hold the SHIFT key on the keyboard and right-click on an empty space inside the folder.
- Select ‘Open PowerShell window here’.
-
Power down the phone.
-
Hold the Volume Down button and connect the USB cable to boot into Bootloader Mode.
-
Flash TWRP image to the ‘boot’ partition using:
fastboot flash boot twrp-3.2.1-0-cheryl.img
-
Hold the Power button for 15 seconds to force shutdown the device.
-
As soon as the phone powers off, press and hold the Volume Up button to boot into TWRP.
-
On the ‘Unmodified system warning’ screen, do not swipe the button. Simply tap on the ‘Keep Read Only’ button.
-
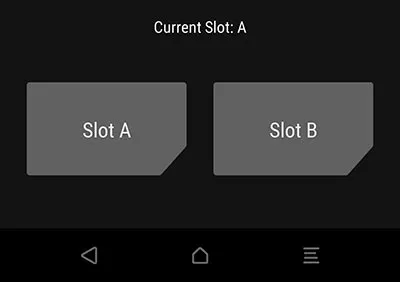
Open the ‘Reboot’ menu and set the current slot to ‘Slot A’.
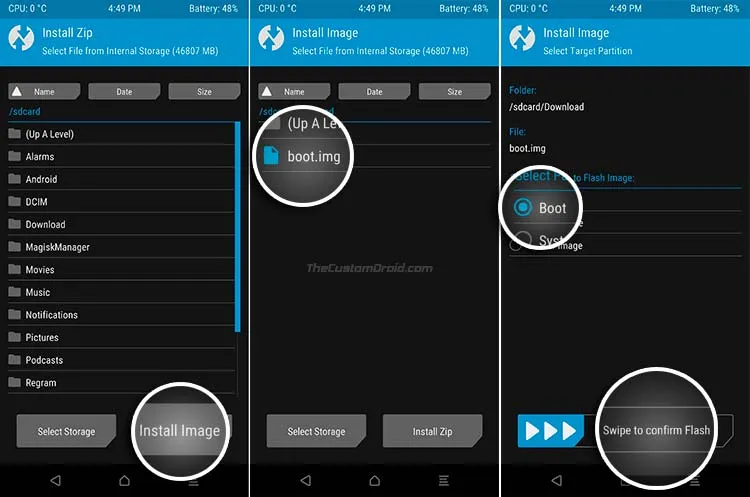
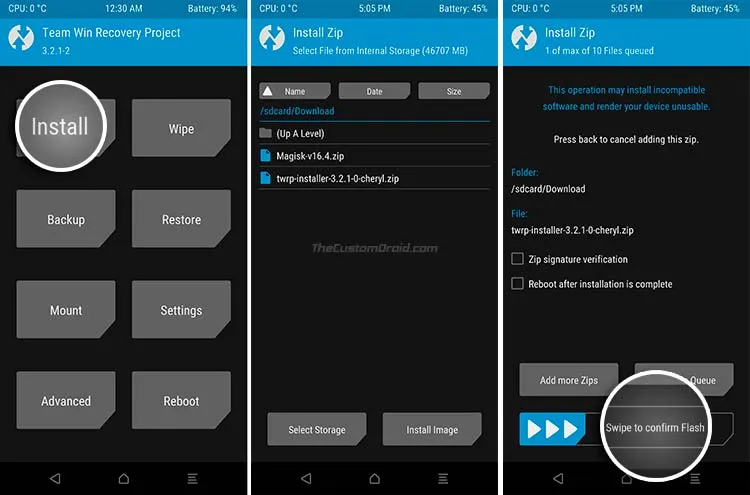
- Go back to the main TWRP screen and tap on the ‘Install’ button.
- Press the ‘Install image’ button and flash the stock boot.img file to the ‘boot’ partition.
- Again, go to the ‘Reboot’ menu and set the current slot as ‘Slot B’. Repeat and flash the boot.img to Slot B this time.
- Once done, switch back to Slot A and flash the TWRP injector and Magisk ZIP.
- Finally, go to ‘Reboot’ > ‘Bootloader’.
When everything above is finished, the phone will reboot into the bootloader mode. You are now ready to install Generic System Images on Razer Phone using Fastboot.
Install Generic System Images on Razer Phone
-
Connect Razer Phone to the PC while it is in bootloader mode.
-
Download GSI (ARM64 and A/B) of one of the following custom ROMs:
-
Copy the downloaded *.img file to C:\adb, where the ADB and Fastboot binaries are present.
-
Hold the SHIFT key on the keyboard and right-click on an empty space inside the folder.
-
Select the ‘Open PowerShell window here’ option.
-
Run the following command to confirm that the Razer Phone is detected properly:
fastboot devices
-
The command shall return a device ID along with the ‘fastboot’ message.
-
Enter the following command to install Generic System Images on Razer Phone:
fastboot flash system_a system-arm64-ab.img

-
Set active slot to B using:
fastboot set_active=_b
-
Flash GSI on slot B:
fastboot flash system_b system-arm64-ab.img
-
Once installed, set active slot as A:
fastboot set_active=_a
-
Finally, reboot the phone:
fastboot reboot
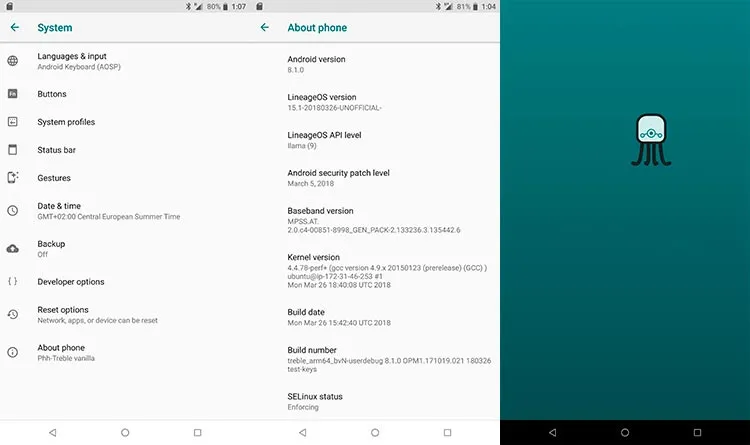
So, you have just installed Generic System Image on your Razer Phone and your device should boot into the custom ROM that you flashed. This is currently the easiest method to install a custom ROM on the Razer Phone. Thanks to linuxct, we now have more details on how exactly to follow the procedure. We can’t thank him and everyone involved enough for their contribution.
It’s highly likely that support for more ROMs will be added in coming time. Until then, flash and enjoy the available ROMs on your phone.
This was our tutorial on how to install Generic System Images on Razer Phone. If you have any questions regarding the procedure, let us know through the comments.
Comments
Comments are moderated, and published only if they are relevant to the topic and add value in a constructive way. If you disagree with something, please be polite and respectful. We suggest you read our comment policy before commenting.