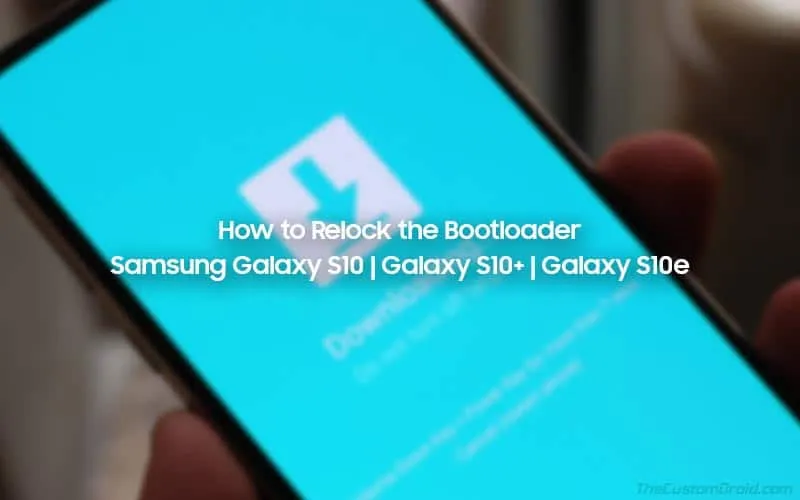
Relock Bootloader on Samsung Galaxy S10, Galaxy S10+, and Galaxy S10e (Fully Working Method)
In this tutorial, I will show you how to relock bootloader on Samsung Galaxy S10, Galaxy S10+, and Galaxy S10e easily.

On this page
In this tutorial, I will show you how to relock bootloader on Samsung Galaxy S10, Galaxy S10+, and Galaxy S10e easily. Relocking the bootloader will also allow you to remove the unlocked bootloader warning message that appears on the phone’s screen when it boots up.
Right after Samsung launched the Samsung Galaxy S10 devices earlier this year, the custom development scene kicked off. Gaining root access and compiling a fully-working TWRP recovery took its time due to several new security features introduced by the OEM in the said devices. Eventually, we had methods to finally install TWRP on Galaxy S10 series and root it using Magisk.
Installing TWRP, rooting, or performing any other sorts of modifications would first require you to unlock the phone’s bootloader. However, it comes with some repercussions, which several users tend to overlook initially. The first of which is the dreadful unlocked bootloader warning message that is shown every time the device boots. Although the message doesn’t itself cause any issue or prevent you from using the device, it could be a problem if you’re about to sell your device, and above all, it is quite annoying.
Next, the second you unlock the phone’s bootloader, the device automatically loses its Play Protection certification. In simpler words, it means that you will not be able to install and use certain apps (like Netflix) that would require Google Play certification.
So, if anytime you want to remove the unlocked bootloader warning message and get your phone Play Protection certified again, then you must relock the bootloader on your Samsung Galaxy S10/S10+/S10e.
Before you go ahead, there are a few keys things you should note:
- Once you install TWRP or root your Galaxy S10 device, the KNOX counter will be tripped.
- KNOX once tripped cannot be reverted even if you flash the stock firmware using Odin and unroot your phone.
- Tripped KNOX means that you will no more be able to use apps like Samsung Pay, Secure Folder, etc.
- Following this tutorial to relock the bootloader on Samsung Galaxy S10 devices will only help you to remove the unlocked bootloader message and get back the Play Protect Certification.
- Hence, even if you lock the phone’s bootloader back, you will still not be able to use apps like Samsung Pay, Secure Folder, etc.
- There’s a small grey area when it comes to KNOX though. If you ONLY unlocked the bootloader, and never flashed a custom binary (like TWRP or Magisk), then the KNOX counter shouldn’t be tripped at all.
- Unlocking and relocking the bootloader will wipe all the data stored on your phone, including the internal storage. So, make sure that you take a complete backup of all your data first.
Now, with that information at hand, follow the instructions below to relock your Samsung Galaxy S10’s bootloader.
Steps to Relock Bootloader on Samsung Galaxy S10 Devices
In brief: The first step is to download the required files and make sure that your device is fully ready for the steps to follow. The second step is to ensure that the OEM Unlocking toggle on your S10 device is turned ON. The third step is to finally relock the bootloader by entering the ‘Device Unlock Mode’. And finally, the fourth and final step is to re-flash the stock firmware using Odin.
The fourth step is only for users who installed TWRP/rooted their device after unlocking the bootloader. If you never flashed any custom binaries, then you can skip this step as your device is already running the full stock firmware.
Below is a short video by robbo1947 where he proves that this method works.
https://www.youtube.com/watch?v=TOpqP6aVOMM&feature=youtu.be
Overall, the process is quite easy and would take just about 10-15 minutes to complete. I have personally tested this method on my Galaxy S10e running Android 10 (One UI 2.0) firmware. Although it should work on any S10 device regardless of the Android version installed.
Step 1: Download the Required Files
First, you must download Odin v3.14.4 and extract the downloaded zip file to an easily accessible location on your PC. Second, you must also install the latest USB drivers for your Samsung Galaxy S10 on your PC.
And lastly, you should download the stock firmware that is currently installed on your phone. To check what version is currently installed, go to your phone’s Settings > About phone > Software information and look at the build number. Once you kn0w that, you can either use the SamFirm tool or Frija Tool, or get the firmware from online databases like SamMobile, SamFrew, etc.
Once you have downloaded the firmware file (in ZIP file format), extract it on your PC.
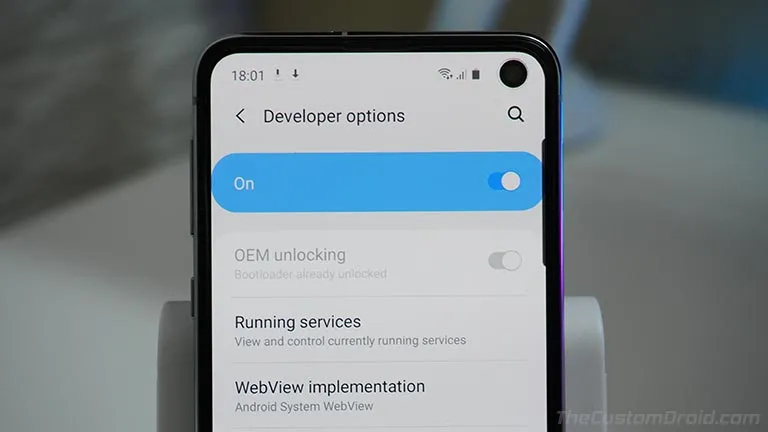
Step 2: Ensure that the OEM Unlocking Toggle is Turned ON
Now, this is very important. In order to relock the bootloader on Samsung Galaxy S10/S10+/S10e, the OEM Unlocking toggle (in ‘Settings’ > ‘Developer options’) should be turned ON. This brings the situation to 4 different scenarios, all of which have been listed and explained below.
Scenario 1: Your phone is currently rooted with Magisk
- When your Galaxy S10 is rooted with Magisk, the OEM Unlocking option will be turned ON and you can simply head over to the next step.
Scenario 2: Your phone was previously rooted and the OEM Unlocking Toggle is ON
- In this case, the greyed out OEM Unlocking toggle is ON. So, you can simply proceed with the next step.
Scenario 3: Your phone was previously rooted but the OEM Unlocking Toggle is OFF
- In this case, the greyed OEM Unlocking toggle is OFF. In order for it to be turned ON, you must root your Samsung Galaxy S1o using Magisk again. Once rooted, the OEM Unlocking toggle should be turned ON and you proceed to the next step.
Scenario 4: Your phone’s bootloader was unlocked, but it was never rooted
- Very similar to the first scenario. All you need to do is move to the next step.
Now, you must analyze the scenario your Galaxy S10 is in and proceed accordingly.
Step 3: Relock Bootloader on Galaxy S10/S10+/S10e
Now, in order to relock the phone’s bootloader, you must boot it into the Download Mode. Just follow the instructions below:
- Power off your Samsung Galaxy S10 device completely.
- Press and hold the Bixby and Volume Down buttons together.
- While holding the said buttons, connect your phone to the PC using the USB cable.
- You should now see a blue-colored ‘Warning’ screen on your Galaxy S10.
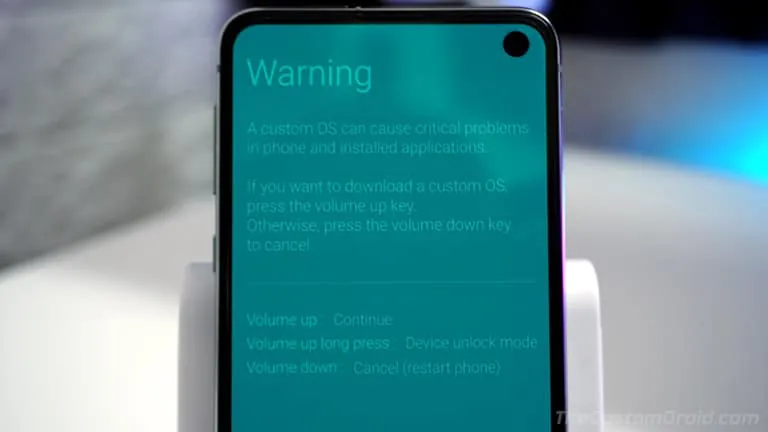
- Simply long-press the Volume Up button to enter the ‘Device Unlock Mode’.
- The device should now prompt you to confirm whether you want to lock the bootloader or not.
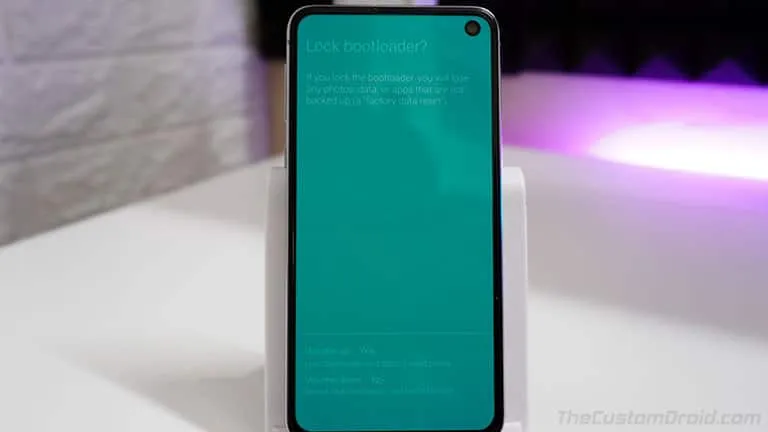
- Now press the Volume Up button to confirm and relock the bootloader on your Galaxy S10/S10+/S10e.
- The device will reboot and the bootloader will be locked.
If you ONLY unlocked the bootloader and never rooted the device or flashed TWRP, then there’s no need to follow any further steps. However, if you have done any of that, you will need to follow the next and final step to restore the stock firmware on your Galaxy S10.
Step 4: Restore the Stock Firmware
At this point, your device should be in the Download Mode with the ‘VBMETA: Error verifying vbmeta image’ message at the top. This is because your phone still has the modified firmware installed. So, you need to flash and restore the stock firmware. If you’re new to flashing, you can check the step-by-step instructions in this guide.
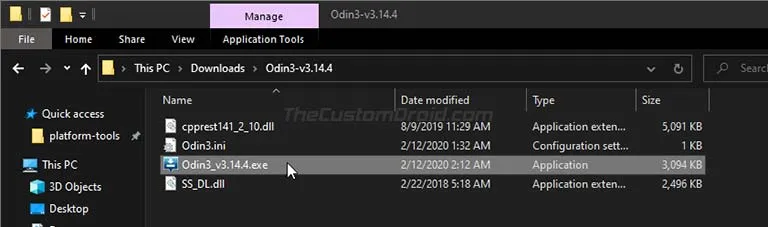
To do so, connect your Galaxy S10 device to the PC using a USB cable while it is in Download Mode. Then launch the Odin Flash tool on your Windows PC by double-clicking on the ‘Odin3 v3.14.4.exe’ executable file.
Next, make sure that ‘Auto Reboot’ and ‘F. Reset Time’ are checked in Odin’s options menu. Now, click on the ‘AP’ button and select the AP firmware file (in .tar.md5 file format) that you extracted during step #1. Similarly, select the ‘BL’, ‘CP’, and ‘CSC’ firmware files in their corresponding slots.
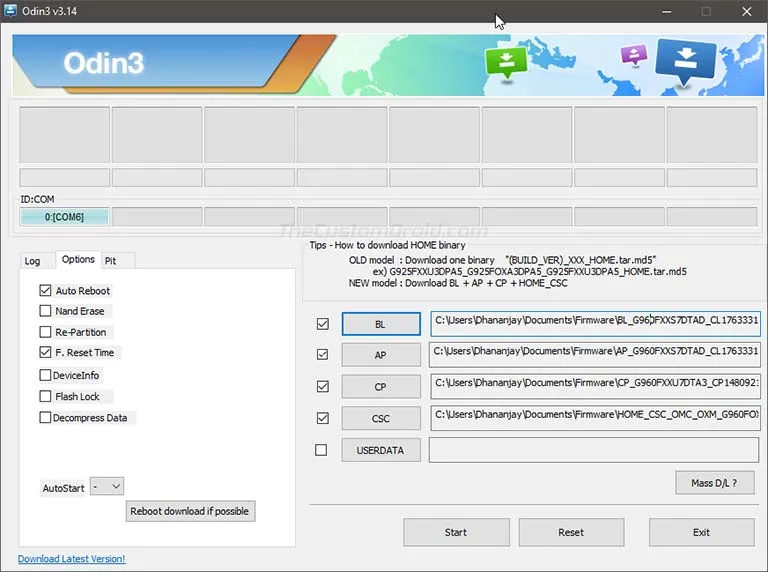
Once all the firmware files are loaded, click on ‘Start’ in Odin to flash the stock firmware on your Galaxy S10/S10+/S10e. Once the flashing process finishes, your device will reboot into the OS (system).
The first boot after relocking the bootloader could take a few minutes, so do not worry, it’s normal. Since the bootloader of your device is now locked, you shouldn’t see the Unlocked Bootloader warning message at all. That’s it!
So, this was our guide on how to relock bootloader on Samsung Galaxy S10/S10+/S10e. If you have any questions regarding the instructions or regarding the relocking process in general, please let me know by leaving a comment below.
This method to successfully relock the bootloader was discovered and shared by XDA Senior Member robbo1947. The generous member unlocked and relocked his own phone’s bootloader multiple times to come up with a full working method for various different scenarios. So, all the credits for this tutorial to go to him! (Source)
Comments
Comments are moderated, and published only if they are relevant to the topic and add value in a constructive way. If you disagree with something, please be polite and respectful. We suggest you read our comment policy before commenting.