Unofficial and official builds of TWRP for Galaxy S10 devices is now available. In this guide, I will show you how to install TWRP Recovery on Samsung Galaxy S10, Galaxy S10+, Galaxy S10e.
Advertisement
I recently published a tutorial on how to root Samsung Galaxy S10 devices using Magisk. Not so long after that, TWRP 3.3.1 was released and official support was added for the Exynos variants of the Galaxy S10 series sold internationally. The project is currently being maintained by XDA Senior Member ianmcd. So, if you wish to install TWRP, you can do so now and also root your Galaxy S10 device simultaneously using Magisk.
Before you head to the instructions, take some time to understand why rooting and installing TWRP is different now, compared to the traditional method that we have been using so far for older Galaxy phones.
According to topjohnwu (Magisk developer), Samsung has introduced some features in newer devices like the Galaxy S10 and Note 10 series that have hindered the custom development process and things like Root and TWRP. These are the A-only system-as-root (SAR) setup that the said devices use, and the “VaultKeeper” service in the bootloader.
Advertisement
For an average user, this means you cannot simply flash TWRP and then use it to install the Magisk ZIP file for root. Developer topjohnwu found a way around and devised a method to method to install Magisk directly to the /recovery partition to gain root. Now, following the same method, it is now possible to install TWRP on Samsung Galaxy S10/S10+/S10e, following a specific set of instructions, as laid below.
Warning & Disclaimer
- Installing TWRP on your phone will wipe the data completely and trip the KNOX counter. This means your phone’s warranty will be void (destroyed) and you will not be able to use apps or services like Samsung Pay, Secure Folder, etc that rely on KNOX’s integrity.
- Proceed at your own risk and understanding. Make sure that you follow it very carefully and do not skip any of the instructions. Doing so will soft-brick your device.
- I, TheCustomDroid.com, or any of its members shall not be held liable for any damage caused to your device by following this procedure or after it. Also, make sure that you fully understand the procedure before you perform it.
Page Contents
Supported Devices
This guide is compatible with the following Galaxy S10 devices running Android 10 and Android 9 Pie, with corresponding model numbers.
- Samsung Galaxy S10: Exynos variant (codename: beyond1lte) with model number SM-G973F/FD is supported.
- Samsung Galaxy S10+: Exynos variant (codename: beyond2lte) with model number SM-G975F/FD is supported.
- Samsung Galaxy S10e: Exynos variant (codename: beyond0lte) with model number SM-G970F/FD is supported.
- Samsung Galaxy S10 5G: Exynos variant (codename: beyondx) with model number SM-G977B is supported.
Prerequisites
Before you begin with the instructions to install TWRP on Samsung Galaxy S10/S10+/S10e, make sure that you fulfill all the requirements stated below.
- This procedure will wipe your device completely, including the internal storage, maybe even multiple times. Until you have finished the procedure successfully and booted your phone, do not restore any data. So, make sure that you take a complete backup of all your data stored on the device.
- A MicroSD card of your choice and a Windows PC.
- Charge your Galaxy S10 device to a sufficient battery level (above 40% at least). This shall help avoid any sudden shutdowns during the rooting process.
- Download and install the latest Samsung USB drivers on the PC.
- Also, download Odin v1.13.1 and extract the package to an easily accessible location on the PC.
- Important: In order to install TWRP, you must first unlock the bootloader and root your phone. To do so, go through the instructions in this guide. Once done, come back here and follow the instructions below to install TWRP on Galaxy S10/S10+/S10e.
- Download the Multi-Disabler ZIP file and transfer it to your phone’s SD card prior to following the procedure.
Downloads
- TWRP Recovery (Android 10; BSKO Kernel)
- Galaxy S10 (SM-G973F): twrp-beyond1lte-3.3.1-101_ianmacd.img (Unofficial)
- Galaxy S10+ (SM-G975F): twrp-beyond2lte-3.3.1-101_ianmacd.img (Unofficial)
- Galaxy S10e (SM-G970F): twrp-beyond0lte-3.3.1-101_ianmacd.img (Unofficial)
- Galaxy S10 5G (SM-G977B): twrp-beyondx-3.3.1-100_ianmacd.img (Unofficial)
- TWRP Recovery (Android 9 Pie; ASJG Kernel)
- Galaxy S10 (SM-G973F): twrp-beyond1lte-3.3.1-13_ianmacd.img | twrp-3.3.1-9-beyond1lte.img (Official)
- Galaxy S10+ (SM-G975F): twrp-beyond2lte-3.3.1-13_ianmacd.img | twrp-3.3.1-9-beyond2lte.img (Official)
- Galaxy S10e (SM-G970F): twrp-beyond0lte-3.3.1-13_ianmacd.img | twrp-3.3.1-9-beyond0lte.img (Official)
- Galaxy S10 5G (SM-G977B): twrp-beyondx-3.3.1-7_ianmacd.img
- Multi-Disabler zip: multidisabler-samsung-2.2.zip
- Disables File-Based Encryption (FBE), VaultKeeper, Process Authentication, and prevent stock recovery restoration.
Although I will try to keep this post updated with the latest download links, I still recommend checking the original XDA thread for the latest TWRP builds according to the software version installed on your phone.
Advertisement
Instructions to Install TWRP Recovery on Samsung Galaxy S10, Galaxy S10+, and Galaxy S10e
Like I mentioned above, the process of installing TWRP is a lot different than what we used to follow for older devices like the Galaxy S9 or S8.
In brief: In order to install TWRP Recovery on Galaxy S10/S10+/S10e, you must first unlock the bootloader and root the phone with Magisk (See #6 in the ‘Prerequisites’ section above). Once the phone is rooted, you will need to download TWRP recovery for your Galaxy S10, patch it using Magisk Manager, then flash the patched TWRP recovery image using the Odin tool. Finally, you will have to flash the Multi-Disabler ZIP using TWRP and format the data partition.
For your convenience and easy understanding, I have split the instructions into four (4) major steps. Make sure that you follow each and every step in the given order.
Step 1: Patch TWRP Recovery Image using Magisk Manager
The first step is to download the TWRP image and patch it using Magisk Manager. Just follow the instructions below.
- Download the TWRP Recovery for Galaxy S10/S10+/S10e.
- Connect your phone to the PC and transfer the recovery image file to the phone’s storage.
- Next, download the latest Magisk Manager APK from here and install it on your Galaxy S10 device.
- Once installed, go to the app drawer and launch the ‘Magisk Manager’ application.
- Tap on the ‘Install’ button.

- Next, tap on ‘Install’ and select the ‘Select and Patch a File’ option.
- Navigate to the phone’s storage and select the TWRP recovery image file.
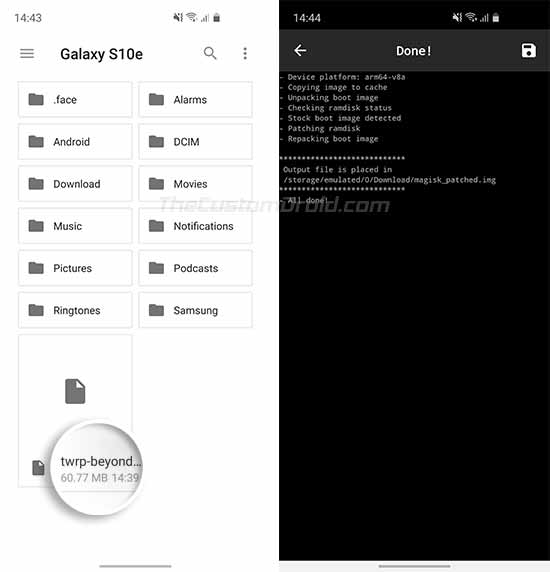
- Magisk Manager will now patch the file with the latest version of Magisk.
Once done, the magisk_patched.img (patched TWRP image) file will be available in ‘[internal storage]/Download/’ folder of your phone.
Advertisement
Step 2: Rename and Compress Patched TWRP Image as tar
At this point, the patched TWRP image is available as a “.img” file. In order to flash it to your Galaxy S10 using Odin, it must be renamed and properly compressed in the “.tar” file format. Simply changing the file’s format from “.img” to “.tar” isn’t going to cut it. This has to be done in a proper way, through the instructions below.
- First of all, transfer the patched TWRP image (magisk_patched.img) file from your phone’s storage to the PC.
- Open the folder where the file was transferred.
- Hold the SHIFT key on the keyboard and right-click on any empty space inside the folder.
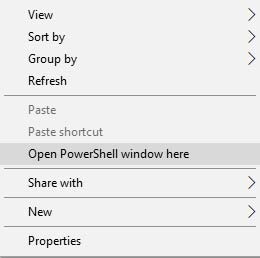
- Then select the ‘Open PowerShell window here’ option.
- Now, enter the following command to rename the ‘magisk_patched.img’ to ‘recovery.img’:
mv magisk_patched.img recovery.img
- Use the following command to compress the renamed ‘recovery.img’ as tar, according to the device you’re using:
- Galaxy S10:
tar cf twrp-beyond1lte.img.tar recovery.img
- Galaxy S10+:
tar cf twrp-beyond2lte.img.tar recovery.img
- Galaxy S10e:
tar cf twrp-beyond0lte.img.tar recovery.img
- Galaxy S10 5G:
tar cf twrp-beyondx.img.tar recovery.img

- Galaxy S10:
Once the patched TWRP image has been successfully renamed and compressed, it should be ready to flash on your device.
Step 3: Flash Patched TWRP Image to Install TWRP on Samsung Galaxy S10/S10+/S10e
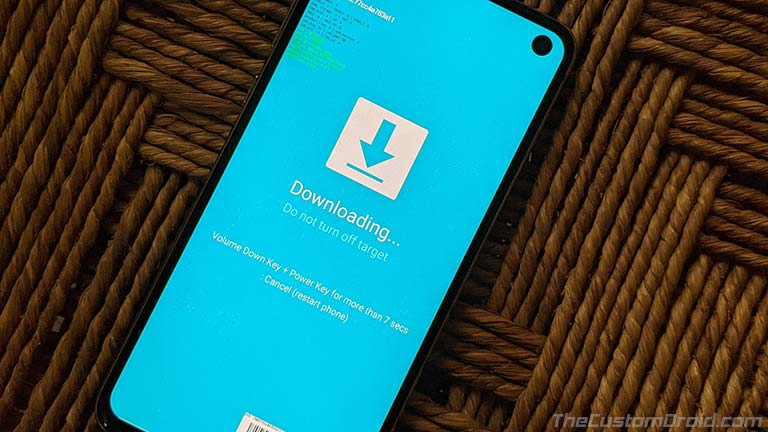
- First, boot your Galaxy S10 device into Download Mode. To do so, power off the device completely.
- Then press the Volume Down + Bixby buttons together. While holding the buttons, connect your phone to the PC using the USB cable.
- Go the folder on the PC where the Odin 3.13.1 tool was extracted.
- Double-click on the ‘Odin3 3.13.1.exe’ executable file to launch the Odin tool.
- Important: Uncheck ‘Auto Reboot’ under the ‘Options’ tab in Odin.
- Click on the ‘AP’ button and select the patched TWRP tar file (e.g. twrp-beyond0lte.img.tar).

- Finally, click on the ‘Start’ button to install TWRP Recovery on Samsung Galaxy S10/S10+/S10e.
DO NOT REBOOT YOUR PHONE YET! It is extremely important that your boot your Samsung Galaxy S10 device directly into TWRP recovery mode. Then flash the Multi-Disabler zip and format the data (factory reset) partition to disable Samsung’s FBE. For this, follow the instructions in the fifth and final step below.
Step 4: Boot into TWRP, Flash Multi-Disabler zip, and Format the Data
- Press Power and Volume Down buttons together to exit Download Mode.
- As soon as the screen turns off, quickly press and hold the Power, Volume Up, and Bixby buttons together until the Bootloader Warning message appears.
- Once the Bootloader Warning screen appears, release the Bixby and Power buttons, and keep holding the Volume Up button to enter TWRP recovery mode.
- Tap on the ‘Install’ button in TWRP.
- Navigate to the MicroSD card and select the Multi-Disabler ZIP file (e.g. multidisabler-samsung-2.2.zip).
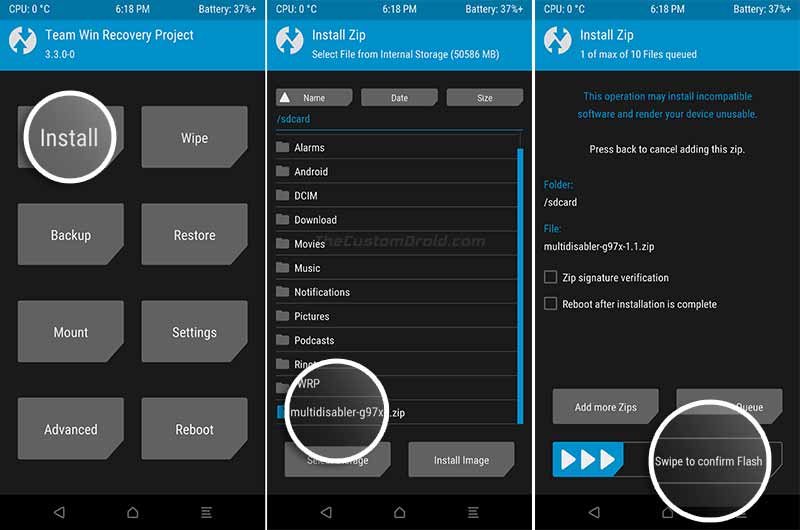
- Swipe the button on the screen to flash the Multi-Disabler zip file on your Galaxy S10.
- Once the file has been flashed successfully, go to ‘Wipe’ > ‘Format Data’ in TWRP.
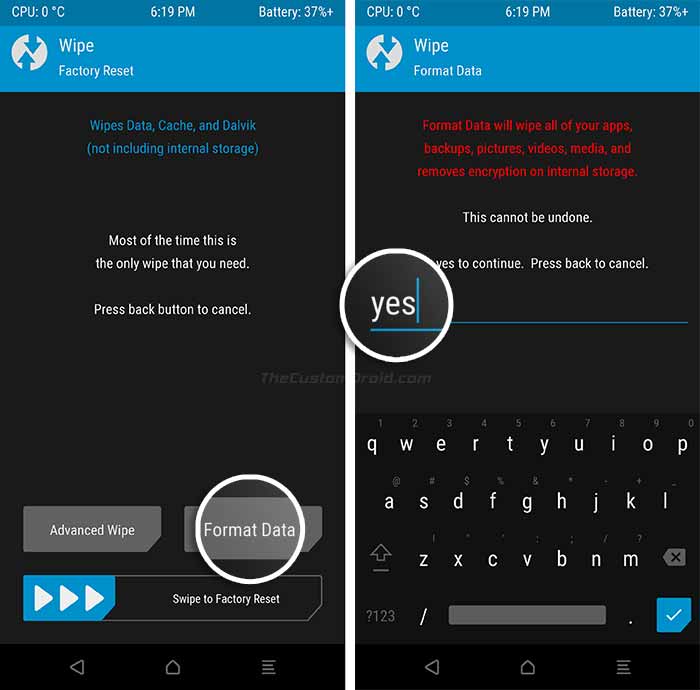
- Enter ‘Yes’ in the field to format the data partition/factory reset the device.
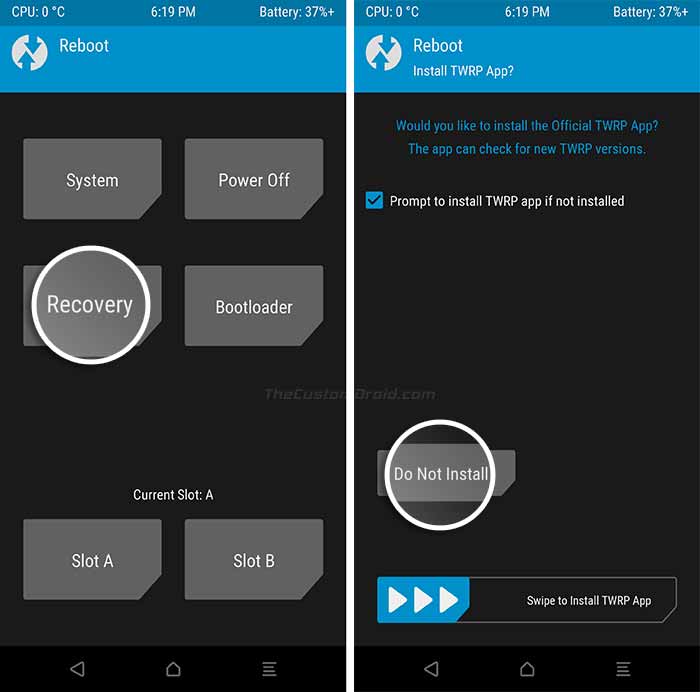
- Finally, go to the ‘Reboot’ menu in TWRP and select ‘Recovery’ to boot your Samsung Galaxy S10 device into rooted OS with TWRP.
When your device boots into the OS, complete the initial setup and connect it to the internet via mobile data or WiFi. Then open the app drawer and launch the ‘Magisk Manager’ application. The app will perform the needed additional setup and your Galaxy S10 device will automatically reboot upon completion.
Advertisement
That’s it! You have just succeeded to install TWRP on Samsung Galaxy S10, Galaxy S10+, and Galaxy S10e, and it is also rooted with Magisk.
How to Boot Samsung Galaxy S10 into TWRP Recovery or Rooted OS
Since both TWRP and Magisk reside in the /recovery partition, you’ll need to use specific buttons combination to boot your Galaxy S10 into TWRP recovery or rooted OS. So, to boot your phone into:
- Unrooted System: Press the Power button to power up normally will boot your Galaxy S10 into the Unrooted System.
- Rooted OS with Magisk: Hold the Power, Bixby, and Volume Up buttons together. Release all the buttons once the Bootloader Warning screen appears to boot your Galaxy S10 into Rooted System with Magisk.
- TWRP Recovery: Hold the Power, Bixby, and Volume Up buttons together. Release the Power and Bixby buttons and keep holding the Volume Up button when the Bootloader Warning screen appears, to boot your Galaxy S10 into TWRP recovery.
F.A.Q.
- A new update for Magisk has arrived, how can I update?
- It’s easy. Open Magisk Manager and tap on the ‘Update’ button and let it do the rest for you. According to the developer, you can only upgrade Magisk from within the Magisk Manager app, for now.
- After performing this procedure and rooting my Galaxy S10, I am not able to use apps like Samsung Pay, Secure Folder, etc. What should I do?
- You were already warned about this in this tutorial. Rooting/flashing any custom binaries trips the KNOX counter, which means you cannot use any apps that rely on its integrity. And no, restoring the stock firmware will not restore KNOX back to stock.
- Can I get re-lock the bootloader and get rid of the warning message?
- XDA Senior Member robbo1947 came up with a pretty neat and simple solution to re-lock the Galaxy S10/S10+/S10e bootloader and get rid of the unlocked bootloader warning. You can read his instructions here. Huge thanks to robbo1947 for sharing this information with us!
However, note that this method WILL NOT RESTORE THE KNOX COUNTER. Which means, even if you lock the bootloader back, you would still not be able to use apps/services likes Samsung Pay, Health, etc.
- XDA Senior Member robbo1947 came up with a pretty neat and simple solution to re-lock the Galaxy S10/S10+/S10e bootloader and get rid of the unlocked bootloader warning. You can read his instructions here. Huge thanks to robbo1947 for sharing this information with us!
We’d like to thank topjohnwu for developing a proper root solution for Galaxy S10 devices, ianmacd for TWRP recovery, and XDA senior member PiCkLeS for providing these simple instructions.
So now, you have just been able to install TWRP on Samsung Galaxy S10/S10+/S10e. Go ahead and install some root-enabled apps on the device, or use Magisk Hide to cloak root from apps like Pokemon Go, etc.
Comments 10 Comments
Comments are moderated, and published only if they are relevant to the topic and add value in a constructive way. If you disagree with something, please be polite and respectful. We suggest you read our comment policy before commenting.
Nice guide but what about flashing vbmeta?
The guide was written back when the S10 series was released. I am in the middle of updating this, as well as the Note 10 series article.
As for vbmeta, the general rule of thumb is to first root the phone via Magisk and then proceed with TWRP. This is something the developer also recommends if I remember correctly.
For users who strictly want to proceed with a TWRP-first setup will need to flash the vbmeta (with DM-verity disabled). I will make sure to add the relevant info when updating.
Ok thank you could you also do a guide to install magisk and twrp together? i’m a newbie and this samsung stuff is very complicated
Yes, indeed they have made it complicated by adding their own flavor to the mix. The fact that their devices still don’t use the A/B partition scheme is a blow-away.
Sure. You first have to start by rooting your S10 using Magisk. The guide I covered is here.
There are a few things in that guide that need to be revised. The core method remains the same. I will point out these things for you:
1) In step #2 there, just use the Frija tool straightaway. Instead of opting for online databases. Frija downloads the firmware directly from the Samsung servers without any speed caps.
2) In step #3 wherein you flash the patched AP firmware, use the regular ‘CSC’ file instead of the ‘HOME_CSC’. The regular CSC performs a data reset on its own during the flash, and so you will not need to perform step #4 at all.
3) Give proper attention to the part where you boot the phone after rooting. It’s all about getting the timing right.
The above corrections along with that guide will help you root the phone easily. Once that is done, I will further get you through TWRP installation.
I am about to re-write the instructions in that guide from scratch. It will be done within the next 24 hours, so if you want, you can wait for that.
Hi, do I need to buy an sd card or I can use the internal storage of the device.
Hi. Not necessarily. Alternatively, you can simply transfer the multi-disabler zip file to the phone’s storage before any time before step #3.
I have an Exynos SM-G975F (TEL-Australia) with TWRP and Magisk from following this guide. I want to update to Android 10 by using the German One UI 2 rom that was released recently. Does this guide work with One UI 2? Also can I do this without wiping my data?
Hi Sim. TWRP for Android 10 is still in works due to significant changes bought by Android 10.
If you’d like to root your S10 via Magisk, then follow this guide.
ABSOLUTELY, the best set of instructions on Rooting & installing TWRP on a S10/S10+/S10e that I have seen to date! Congratulations on a job well done! This takes all the mystery out of the task… and the pics showing where to fill in the info was the gravy on top!
Hi Chris! Thanks a lot. It took a lot of effort and I am glad to see that our readers appreciate it!