How to Root Samsung Galaxy S9 and Galaxy S9 Plus (Exynos)
Do you want to root your Galaxy S9/S9 Plus flagship? Well, you just landed in the right place for the job.

On this page
Do you want to root your Galaxy S9/S9 Plus flagship? Well, you just landed in the right place for the job. This tutorial will help you install TWRP recovery and root Samsung Galaxy S9 and Galaxy S9 Plus. This is compatible and will work on any Exynos Galaxy S9/S9+ running Android 10 (One UI 2.0), Android Pie (One UI 1.1/1.0), and Android Oreo.
Samsung is counted among one of the top manufacturers and is well known for its Galaxy flagship phones. In 2018, the company did another exceptional job with the Galaxy S9 and Galaxy S9 Plus by adapting the most recent trends in the smartphone market. The phones were launched in March 2018 and certainly turned out to be the best Galaxy flagships to date. Following a very similar design to the predecessor, the hardware and software are where the said phones excel.
Despite all the latest features, users might often want to further customize the software beyond what the manufacturer has to offer. And if you feel the same, then rooting your Galaxy S9 or S9+ will provide you with a plethora of options/ways to customize the software of your phone.
Important Information
Flashing custom binaries such as TWRP and rooting the Galaxy S9/S9+ will trip the KNOX counter. Apps that rely on KNOX, such as Samsung Pass, Secure Folder, etc will no longer work.
Make sure that you’re comfortable and fully understand the process of rooting before you start performing it.
Supported Variants and Models
Currently, only the Exynos variant of the Galaxy S9/S9 Plus is supported. Although TWRP recovery for Snapdragon Galaxy S9 and S9+ is available, we have chosen to keep this post specific to the Exynos devices only. Please make sure to check the list of supported devices below before proceeding with the instructions.
- Samsung Galaxy S9
- Compatible: Exynos variants (codename: starlte) with model number SM-G960F/FD/N/X are supported.
- Not Compatible: Snapdragon variants (codename: starqlte) with model number SM-G960U/U1/W/0/2/8/SC are not supported.
- Samsung Galaxy S9 Plus
- Compatible: Exynos variants (codename: star2lte) with model number SM-G965F/FD/N/X are supported.
- Not Compatible: Snapdragon variants (codename: star2qlte) with model number SM-G965U/U1/W/0/2/8/SC are not supported.
Prerequisites
- Take a complete backup of all your data on the device. Everything including apps, contacts, messages, logs, internal storage, etc will be wiped during the process. You can also follow our guide on how to backup Android devices for this purpose.
- Charge the Galaxy S9/S9+ to at least 60% battery level. This will help avoid any sudden shutdowns during the rooting process.
- Download and install Samsung USB drivers on the PC.
- Download Odin v3.14.4 zip package and extract the file to an easily accessible location on the PC.
Make sure to fulfill all the requirements stated above before you proceed to follow the instructions to root Samsung Galaxy S9 and S9 Plus.
Downloads
Below, you will find all the files you’ll need while performing the instructions.
- TWRP Recovery for Galaxy S9 (starlte): twrp-3.4.0-0-starlte.img.tar (Check the latest build here)
- TWRP Recovery for Galaxy S9 Plus (star2lte): twrp-3.4.0-0-star2lte.img.tar (Check the latest build here)
- Samsung Encryption and Disk Quota Disabler: Disable_Dm-Verity_ForceEncrypt_10.28.2020.zip
- RMM State Bypass zip (Only for Android Pie/Oreo, not needed for Android 10): RMM__Bypass_v3_corsicanu.zip (Thanks BlackMesa123 & corsicanu!)
- SuperSU 2.82 SR5 (Discontinued): SR5-SuperSU-v2.82-SR5-20171001224502.zip
- Latest Stable Magisk Installer ZIP: Magisk-v21.0.zip and check the latest version here
Instructions to Root Samsung Galaxy S9 and Galaxy S9 Plus
To make it easier for you to understand the rooting process, we have broken down the instructions into four major steps.
The first step is to enable ‘OEM Unlocking’ to allow flashing custom binaries. Once that is done, the second step is to install TWRP recovery on your Galaxy S9/Galaxy S9 Plus. Then the third step is to disable forced-encryption and prevent Prenormal KG/RMM State (Only on Android Pie and Oreo) by flashing the no-verity zip and RMM State Bypass zip files respectively. Finally, when all is done, the fourth and the last step is to flash the Magisk ZIP using TWRP to root the Galaxy S9/Galaxy S9 Plus.
While the process might not be as simple as that on devices like Google Pixel, it is still fairly easy. Even if you’re new to the scene, you will easily be able to perform the whole procedure. Just make sure that you follow each and every step as mentioned.
Step 1: Enable Developer Options and OEM Unlock in Settings
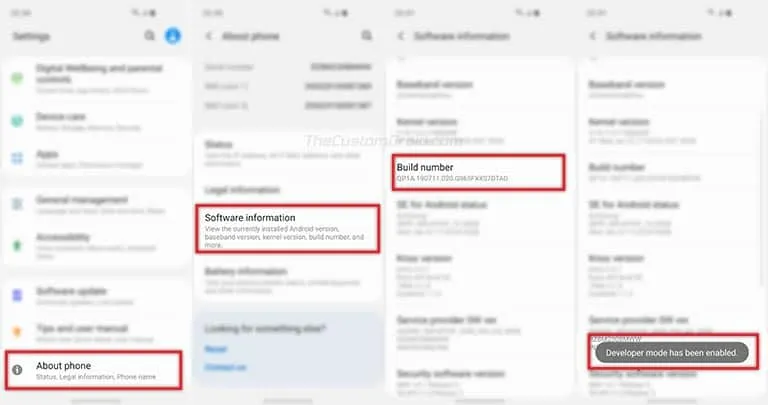
In order to install TWRP and root, you must first enable ‘OEM Unlocking in your Galaxy S9’s Settings menu. To do that, go to Settings -> About Phone -> Software Information and tap 7 times on the ‘Build number’. You shall then see a toast notification - “Developer mode has been enabled”.
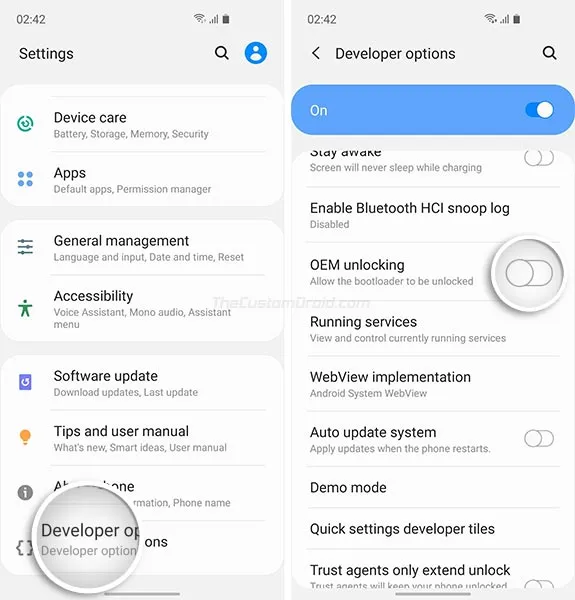
Once that is done, go back to the Settings main screen and tap on ‘Developer options’. Scroll down until you find the ‘OEM Unlocking’ toggle and turn it ON. If the option is not yet visible on your device, it means that your phone has entered a 7-day buffer period. After this time (Or, you can try bypassing it using the instructions here), the ‘OEM Unlocking’ option shall be available. If it is still not available, it means that your phone cannot be rooted.
With the option enabled, you can now go ahead and install TWRP on your Galaxy S9/S9 Plus. The next section will take you through the complete process in detail.
Also read: How to Boot Samsung Galaxy S9 Safe Mode (Guide)
Step 2: Install TWRP Recovery on Samsung Galaxy S9 and Galaxy S9 Plus
The second step is to flash TWRP on your Galaxy S9/S9+ through the Odin Flash Tool. To do this:
- First, download TWRP Recovery for Galaxy S9 and Galaxy S9 Plus.
- Double-click the “Odin3 v3.14.4.exe” executable file to launch the Odin flash tool on your PC.
- Power off the phone completely.
- Hold the Volume Down, Bixby, and Power button simultaneously.
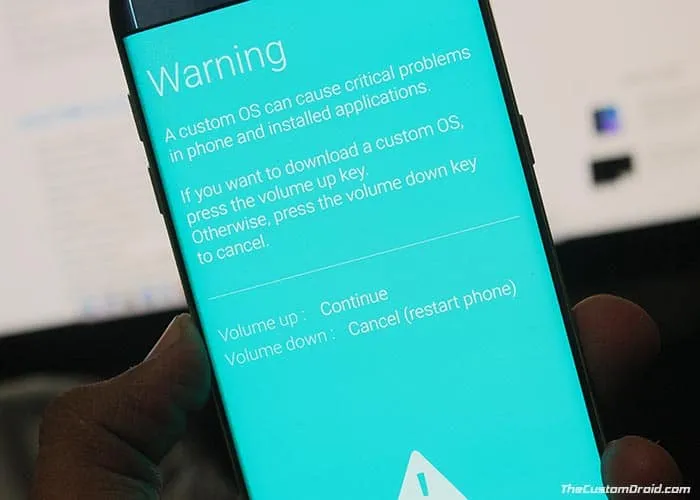
- On the warning screen, press the Volume Up button to enter Download Mode on Galaxy S9/S9 Plus.
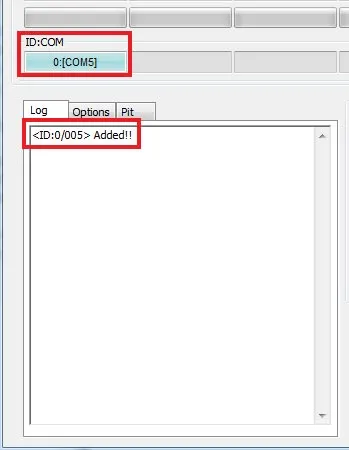
- As the Odin window loads, you shall see “Added!!” in the message box and the ID:COM port should also light up.
- Now make sure that the ‘Auto Reboot’ box is not selected in the ‘Options’ tab of the Odin tool.
- Next, click on the ‘AP’ button under the ‘Files’ section of Odin and select the TWRP recovery (.tar) file for your device.
- Finally, click the ‘Start’ button to install TWRP recovery on Samsung Galaxy S9 and Galaxy S9 Plus.
The flashing process would take a few seconds to complete. Once it is finished your phone shall stay in Download Mode.
Now it is very important to boot into TWRP mode directly, if by any chance your phone boots into the OS, the Prenormal RMM State will be set. This will force you to wait for another 7 Day period before you can actually flash anything. To do this:
- Hold the Volume Down, Bixby, and Power button simultaneously until the phone powers off.
- Important: As soon as the screen shuts down, release the Volume Down key and hold the Volume Up button while still holding the Bixby and Power buttons.
- Your Galaxy S9/S9+ should boot into TWRP recovery.
- On the ‘Unmodified System Partition’ screen, slide the ‘Swipe to Allow Modifications’ button.
With your phone now in TWRP recovery, follow the next step to disable encryption on Samsung Galaxy S9 and Galaxy S9 Plus.
Step 3: Flash Encryption Disabler and KG/RMM Bypass ZIPs using TWRP
Now, in order for TWRP to successfully decrypt your phone’s storage, you must format the data partition and flash the Encryption Disabler zip file.
Note: You only need to flash KG/RMM Bypass zip if your phone is running Android Pie or Oreo. It isn’t compatible with Android 10.
- Go to the ‘Wipe’ menu in TWRP and tap on ‘Format Data’.
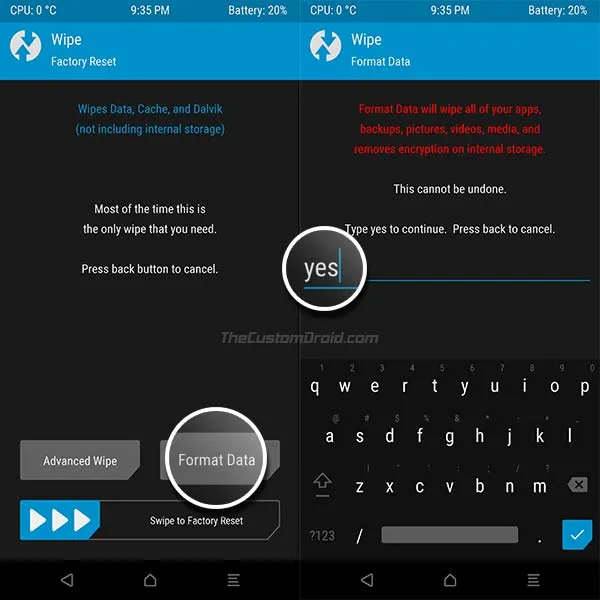
- Enter ‘Yes’ in the provided field to completely format the data partition (including internal storage).
- Once finished, go to the ‘Reboot’ menu in TWRP and press the ‘Recovery’ button to reboot your phone into TWRP. This will ensure that TWRP can decrypt the storage.
- When the phone boots back into TWRP, go to the ‘Mount’ menu.
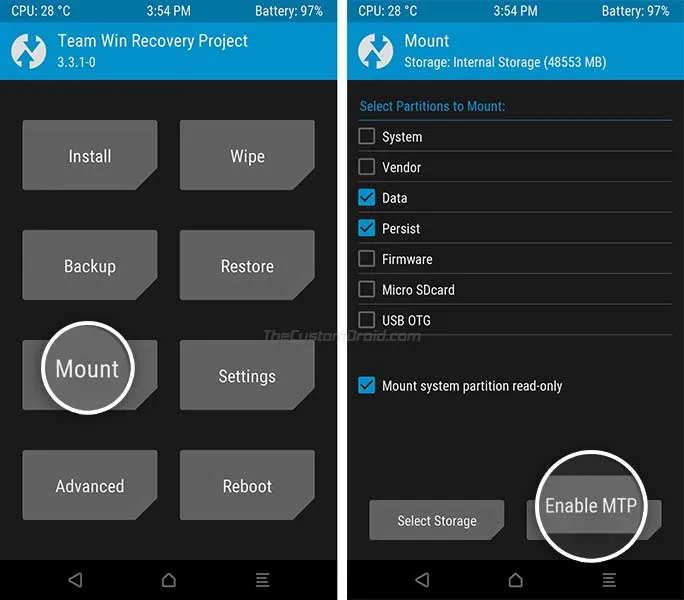
- Now select “Enable MTP” and connect the Galaxy S9/S9 Plus to the PC using the USB cable.
- Download DM-Verity disabler and KG/RMM State Bypass zip (Only for Android Pie/Oreo) files from the ‘Downloads’ section above.
- Transfer the files to the phone’s internal storage and then disconnect the phone from the PC.
- Go to the ‘Install’ menu in TWRP and select the Encryption Disabler zip file (e.g. Disable_Dm-Verity_ForceEncrypt_02.24.2020.zip).
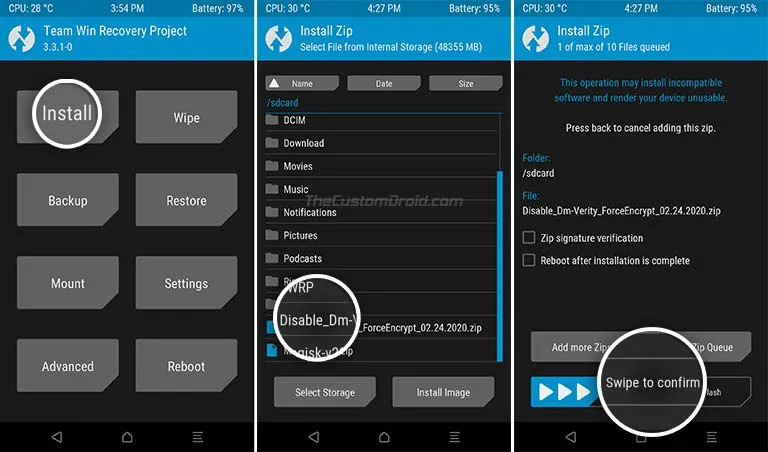
- Swipe the button to flash the file and disable encryption on Samsung Galaxy S9/S9+.
- If your phone is running Android Pie/Oreo, repeat the installation method and flash the KG/RMM State Bypass zip to prevent your phone from being locked again (Prenormal KG/RMM State).
If you see an error message that states ‘Failed to mount /odm (No such file or directory)’, you can safely ignore it.
Now, with everything set, follow the instructions in the fourth and final step below to finally root Samsung Galaxy S9/S9 Plus.
Also read: Download Samsung Good Lock 2019 and Install Add-ons
Step 4: Flash Magisk to Root Samsung Galaxy S9 and Galaxy S9 Plus
The last and final step of the process is to flash the Magisk ZIP file through TWRP and root your your phone.
- First, download the latest Magisk installer ZIP file on the PC.
- Connect your Galaxy S9 to the PC using the USB cable.
- Go to the ‘Mount’ menu in TWRP and press the ‘Enable MTP’ button.
- Transfer the Magisk installer ZIP file (e.g. Magisk-v21.0.zip) to the phone’s internal storage.
- Now disconnect your Galaxy S9/S9 Plus and go back to the TWRP main screen.
- Press the ‘Install’ button and select the Magisk installer ZIP file from the phone’s internal storage.
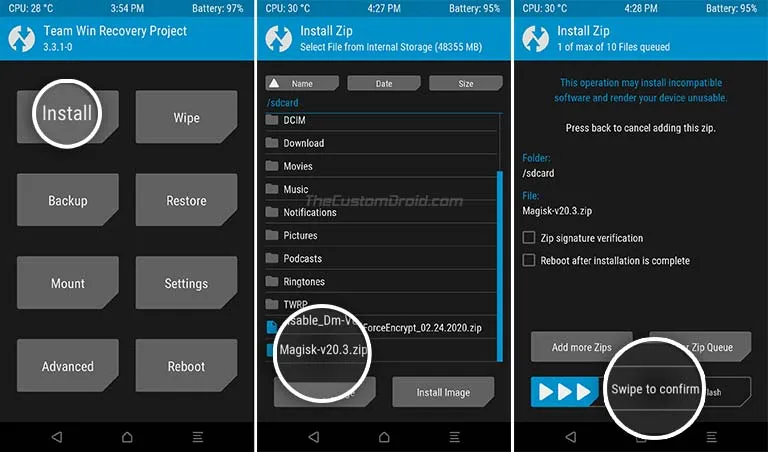
- Finally, swipe the button on the screen to flash the file and root your Samsung Galaxy S9/S9+.
When the flashing process finishes, tap on the ‘Reboot System’ button to boot your phone into the rooted OS. Note that the first boot may take a few minutes, so there’s nothing to worry about.
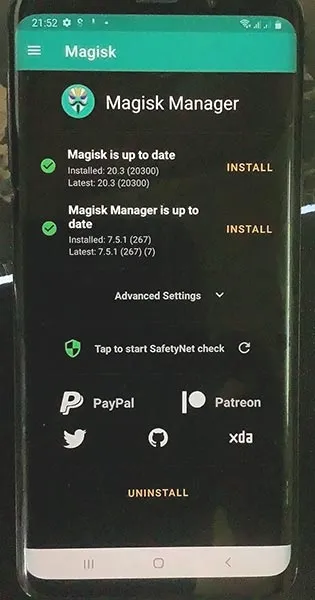
Once your S9/S9+ boots, it should be rooted with Magisk. To verify the same, go to the app drawer and launch the Magisk Manager application.
You can go ahead and start using your favorite root apps. With Magisk you can also hide root from certain apps like Pokemon Go, Google Pay, etc that may normally stop working if the root is detected. It also gives you the ability to install modules for injecting additional features and customizing the OS. The things you can on a rooted phone are way more than what we can list here.
So, this was our tutorial on how to install TWRP and root Samsung Galaxy S9/S9 Plus running Android 10, Android Pie, or Android Oreo. If you have any questions regarding the instructions or the rooting procedure on the whole, please feel free to ask us.
Comments
Comments are moderated, and published only if they are relevant to the topic and add value in a constructive way. If you disagree with something, please be polite and respectful. We suggest you read our comment policy before commenting.