OnePlus Nord Stock Boot Image Collection & Installation Guide
Are you looking for the stock boot image for your OnePlus Nord? The stock boot image is required for rooting, unrooting, and also sometimes for fixing boot

On this page
Are you looking for the stock boot image for your OnePlus Nord? The stock boot image is required for rooting, unrooting, and also sometimes for fixing boot loops. This page serves as a repository through which you can download stock boot images for OnePlus Nord, for all the OxygenOS versions (Stable & Open Beta) released till now. Further, we will show you how to flash a stock boot image to your OnePlus Nord using Fastboot commands and TWRP recovery.
If you’re new to Android software modding and things like rooting, TWRP, custom ROMs, etc, then it’s important that you understand what a boot image is and its importance when dealing with such things.
What is a Boot Image?
A boot image in its most basic sense is a disk image file containing the contents and structure of a storage device that is responsible for booting the hardware.
According to Google, an Android boot image (often referred to as a boot.img) contains the kernel and ramdisk that loads the Android system. It is also the first partition image loaded by the bootloader during a normal boot process.
Stock Boot Image vs Patched Boot Image
The “stock” moniker is added to represent the unmodified state of a boot image file. In a similar manner, you might often come around a “Patched boot image”, wherein the word “Patched” generally indicates that the boot image is patched with Magisk.
Why would you need the stock boot image?
The software on OnePlus devices is easy to customize due to the fact that the bootloader can be unlocked in a straightforward way. Meaning, you can play around with the software as much as you like. You can root the phone, install TWRP custom recovery, flash custom ROMs/kernels/mods, and do much more.
The OnePlus Nord is no different. Soon after the launch, the phone quickly picked up a decent amount of support from the custom development community.
Recently, we covered a tutorial a step-by-step tutorial on rooting the OnePlus Nord without using TWRP recovery at all. A copy of the stock boot image file for the installed OxygenOS version is required during the process, as shown in that tutorial.
A stock boot image also plays a very important role when unrooting the phone. Generally, Magisk creates a back up of your phone’s stock boot image during the installation process.
However, there could be a chance that Magisk might not have stored a backup of your stock boot image - (1) because you used a pre-patched boot image provided by another person, or (2) because of a general software error. In such a case, the stock boot image could come in really handy for uninstalling Magisk and unrooting the phone completely.
Flashing the stock boot image is also considered as one of the first steps when debugging and fixing software boot loops. It could help you eliminate the possibility of having a modified boot partition causing a problem.
Download OnePlus Nord Stock Boot Images
Below, you will find the links to download the stock boot images for the OnePlus Nord.
These boot images have been extracted directly from the respective full ROM package. We would give our best to keep the links up to date for the latest boot images.
If you want, you can also self-extract these images from the OxygenOS full ROM/OTA package using the instructions in this guide.
Global (AC01AA)
| OxygenOS 10.5.2.AC01AA | stock_boot_oos_10.5.2_oneplus_nord_global.zip |
| OxygenOS 10.5.3.AC01AA | stock_boot_oos_10.5.3_oneplus_nord_global.zip |
| OxygenOS 10.5.4.AC01AA | stock_boot_oos_10.5.4_oneplus_nord_global.zip |
| OxygenOS 10.5.5.AC01AA | stock_boot_oos_10.5.5_oneplus_nord_global.zip |
| OxygenOS 10.5.6.AC01AA | stock_boot_oos_10.5.6_oneplus_nord_global.zip |
| OxygenOS 10.5.7.AC01AA | stock_boot_oos_10.5.7_oneplus_nord_global.zip |
| OxygenOS 10.5.8.AC01AA | stock_boot_oos_10.5.8_oneplus_nord_global.zip |
| OxygenOS 10.5.9.AC01AA | stock_boot_oos_10.5.9_oneplus_nord_global.zip |
| OxygenOS 10.5.10.AC01AA | stock_boot_oos_10.5.10_oneplus_nord_global.zip |
| OxygenOS 10.5.11.AC01AA | stock_boot_oos_10.5.11_oneplus_nord_global.zip |
| OxygenOS 11.AC01AA | stock_boot_oos_11_oneplus_nord_global.zip |
| OxygenOS 11.1.1.1.AC01AA | stock_boot_oos_11.1.1.1_oneplus_nord_global.zip |
| OxygenOS 11.1.1.2.AC01AA | stock_boot_oos_11.1.1.2_oneplus_nord_global.zip |
Europe (AC01BA)
| OxygenOS 10.5.2.AC01BA | stock_boot_oos_10.5.2_oneplus_nord_eu.zip |
| OxygenOS 10.5.3.AC01BA | stock_boot_oos_10.5.3_oneplus_nord_eu.zip |
| OxygenOS 10.5.4.AC01BA | stock_boot_oos_10.5.4_oneplus_nord_eu.zip |
| OxygenOS 10.5.5.AC01BA | stock_boot_oos_10.5.5_oneplus_nord_eu.zip |
| OxygenOS 10.5.6.AC01BA | stock_boot_oos_10.5.6_oneplus_nord_eu.zip |
| OxygenOS 10.5.7.AC01BA | stock_boot_oos_10.5.7_oneplus_nord_eu.zip |
| OxygenOS 10.5.8.AC01BA | stock_boot_oos_10.5.8_oneplus_nord_eu.zip |
| OxygenOS 10.5.9.AC01BA | stock_boot_oos_10.5.9_oneplus_nord_eu.zip |
| OxygenOS 10.5.10.AC01BA | stock_boot_oos_10.5.10_oneplus_nord_eu.zip |
| OxygenOS 10.5.11.AC01BA | stock_boot_oos_10.5.11_oneplus_nord_eu.zip |
| OxygenOS 11.AC01BA | stock_boot_oos_11_oneplus_nord_eu.zip |
| OxygenOS 11.1.1.1.AC01BA | stock_boot_oos_11.1.1.1_oneplus_nord_eu.zip |
| OxygenOS 11.1.1.2.AC01BA | stock_boot_oos_11.1.1.2_oneplus_nord_eu.zip |
India (AC01DA)
| OxygenOS 10.5.2.AC01DA | stock_boot_oos_10.5.2_oneplus_nord_india.zip |
| OxygenOS 10.5.3.AC01DA | stock_boot_oos_10.5.3_oneplus_nord_india.zip |
| OxygenOS 10.5.4.AC01DA | stock_boot_oos_10.5.4_oneplus_nord_india.zip |
| OxygenOS 10.5.5.AC01DA | stock_boot_oos_10.5.5_oneplus_nord_india.zip |
| OxygenOS 10.5.6.AC01DA | stock_boot_oos_10.5.6_oneplus_nord_india.zip |
| OxygenOS 10.5.7.AC01DA | stock_boot_oos_10.5.7_oneplus_nord_india.zip |
| OxygenOS 10.5.8.AC01DA | stock_boot_oos_10.5.8_oneplus_nord_india.zip |
| OxygenOS 10.5.9.AC01DA | stock_boot_oos_10.5.9_oneplus_nord_india.zip |
| OxygenOS 10.5.10.AC01DA | stock_boot_oos_10.5.10_oneplus_nord_india.zip |
| OxygenOS 10.5.11.AC01DA | stock_boot_oos_10.5.11_oneplus_nord_india.zip |
| OxygenOS 11.AC01DA | stock_boot_oos_11_oneplus_nord_india.zip |
| OxygenOS 11.1.1.1.AC01DA | stock_boot_oos_11.1.1.1_oneplus_nord_india.zip |
| OxygenOS 11.1.1.2.AC01DA | stock_boot_oos_11.1.1.2_oneplus_nord_india.zip |
How to Flash a Boot Image on OnePlus Nord?
Installing or flashing a boot image file on your OnePlus Nord could be easily done by executing a Fastboot command from your computer. The alternative way is to flash the boot image file through TWRP recovery (in case you have that installed).
The latter is more convenient because it wouldn’t require a computer. We have covered both the methods below for you. The same instructions will apply while flashing both, a stock boot or a patched boot image.
Method #1: Flashing a Boot Image using Fastboot
NOTES:
- Flashing the stock boot image (or any other partition image file) through fastboot requires the phone’s bootloader to be unlocked. For instructions, refer to this page.
- If you’re trying to unbrick your OnePlus Nord or fix a bootloop problem with a locked bootloader, then we suggest you take a look at our comprehensive OnePlus Nord Unbrick Guide.
- When executing the commands mentioned below, make sure that you prepend them with the right syntax according to your computer. For example, commands in Windows PowerShell should be prepended with a dot and backslash ”.\” and those in macOS/Linux Terminal with a dot and forward slash ”./”.
In order to flash the boot image file using Fastboot, you must first download and set up the Android platform-tools on your computer. To do this, simply download the platform-tools package for your computer from this page and extract its contents. The extracted ‘platform-tools’ folder should contain the Fastboot tool binary that you’ll be needing.
Tip: For easier access, it’s recommended to move the ‘platform-tools’ folder to the root of the C:\ driver on a Windows computer, or to the ‘Documents’ or ‘Desktop’ directory on a macOS/Linux computer.
Next, launch the command-line window inside the ‘platform-tools’ folder:
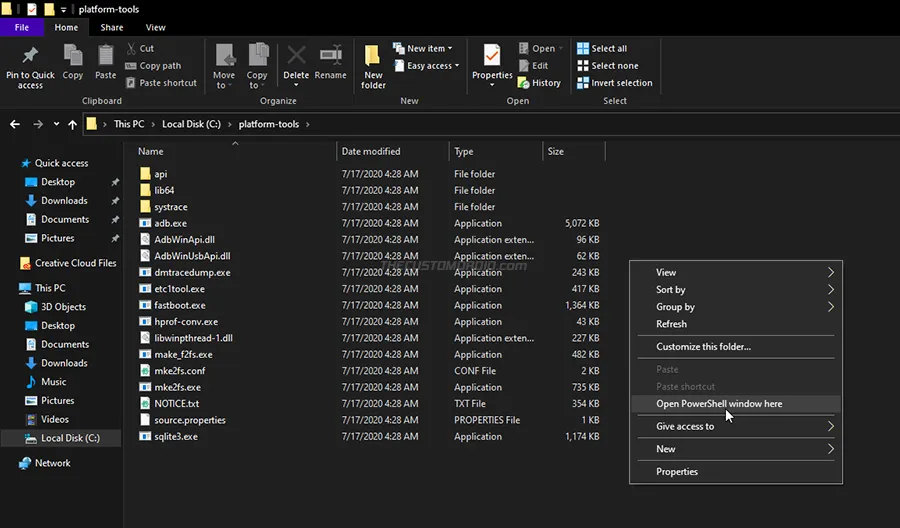
- On Windows: Open the ‘platform-tools’ folder, hold the SHIFT key, and right-click on any empty space inside the folder. Then select the ‘Open PowerShell window here’ option.
-
On macOS/Linux: Launch the Terminal and change its directory to the ‘platform-tools’ folder using the cd command. E.g. If the ‘platform-tools’ folder is inside the ‘Documents’ directory, then the command should be:
cd Documents/platform-tools
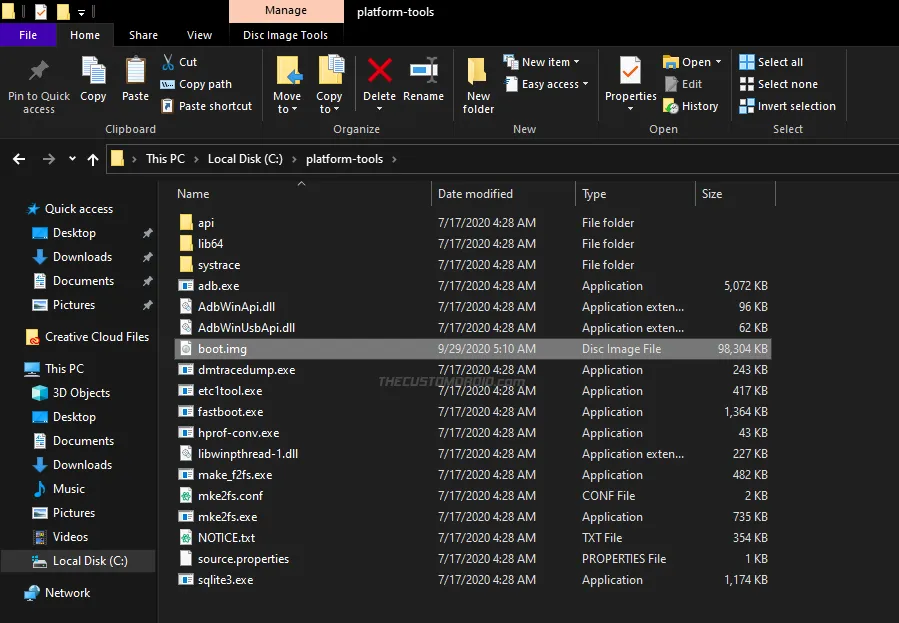
Now, download the boot image file that you wish to flash to your OnePlus Nord and move it inside the ‘platform-tools’ folder on your computer. At this point, your computer is ready to carry out the flashing process.
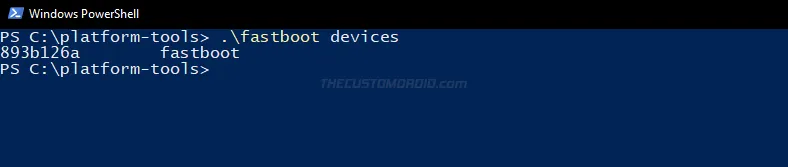
Boot your OnePlus Nord into Fastboot Mode and connect it to the PC using the USB cable. Then execute the following command to verify that your PC can communicate with your phone over the fastboot interface.
fastboot devices
The command should return your phone’s unique ID. If you see a blank output, make sure that you have the latest OnePlus USB drivers installed on your PC and verify that the phone is recognized as “Android Bootloader Interface” in Control Panel > Device Manager.
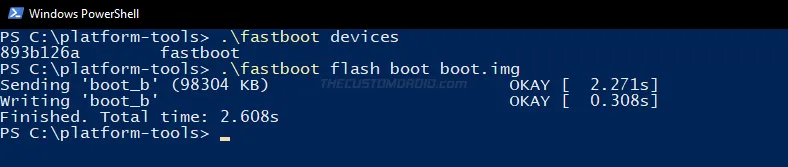
Now execute the following command to finally flash the boot image to your OnePlus Nord:
fastboot flash boot boot-image-filename.img
You have to replace “boot-image-filename.img” in the above command with the full filename of the boot image you’re flashing. For example, if you have downloaded the stock boot image from above, the filename should be “boot.img” and the command should look like the following:
fastboot flash boot boot.img
The above command will only flash the boot image to the boot slot (boot_a or boot_b) that’s currently active, which is generally what you should do. However, if you wish to flash the boot image file to both the slots, you would need to use the following commands:
fastboot flash boot_a boot-image-filename.img
fastboot flash boot_b boot-image-filename.img
You must always flash the boot image corresponding to the OxygenOS version install on that particular slot. It’s often rare for both the boot slots on your OnePlus Nord to have the same OxygenOS version installed. So be absolutely sure of what you’re doing when flashing a boot image to both the slots individually.
After you have successfully flashed the boot image, reboot your phone using the following command:
fastboot reboot
Method #2: Flashing a Boot Image using TWRP Recovery
As mentioned earlier, an alternative (and easier) way to flash the boot image to your OnePlus Nord is by using TWRP. Unlike the first method, this wouldn’t require you to have a computer. To flash using this method:
- First, download the boot image file you wish to flash to your phone’s internal storage.
- Power off your OnePlus Nord and boot it into TWRP recovery mode using the instructions in this tutorial.
- Select ‘Install’ from the TWRP main screen.
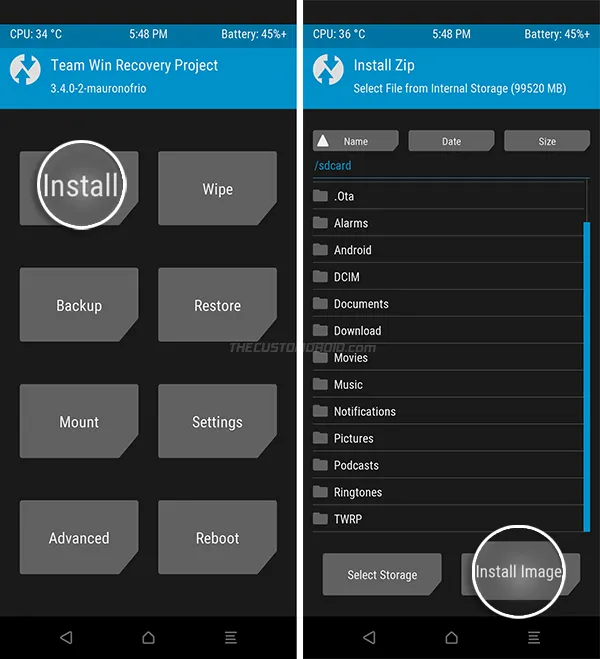
- Tap the ‘Install Image’ button on the bottom-right to switch TWRP to image installation mode.
- Navigate to your phone’s internal storage and select the boot image file. As soon as you select, TWRP will prompt you to choose a partition to flash the image.
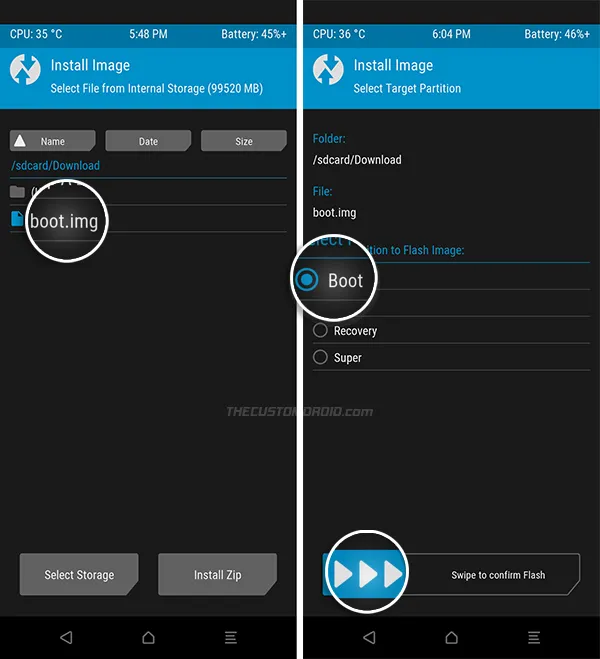
- Select “Boot” and swipe the button on the bottom of the screen to flash the boot image to your OnePlus Nord.
That’s it! From here on, you can boot your phone by pressing the ‘Reboot System’ button.
Wrapping Up
By now, you should have a very good idea of what a boot image is, why you would need it, and also how to flash one.
The instructions under Method #1 are what you’d generally use to flash the patched boot image when rooting your OnePlus Nord with Magisk, and also when flashing back the stock boot for unrooting.
Even if you are not into rooting and software modding, having some basic knowledge of boot images could come in handy when debugging and fixing software issues like a boot loop.
We hope the provided information proves useful to you. Also, we will constantly be updating the download links as new OxygenOS updates (stable and open beta) are available for the OnePlus Nord. But if we do forget, don’t hesitate to throw us a reminder. If you have any questions regarding the topic or the instructions, feel free to drop a comment below.
Comments
Comments are moderated, and published only if they are relevant to the topic and add value in a constructive way. If you disagree with something, please be polite and respectful. We suggest you read our comment policy before commenting.