TWRP now officially supports Xiaomi’s first Android One device. Follow this guide to easily install TWRP recovery and root Xiaomi Mi A1 (Tissot) on Android Pie and Oreo using Magisk.
Advertisement
The rooting scene has been pretty challenging since Google released the first generation Pixel devices in 2016. The devices brought the all-new A/B partitioning system to support seamless system updates. Overall, this was a great innovation and prevents any scenario of an unbootable device after an OTA update. But the new partition scheme brought enough obstacles for the development community to overcome. Since the release of the Mi A1 in September 2017, the developers have been trying the best to find a working solution for root and TWRP.
After a lot of testing and updates, the Mi A1 gained the official support of TWRP in 2018. Ever since then, the recovery has been constantly updated and is now compatible with Xiaomi Mi A1 running Android Pie, Oreo, and Nougat. TWRP for Mi A1 is being maintained and developed by XDA Recognized Developer nicknitewolf. An unofficial version of the recovery is also available, which supports Treble-based custom ROMs and is being maintained by XDA Senior Member Giovix92.
Advertisement
The instructions below will help you install TWRP on Xiaomi Mi A1. It will begin by temporarily booting the TWRP recovery image and then installing the image using the ‘Install Recovery Ramdisk’ option. Once installed, you can flash the Magisk installer zip file to easily root Xiaomi Mi A1.
Advertisement
Page Contents
Prerequisites
- Before you do anything, make sure to backup your device completely. You can follow our guide on how to backup Android phones.
- In order to install TWRP and root, you must first unlock your phone’s bootloader. Note that unlocking the bootloader will wipe all the data stored on the phone. So make sure that you have backed-up all your data beforehand.
- To do so, boot your phone into Fastboot Mode. Then connect it to the PC using the USB cable and execute the following command via the CMD/PowerShell:
fastboot oem unlock
- To do so, boot your phone into Fastboot Mode. Then connect it to the PC using the USB cable and execute the following command via the CMD/PowerShell:
- Download and install Xiaomi USB Drivers on your PC.
- Charge your Mi A1 to at least 50-60% battery level. This shall help avoid any sudden shutdowns during the process.
- Install ADB and Fastboot on your PC. You can also use Minimal ADB and Fastboot alternatively.
Make sure that you have fulfilled all the requirements listed above before you head below to the instructions to install TWRP recovery and root Xiaomi Mi A1.
Downloads
- Official TWRP Recovery for Xiaomi Mi A1: twrp-3.3.1-0-tissot.img
- Unofficial TWRP with Tissot Manager (For Treble support): TWRP-3.3-withTM-2.1-BOOT.zip | TWRP-3.3-withTM-2.1-INSTALLER.zip
- Magisk Installer zip: Magisk-v20.3.zip | Check for the latest version here
Note: Starting with TWRP 3.3, there’s no need to download a separate installer zip. You can simply use the ‘Install Recovery Ramdisk’ option to permanently install the recovery.
How to Install TWRP Recovery on Xiaomi Mi A1
- Download TWRP recovery image for your Xiaomi Mi A1.
- Connect your phone to the PC and transfer the downloaded file to the phone’s storage.
- Power off your phone completely.
- Press and hold the Volume Down + Power buttons altogether to boot your Mi A1 into Fastboot Mode.

- Copy the TWRP recovery image (e.g. twrp-3.3.1-0-tissot.img) file to the folder where all the ADB and Fastboot binaries are present (e.g. C:\adb).
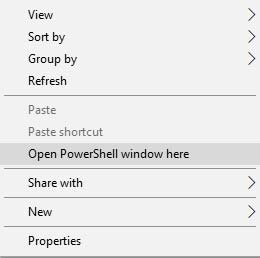
- Press the SHIFT key and right-click on an empty space inside this folder.
- Select ‘Open PowerShell window here’ from the menu that appears.
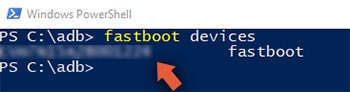
- Enter the following command to make sure that your device is being detected properly. If you’re using Linux/macOS, make sure to add dot and front-slash (./) prior to the command(s).
fastboot devices
- The command shall return a device ID, along with the ‘fastboot’ message.
- Now, enter the following command to temporarily boot TWRP recovery on Mi A1:
fastboot boot twrp-recovery-image.img
- Make sure to replace “twrp-recovery-image.img” with the actual filename of the TWRP recovery image.
- For example:
fastboot boot twrp-3.3.1-0-tissot.img
- For example:
- The device should now boot into TWRP recovery mode.
- Go to the ‘Advanced’ menu in TWRP and tap on the ‘Install Recovery Ramdisk’ option.
- Select the TWRP recovery image file (twrp-3.3.1-0-tissot.img).
- Finally, swipe the button to confirm the flashing process and permanently install TWRP recovery on your Xiaomi Mi A1.
Now with TWRP installed, you can follow the instructions below to root Xiaomi Mi A1 using Magisk.
Advertisement
Recommended: Enable Camera2 API and Download GCam Port for Xiaomi Mi A1.
Instructions to Root Xiaomi Mi A1
- First, download the latest Magisk installer zip file.
- Power off your Xiaomi Mi A1 completely.
- Press and hold the Volume Up and Power button to enter TWRP recovery mode.
- Go to the ‘Mount’ menu in TWRP.
- Tap on the ‘Enable MTP’ button and connect your phone to the PC using the USB cable.
- Download the Magisk installer zip file and transfer it to your phone’s storage.
- Once transferred, disconnect the phone from the PC.
- Go back to the TWRP main screen and tap on the ‘Install’ button.
- Navigate to the storage and select the Magisk installer zip file (Magisk-v20.3.zip).
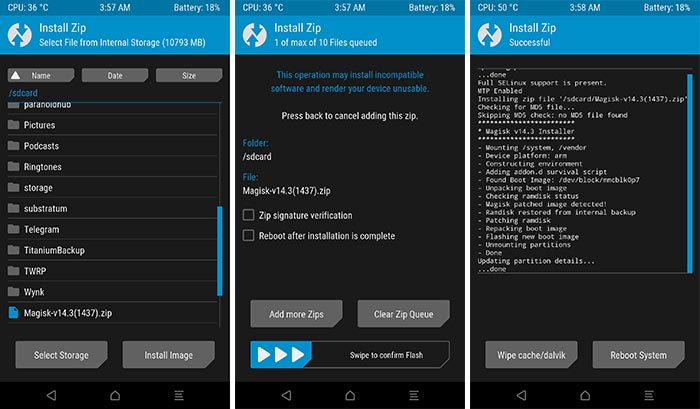
- Finally, swipe the button to flash the file and root Xiaomi Mi A1 using Magisk.
- Press the ‘Reboot System’ button.
Once your Mi A1 boots into the OS, you shall see “Magisk Manager” in the app drawer. You can leverage it to hide root from certain apps or install modules to customize almost any aspect of the software. You can now also use root-enabled apps on your device, install mods like ViPER4Android and Dolby Atmos, and customize it to your needs.
Advertisement
If you have any trouble while performing the instructions to install TWRP and root Xiaomi Mi A1, then feel free to drop a comment.
Comments 12 Comments
Comments are moderated, and published only if they are relevant to the topic and add value in a constructive way. If you disagree with something, please be polite and respectful. We suggest you read our comment policy before commenting.
HELP ME MY PHONE IS STUCK IN FASTBOOT MODE WITH SOME KINDCOF IMAGE OF A RABBIT TRYING TO FIX AN ANDROID
Yash, it appears that your phone has entered Fastboot Mode.
Simply hold the Power key for 10-12 seconds to exit out of Fastboot Mode. If, in case, that doesn’t work, try holding the Volume Down and Power keys together for 10-12 seconds.
Either of these should help you get your phone out of Fastboot Mode.
Hello Dhananjay, As soon as the TWRP booted , the screen of my device froze. I’m new at this all rooting and installing TWRP. The boot ends at asking Unmodified System Partition and makes me swipe to allow modifications. Unfortunately the swipe and the whole screen doesn’t work now. What to do? I downloaded the official one (TWRP).
Hi Anand. Please reboot your phone back into Fastboot Mode and try the unofficial TWRP. The official TWRP is pretty much outdated and doesn’t work as expected, especially on newer Android versions.
Hi..Dhananjay.
I was succesfull with this methods on Mi A1 pie (November update), everything is work good. But, I have some litle question after rooting, did we have received update OTA for next time? FYI, I am in Indonesia.
And the second question is, what the effect of we relock bootloader?
Thanks.
Hi Ricky. Taking official OTAs wouldn’t be possible with rooting and a custom recovery like TWRP installed. However, there is a working way to install OTAs on rooted devices. All the explanations and instructions for the same can be found in this post.
Do not re-lock the bootloader at all if your phone has a modified software, your device will end up in a bootloop. It’s best to keep it unlocked.
when i come into recovery why needed password? if i skip cant mount to storage?
Hi, that’s because the storage is encrypted. In order to decrypt it and to be able to access the storage/files, you will need to enter the password.
What is the password
You will need the password/PIN of the lockscreen (That you have set) to decrypt the /data partition in TWRP.
I followed your guide and rooted my mi a1 perfectly. The problem is i can’t install July OTA update.
I tried to update July pack by following these steps but failed.
Couldn’t install Magisk Manager after OTA update “Install to Second Slot” option is missing. So I chose not to install Magisk Manager.
After reboot, the phone went to TWRP screen. I flashed magisk. After another reboot, My M1 showed this message “couldn’t update Installation problem”. Fortunately, the phone works fine so far.
What do i have to do to update and root my phone properly. Thanks for the answers.
Upgrading your phone using OTA and still maintaining root is more of a hassle in my opinion. I do plan on covering a tutorial on that as well.
What I’d suggest is, you can simply use TWRP flashable ZIP or Fastboot image to update your phone (We always have a post for that, you can find the July 9.6.4.0 update on the homepage itself). In both the cases, the data will not be wiped, if you follow everything correctly.
As for root, all you have to do is simply flash the latest Magisk ZIP using TWRP, that’s all.