In this tutorial, I will walk you through the steps to install TWRP recovery on Snapdragon Galaxy S20, S20+, or S20 Ultra, and simultaneously root the phone using Magisk. This will work with all Snapdragon Galaxy S20/S20+/S20 Ultra models sold in the USA, Canada, Hong Kong, and Korea running Android 12, Android 11 R, and Android 10 Q.
Advertisement
Disclosure: Snapdragon variants of the Galaxy S20 series sold in the USA and Canada come with non-unlockable bootloaders. The only way to unlock the bootloader on these devices is by using a paid service like UNSAMLOCK.
If you have Hong Kong (China) and Korea based model, you can unlock the bootloader as shown in the instructions below.
If you’re stepping into software modding and flashing, then TWRP is a tool you should be familiar with. It is a custom recovery that allows you to flash custom ROMs, kernels, mods like ViPER4Android and Xposed Framework, and even take NANDroid backups of the complete Android OS. If you’re after rooting, you can also use TWRP to flash Magisk and root your phone, something I will be demonstrating in this tutorial as well.
I have already covered tutorials to install TWRP on the Exynos Galaxy S20 series and root it using Magisk. The method for the Snapdragon models is a bit different and required additional steps and files. So I decided to do a separate tutorial for it.
Did you know? You can easily remove bloatware from the Galaxy S20 series without Root.
Advertisement
Page Contents
- TWRP for Snapdragon Galaxy S20 series
- Supported Devices
- Before you start
- Download required files
- Instructions
- Step 1: Unlock the bootloader of your Snapdragon Galaxy S20
- Step 2: Boot your Galaxy S20 into Download Mode
- Step 3: Flash vbmeta_disabled.tar to disable AVB
- Step 4: Install TWRP Recovery on Snapdragon Galaxy S20
- Step 5: Disable Encryption using Multidisabler and Format Data Partition
- Step 6: Flash Magisk to root Snapdragon Galaxy S20
- Wrapping up
TWRP for Snapdragon Galaxy S20 series
Thanks to XDA Senior Member and developer afaneh92, fully working builds of TWRP recovery are available for the Snapdragon models of the Galaxy S20, S20+, and S20 Ultra.
While the recovery is completely stable for usage. Since the initial release, the developer has made significant improvements. For example, the recovery is now updated to TWRP 3.7.0, supports userspace fastboot (fastbootd) as well as Dynamic Partitions.
However, there are two issues that have been highlighted by the developer:
- First, encryption of the
/datapartition does not work. This means TWRP will not be able to recognize your phone’s internal storage unless it’s decrypted first (something that’s covered below). Second, haptic feedback (vibration) doesn’t work while in TWRP. This doesn’t affect the functionality though.Fixed in TWRP v3.6.0 release.
With that information at hand, let me now show you how to install TWRP recovery and subsequently root Snapdragon Galaxy S20/S20+/S20 Ultra using Magisk. The instructions below will take you through the complete process in a comprehensive manner.
Important Info: Installing a custom binary, such as the modified VBMeta and TWRP will trip the KNOX counter permanently. You will not be able to use applications that rely on KNOX like Samsung Folder, Secure Pay, etc.
Supported Devices
Following is the list of Snapdragon Galaxy S20 devices supported by this guide, along with their corresponding model numbers.
- Galaxy S20 with model number:
- SM-G9810 (Hong Kong/China)
- SM-G981N (Korea)
- SM-G981U (USA)
- SM-G981U1 (USA unlocked)
- SM-G981W (Canada)
- Galaxy S20+ with model number:
- SM-G9860 (Hong Kong/China)
- SM-G986N (Korea)
- SM-G986U (USA)
- SM-G986U1 (USA unlocked)
- SM-G986W (Canada)
- Galaxy S20 Ultra with model number:
- SM-G9880 (Hong Kong/China)
- SM-G988N (Korea)
- SM-G988U (USA)
- SM-G988U1 (USA unlocked)
- SM-G988W (Canada)
Before you start
Here are a few things you should do before you attempt the instructions.
1. Take a backup: Unlocking the bootloader will erase all the data stored on your phone including that on the internal storage. The data will be wiped again during the instructions to decrypt the /data partition.
So, make sure that you take a complete backup of your important data before you proceed. You could also refer to our tutorial on backing up Android devices if you need guidance.
2. Install Samsung USB drivers: Your Windows computer should automatically install the required USB drivers when the device is connected. But if you face any issues with the connection, you’d need to manually install the Samsung Android USB drivers on your computer.
3. Charge your phone: Make sure that your Galaxy S20 has sufficient battery charge to avoid it from suddenly shutting down in the middle of the process. 40-50% battery level is a good starting point.
Download required files
Below, you will find the links to download all the files required during this guide. Download these files to your computer and place all of them inside a single folder so that they are easier to locate later on.
Note: The TWRP recovery files linked below are the latest at the time of publishing this guide. Should you arrive at this tutorial at a later time, check the respective database page and make sure that use the latest recovery at all times.
- TWRP recovery for Snapdragon Galaxy S20
- For Android 12: twrp-3.7.0_12-1_afaneh92-x1q.tar
- For Android 11 R: twrp-3.6.0_11-4_afaneh92-x1q.tar
- for Android 10 Q: twrp-3.5.0_10-1_afaneh92-Q-x1q.tar
- TWRP recovery for Snapdragon Galaxy S20+
- For Android 12: twrp-3.7.0_12-1_afaneh92-y2q.tar
- For Android 11 R: twrp-3.6.2_11-5_afaneh92-y2q.tar
- For Android 10 Q: twrp-3.5.2_10-3_afaneh92-y2q.tar
- TWRP recovery for Snapdragon Galaxy S20 Ultra
- For Android 12:
- For Android 11 R: twrp-3.6.0_11-4_afaneh92-z3q.tar
- For Android 10 Q: twrp-3.5.0_10-1_afaneh92-Q-z3q.tar
- Odin Flash Tool v3.14.1:
- Download Odin (Extract the ZIP file after downloading)
- VBMeta Disabler:
- vbmeta_disabled.tar available on this XDA thread. Scroll down to the bottom of the first post and view the attachments. (Credits: XDA Recognized Developer jesec)
- Multidisabler for Samsung:
multidisabler-samsung-3.x.zip from this XDA thread (Credits: XDA Senior Member ianmacd). Transfer this file to your phone’s external storage (SD card). Alternatively, you can also transfer it to a USB OTG storage device.Not need anymore; Multidisabler script is now integrated in the latest TWRP build.
- Magisk installer script:
- Magisk v25 APK or newer available on the official GitHub release page (The latest Magisk installer script is an APK file and not a ZIP file; TWRP 3.7 supports flashing the Magisk APK file)
Make sure that you download the TWRP recovery according to the Galaxy S20 device you have and the Android version installed on it.
Instructions
I have broken down the instructions into six major steps so that it’s easier for you to understand the whole process. These steps will take you through the complete process of installing TWRP recovery on the Snapdragon Galaxy S20 series and subsequently rooting the phone using Magisk.
Let’s start!
Step 1: Unlock the bootloader of your Snapdragon Galaxy S20
Note:
Snapdragon models sold in the USA and Canada come with a non-unlockable bootloader. In order to unlock the bootloader on these devices, you will need to opt for a paid service known as UNSAMLOCK. Once the bootloader is unlocked, you can come back here and start following the instructions from Step #2 and onward.
In order to flash the device partitions, you must first unlock the bootloader. Unlike the Canadian and US Snapdragon variants, the models sold in Hong Kong and China come with an unlockable bootloader.
The method of unlocking the bootloader is fairly simple and the same as one would follow for the Exynos counter parts of the S20 series. It involves enabling the ‘OEM unlocking’ switch located inside the ‘Developer options‘ menu and then using the Device Unlock Mode for bootloader unlocking. Once done, you need to go through the intial setup, connect your Galaxy S20 to the internet and verify that the OEM unlocking switch is enabled and greyed out. This will disable Samsung’s Vaultkeeper service and prevent it from kicking in and relocking the bootloader.
The tutorial linked below will take you through the complete process in a step-by-step manner:
Advertisement
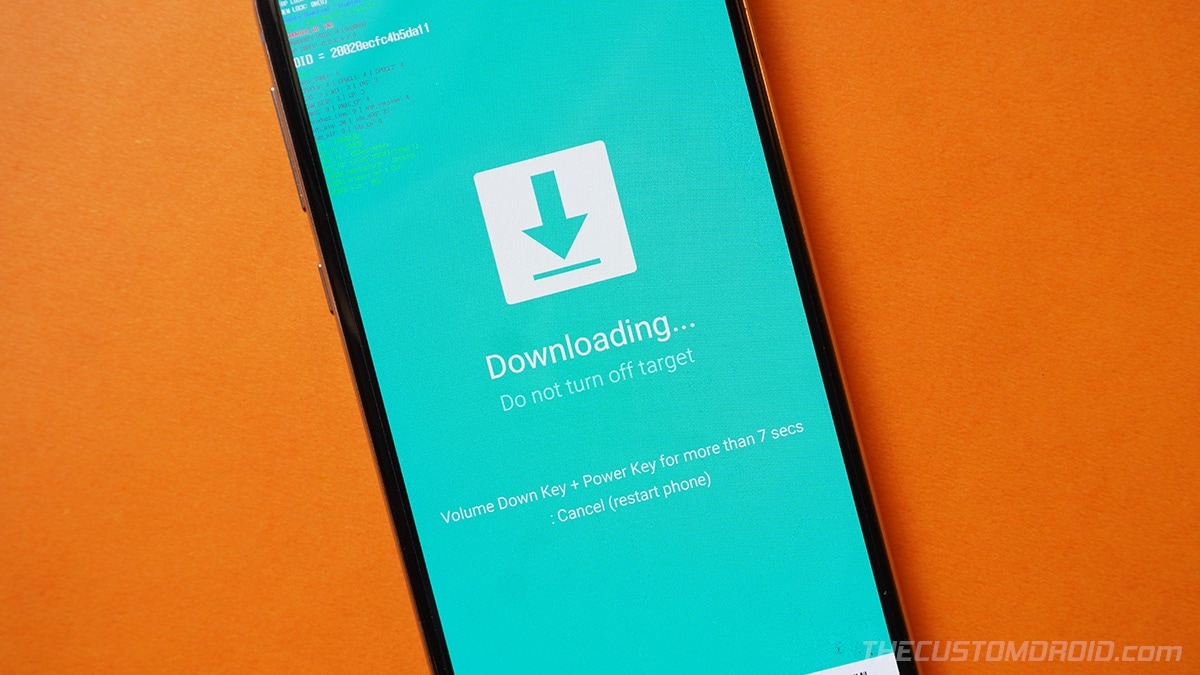
Step 2: Boot your Galaxy S20 into Download Mode
In order to flash using Odin, you need to boot your Galaxy S20 into Download Mode (also known as “Odin Mode”).
To do this, power off your phone first. Then connect it to the computer using the USB cable while holding the Volume Up and Volume Down keys together until you see the Bootloader screen (what you saw while performing step #2). Simply, press the Volume Up key once to enter Download Mode.
- Detailed instructions: How to boot Samsung Galaxy S20 into Download Mode
Step 3: Flash vbmeta_disabled.tar to disable AVB
With the bootloader unlocked and your Galaxy S20 in Download mode, you now need to use Odin to flash vbmeta_disabled.tar file to disable Android Verified Boot.
So, launch the Odin tool on your computer by double-clicking the “Odin3 v3.14.1.exe” executable. The tool will automatically recognize your Galaxy S20 and display the corresponding COM port number of the top-left.
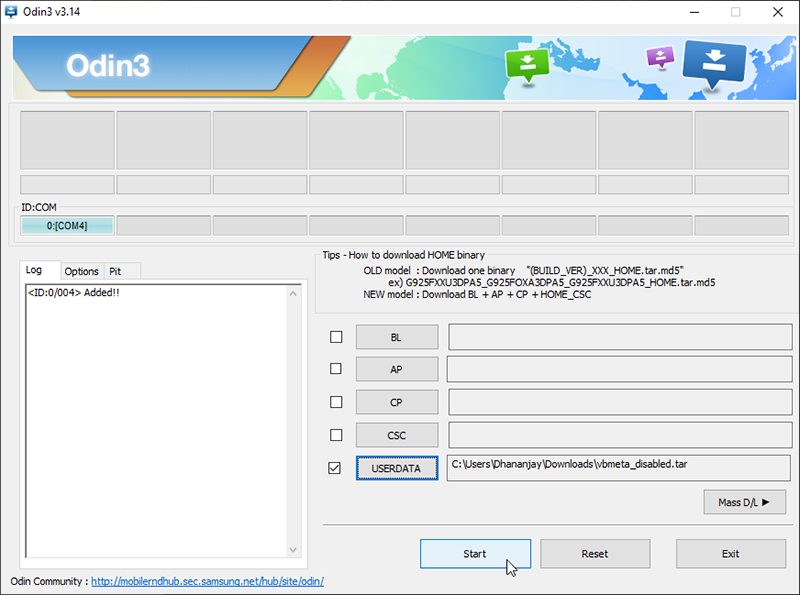
Click the “Userdata” button in Odin and select the downloaded “vbmeta_disabled.tar” to load it into the slot for flashing. Then click “Start” to flash the file to your phone.
Once the flash is complete, exit the Odin tool. Your Galaxy S20 will automatically reboot and enter the stock recovery mode. It will prompt you to reset the device because the VBMeta signature has been changed. Use your phone’s Volume Up or Down keys to move the selector and press the Power key to confirm.
After doing this, the phone will boot into the system (OS). Do not set up the device yet as it will be wiped again during the steps that follow.
Step 4: Install TWRP Recovery on Snapdragon Galaxy S20
Now that you have unlocked the bootloader and disabled AVB, it’s time to finally install TWRP on your Snapdragon Galaxy S20 / S20+ / S20 Ultra.
Begin by booting your phone into Download Mode again, as described in step #2. Then make sure that your phone is connected to the computer and launch the Odin Flash Tool.
Click the “AP” button and load the downloaded TWRP .tar file in the slot for flashing. Then click the ‘Options’ tab in Odin and uncheck the “Auto Reboot” option.
Advertisement
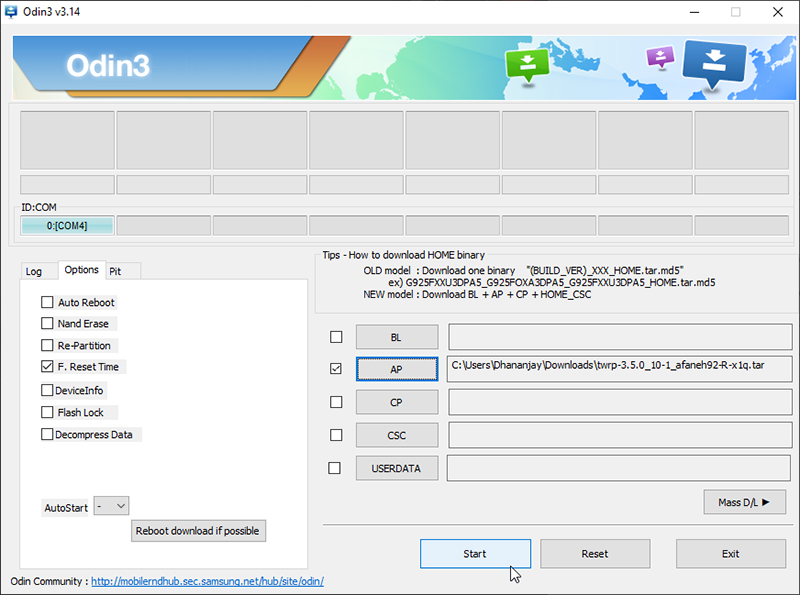
Finally, hit “Start” to flash TWRP on your Galaxy S20. The process should take a couple of seconds to finish. Once it does, close the Odin window, but DO NOT DISCONNECT the phone from the computer yet.
Now you will need to boot the phone directly into TWRP recovery. To do this, hold the Volume Down and Power keys together for about 7 seconds to exit Download Mode. As soon as the screen turns off, release the Volume Down key and quickly hold the Volume Up key while still holding the Power key.
Your Galaxy S20 should enter TWRP recovery mode now. You can disconnect the phone from the computer for now.
Step 5: Disable Encryption using Multidisabler and Format Data Partition
As I mentioned initially, TWRP recovery for the Snapdragon Galaxy S20 does not support decryption of the Data partition. In simpler words, it won’t be able to read your phone’s internal storage unless you disable encryption.
Encryption could easily be disabled on your phone using Multidisabler script developed by ianmcd@XDA and then formatting the /data partition. The script essentially patches the kernel to prevent it from triggering encryption when the phone boots. The script itself is integrated into the TWRP recovery, so you wouldn’t need to download and flash it separately.
Now, to disable encryption on your Snapdragon Galaxy S20, go to “Advanced” > “Terminal” in TWRP and enter the multidisabler command in Terminal. If the script informs you about free space left on the device and attempts to resize the vendor partition, you will need to run the multidisabler command again.
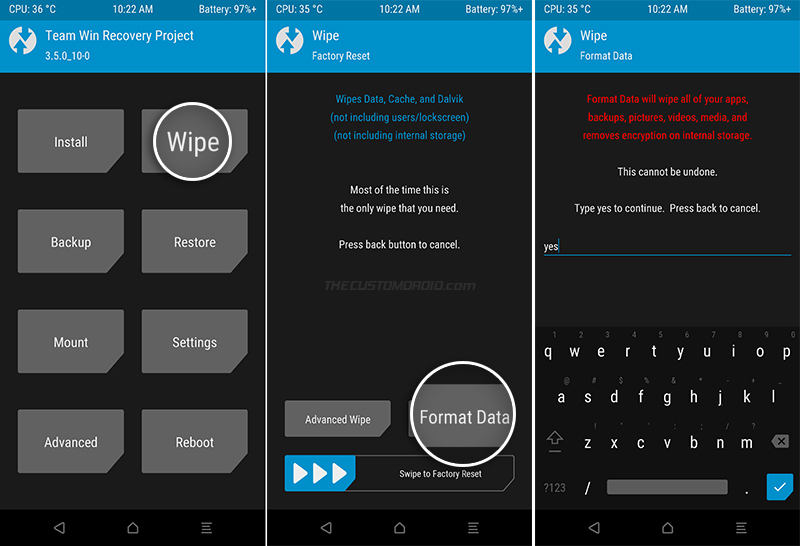
Once you see the Finished message on the screen, go to “Wipe” from the TWRP main screen and tap on “Wipe”. Select “Format Data” and enter “yes” in the provided field to format the /data partition.
Step 6: Flash Magisk to root Snapdragon Galaxy S20
The final step of this tutorial is to flash the Magisk via TWRP to root your Snapdragon Galaxy S20/S20+/S20 Ultra.
Advertisement
To do this, you will first need to transfer the downloaded Magisk APK file to your phone’s internal storage. Since you disabled encryption in the previous step, TWRP will now be able to read and mount the internal storage without any problems. So just connect the phone to the computer via the USB cable and copy the Magisk APK file to internal storage.
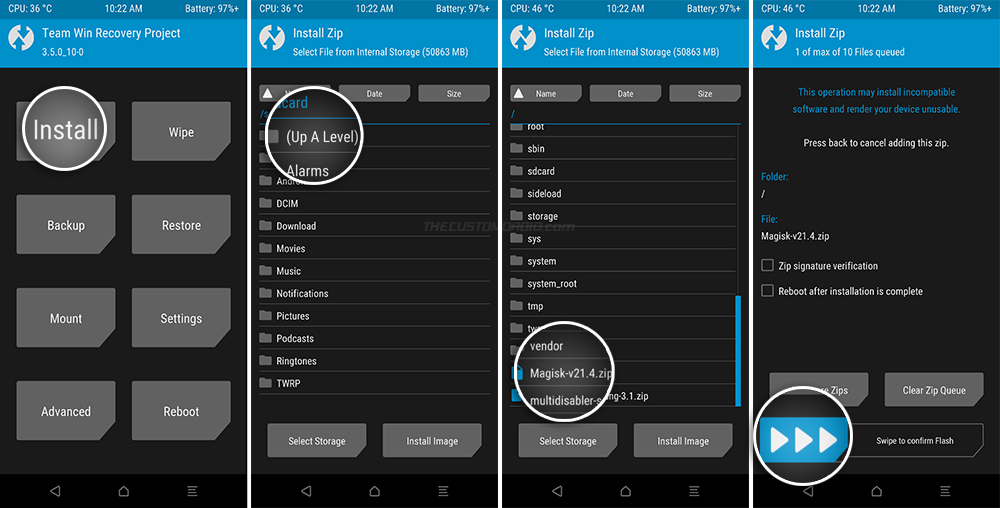
Once done, select “Install” from the TWRP main screen, locate the transferred Magisk APK file (e.g. Magisk-v25.2.apk) and select it to add the file to the flashing queue. Finally, swipe the button on the bottom of the screen to flash Magisk and root your phone.
Once the flash completes, press “Reboot” and then select “System”.
Wrapping up
That’s it! Your Snapdragon Galaxy S20 should be rooted with Magisk and TWRP recovery installed. Once your phone boots set it up by following the on-screen instructions.
You can verify root by launching the Magisk application and checking Magisk’s installation status. You can now install and use root applications such as Titanium Backup, or install modules like ViPER4Android and Xposed Framework.
Starting with Magisk v20.4, Magisk Hide is disabled out-of-the-box on new installations. So, make sure that you enable it from the Magisk app settings.
While at it, you can also check if your rooted Galaxy S20 passes SafetyNet. If SafetyNet fails and shows ‘Hardware’ evalType, it means that Google’s new hardware-backed attestation is now in effect on your phone. You can try fixing this by using the Universal SafetyNet Fix module.
With TWRP installed, you can now backup and restore NANDroid and install custom ROMs that are available on the XDA-Developers forum.
So by now, you have learned how to install TWRP recovery on Snapdragon Galaxy S20, S20+, and S20 Ultra, and root the phones using Magisk. If you have any questions or face any difficulties while performing the instructions, feel free to let me know.
A huge thanks to afaneh92 for bringing up TWRP support for the Snapdragon S20 devices. He was also patient in answering some of the questions I had while jotting down this tutorial. You should also consider joining his Telegram group.
Source: XDA
Comments 8 Comments
Comments are moderated, and published only if they are relevant to the topic and add value in a constructive way. If you disagree with something, please be polite and respectful. We suggest you read our comment policy before commenting.
hi Dhananjay Bhardwaj
the author of this custom twrp has deleted his source on afh. please update another mirror
i found this post: https://xdaforums.com/t/s20-s20u-s20-twrp.4677536/
although the post doesn’t say it but those files are from afaneh92 himself
Hi, it seems like the author did so deliberately. The only other source of TWRP seems to be the one you shared. Have you tried it for yourself?
One more thing, which model of the Galaxy S20/S20+/S20 Ultra is in question here?
Hi Dhananjay Bhardwaj, thank you so much for this. I cannot currently find the page for twrp android 10 for S20 Ultra, is there a page where I can download this? Thanks in advance…
Jackson, the latest TWRP for the Snapdragon S20 Ultra could be found in the AFH folder shared by the developer.
My SM-988U1 has the bootloader unlocked through SamPWND, but I do not see anything regarding “OEM Unlocking”. I’m not trying to lose my BL Unlock either, by doing the wrong thing.
Jimmy, once you have unlocked the bootloader through SamPWND, you just have to follow from Step #2 onwards. The first step for unlocking the bootloader is for models that support unlocking. You can skip it as your model doesn’t come with an officially unlockable bootloader.
Thanks a lot for this article. I could follow until step 4. But when i try to enter TWRP recovery mode as described IN THE END OF STEP 4, my s20 stay in booting screen with warning text in red. The only thing I could do, was to reboot with volume down + power and enter download mode fast(by pressing volume up + down && power button) and flash with odin the firmware. How do i make it successfull from Step 4 to Step 5? was my problem a wrong TWRP Version or different button combination(which everybody seems have different)?
Would help me a lot, thanks in advance o/
Igor, it’s the key combination part that needs some getting used to. After the flash is complete, disconnect the phone from the computer. Then hold the Volume Down + Power keys for about 7-10 seconds to force-exit Download Mode.
As soon as the screen turns off, quickly release the Volume Down key and press and hold the Volume Up (keep holding the Power key all the time).
Only let go of the Volume Up and Power keys when you see the TWRP splash screen.
Another thing, the downloads section includes the link to the TWRP download page provided by the developer. Make sure that you use the latest version of TWRP. At the time I published this guide, it was TWRP v3.5.0-10_1. I just checked and the latest one is v3.5.0-10_2. So make sure that you use the latest one.