How to Unlock Bootloader, Install TWRP And Root Nokia 3
The guide below instructs you on how to easily root Nokia 3 Android smartphone right now. Nokia came into the Android phone marketplace with HMD worldwide and

On this page
Nokia came into the Android phone marketplace with HMD worldwide and now have launched the Nokia 3. In this guide we will show you how to unlock the bootloader, install TWRP recovery and root the Nokia 3. The current version of TWRP recovery is presently in beta mode and it will work only with MediaTek variant of the Nokia 3.
All of the Nokia Android phones have been released with locked bootloader and bloatware. Hence, Nokia 3 is also released with locked bootloader and bloatware. Once you are done with unlocking the device, you can root the device and install Twrp Recovery.
After rooting the device, you can eliminate bloatware Stock apps, and it is also possible to customize your device in Android 7.0. TWRP recovery. That will help you to install custom ROMs and mods like ViPER4Android and Xposed framework.

Prerequisites
- Charge Your Device to at least 60% battery level to avoid any mishaps during the process.
- Backup your device completely.
- Required Android 7.0.
- Setup your Nokia 3 to access over ADB (Includes enabling Developer options).
- Enable OEM unlocking in Developer options. Go to Settings > Developer Options and enable the OEM unlock toggle.
Downloads
- Install Nokia Drivers: Link
- Latest SuperSU root package: Link
- Download TWRP Recovery for Nokia 3: Link
How To Unlock Nokia 3 Bootloader
- Make sure to install the drivers listed above.
- Keeping in mind that you have already completed step #4 of “Prerequisites”, you will have your device connected to the PC and ready for ADB access.
- Now type the following command and then hit enter to switch your phone into bootloader style:
adb reboot bootloader- Use this command to Unlock Bootloader Of Nokia 3.
fastboot oem unlock- The device will prompt with a warning. Confirm the process by selecting “Yes”.
Guide To Install TWRP Recovery On Nokia 3
- Once you have unlocked the bootloader, you can go ahead and install TWRP recovery on Nokia 3.
- Copy the downloaded
cofface_twrp_recovery_markw_1121.imgfile to the folder where the ADB and fastboot binaries are present. - In the CMD window, type the following command to reboot the device into bootloader mode, again.
adb reboot bootloader- Now flash TWRP by entering the following command:
fastboot flash recovery cofface\_twrp\_recovery\_markw\_1121.img- When the flashing process is done, reboot the device: fastboot reboot
- Great, so now you have unlocked the bootloader and installed TWRP, it is time to root Nokia 3.
How To Root Nokia 3
- Transfer the root package (SuperSU-v2.82-201705271822.zip) to the Nokia 3’s internal storage.
- Reboot your Nokia 3 into TWRP - Power it off completely. Press and hold the Volume Up + Power buttons together.
- Proceed to the “Install” tab. Browser and select the SuperSU-v2.82-201705271822.zip file.
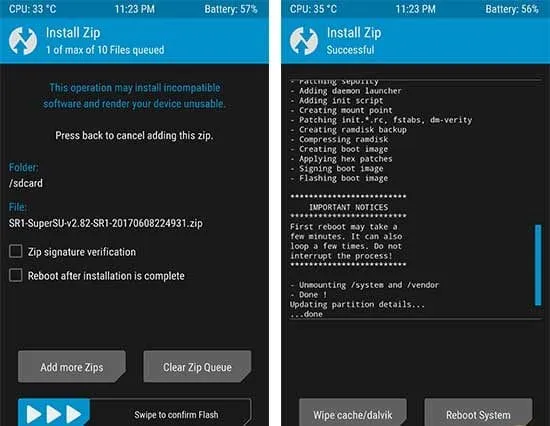
- Finally, swipe the button on the bottom of the screen to root the Nokia 3.
- Tap on the “Reboot System” button to boot into the rooted Nokia.
So, this was the comprehensive guide to Unlock Bootloader, Install TWRP recovery and Root Nokia 3. Hope you have successfully rooted Nokia 3. If you face any problems during the process, let us know via comments.
Comments
Comments are moderated, and published only if they are relevant to the topic and add value in a constructive way. If you disagree with something, please be polite and respectful. We suggest you read our comment policy before commenting.