It’s been more than a month since Google released the Android 10 update. If you have updated your phone and further wish to root it, then you’d be glad to know that Magisk v21.0 has been released with full Android 11 support. In this guide, we will show you how to root your device running Android 11 using Magisk. This could be easily done by patching the boot image and then flashing the patched boot image using Fastboot.
Advertisement
Before we get to the instructions, we would like to talk a bit about the core changes in Android 11 and how they affected Magisk/root development. If you’re not into the technical details, you could head over to the instructions directly.
Page Contents
- Android 11 & Magisk Root Development: Recap
- How to Root Android 11 using Magisk
- Step 1: Unlock the Bootloader
- Step 2: Get the Boot Image for your Phone
- Step 3: Install Magisk Manager v8.0.2+ on your Phone
- Step 4: Patch the Boot Image with Magisk Manager
- Step 5: Set up Android platform-tools on your Computer
- Step 6: Launch Command-line Window Inside ‘platform-tools’ Folder
- Step 7: Transfer the Patched Boot Image to your Computer
- Step 8: Boot your Phone into Fastboot Mode
- Step 9: Flash the Patched Boot Image to Root your Android 11 Device
- Wrapping Up
Android 11 & Magisk Root Development: Recap
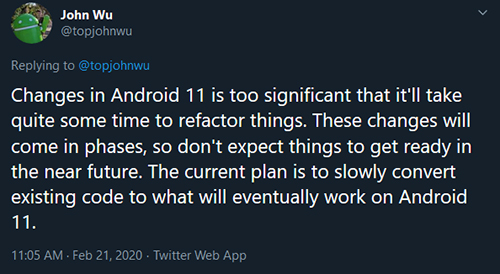
Every major Android release tends to bring some new challenges for the custom development community, especially the rooting part. And Android 11 wasn’t any different. Back when Google released the Android 11 developer preview, Magisk’s creator John Wu (@topjohnwu) was quick enough to hop onto the development with his new Pixel 4 XL running Android 11.
Advertisement
- The first thing pointed out by the developer was the removal of the
/sbinfolder from the root directory in Android 11. This folder (up until Android 10) was used to load all Magisk binaries such asmagiskinitetc. With the unavailability of the/sbinfolder, the developer had to work out an alternative way to add Magisk binaries to the PATH. With the latest v21.0 on Android 11, Magisk now randomly creates a folder under/devand uses it as a base folder. - John also added that Google removed
init.rcfrom the root directory and moved it to/system/etc/init/hw/init.rc. For those who do not know,init.rcis a key component of Android that initializes the Android boot sequence (Read more about it here or follow the official documentation).
While not much, these two changes themselves are quite major and change how Android behaves at the early boot. It took a lot of time and effort from John to get around these new challenges and he finally merged the required fixes for Android 11 support to the Magisk Canary channel.
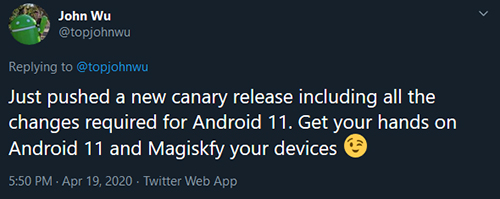
The developer has released Magisk 21.x that adds full support for Android 11 to the stable channel as well. Users who already have Magisk v21 installed can easily upgrade to the stable Android 11 update without losing root.
How to Root Android 11 using Magisk
Installing Magisk and rooting your device running Android 11 is quite easy. In brief, you first have to get a copy of the stock boot image for your phone. Then you have to patch that boot image on-device using the Magisk Manager application. And finally, you have to flash the resultant patched boot image to your phone using Fastboot commands. The steps below will take you through the process in detail.
Before you begin, make sure that you take a backup of all your important data. Although nothing shall be wiped off your phone while rooting using this method, it is good to safeguard the data anyways.
Requirements
- Your Android 11 device
- A Windows, macOS, or Linux computer
- A compatible USB cable
Step 1: Unlock the Bootloader
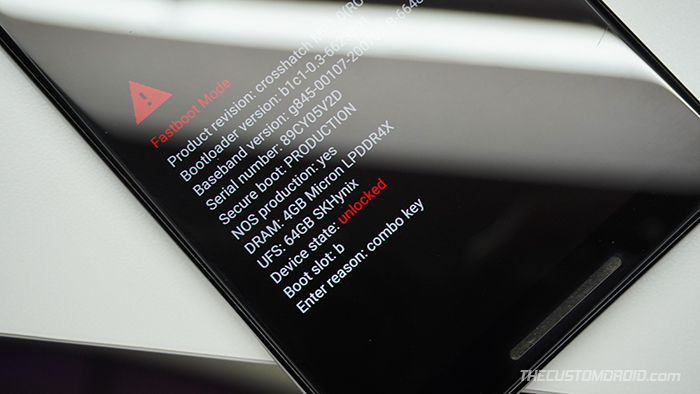
While installing Magisk and rooting your phone, you’d need to flash the patched boot image to your phone. To do this, you’d first need to unlock the bootloader of your phone. If your phone’s bootloader is already unlocked, you do not need to do it again.
Note that unlocking the bootloader will erase all the data on your phone, including that on the internal storage.
On most stock Android devices such as the Google Pixel series, or OnePlus phones, the bootloader could easily be unlocked using a couple of Fastboot commands. The tutorial linked below will take you through the process in detail.
Some manufacturers like Asus, Realme, Xiaomi, etc would require you to use special tools for bootloader unlocking. Xiaomi/Redmi/Poco phone users could simply use the official Xiaomi Unlock Tool. Realme users could refer to the official tool collection here. Alternatively, you could also search our website to find your device-specific tutorial.
Step 2: Get the Boot Image for your Phone
The second step is to get the stock boot image for the Android 11 software version currently installed on your phone.
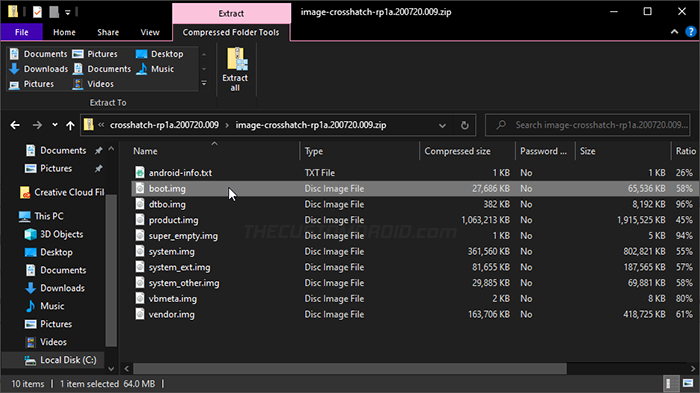
If your phone’s manufacturer allows bootloader unlocking, chances are that they also provide download links for the factory images. These factory images (also sometimes referred to as “fastboot images”) are in form of .zip archives and contain .img files of individual device partitions. For the rooting process, you’d need the boot image file that’s generally named as boot.img.
Google Pixel owners can get the Android 11 factory image for their phones from the official repository.
Some manufacturers like OnePlus, Asus, etc, only provide OTA update packages (instead of factory images) for their phones. Users with devices from such manufacturers would need to go an extra step to extract the OTA payload.bin to get the boot image file. An alternative (and easier) way to get the boot image is to look up for your device-specific section at XDA-Developers or check out firmware.mobi.
Once you have the boot image, transfer it inside the “Download” folder of your phone’s internal storage. You can copy it anywhere actually, but we chose the ‘Download’ folder for convenience.
Step 3: Install Magisk Manager v8.0.2+ on your Phone
First, download the APK file of Magisk Manager v8.0.2 (or above) from the official Github release page directly to your phone. Then, launch a file manager application of your choice and navigate to the folder where the file was downloaded (generally ‘Download’ folder in internal storage). Locate the downloaded file (e.g. MagiskManager-v8.0.2.apk) and tap on it to launch Android’s in-built package installer. Press “Install” and wait for the installation to finish. Once it is, press “Ok” or “Done”.
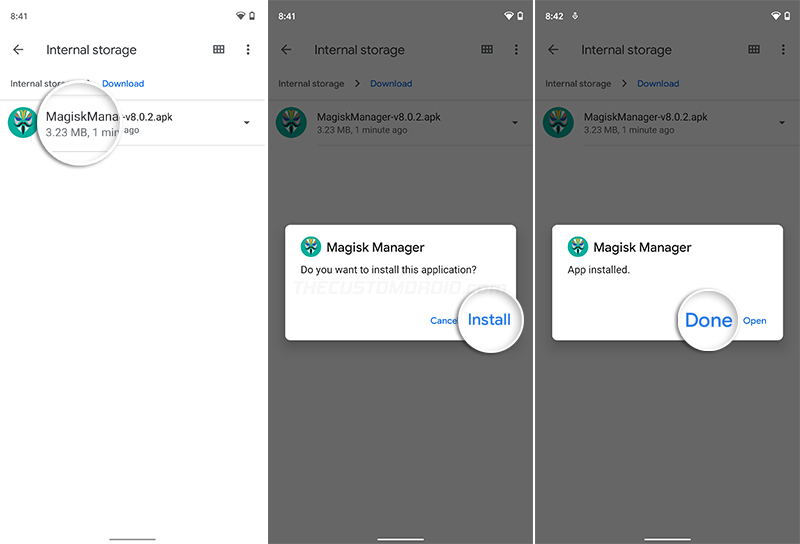
You might be prompted to allow access for the installation of unknown apps. If you do not know how to do it, then follow the link below.
Advertisement
Step 4: Patch the Boot Image with Magisk Manager
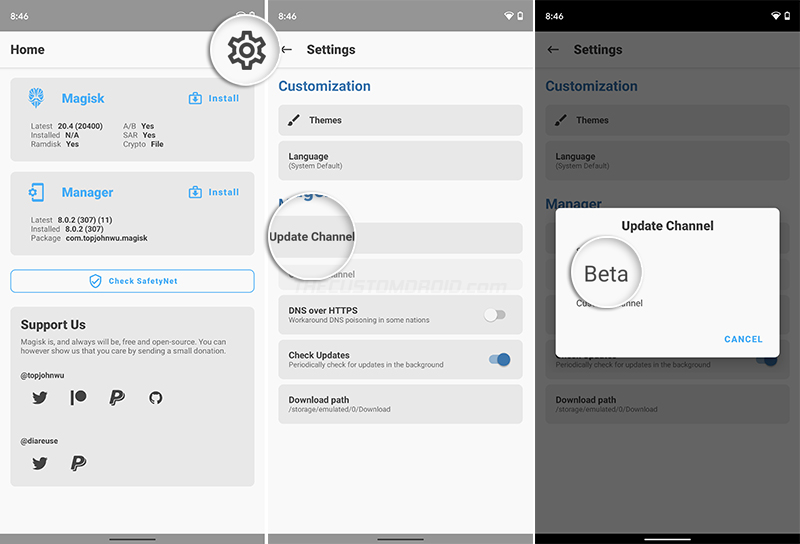
Now that you have both, the boot image and Magisk Manager installed, it’s time to patch it. To do this, launch the Magisk Manager app and press the cogwheel icon on the top-right to access the “Settings”. Tap on “Update Channel” and set it to “Beta”. This is because Magisk v21.0 is currently not available on the Stable channel, but only on the Public Beta channel (not for long though).
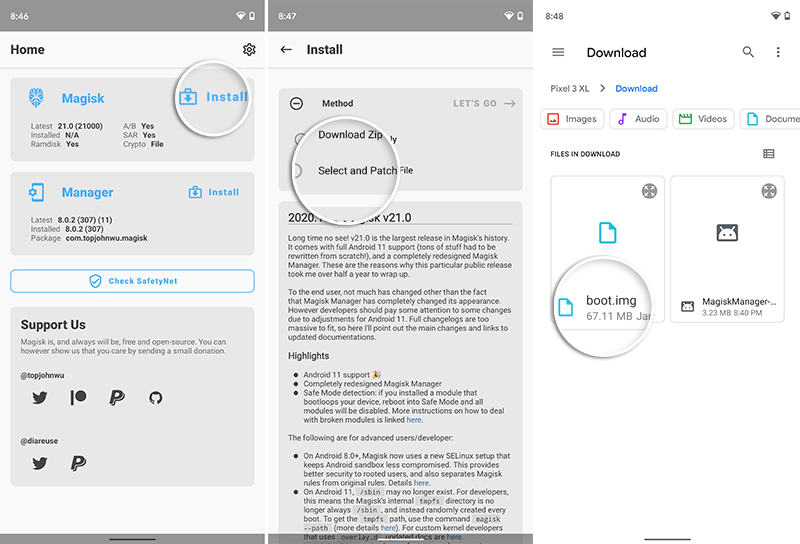
Next, go back to the main screen, press “Install” and choose “Select and Patch a File” from the list of available methods. The file selector will open, so navigate to the “Download” folder of your phone’s internal storage and select the boot image file (boot.img).
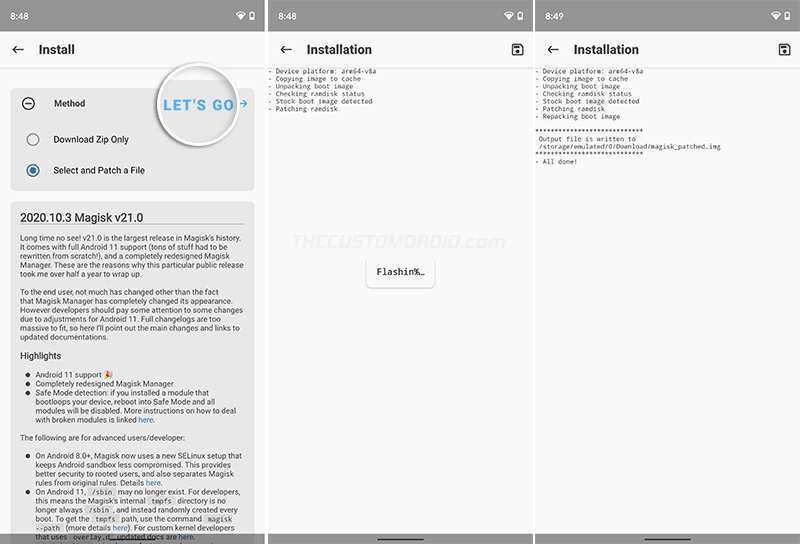
Once the boot image is selected, press “Let’s Go”. Magisk Manager will start downloading the latest version of Magisk i.e. v21 and patch the boot image with it. Once done, the resultant patched boot image will be stored inside the “Download” folder.
Step 5: Set up Android platform-tools on your Computer
You have the boot image patched with Magisk and ready to be flashed to your phone. To carry out the flashing process, you will need to set up the Android platform-tools on your computer. So start by downloading the latest platform-tools package according to your PC’s operating system from the links below.
Once downloaded, extract the contents of the zip archive to get the ‘platform-tools’ folder. Next, move this folder to an easily accessible location on your PC for installation. For example, move it to the C:\ drive if you’re using a Windows PC or inside the ‘Documents’ directory on a Linux/Mac machine.
If you need detailed instructions for installing these tools, refer to the tutorial linked below.
Step 6: Launch Command-line Window Inside ‘platform-tools’ Folder
With the tools installed, it is important to launch the command-line window inside the ‘platform-tools’ folder. This is because the command-line can only recognize files that are added to the PATH and/or are inside the folder where it’s open. To do this:
Advertisement
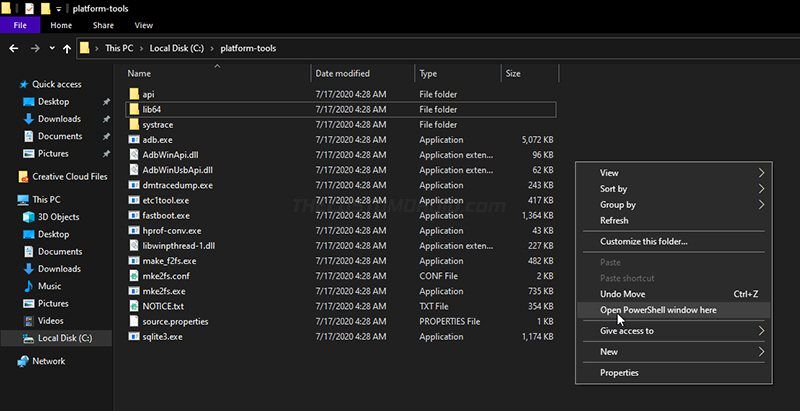
- On Windows: Go to C:\platform-tools. Hold the SHIFT key on the keyboard and right-click on any empty space inside the folder. Then select the “Open PowerShell window here” option.
- On Linux/Mac: Launch the Terminal and use the cd command to change its directory to the “platform-tools” folder. For example: If you moved the folder inside the “Documents” directory, then the command should be:
cd Document/platform-tools
At this point, everything on your computer is now set up to carry out the flashing process.
When entering the mentioned commands, make sure to prepend them with a dot and backslash [.\] in Windows PowerShell or a dot and forward slash [./] on Mac/Linux Terminal. For reference, take a look at the figures below.
Step 7: Transfer the Patched Boot Image to your Computer
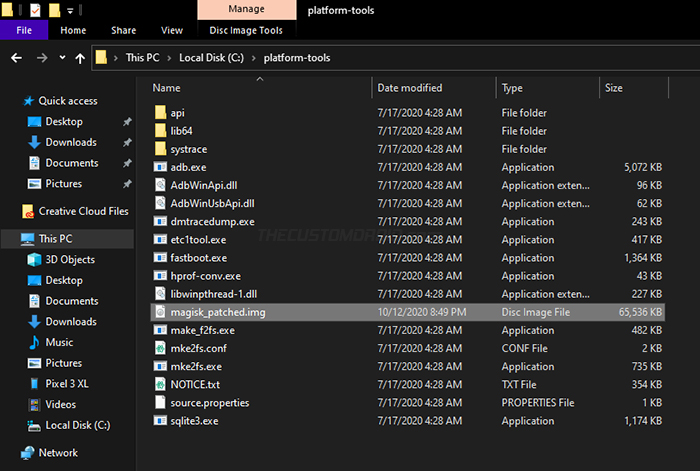
As mentioned earlier, the boot image is stored inside <internal storage>/Download after patching. It is named magisk_patched.img so that it’s easier for the users to identify.
So, connect your Android 11 device to the computer via the USB cable and turn on the “File Transfer” (MTP) mode on it. Then copy the Magisk patched boot image from inside the “Download” folder to the “platform-tools” folder on your PC. Disconnect the phone after the transfer is complete.
Step 8: Boot your Phone into Fastboot Mode

The Fastboot tool can only recognize and flash files to your phone over the bootloader interface, which is more commonly known as “Fastboot Mode” or “Bootloader Mode”.
To enter Fastboot Mode, enable USB debugging on your phone, connect it to the computer, and execute the adb reboot bootloader command from your computer.
Another easier way to get into Fastboot Mode is by using the buttons combination while the phone is powered off. On a lot of Android devices (especially Google Pixel and stock Android devices), it could be done by holding the Volume Down and Power keys together.
Step 9: Flash the Patched Boot Image to Root your Android 11 Device
Finally, it’s time to flash the patched boot image to install Magisk and root your Android 11 device. To do this, connect your phone to the computer over USB while it is in Fastboot Mode.
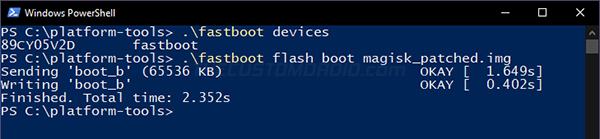
Then verify that your PC can recognize your phone over the bootloader interface using:
fastboot devices
The command should return your device’s unique ID, as shown in the figure below. If you’re operating on a Windows computer, you might see an empty output, which indicates that there is a driver issue. You could fix this by downloading and installing the latest Google USB drivers on your PC.
Advertisement

Now enter the following command on your computer to flash the patched boot image to your phone:
fastboot flash boot magisk_patched.img
It’s worth noting that the boot image will only be flashed to the currently active slot on devices that support the A/B partition system. This is extremely useful for installing OTA updates on rooted phones.
After the flashing is complete, reboot your phone into the OS using:
fastboot reboot
You can disconnect the phone now and wait for it to finish the boot.
Wrapping Up
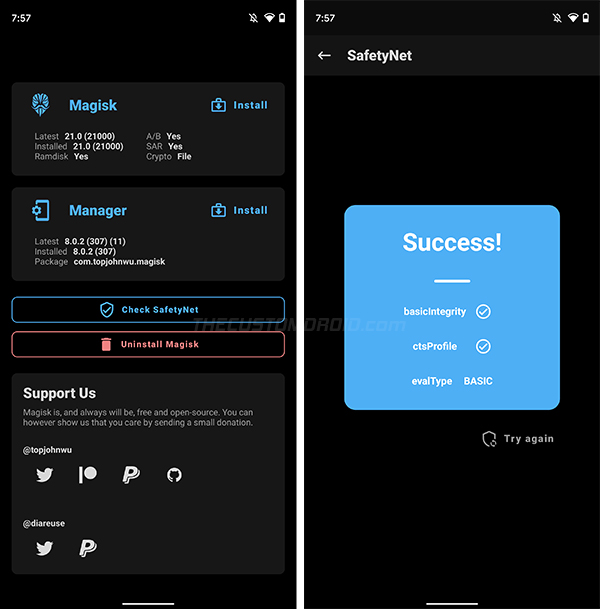
That’s it! Your Android 11 Device is now rooted. To verify this, launch the Magisk Manager application on your phone and check the info corresponding to the “Installed” label. It should show the latest Magisk version. You can further check the SafetyNet status by pressing “Check SafetyNet”.
Magisk not passing SafetyNet on Android 11? – Read about SafetyNet’s hardware-backed attestation
Now that you have root access, you could install and use some of the most popular root applications such as Titanium Backup. You could also use Magisk Manager to install modules for adding new features to the software.
Furthermore, if certain apps like banking and security apps stop working, simply go to ‘Magisk Manager’ > ‘Settings’ and enable Magisk Hide. Since Magisk v20.4, this feature is disabled by default on new installations in light of the new SafetyNet attestation method.
If you have any questions regarding the rooting process and need help, comment below.
Comments 5 Comments
Comments are moderated, and published only if they are relevant to the topic and add value in a constructive way. If you disagree with something, please be polite and respectful. We suggest you read our comment policy before commenting.
Buddy, you are the best. Been trying to root my Alldocube X game for like 2 weeks now. You made it look so easy ! Thanks ! God Bless !
Shoaib, I am glad this guide proved useful in rooting your Alldocube X Game. This guide was originally published when Android 11 came out, and at the time Magisk v21 was the latest. The latest version now is Magisk v25, I hope that you have upgraded to that.
Hello,
Thank you so much. It worked for me. OnePlus 7 Pro.
I’m running now Oxygen OS 11.0.0.2 with Magisk. 🙏👍
Easy and simple process.
Trying to root my OnePlus 7T Android 11 beta 4 and I get stuck in Fastboot mode
Make sure that you use the OnePlus 7T A11 Beta 4 boot image. To recover your device, simply flash the stock boot image of Beta 4 through fastboot and it should be fixed.
Next, patch the Beta 4 boot image with Magisk v22 (only Magisk v21+ supports Android 11).
One more thing, this tutorial was written back when the stable Magisk release wasn’t updated to support Android 11. Since it’s available now, there’s no need to change Magisk’s update channel under step #4. The rest of the process stays the same.