Install Android Oreo on Nexus 9 via LineageOS 15
Nexus 9 has extended its support to Android 8.1 Oreo, unofficially through LineageOS 15 custom ROM.

On this page
Nexus 9 has extended its support to Android 8.1 Oreo, unofficially through LineageOS 15 custom ROM. This tutorial will help you install Android Oreo on Nexus 9 right now.
The Nexus 9 has seen it’s last major update with Nougat 7.1.1 and it has all ended there for users operating stock firmware. But now you can enjoy Android Oreo on Nexus 9 and major features including Picture-In-Picture mode, Notification Channels, Adaptive icons, Autofill framework, and a few WiFi related goodies, etc. A lot of devices have recently started receiving the Oreo taste using custom ROMs and support for the N9 has been added recently, thanks to XDA member - 䙉Êû.

Get Android Oreo on Nexus 9 using LineageOS 15 ROM
The Oreo update has been brought to the Nexus 9 via LineageOS 15 ROM compiled by the developer. Even though the build is in the experimental phase, you will be enlighted to know that most of the fundamental features work flawlessly, already.
However, you should prepare yourself for any unknown bugs that you might face. After all, it is only the first set of builds. We might see more improvements, fixes, and feature support later in the course of future releases.
Below are all the features that are working on this ROM:
- WIFI
- Bluetooth
- Camera
- Gravity & light Sensors
- Audio
- USB OTG support
- Video playback
The developer does credit XDA contributor - USBhost for providing the stock kernel that allowed the ROM to finally boot. So our appreciations go to him too. It requires you to flash his Fire-Ice kernel or the ROM wouldn’t boot at all. You shall also need to have the latest vendor (N9F27H) image and bootloader installed. Now to get Android Oreo on Nexus 9, follow the instructions below.
The ROM will encrypt your device storage, so make sure that you flash the SuperSU or Magisk root package prior to the first boot.
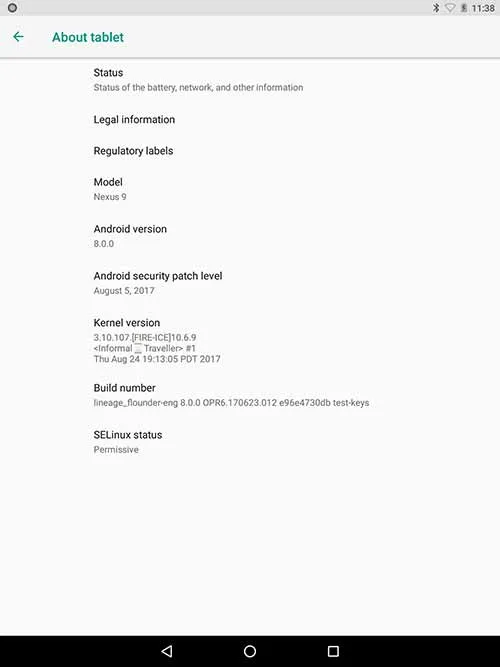
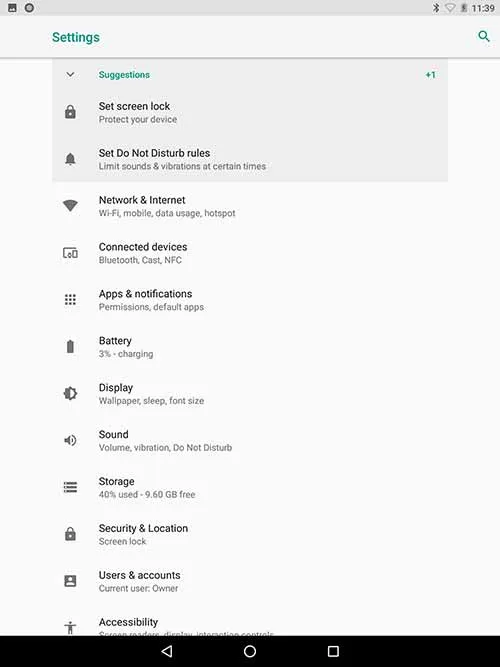
Screenshots
The screenshots were provided by ROM developer - 䙉Êû on the XDA thread.


Prerequisites
- Make sure that you backup your device completely. Installing the ROM wouldn’t erase any data on the internal storage, but it is better to take appropriate precautions.
- Charge your Nexus 9 to at least 50-60% battery level to avoid any disruptions during the process.
- The Nexus 9 must have TWRP installed to flash this ROM. You can download TWRP for the Nexus 9 from here.
— Install Android Oreo L Speed Mod to Improve Performance
Downloads
- LineageOS 15 ROM and Fire-Ice Kernel ZIP files: lineage-15.1-20180406-UNOFFICIAL-flounder.zip
- GApps: Link
- SuperSU root package or Magisk installer (for root and storage decryption): SuperSU | Magisk
Install LineageOS 15 Oreo ROM on Nexus 9
Once you have downloaded all the files, you will need to follow the instructions below to install Android Oreo on Nexus 9.
-
The first thing you will need to do is transfer all the downloaded files - ROM, GApps, Fire-Ice kernel, and SuperSU/Magisk to the device’s internal storage.
-
So connect your Nexus 9 to the PC is file transfer mode and copy all the files to an easily accessible directory.
-
Disconnect the device.
-
Boot into TWRP recovery mode - If you know to do it using the buttons combination, then do it. Or, enable USB debugging on your N9 and open CMD/Terminal with ADB access. Enter the command to reboot into TWRP:
adb reboot bootloader
-
Once your Nexus 9 is in TWRP main screen, go to Wipe > Advanced Wipe. Select the following options - Dalvik/ART Cache, Data, System, and Cache. Swipe the button on the screen to begin the process.
-
Finally, flash the ROM by going to TWRP > Install. Select the ROM ZIP (lineage-15.0-20170909-UNOFFICIAL-flounder.zip) file.
-
Don’t flash it yet, tap on the “Add more Zips” button and add the GApps, Fire-Ice kernel, and SuperSU to the flashing list.
-
Now swipe the button on the bottom of the screen to start the flashing process. Give it a few minutes to complete.
-
Once it is, tap on “Reboot System”.
Your Nexus 9 will now boot into Android 8.1 Oreo-based LineageOS ROM. Follow the instructions during the device setup. That’s it! You have successfully installed Android Oreo on Nexus 9 through LineageOS.
You will now be able to enjoy most Oreo features on your device. Given the time, the ROM will see improvements and much more stable workspace with upcoming updates. Now that you have installed Android Oreo on Nexus 9, you can root it easily - How to Root Android Oreo 8.0
More for you:
- Tips To Fix Android Oreo Battery Drain Problem
- How to Fix Android Oreo Bluetooth Issue
- How to Customize Android Oreo Navigation Bar without root
If you have any problem during the procedure to install Android Oreo on Nexus 9, you can let us know by commenting below.
Comments
Comments are moderated, and published only if they are relevant to the topic and add value in a constructive way. If you disagree with something, please be polite and respectful. We suggest you read our comment policy before commenting.