In this guide, we will show you how to install TWRP Recovery on the OnePlus 7 and OnePlus 7 Pro (5G), and then how to use it to root your phone using Magisk.
Advertisement
When we talk about Android custom development and software modding, OnePlus devices are always among the front-runners. This notion is further made stronger by the fact that the bootloader on these devices is pretty easily unlockable. And the OnePlus 7 and OnePlus 7 Pro are no different.
If you’re into software modding, TWRP is a tool you should be familiar with. It is a custom recovery that will allow you to flash custom ROMs, kernels, mods like ViPER4Android and Xposed Framework, and even take NANDroid backups of the complete Android OS. If you’re after rooting, you can also use TWRP to flash Magisk and root your phone in a matter of minutes, something we’ll be demonstrating in this tutorial as well.
TWRP for the OnePlus 7 and OnePlus 7 Pro is brought to the community by XDA Recognized Developer mauronofrio. He is also the one who is officially maintaining the official builds being posted on the TWRP website.
Advertisement
According to the developer, the recovery is completely usable and supports Android 11, Android 10, as well as Android 9 Pie. It can also decrypt the /data partition on the latest version of Android. The only existing issue with the recovery is that the vibration does not work while in recovery mode, which doesn’t affect the recovery’s functionality at all.
With that aside, let us show you how to install TWRP recovery on the OnePlus 7/OnePlus 7 Pro and subsequently root the phone using TWRP and Magisk. The instructions in this tutorial will take you through the complete process in a comprehensive manner.
If you do not plan on using TWRP for flashing ROMs, taking NANDroid backups, etc, then you can also root the OnePlus 7/7 Pro without TWRP Recovery.
Page Contents
Before You Begin
Before you start, there are a few things you should do.
1. Take a Complete Backup: Installing TWRP or rooting your OnePlus 7/Pro using the instructions here will not erase any data. However, it’s generally a good practice to take a complete backup of all your important data beforehand. This will create a failsafe in case the data is lost due to corruption or a bad flash.
If you need guidance in the matter, you could refer to our tutorial on backing up Android devices.
2. Install OnePlus USB Drivers: If you’re operating on a Windows computer, it will generally install the required USB drivers for your phone automatically. But that’s not always the case, and especially when working with ADB and Fastboot. So, it’s best that you install the latest version of the OnePlus USB drivers on your computer.
Users operating on macOS or Linux computers will not need any drivers at all.
3. Charge your Phone: Make sure that your OnePlus 7 device has a sufficient battery charge so that it doesn’t turn off accidentally while performing the instructions. We suggest having at least 40% battery charge before you begin.
4. Unlock the Bootloader: In order to install TWRP, root, or flash the device partitions, you must first unlock the bootloader of your OnePlus 7. Like we said earlier, this is extremely simple and could be done by issuing a fastboot command from your computer.
- More info: How to Unlock OnePlus 7 (Pro) Bootloader
Instructions
In order to make it easier for you to understand, we have split the whole process into 7 steps. So, follow the steps below to install TWRP recovery on your OnePlus 7 (Pro) and then root it using Magisk.
Step 1: Install Android SDK Platform-tools on Computer
You will be flashing TWRP using a fastboot command. So, the first step is to install the Android SDK platform-tools on your computer. Begin by downloading the latest platform-tools for your computer using the links below.
Once you have downloaded the tools, extract the ZIP package to get the “platform-tools” folder. This folder should contain the binary files of the required tools, such as ADB and Fastboot.
For easier access, we suggest you move the “platform-tools” folder to the root of the C:\ drive if you’re using a Windows computer, or inside the “Documents” directory if you’re using a macOS/Linux PC.
While you could use one-click ADB/Fastboot installers like Minimal ADB and Fastboot, we recommended doing it the manual way as shown above. This is because one-click installers often include outdated platform-tools binaries, which may cause unusual errors during usage.
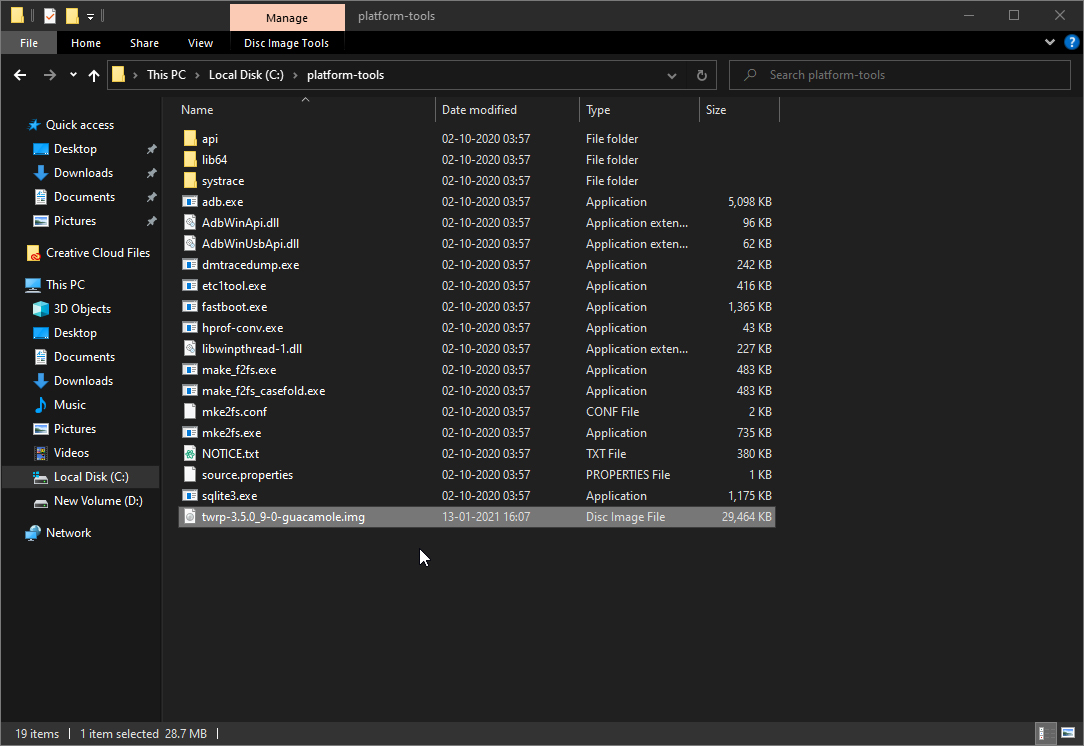
Step 2: Download TWRP and Magisk Files
The second step is to download the files you’ll need further down this guide. These include the TWRP recovery for the OnePlus 7/7 Pro and the Magisk installer file.
- TWRP Recovery (supports Android 11 too): TWRP-3.5.1-guacamole-Nebrassy-3.img
- Note: Official TWRP recovery for the OnePlus 7 does not support Android 11 yet.
- Magisk Installer Package: Magisk-v23.0.apk
At the time of updating this guide, TWRP 3.5.1 and Magisk 23.0 are the latest versions of the respective tools. Make sure that you check and verify the latest version of TWRP here and Magisk over at Github.
Advertisement
Once the files have been downloaded, move the TWRP recovery image (e.g. TWRP-3.5.1-guacamole-Nebrassy-3.img) inside the “platform-tools” folder you extracted during the previous step.
Next, connect your OnePlus 7 to the computer via USB and transfer the TWRP recovery image (e.g. TWRP-3.5.1-guacamole-Nebrassy-3.img) and Magisk (e.g. Magisk-v23.0.apk) files to internal storage.
Step 3: Launch Command-line Inside ‘platform-tools’ Folder
Now that you have the required tools installed and the TWRP recovery image in the correction location, the third step is to launch the command-line inside the working directory (i.e. ‘platform-tools’ folder).
Just follow this handy guide: How to open a Command Window inside Platform-Tools
If you’re experienced with using the command-line, you could alternatively add the platform-tools to your computer’s PATH.
Command-line Usage:
When entering the commands, make sure to prepend them with a dot and backslash “.\” in Windows PowerShell, and a dot and forward slash “./” in Mac/Linux Terminal.
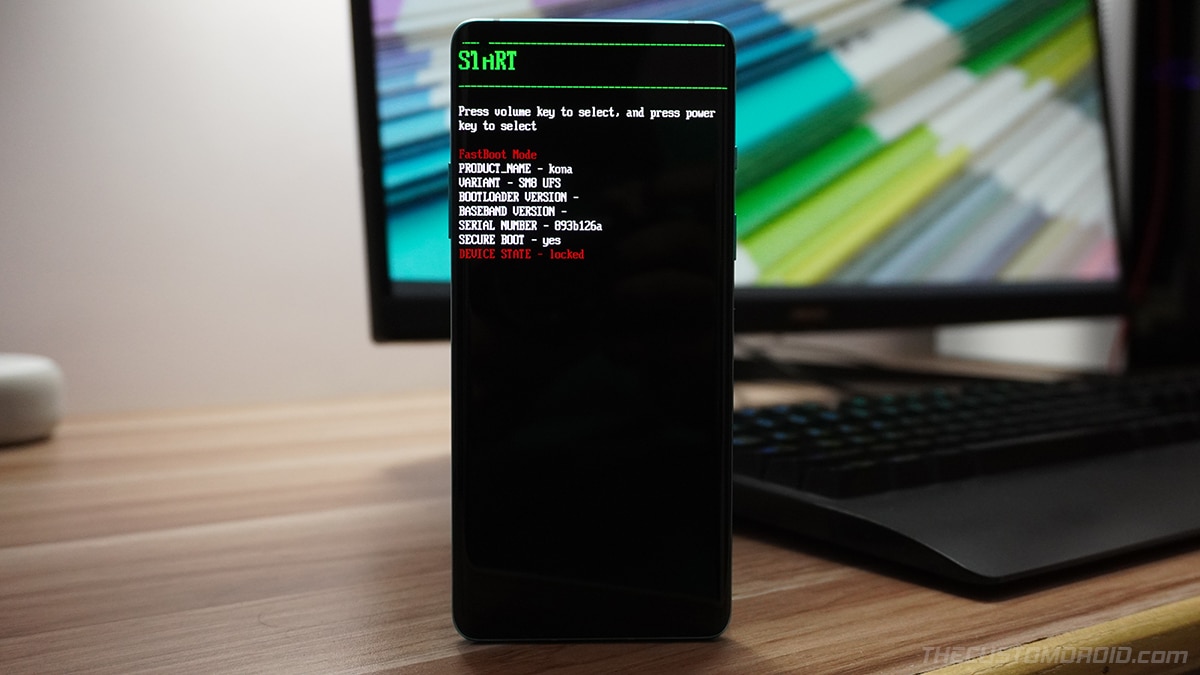
Step 4: Enter Fastboot Mode on your phone
Your phone can only accept fastboot commands while it’s in a dedicated boot mode known as ‘Fastboot Mode’. So, you have to boot your OnePlus 7/7 Pro into Fastboot Mode.
To do this, first power off your phone and wait for a few seconds to ensure that it’s completely off. Then hold the Volume Up, Volume Down, and Power keys together until you see the fastboot mode screen. With your phone in Fastboot Mode, connect it to your computer using the USB cable.
Here’s what the Fastboot Mode on OnePlus looks like:
Advertisement
Step 5: Install TWRP Recovery on OnePlus 7/7 Pro
The OnePlus 7 and OnePlus 7 Pro support the A/B partition scheme, without a dedicated recovery partition. In which case, TWRP recovery must be installed to the /boot partition itself. This is done by booting the recovery image using fastboot to enter TWRP and then flashing the installer script.
So, how do you do it? It’s quite easy. First, temporarily boot TWRP on your phone by using the following command:
fastboot boot twrp.img“twrp.img” in the above command should be replaced with the full filename of the recovery image you’ve downloaded. For example, if you have downloaded the latest TWRP 3.5.1 recovery image, then the command should be:
fastboot boot TWRP-3.5.1-guacamole-Nebrassy-3.img
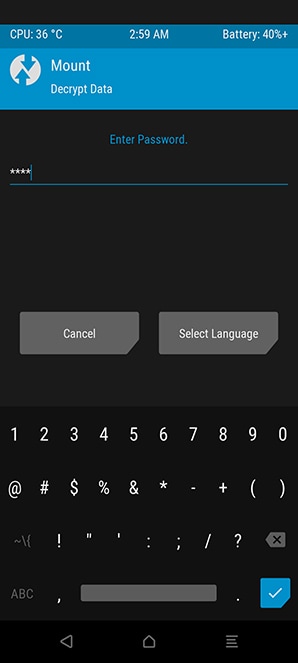
As soon as the command is entered, your phone will instantly reboot and enter the TWRP recovery mode.
If you have lock screen security set up on your phone, then TWRP will prompt you to enter the PIN/Password. This is required so that TWRP can properly decrypt the /data partition (internal storage). So, make sure that you input the PIN/password when prompted.
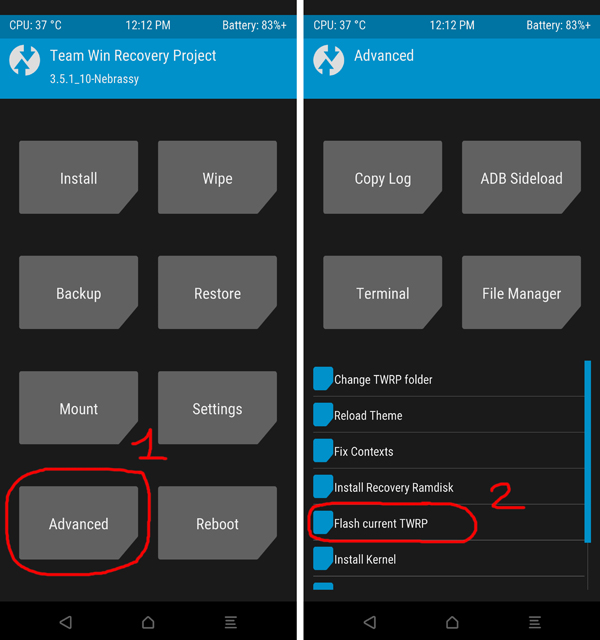
 Starting with the latest version of TWRP, you do not need to flash the TWRP installer ZIP file to permanently flash the recovery on your phone. A new option has been built into the recovery mode that automatically patches the
 boot_a and boot_b partitions and permanently install TWRP on your OnePlus 7/7 Pro.
Just go to the “Advanced” menu in TWRP and press “Flash current TWRP” from the list of available options.
Once the installation finishes, go back to the recovery’s main screen. Why? If you attempt to boot your phone into the OS right away, it will end up in a bootloop. That’s because DM-Verity will be triggered and will prevent the phone from booting if any partitions have been modified. In the next step, you will flash Magisk which will not only root the phone but will also disable DM-Verity simultaneously.
Advertisement
Step 6: Root OnePlus 7/7 Pro by Flashing Magisk
The seventh and last step of this tutorial is to flash the Magisk ZIP file using TWRP and root your OnePlus OnePlus 7/7 Pro.
To do this, press the ‘Install’ button on the TWRP main screen. Then navigate to the internal storage of your phone and select the Magisk ZIP file (e.g. Magisk-v21.2.zip) to add it to TWRP’s flashing queue.
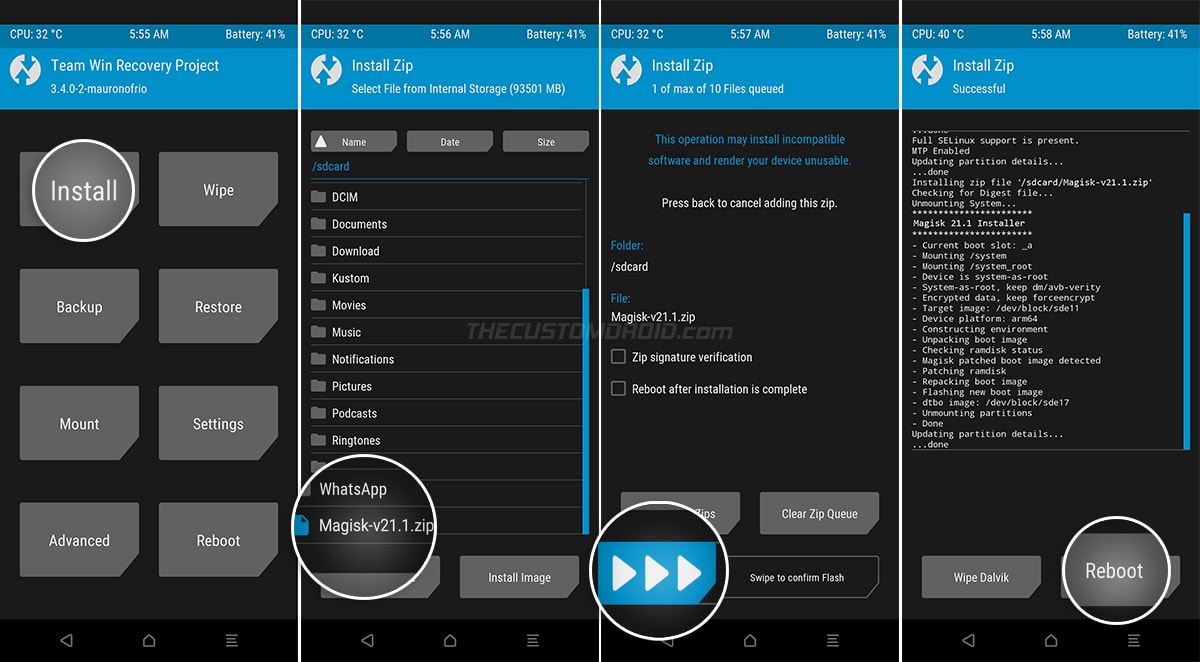
Finally, swipe the button on the bottom of the screen to install Magisk and finally root your phone. The flashing process will take a few seconds to finish. Once it is complete, you can press the ‘Reboot System’ button to reboot your OnePlus 7/7 Pro into the system (OS).
Wrapping Up
Once your phone boots, you should see the Magisk Manager application among other apps in the app drawer. You can launch the app and verify Magisk’s installation status and version. You can further check if your rooted phone passes SafetyNet by pressing the ‘Check SafetyNet’ button in Magisk Manager.
SafetyNet fails and shows ‘Hardware’ evalType? It means that Google’s new hardware-backed attestation is now in effect on your phone. In that case, you could use the
Now go ahead and start using root applications such as Titanium Backup. Root permissions for these apps can easily be managed from within Magisk Manager. You can also install mods like Xposed Framework, and ViPER4Android to tune up your phone’s audio. With TWRP, you can also flash a variety of different custom ROMs, kernels, and mods available for your OnePlus 7 and OnePlus 7 Pro at XDA.
So by now, you have learned how to install TWRP recovery on the OnePlus 7 and OnePlus 7 Pro (5G) and root it with Magisk. If you have any questions in regards to the instructions or find yourself stuck anywhere, let us know.
Comments 14 Comments
Comments are moderated, and published only if they are relevant to the topic and add value in a constructive way. If you disagree with something, please be polite and respectful. We suggest you read our comment policy before commenting.
Got stuck in fastboot mode after command “fastboot boot twrp.img” (in command line showed the same result, sending boot img, booting, finished etc.)
Oneplus 7 pro OOS 11.0.1.1.GM21BA
Even tried to boot mauronofrio’s unofficial (twrp-3.4.0-10-guacamole-unified-Q-mauronofrio.img) that didnt work either.
I was able to install twrp on my own oneplus 7 pro, which is currently on android 10.
Should i downgrade on this phone to android 10 to make it work or is there any way to solve my problem?
That’s definitely has something to do with the Android 11 firmware and the particular TWRP build being not updated for the same.
Could try this new build of TWRP from XDA-Developers that’s actually meant to work on OnePlus 7 / 7 Pro running Android 11? Let me know if it does work. I will add an update to this article right away.
Thank you for your help, it did work!
Hi is this provided instructions works on oneplus 7 running on stock android 11 OS ???
Thanks in advance.
Rajesh, official builds of TWRP for the OnePlus 7/Pro do not support Android 11 as of now. Although it should in the near future.
In the meantime, you will need to use unofficial builds provided by mauronofrio. He’s also the official maintainer of TWRP for the OP7/Pro, so it’s extremely stable as well.
So, go and grab the TWRP 3.4.0-10 image and installer ZIP files from the XDA thread. The process and instructions stay the exact same. Just make sure to use these TWRP builds instead.
Thank you!
It worked like a charm, didn’t even need an installer zip.
Managed to install magisk via this twrp build, seems to be okay, no bootloops or any unconventional stuff so far.
So are you saying I don’t have to do the boot.img patch if I’m doing TWRP and magisk- which is what I plan to do anyway?
And do I hit keep read only or swipe to allow modifications when booting into TWRP
I personally would suggest keeping it ‘Read-only’ so that TWRP wouldn’t alter any partitions. This will allow you to take OxygenOS OTAs on your OnePlus 7 whilst rooted.
But if you’re going to install a custom ROM or modifying the partitions is what you will do, then there’s allowing TWRP to make modifications makes more sense.
That’s correct. If you’re going to install TWRP, just use that to flash the Magisk ZIP package.
Hey Dhananjay. Love your tutorials
I can’t boot into twrp recovery. I do not have magisk installed. I am doing this completely on stock firmware.
I typed
.\fastboot devices
to see if it was connected properly and my serial number showed up.
I then typed
.\fastboot boot twrp-3.3.1-2-guacamole.img
(if I type it without “.\” before it, it doesn’t work but if I do it works fine.)
In return it says
Sending ‘boot.img’ (56616 KB) OKAY [1.704s]
and then
Booting FAILED (remote: ‘unknown command’)”
and then after that, it says
fastboot: error: Command failed
My model number is GM1910. I followed all of the steps up until I couldn’t boot into twrp recovery.
Thanks for the appreciation. There are two things I would like to point in your case:
First, make sure that you’re using the latest version of Android platform-tools from here. By any chance, you have not installed ADB and Fastboot through a one-click installer, have you?
Second, use TWRP 3.4 image from this link, instead of the older one provided above. This new TWRP recovery image is unified and should work on both OnePlus 7 and OnePlus 7 Pro.
Do let me know how it goes.
Hey Dhananjay,
Worked great! Thank you for such a quick response!
I am glad it worked out for you. I will update the article with the latest links and more comprehensive instructions.