In this guide, I have provided step-by-step instructions on how to convert ROG Phone 2 Tencent Edition (with CN ROM) to Global Edition ( with WW ROM), or vice-versa. This could be done by properly installing the global ROM on your phone and changing its fingerprint from ‘CN’ to ‘WW’. The same method could also be used to install CN ROM and convert your phone back to the Tencent edition.
Advertisement
Asus released its second gaming smartphone in 2019 as the ROG Phone 2, but its availability was limited to China for months. In September 2019, the Taiwanese manufacturer released the ROG Phone 2 in the US and Indian markets, labeled as the ‘Global edition’ (Also known as the ‘STRIX edition’). Apart from minor differences in specs, the only major difference between the two editions was the pre-installed ROM (software).
There are a couple of reasons why you would want to convert your phone and install the Global ROM on it. For starters, the Global ROM offers much quicker software updates, it supports more themes and gamer profiles in the ROG Armoury Crate software, and also comes with the least amount of pre-installed system apps (bloatware). Moreover, if you purchased the Tencent Edition of the phone from the grey market and had it shipped to you outside China, you might face software issues like video recording errors, etc.
So, for whatever reason that you might want to do it, this guide will take you through the complete process in a step-by-step manner.
Advertisement
If you own the ROG Phone, then you could follow my recent tutorial to convert the ROG Phone 3 Tencent to the Global edition.
Page Contents
Properly Converting ROG Phone 2 Tencent Edition to Global Edition (or Vice-versa)
Asus does provide firmware files for both the editions for the purpose of manual flashing/upgrading. And while you can use the provided firmware to flash the Global WW ROM on a Tencent ROG Phone 2, or vice-versa, it will not properly convert your phone. This will also result in things like not being able to re-lock the bootloader, take OTA updates, SafetyNet issues, and thus not being able to use apps (like banking and password apps) that rely on SafetyNet.
That’s because the firmware (ROM) files provided by Asus lack the ‘recovery’ partition, where the device’s ‘Product ID’ and ‘Fingerprint’ are stored. So, in order to properly convert your ROG Phone 2 Tencent Edition to Global Edition, you must change the phone’s Product ID and Fingerprint from ‘WW’ to ‘CN’.
So, how can this be done? According to XDA Senior Member JasonX, you can install Global WW ROM on your ROG Phone 2 Tencent Edition or China CN ROM on Global Edition by using the RAW firmware file. These files are basically used by Asus internally or in their authorized service centers. Flashing this RAW firmware file will forcibly overwrite all the device partitions.
In order to fully convert the phone, it is VERY IMPORTANT to also change the device’s fingerprint from ‘CN’ to ‘WW’ (or vice-versa) manually. To do this, you will need to root the phone and use a root file manager app. Once everything is done, you can unroot the phone and relock the phone’s bootloader.
Now without any further ado, let us get to the instructions.
Before You Begin
Take a look at some important pre-requisites and notes listed below.
- Make sure to take a complete backup of all your important data including apps, music, videos, photos, contacts, messages, etc. Your phone will be completely formatted while performing the conversion. If you need it, you can also follow our detailed guide on backing up Android devices.
- Charge your ROG Phone 2 to a sufficient battery level. This shall dismiss any possibility of your phone suddenly shutting down in the middle of the process.
- Log out of your Google account on the phone to prevent locking out of your device after the conversion due to Google’s FRP (Factory Reset Protection).
- Use a Windows PC with x64/64-bit architecture. Certain users have reported that their device bricked because the RAW firmware was not compatible with x86/32-bit PCs.
- When asked to connect your phone to the PC, use a good quality USB-C cable and connect it to the side of the phone (not the charging port on the bottom).
- In order to convert your phone to Global Edition (or back to Tencent Edition), you will need to unlock the phone’s bootloader (as mentioned in the instructions). In doing so, your phone will lose its official limited warranty offered by Asus. So, make sure that you understand this completely before you proceed.
Download Asus ROG Phone 2 RAW Firmware File
Below, you will find download links for the RAW firmware files of both Global WW ROM and China CN ROM and of different firmware versions. Make sure that you download the file according to which edition you’re converting to.
Global WW ROM RAW Firmware
For converting ROG Phone 2 Tencent Edition to Global Edition
- WW-17.0240.2009.49: MR3.6_WW_ZS660KL_17.0240.2009.49_M3.23.44.9-ASUS_1.1.225_Phone-user.raw.zip
- WW-17.0240.2007.27: WW_ZS660KL_17.0240.2007.27_M3.23.44.9-ASUS_1.1.204_Phone-user.raw.zip
- WW-17-0240.2004.9: WW_ZS660KL_17.0240.2004.9_M3.23.44.9-ASUS_1.1.185_Phone-user.raw.zip
- WW-17.0230.2004.60: WW_ZS660KL_17.0230.2004.60_M3.23.44.9-ASUS_1.1.162_Phone-user.raw.zip
- WW-17.0230.2002.32: WW_ZS660KL_17.0230.2002.32_M3.23.44.8-ASUS_1.1.145_Phone-user.raw.zip
- WW-16.0631.1910.64: WW_ZS660KL_16.0631.1910.64_M3.13.33.33-ASUS_1.1.253_Phone-user.raw.zip.zip
China CN ROM RAW Firmware
For converting ROG Phone 2 Global Edition to Tencent Edition
- CN-17.0240.2007.27: CN_ZS660KL_17.0240.2007.27_M3.23.44.9-ASUS_1.1.205_Phone-user.raw.zip
- CN-17.0230.2004.60: CN_ZS660KL_17.0230.2004.60_M3.23.44.9-ASUS_1.1.35_Phone-user.raw.zip
- CN-17.0235.2004.1: CN_ZS660KL_17.0235.2004.1_M3.23.44.9-ASUS_1.1.171_Phone-user.raw.zip
- CN-17.0230.2004.60: CN_ZS660KL_17.0230.2004.60_M3.23.44.9-ASUS_1.1.35_Phone-user.raw.zip
- CN-16.0631.1910.52: CN_ZS660KL_16.0631.1910.52_M3.13.33.32-ASUS_1.1.240_Phone-user.raw.zip
A huge thanks to XDA Senior Member JasonX and 4PDA forums for uploading and providing the download links of the RAW firmware files!
How to Convert ROG Phone 2 Tencent Edition to Global Edition
Converting the ROG Phone 2 Tencent Edition and installing Global ROM on it is a five-step process.
The first step is to unlock your phone’s bootloader. Once that is done, the second step is to flash the RAW firmware file via Fastboot. Then, the third step is to root the phone via Magisk and install the Root Explorer app. This is followed by the fourth step, where you have to use the root explorer to manually change the device’s fingerprint. Once everything is done, the fifth and last step is to unroot the phone and relock the bootloader so that you can receive OTA updates.
Advertisement
I have split the instructions into these five (5) major steps so that it’s easier for you to understand the procedure. The instructions below will take you through each of these steps in detail. Let’s begin.
Note: These same instructions can also be used to convert your phone back to Tencent Edition. If you want to do it, simply use the China CN RAW firmware file instead of the Global one.
Step 1: Unlock the Bootloader
In order to flash the RAW firmware and convert your phone, the first step is to unlock the bootloader of your ROG Phone 2. Unlocking the bootloader is quite easy and could be done by using the official unlock tool provided by Asus.
Start by downloading the official Asus Unlock Tool (in APK file format) according to the Android version installed on your phone.
A newer version of the unlock tool has been released that supports both Android 9 Pie and Android 10. Thanks, Trinugo!
- ZS660KL_0807-1814_SIGNED_UnlockTool_9.2.0.0_200807_fulldpi.apk
For Android 9 Pie: ZS660KL_SIGNED_UnlockTool_9.1.0.10_190702_fulldpi.apkFor Android 10: YODA_SIGNED_UnlockTool_9.1.0.11_190708_fulldpi.apk
Once you have downloaded the APK file, install it on your phone. If you’re new to Android and don’t know how to install an APK file, then please refer to the instructions in this tutorial.
After the app has been installed, go to the app drawer and launch the ‘Unlock Device Tool‘ application on your phone. In the app’s window, scroll until the end and check ‘Agree‘. Then press on ‘Tap to unlock your device‘ option to unlock the bootloader on your ROG Phone 2.
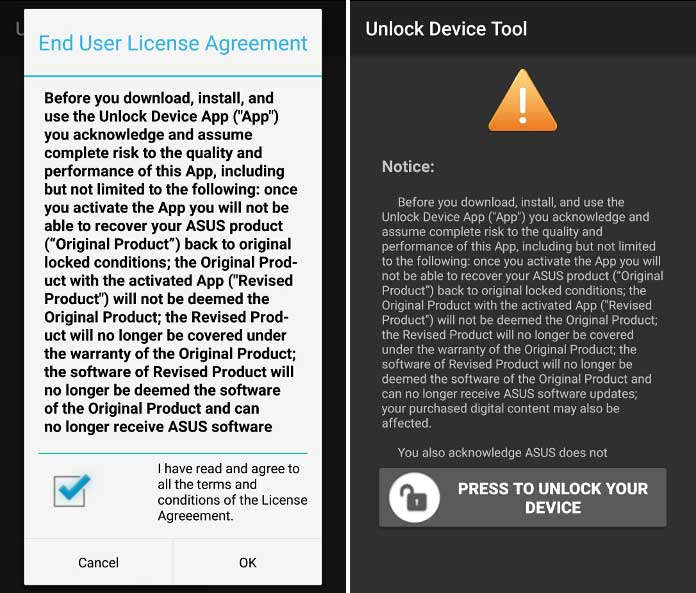
Your phone will automatically reboot and erase all your data. The bootloader should now be fully unlocked. Once it is, you will see a bootloader unlocked warning message on the screen and your phone will reboot into the system (OS).
Step 2: Flash Global WW ROM on ROG Phone 2 Tencent Edition
Now that your phone’s bootloader is unlocked, it can accept fastboot commands for flashing the partitions (RAW firmware).
Advertisement
- First, turn off your ROG Phone 2 completely and boot it into Fastboot Mode. To do so, hold the Volume Up and Power keys simultaneously while the phone is powered off.
- Connect the phone to the PC via a USB cable while it’s in Fastboot Mode.
- Now, download the RAW Firmware file of the Global WW ROM on your PC.
- Once downloaded, extract the contents of the ZIP file using an archive utility like 7-Zip.
- The extracted files should contain the required Android SDK tools, the flashing scripts, and the actual RAW firmware file that will be flashed onto your phone.
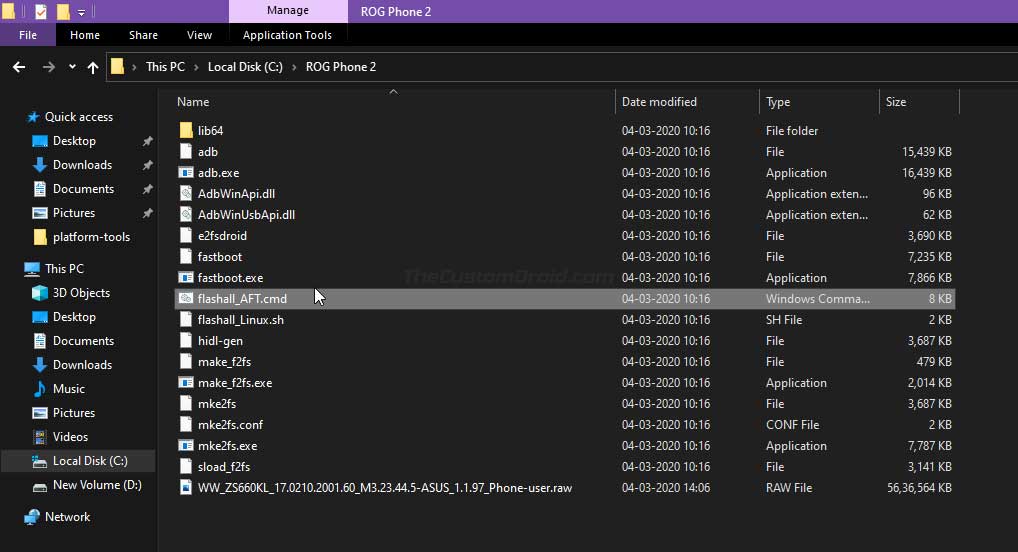
- Finally, double-click on the ‘flashall_AFT.cmd‘ flashing script to flash the RAW firmware on your ROG Phone 2.
As soon as you launch the script, you should see a command-line (CMD) window on your PC’s screen. The complete flashing process could take a couple of minutes to finish. During this time period, do not disrupt the connection between the phone and the PC and also do not close the CMD window.
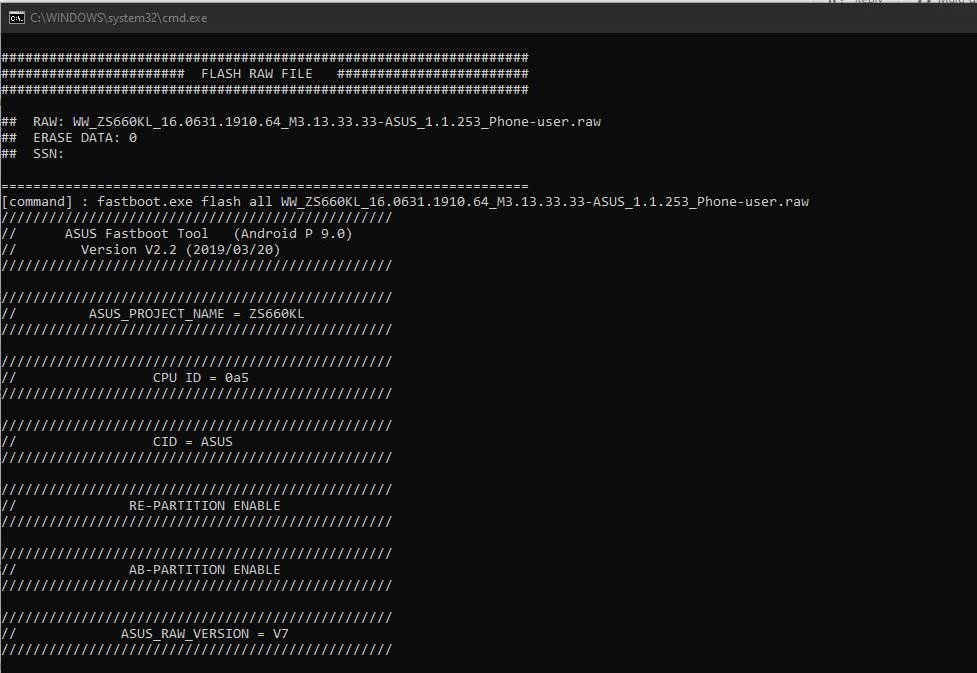
Once the flashing finishes, your ROG Phone 2 will automatically reboot into the OS.
Step 3: Root your Phone and Install Root Explorer App
At this point, your phone has the Global WW ROM installed. However, it’s not fully converted until you change the device’s fingerprint from ‘CN’ to ‘WW’. To do this, you must root your phone and use the Root Explorer application.
- First, download the latest version of the Android SDK platform-tools from here. Once downloaded, extract the file (e.g. platform-tools_r29.0.6-windows.zip) to the C:\ drive of your Windows PC. The extracted folder (platform-tools) should contain all the Android tools including the fastboot tool that you’ll need for flashing.
- Note: From here onwards, all the files are to be flashed from this ‘platform-tools’ folder where the Android SDK tools are installed
- Next, download the Magisk pre-patched boot image for your ROG Phone 2 from below, according to the firmware version you have installed. For example, if you have installed ‘WW-17.0210.2001.60’, then you must use the ‘WW-17.0210.2001.60’ boot image only. Using a boot image from a different firmware version can result in a soft brick.
- Note: From WW-WW-17.0240.2009.49 and above, you will need to download the stock boot image from step #5 below and patch it on your own using the instructions here.
- WW-17.0240.2004.9 Patched Boot Image
- WW-17.0230.2004.60 Patched Boot Image
- WW-16.0631.1910.64 Patched Boot Image
- WW-16.0631.1910.44 Patched Boot Image
- WW-16.0631.1910.35 Patched Boot Image
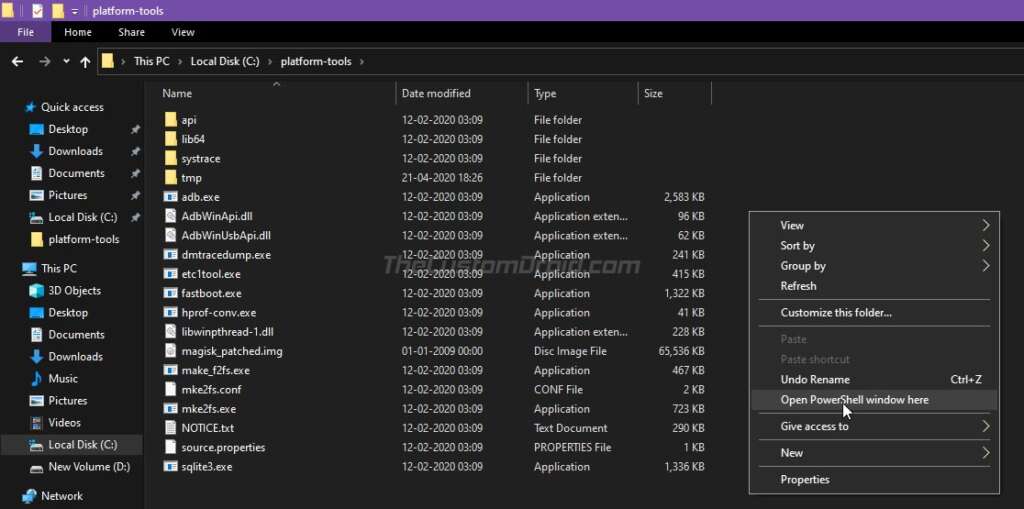
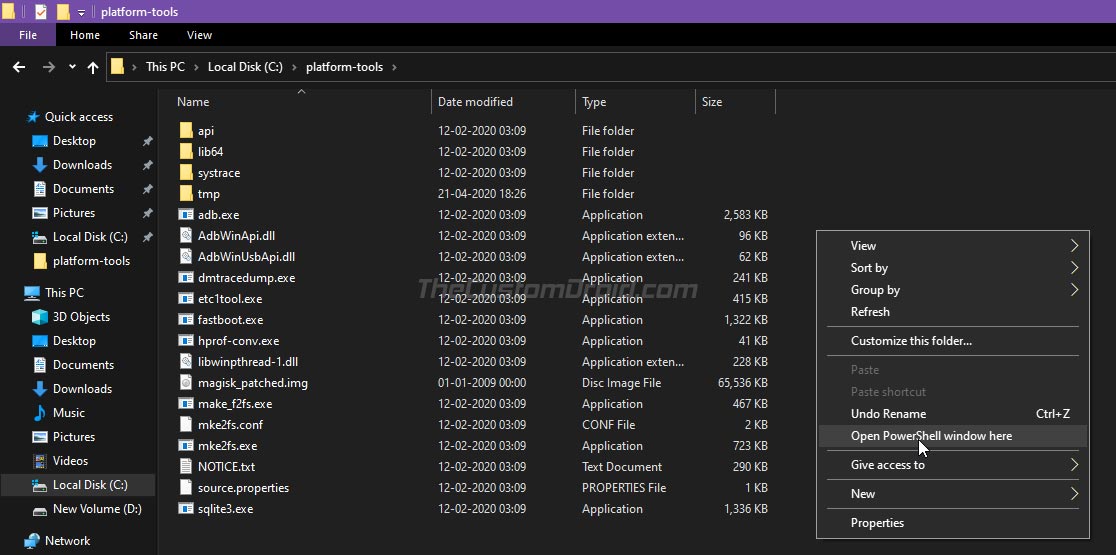
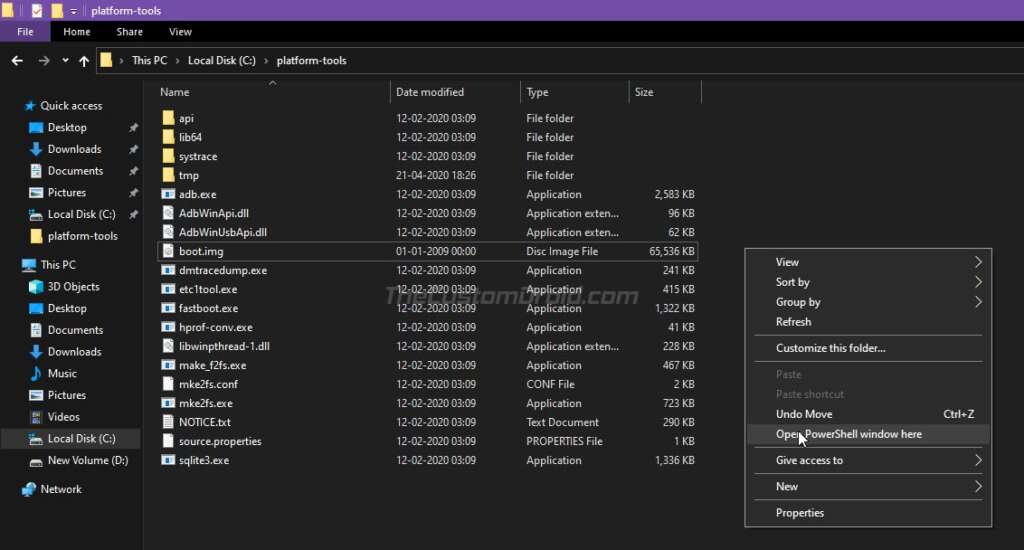
- Once downloaded, extract the ZIP file to get the ‘magisk_patched.img‘ file and copy it file to the ‘platform-tools‘ folder in the C:\drive. Then while holding the SHIFT key, right-click on any empty space inside the folder. Select the ‘Open PowerShell window here‘ option from the contextual menu that appears on the screen. A blue-colored PowerShell window should open up on your PC.
- Now, power off your ROG Phone 2 completely and boot it into Fastboot Mode by holding the Volume Up and Power keys together. Then connect your phone to the PC via a USB cable.
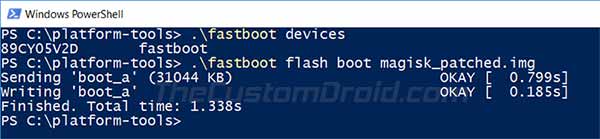
- Issue the following command to ensure that your phone is properly detected by the PC over fastboot:
.\fastboot devices
- Enter the following command in the PowerShell window to flash the patched boot image and root your ROG Phone 2:
.\fastboot flash boot magisk_patched.img
- After flashing the boot image, reboot your phone into the system by entering the following command:
.\fastboot reboot
- Your phone should now be rooted. To confirm, go to the app drawer and launch the Magisk Manager application. If you do not see the Magisk Manager app in the app drawer, then download the latest APK from here and install it.
- Now, download the APK file of the Root Explorer app from here and install it on your phone.
Step 4: Change Device Fingerprint from ‘CN’ to ‘WW’
Now comes the actual part where you have to manually change the device’s fingerprint from ‘CN’ to ‘WW’. This step is extremely important to fully convert your Tencent edition ROG Phone 2. Without doing this step, even though you will have the Global WW ROM installed, but you will still not receive FOTA updates. That’s because your phone still has the ‘CN’ fingerprint that will mismatch with the installed Global WW ROM.
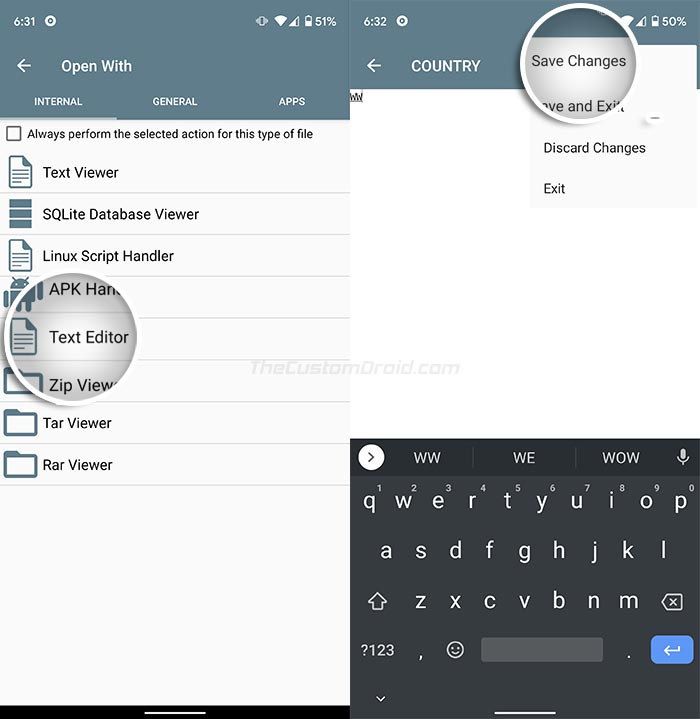
To do this, go to the app drawer and launch the ‘Root Explorer‘ application that you installed during the previous step. As soon as the app is launched, it will prompt you to grant superuser permissions. So, press ‘Grant‘ to grant the request.
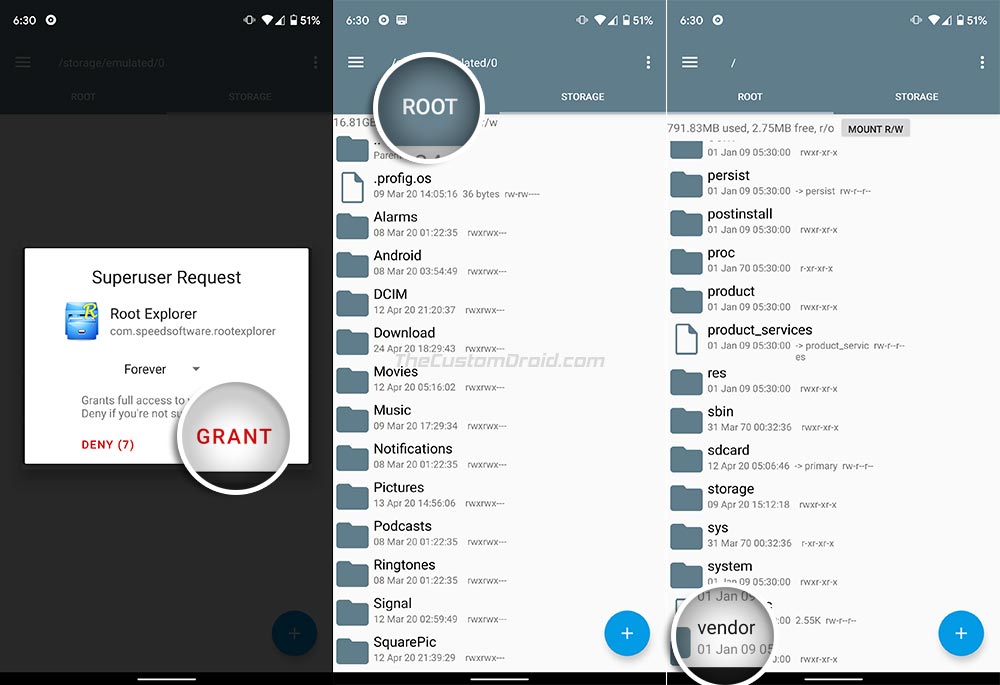
Next, press on the ‘ROOT‘ tab to access the root storage of your phone. Navigate to ‘/Vendor/Factory‘ folder and find the file with the name ‘COUNTRY‘. Tap on the file and open it with the ‘Text Editor‘. Now, change the fingerprint by renaming ‘CN‘ to ‘WW‘ (in caps). Once you have made the change, tap the 3-dot buttons on the top right and press ‘Save Changes‘. Editing and saving this file will create a backup of this file in the same directory as ‘COUNTRY.bak‘. Simply delete this backup file.
Advertisement
Now, the next thing you have to do is enable the hidden Armoury Crate themes and wallpapers. To do this, navigate to ‘/System/etc/AsusTheme/themes‘ and delete the file that’s named ‘hidden‘. That’s it! You have successfully changed your device’s fingerprint from ‘CN’ to ‘WW’ and also enabled the hidden themes and wallpapers available in the Global WW ROM. For the changes to take effect, simply reboot your phone.
Step 5: Unroot and Relock the bootloader on your ROG Phone 2
Although the conversion is complete, your ROG Phone 2 is still rooted at this point. If you wanted to root, you wouldn’t need to follow this step and can always install updates manually. But if you’d like to continue receiving OTA updates, you’d need to unroot and relock the bootloader on your phone. To do this, follow the instructions listed below.
- Power off your ROG Phone 2 and boot it into Fastboot Mode by holding the Volume Up and Power keys simultaneously while the phone is powered off.
- Connect the phone to the PC via a USB cable while it’s in Fastboot Mode.
- Now, download the stock boot image on the PC, according to the firmware version currently installed on your phone.
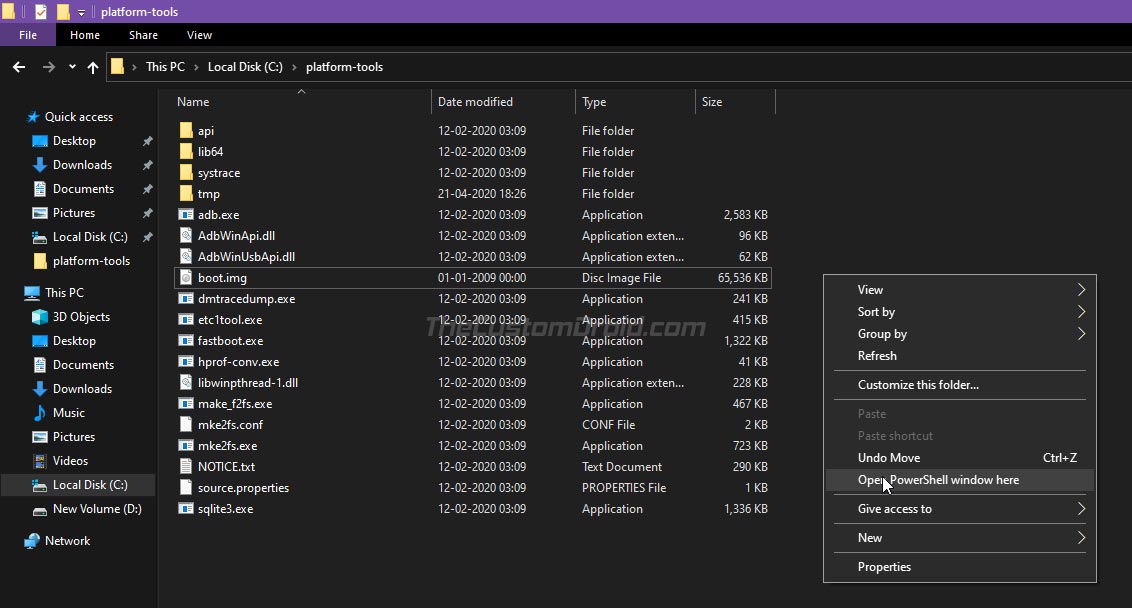
- Extract the downloaded ZIP file and copy the extracted ‘boot.img‘ file to the ‘platform-tools‘ folder in the C:\ drive where the Android tools are present.
- While holding the SHIFT key, right-click on any empty space inside this folder, and select the ‘Open PowerShell window here‘ option.
- Now, enter the following command to flash the stock boot image file and unroot your ROG Phone 2:
.\fastboot flash boot boot.img

- Your phone is now unrooted, to further relock the bootloader, enter the following command:
.\fastboot oem asus-csc_lk
Your ROG Phone 2 should now be unrooted and the bootloader should be locked. At this point, it will still be in the Fastboot Mode. Simply press the volume keys until you see ‘Start‘ in Fastboot Mode, then press the power key to confirm. This will boot your phone directly into the stock recovery and you will see the “Can’t load Android system. Your data may be corrupt…“. To fix this, press the power key to select ‘Factory data reset‘ and then select ‘Yes‘ to confirm and perform a factory reset.
After doing this, your ROG Phone 2 will reboot into the system (OS) with the Global ROM installed, along with the ‘WW’ fingerprint. To verify that the fingerprint was changed successfully, just download the ‘Device Info HW‘ app on the phone and run it. Under the ‘System’ tab of the app, you can verify that the device’s fingerprint shows as ‘WW’ instead of ‘CN’.
That’s it! You have successfully installed Global WW ROM, changed the fingerprint, and converted your ROG Phone 2 Tencent Edition to Global Edition. You should now be able to receive OTA updates directly from Asus.
If you have any questions regarding the method shared here or face any issues while performing the instructions, please feel free to comment below and let me know. I will try to the best of my knowledge to help you.
Source: XDA (1 & 2) | A huge thanks to XDA Senior Members JasonX and reg66 for devising this method and sharing it on XDA!
Comments 20 Comments
Comments are moderated, and published only if they are relevant to the topic and add value in a constructive way. If you disagree with something, please be polite and respectful. We suggest you read our comment policy before commenting.
Hi, thanks for your help, I have followed the above steps to complete CN to WW, how long does it take to receive the OTA? (Not manual update)
Hi Eric, it would not be possible to get OTA updates after conversion. You will need to manually update your ROG Phone 2 or use the Asus Updater utility.
Please Sir! I have a problem to delete the “hidden” from “THEMES”.The system show “Delete failed” alert.
How to do I solving this problem? Help me sir!
Deleting the “hidden” file from the “THEMES” folder is probably the most tricky part. You’d need to close the root explorer and try deleting again. Some users even had to repeat this as much as 15 times.
Hello, im using a tencent one with ww rom installed. Can i just skip to step 3 ?
And also my phone is currently on 16.031.1908.12, do you habe the boot inage for that ?
Hi Andro. I would still suggest following from step #1 to ensure that the firmware doesn’t have any other trace of CN firmware.
As for the firmware to use, you can use the latest one “WW-17-0240.2004.9”. In flashing this, your phone will automatically be updated to the most recent WW firmware.
Buen dia Dhananjay tengo un telefono rog phone 2 tecent games que ya esta con una version global la cual es : ww_16.0631.1910.44_0 quiero actualizar a android 10 baje este firware : UL-ASUS_I001_1-ASUS-17.0230.2004.60-1.1.162-user.zip pero al queres instalar me sale fallo de instalacion por favor si me pueden ayudar gracias .
Hello Carlos. Please download and install the Device Info HW app from the Play Store on your phone. Once installed, launch the application and go to the ‘System’ tab. Then check and report the exact information you see right in front of “Fingerprint”.
Thank you very much for your help. You are a master in telephone software, I want to congratulate you for the personalized attention and for your interest in us.
You’re most welcome, Carlos! If you have got any further questions, please feel free to reach back to me.
Hello Dhannanjay
after installing this WW-17.0210.2001.60 (Android 10): WW_ZS660KL_17.0210.2001.60_M3.23.44.5-ASUS_1.1.97_Phone-user.raw.zip firmware instead of going to os mode my phone ends up in endless boot loop. I can not shut it down or enter the fastboot mode. and i m a compleate noob . is there anything u can help me with?
thanks in advance
Rolin
Hi Rolin, was the firmware flash successful and your phone booted automatically?
If so, then please power off your phone by holding the Power button for about 10 seconds. As soon as the screen turns off, quickly hold the Volume Up and Power buttons together. This will boot your ROG Phone 2 into Fastboot Mode.
In Fastboot Mode, tap either of the Volume buttons until you see “Recovery mode” in red color highlighted on the top of the screen. Then press the Power button to confirm and boot your phone into the stock recovery.
After your phone gets into the stock recovery mode, you have to perform a factory data reset. To do this, use the Volume keys to move the selector to “Wipe data/factory reset” and press the Power button to confirm the selection.
After performing the factory reset, select ‘Reboot system now’ in the stock recovery. This should boot your phone into the OS.
HI, I Received my tencent CN version already converted to global rom android 9. However in safety net it says CTS profile match: failed.
Please what steps do I need to follow to correctly upgrade to the android 10 firmware. I would really appreciate your help.
Hi Bola. CTS profile will not pass anymore because Google has implemented hardware-based attestation for SafetyNet. So, there’s no possible way to pass it anymore. The same was informed by Magisk developer topjohnwu on this Twitter handle.
For upgrading to Android 10, you will need to download the latest Android 10 full firmware zip from here and follow the provided instructions in the same post to install it. Make sure that you download and use the WW Android 10 ROM, not the CN one.
Hy ,, Is it necessary to open the bootloader before installing firmware file of the latest WW-17.0230.2004.60 (Android 10-based April 2020 security update) ? Because my firmware lock to ww rom 9 pie . I’m user ROG phone Tencent.
I help u answer ?
Hi. Have you already converted on Recent ROG phone 2 to Global edition previously?
Yeah ,, i’m convert with Flash EDL mode and now my Rom/fingerprint WW ( Global Rom) . I’m running in android 9 WW.16.0631.1910.35_0 lock bootloader.
Is it necessary to open the bootloader before installing firmware file of the latest WW-17.0230.2004.60 ??
Hi again, Fandy. If you have properly converted your phone to WW edition earlier, then installing Android 10 update is really easy. Please visit this post, download the latest Android 10 full firmware and install it using the provided instructions.
There’s no need to unlock the bootloader to install the update using the method provided in the post I have linked. But do keep in mind that it will ONLY WORK if you have PROPERLY CONVERTED TO WW GLOBAL EDITION.
After holding power and volume i managed to get inside recovery mode. Then it erased things and now it works;)
Now it works again.
Hi Tom, after relocking the bootloader, it’s important to perform a factory reset. Normally, the system will prompt you automatically. If it doesn’t, it needs to be done manually, just like you did it.