Have you accidentally bricked your ROG Phone 3? Then there’s a possible way to unbrick and recover it. In this tutorial, I will guide you on how to unbrick the Asus ROG Phone 3 from a Hard Brick using EDL mode. The process involves using the EDL unbrick tool to make the phone bootable and then flashing the RAW firmware to finally unbrick it.
Advertisement
If you’re into software modding or flashing, and deal with things like TWRP, Magisk, custom ROMs, etc, then there’s always a slight chance of bricking your phone.
A bricked state generally means that your phone fails to boot and is no longer in a working condition. This could either be caused by a user-error or it could just be the software acting up.
Page Contents
- Two Types of Bricked States
- Fixing a Hard-Bricked ROG Phone 3
- How to Unbrick ROG Phone 3 from Hard Brick
- Step 1: Download the EDL Unbrick Tool and extract it
- Step 2: Boot ROG Phone 3 into EDL and connect it to the computer
- Step 3: Install Qualcomm USB Drivers (if required)
- Step 4: Use the EDL Unbrick Tool to repair the Bootloader
- Step 5: Boot the phone into Fastboot mode
- Step 6: Flash the RAW firmware to finally unbrick ROG Phone 3
- Conclusion
Two Types of Bricked States
If you’re not aware, there are two kinds of bricks. These are:
Advertisement
Soft Brick
Also known as a “Semi Brick”, a Soft Brick is extremely common if you have been in the Android software modding scene for a long time. This type of brick is generally caused by using or flashing a wrong/incompatible file.
If your ROG Phone 3 is soft-bricked, it might show signs of life like the boot screen and you might even be able to boot it into Fastboot or Recovery modes.
Generally, a Soft Brick could be easily fixed by performing a factory reset or by flashing the stock firmware through Fastboot or Recovery. However, the solution isn’t that simple when dealing with hard-bricks.
Hard Brick
A hard-brick is generally caused due to corrupt/broken critical partitions like the Bootloader itself. In such a case, it is also not possible to boot the phone into Fastboot mode to flash the RAW firmware and unbrick, as in the case of a soft-brick.
If your ROG Phone 3 is hard-bricked, it will probably only show the black screen (no display output) and may vibrate when connected to the wall charger.
Fixing a Hard-Bricked ROG Phone 3
Contrary to Soft Bricks, Hard Bricks are more difficult to fix. They require low-level firmware flashing through dedicated tools. Luckily in the case of devices with a Qualcomm chipset, like the ROG Phone 3, a hard-brick leads the device to boot into a special boot mode known as “EDL” (Emergency Download Mode).
If you’re interested in knowing more about this, I have covered a pretty detailed article on EDL mode and how it works.
EDL mode could be used to force-flash the firmware and unbrick devices. It utilizes Qualcomm’s Firehose protocol to communicate with a computer and accept digitally signed firmware. Generally, device owners would need to use a special tool such as QPST to flash the firmware over EDL.
But in the case of ROG Phone 3, things are far more easy thanks to XDA Senior Member deadlyindian for providing the EDL Unbrick Tool. The tool package includes a tiny script that basically fixes the bootloader in order to make the device bootable. Once that is done, you could flash the RAW firmware through Fastboot and unbrick your ROG Phone 3 from a Hard Brick.
All you will need to perform the unbrick instructions below are:
- Your bricked ROG Phone 3
- A Windows computer
- A USB-C cable
With that side, let’s begin!
How to Unbrick ROG Phone 3 from Hard Brick
Now follow the steps below to unbrick your ROG Phone 3 using EDL and RAW firmware. I have split the instructions into 6 major steps to make it easier for you to understand the complete process.
Step 1: Download the EDL Unbrick Tool and extract it
Begin by downloading the EDL unbrick tool package directly to your computer: ROG_PHONE_3_ZS661KS_UNBRICK_EDL.7z
The downloaded file should be with a .7z file extension. Once downloaded, you will need to extract the contents of the package using 7-zip or a similar archive utility.
Advertisement
To do this, locate the folder where the EDL package was downloaded and then right-click the file. Select ‘7-Zip‘ from the contextual menu and choose “Extract to /ROG_PHONE_3_ZS661KS_UNBRICK_EDL“.
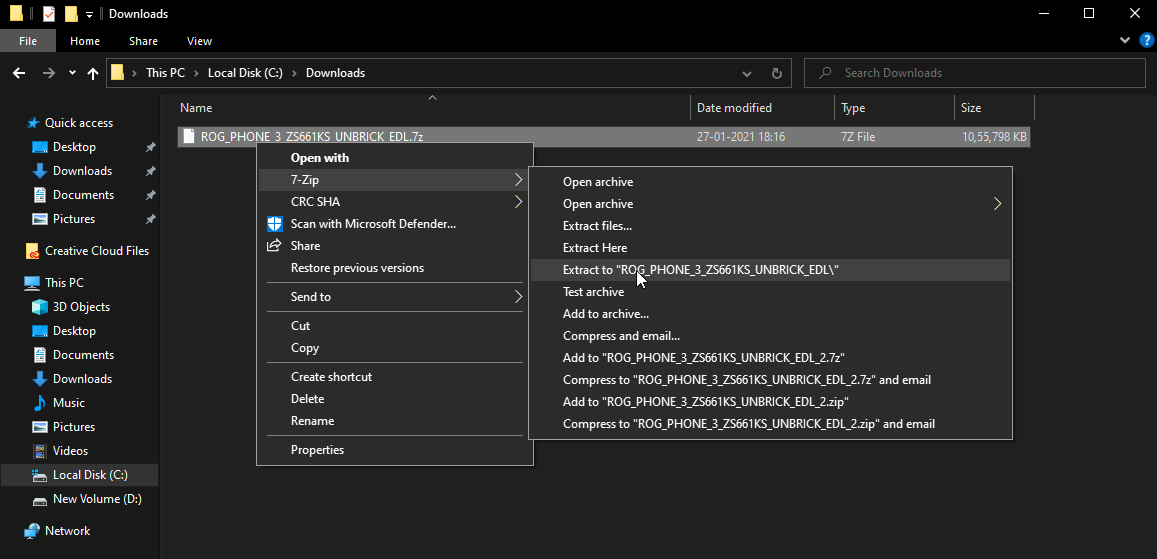
The extracted folder should contain the flashing script along with other required binaries and individual partition image files.
Step 2: Boot ROG Phone 3 into EDL and connect it to the computer
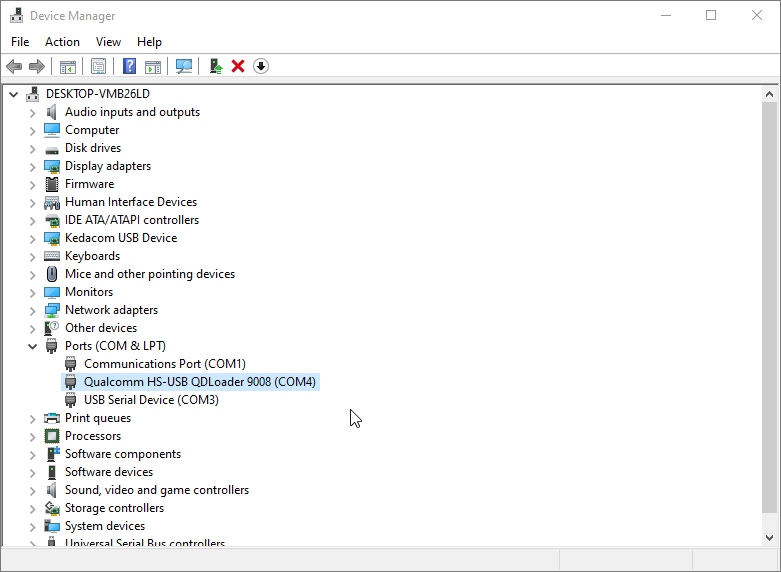
If your ROG Phone 3 shows a black screen even after pressing the Power key for a long time, then it’s probably in EDL mode already. You can confirm this by connecting your phone to a USB 2.0 port of your computer and then going to ‘Control Panel‘ > ‘Device Manager‘.
Important Note:
USB 3.0 or newer gen ports are known to cause issues with EDL mode and also sometimes lead to errors when flashing the firmware. It is strongly advised to use USB 2.0 ports instead.
If your phone is identified as “Qualcomm HS-USB QDLoader 9008“, then you don’t have to do anything else and skip over to step #4 directly. On the other hand, if it is identified as “QUSB_BULK“, you will need to install the Qualcomm USB drivers by following the next step.
 However, if it not recognized as either of the above, then you will need to manually boot your ROG Phone 3 into EDL mode. To do this, first ensure that your phone is completely powered off. Then hold the Volume Up and Volume Down keys simultaneously. While holding the keys connect your phone to the computer by plugging in the USB-C cord to the side port.
Again, EDL mode shows just a black screen. So open the Device Manager on your Windows computer to verify if the phone is now identified or not.
Step 3: Install Qualcomm USB Drivers (if required)
In case your ROG Phone 3 is identified as “QUSB_BULK” in Device Manager, it means that the computer failed to install the appropriate USB drivers. If so, you will need to manually install the required USB drivers on your computer.
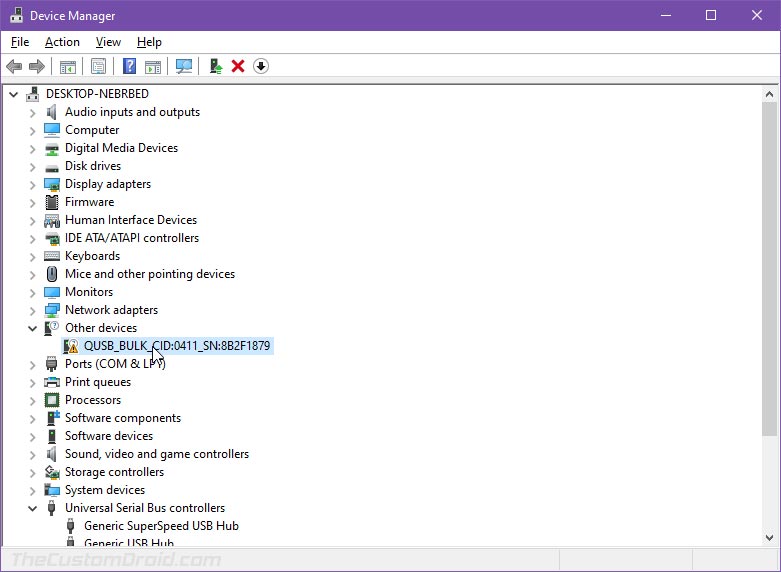 You can download Qualcomm USB drivers from here and follow the corresponding instructions to install them. Alternatively, these drivers are also provided by Microsoft here.
Advertisement
Once installed, restart your computer and reconnect the device. If the drivers were properly installed, your ROG Phone 3 should be identified as “Qualcomm HS-USB QDLoader 9008” in Windows Device Manager.
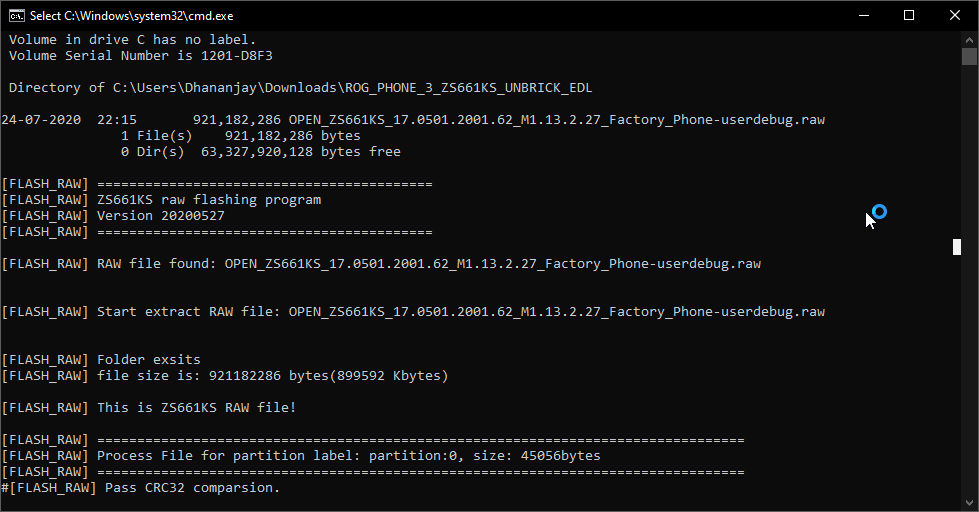
Step 4: Use the EDL Unbrick Tool to repair the Bootloader
With your phone in EDL mode, you can now use the Unbrick Tool to repair the Bootloader of your ROG Phone 3 and thus make it bootable for further flashing.
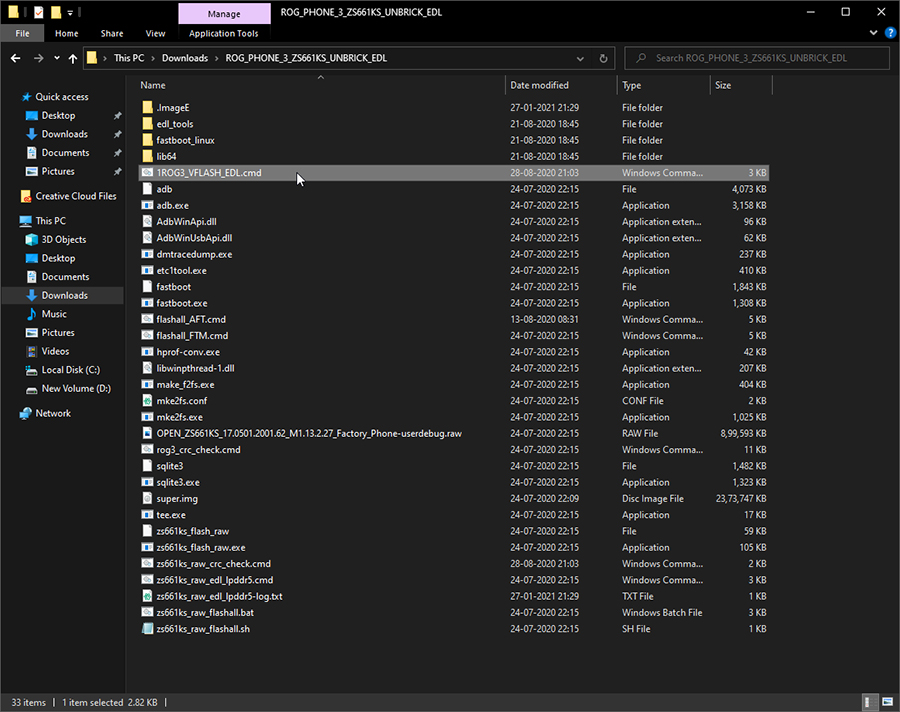
To do this, locate the “ROG_PHONE_3_ZS661KS_UNBRICK_EDL” folder you extracted during step #1 on your computer. Then run the unbrick tool by double-clicking the 1ROG3_VFLASH_EDL.cmd script file.
 You should see a Command Prompt window on your computer’s screen. Once the process finishes, your phone should automatically boot into Fastboot Mode. This could take up to 1-2 minutes, so be patient and do not disconnect the phone from the computer.
Step 5: Boot the phone into Fastboot mode
If your phone automatically enters Fastboot Mode, you can jump straight to step #6 below and flash the RAW firmware. Open the Device Manager to verify that the phone exits EDL and enters Fastboot Mode. In which case, it should be identified as “Android Bootloader Interface“.
But, if that doesn’t happen and your phone stays in EDL mode itself, then you will need to manually boot your ROG Phone 3 into Fastboot mode. To do this, hold the Volume Down and Power keys for 10-12 seconds. This will force-exit your phone from EDL mode and it will enter straight into Fastboot Mode.
Again, you can verify this through the Device Manager. If you face any driver issues at this point, you could try the Google USB drivers.
Advertisement
Step 6: Flash the RAW firmware to finally unbrick ROG Phone 3
Now that your ROG Phone 3 is in Fastboot mode, the last step is to flash the RAW firmware on the phone and unbrick it. So, download the RAW firmware file to your computer from the links provided in the table below.
Notes: You can also use the RAW firmware of a firmware lower than the one that was installed on your ROG Phone 3 prior to the brick. This should allow you to downgrade the software.
After downloading, extract the contents of the ZIP file by right-clicking on the file and selecting “Extract All”. Finally, double-click on the zs661ks_raw_flashall.bat flashing script to flash the RAW firmware and finally unbrick your ROG Phone 3.
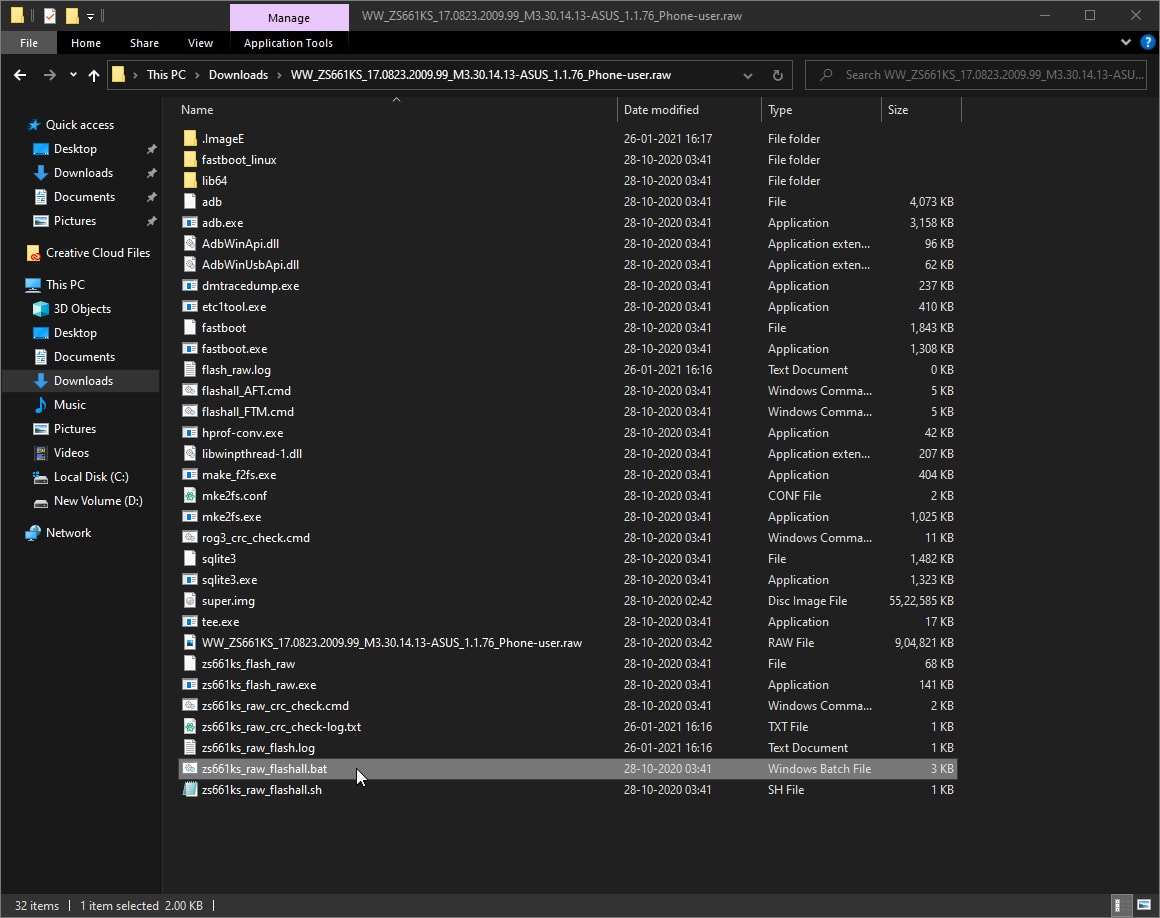
As soon as you launch the script, you should see a command-line (CMD) window on your PC’s screen. The complete flashing process could take a couple of minutes to finish. During this time period, do not disrupt the connection between the phone and the PC and also do not close the CMD window.
Once the flashing finishes, your ROG Phone 3 should automatically boot into the OS.
Conclusion
By now, you have learned how to unbrick the ROG Phone 3 from a Hard Brick. This wouldn’t have been possible if not for XDA senior member deadlyindian. A huge thanks to him for providing the unbrick tool as well as the RAW firmware files needed to carry out the process.
Several users over at XDA have already utilized the files provided by him to unbrick their phone and recover it from a hard-brick state.
In the original XDA thread, the respected member also mentioned the following – “Don’t pay for this stuff anywhere, it’s your device and you deserve the right to fix it yourself. I noticed some people in the community charging up to 50$ for the firmware which should’ve been free from the start“. His spirit for helping fellow users in the community is highly appreciable.
If you have any questions regarding the method shared here or face any issues while performing the instructions, please feel free to comment below and let me know. I will try to the best of my knowledge to help you.
Comments 2 Comments
Comments are moderated, and published only if they are relevant to the topic and add value in a constructive way. If you disagree with something, please be polite and respectful. We suggest you read our comment policy before commenting.
I can´t pass from step 5. My phone doesn´t go to fast boot mode.
Bruno, could you share the output you see in the command-line window right after performing Step #4?