
On this page
The latest stable version of Magisk is now available for download. Here’s how to root Android using Magisk 15.0 update.
Android developers community is no short of amazing custom ROMs, mods, and kernels. But there’s a list of few utilities and apps that stand out above others. Magisk is one such mod available for the community, that provides multiple solutions. Magisk is now backed by enough users to make it a potential replacement for SuperSU. The latter is best known for its simplicity and efficiency to perform one job only - to root Android devices. However, it’s the total opposite when it comes to Magisk.
- Root Google Pixel 2 and Pixel 2 XL using Magisk
- How to Root Essential Phone (PH-1) using Magisk
- Root Xiaomi Mi A1 (Magisk) and Install TWRP Recovery
- How to Install TWRP Recovery and Root Honor 7X
Magisk 15.0 Update - Changes and New Features
Magisk initially came out as a way to add more features to the operating system, without altering the system partition. Just like the infamous Xposed Framework, Magisk also makes use of modules to achieve the desired features.
With time, it became more functional when MagiskSU was released, which is a complete root solution for Android devices. The mod also introduced a rather nifty feature, that proved to be a bliss for rooted users. It allows you to hide root and root-enabled apps from Android’s SafetyNet API, bank apps, and various other security apps. After enormous updates, Magisk is now widely-used among the users, not just to root the device, but also for several other purposes.
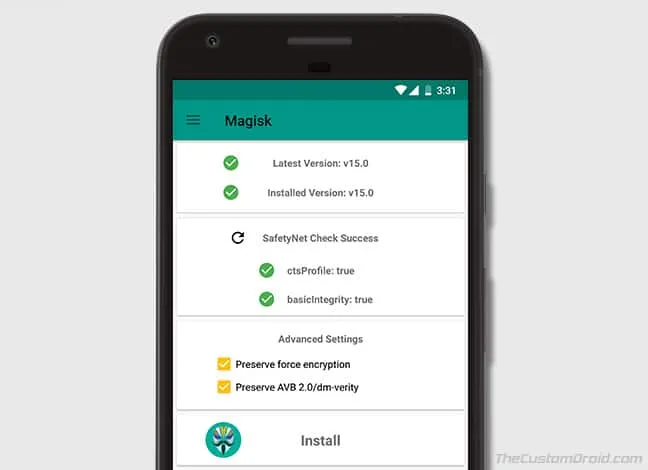
Developer topjohnwu recently announced the Magisk 15.0 update. The new build carries over all the changes from Magisk 14.0 and all the Beta versions released in between. Of which, Magisk 14.6 Beta is the latest.
The purpose of the stable release is to provide support for the Android 8.1 Oreo and compatibility with A/B partition devices like Google Pixel 2 and Xiaomi Mi A1. There have also been major changes to the Magisk modules repo. To know more about the changes, refer to the release notes.
The changelog as mentioned on the official XDA thread is as follows:
- Fixed the bug that Magisk cannot properly detect /data encryption state.
- Add merging /cache/magisk.img and /data/adb/magisk_merge.img support.
- Update to upstream libsepol to support cutting-edge split policy custom ROM CIL compilations.
Now head down to the instructions to root Android using Magisk 15.0 update.
Prerequisites
- Rooting an Android device requires an unlocked bootloader. Check out our Unlock Bootloader archive.
- Take a complete backup of your device before proceeding. You may follow our guide on how to backup Android phones.
- If you choose Method 2, then you must install ADB and Fastboot tools on your PC.
How to Root Android using Magisk 15.0 Update
We have covered two different methods below. The first one involves directly flashing the latest Magisk zip using TWRP recovery. If you want to do it without TWRP, you can hop on to Method 2.
Method 1: Using TWRP Recovery
-
First, you will need to install latest TWRP recovery on your Android device.
-
Next, download Magisk 15.0 Flashable zip: Magisk-v15.0.zip
-
Connect your Android phone to the PC and enable ‘Transfer files’ mode.
-
Copy the downloaded file to the internal/external storage of the device.
-
Once the file is transferred, disconnect the phone and power it off.
-
Use the special button combination to boot into TWRP recovery. Alternatively, you can also use the following ADB command:
adb reboot recovery
-
When your phone is in TWRP recovery mode, press the ‘Install’ button.
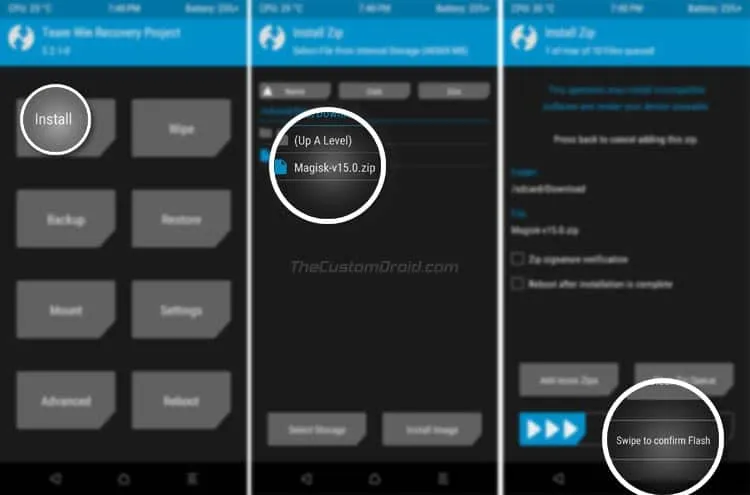
- Browse the internal storage and select the ‘Magisk-v15.0.zip’ file.
- After the file is selected, swipe the button on the screen to root your Android using Magisk 15.0 update.
- Finally, hit the ‘Reboot system’ button.
Your device shall now be rooted and you can start using modules to enjoy additional features.
Method 2: Patching Stock Boot Image
This method doesn’t require you to have TWRP in order to install Magisk 15.0 update.
- Download the latest Magisk Manager APK: MagiskManager-v5.5.1.apk
- Use a file manager to install the downloaded app on your device.
- Grab the stock boot image (kernel) and it should be corresponding to the firmware installed on your device.
- For Nexus and Pixel devices, you can extract it from the factory image. For other OEM devices, you might need to check it with your manufacturer’s support.
- Copy the downloaded “boot.img” to the internal storage of your Android device.
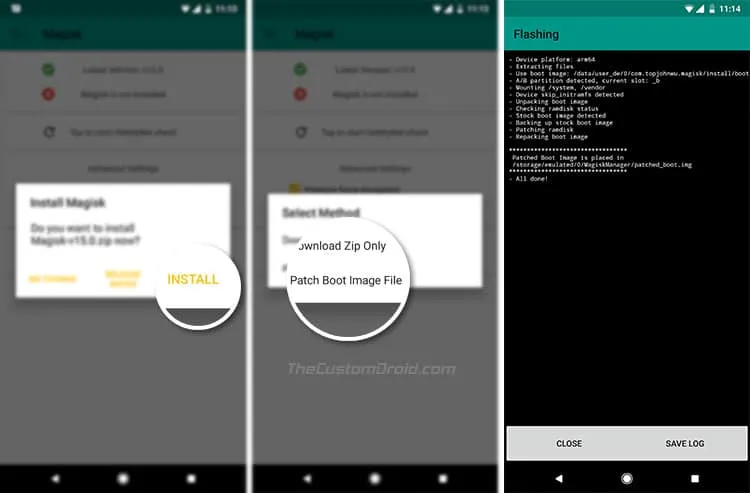
- Open the Magisk Manager app and tap on the ‘Install’ button.
-
Again, choose ‘Install’ and then ‘Patch Boot Image File’.
-
Navigate to the storage and select the ‘boot.img’ file you just transferred.
-
The Magisk Manager app will patch the stock boot image and place the resultant ‘patched_boot.img’ in the ‘MagiskManager’ folder.
-
Transfer the file from your phone to C:\adb folder on your PC.
-
Hold the SHIFT key on your PC and right-click on an empty space inside the folder. Then select ‘Open PowerShell window here’ from the menu.
-
Boot your Android into Fastboot mode and connect it to the PC.
-
Enter the following command to root your Android phone using Magisk 15.0 update:
fastboot flash boot patched_boot.img
-
Finally, reboot your device.
fastboot reboot
You can use Magisk Manager app to manage root permissions or hide root from certain apps like Pokemon Go. You can also install various modules to add certain features to your device systemless-ly.
So you have just been able to root your Android phone using Magisk 15.0 update. If you have any questions, leave them in the comments section below.
Source: XDA-Developers
Comments
Comments are moderated, and published only if they are relevant to the topic and add value in a constructive way. If you disagree with something, please be polite and respectful. We suggest you read our comment policy before commenting.