Install TWRP on Galaxy Note 10 and Note 10 Plus (Exynos)
TWRP is now available for the Exynos Samsung Galaxy Note 10 (Plus), unofficially. In this detailed guide, I will show you how to install TWRP recovery on

On this page
TWRP is now available for the Exynos Samsung Galaxy Note 10 (Plus), unofficially. In this detailed guide, I will show you how to install TWRP recovery on Samsung Galaxy Note 10 or Note 10 Plus easily.
This year’s Note series by Samsung has topped the charts with some powerful hardware and an all-new S Pen. On the software part, the phone(s) come with Android 9 Pie and One UI sitting atop. While Samsung has surely made some huge advancements while transitioning from Samsung Experience to One UI but it still has a long way to go. Not everybody would feel the same, but if you do, then you surely might have thought of installing a third-party firmware (commonly referred to as a custom ROM).
Or, you might just want to couple the stock One UI software with custom kernel for improved performance and battery life. Not that you’d actually need to it since the Note 10 already offers excellent overall performance and a decent battery backup too.
But to install any of the things mentioned above, you’d first need to install TWRP on your Samsung Galaxy Note 10 (Plus) Exynos variant. Well, TWRP’s functionality isn’t just limited to installing ROMs or kernels. You can also flash mods, take NANDroid backups and restore them, wipe the device partitions, and do much more.
Like any of its predecessors, the Note 10/10 Plus has quickly gained attention from the developer community. Developer geiti94 has succeeded in building TWRP for Galaxy Note 10 (Plus). Even though the recovery is in its unofficial state, but it is quite stable with every major feature functioning correctly.
Recommended: Install One UI 2.0 Beta on Samsung Galaxy Note 10/10+ (OTA)

Supported Variants and Models
This guide and the files provided here are only meant for the Exynos variant of the Note 10/10+. Please make sure that you cross-reference your phone’s model number with the list of supported variants and model numbers listed below.
1. Samsung Galaxy Note 10
- Compatible: Exynos variants with model number SM-N970/971/N/F/B are supported
- Not compatible: Snapdragon variants sold in the USA with model number SM-N970U/A/T/P/V/W are not supported
2. Samsung Galaxy Note 10 Plus
- Compatible: Exynos variants with model number SM-N975/976/N/F/B are supported
- Not compatible: Snapdragon variants sold in the USA with model number SM-N975U/A/T/P/V/W are not supported
Warning
Installing TWRP on your phone will trip the KNOX counter. This will further prevent you from availing features and services like Samsung Pay and Secure Folder on your Note 10. Flashing a custom binary (such as TWRP in this case) will also void your phone’s limited warranty offered by Samsung.
Requirements
Before you begin, make sure that all the requirements listed below are fully met.
- Installing TWRP will erase all the data stored on your phone. This includes the installed apps and their corresponding app data, internal storage, messages, contacts, etc. So, take a full backup of all the data before you head any further. We also have a detailed guide on the topic, which you can refer to.
- Next, you must first unlock the bootloader and root your Galaxy Note 10/10 Plus using Magisk. If you haven’t done it yet, then follow the instructions in this guide and come back here once done.
- Download the Odin v3.13.3 tool from here and extract the downloaded zip file to a suitable location on your PC.
- Also, download and install the latest version of the Samsung USB drivers for your Galaxy Note 10.
Downloads
- TWRP Recovery for:
- Galaxy Note 10 (SM-N970F/N/B): TWRP_3.3.1_N10_N970_ASHE_V3.tar
- Galaxy Note 10 5G (SM-N971F/N/B): TWRP_3.3.1_N10_5G_N971_ASHE_V3.tar
- Galaxy Note 10 Plus (SM-N975F/N/B): TWRP_3.3.1_N10+_N975_ASHE_V3.tar
- Galaxy Note 10 Plus 5G (SM-N976F/N/B): TWRP_3.3.1_N10+_5G_N976_ASHE_V3.tar
- Latest Multi-disabler zip from this link.
- This zip disables Samsung encryption, Vaultkeeper, and proca. A huge thanks to XDA developer ianmacd for this!
Guide to Install TWRP Recovery on Samsung Galaxy Note 10 (Plus)
Samsung Galaxy devices have always been troublesome when it comes to the custom development scene. That’s because of the number of increased security features at the kernel and bootloader level, implemented by the manufacturer. This year, the manufacturer further implemented its own flavor of A-only system-as-root, adding more bumps to the development scene.
Due to the same reason, the process of installing TWRP on Galaxy Note 10 devices is completely different than what was followed for its predecessors like Note 9 and Note 8. Despite being different, the process is still easy, thanks to topjohnwu, geiti94, and other developers who have contributed.
The process in-brief:
You will first have to start by unlocking the bootloader and rooting your Galaxy Note 10/Note 10 Plus via Magisk (See #2 in the ‘Requirements’ section). Once that is done, you can patch the TWRP recovery image file using Magisk Manager, and then flash the patched TWRP recovery image to your phone via Odin tool. After that, you will have to flash the Multi-disabler zip, reboot TWRP, and finally, format the /data partition.
Following this, you will have TWRP installed and your Note 10 (Plus) should be rooted with Magisk.
For your convenience and understanding, we have split the instructions into individual steps. Make sure that you follow them in the given order. Now without any further discussion, let us get straight to the instructions below.
Step 1: Patch TWRP Recovery using Magisk Manager
- Download the TWRP recovery for Galaxy Note 10/Note 10+.
- Transfer the downloaded file to your phone’s internal storage.
- Download the latest Magisk Manager APK and install it on your phone.
- Once installed, go to the app drawer and launch the Magisk Manager app.
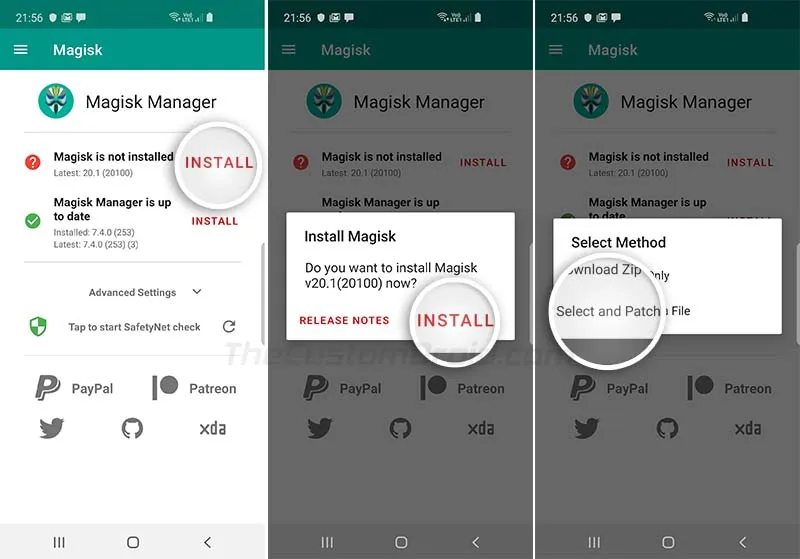
- Tap on ‘Install’ > ‘Install’ > ‘Select and Patch a File’.
- Select the TWRP recovery image file to patch it using Magisk.
- Once patched, the resultant Magisk-patched TWRP recovery will be stored in [internal storage]/Download folder.
- Transfer the ‘magisk_patched.tar’ file from your phone to the PC.
You have successfully patched the TWRP recovery with Magisk. Now head over to the next step to install the Magisk-patched TWRP recovery on your Galaxy Note 10.
Step 2: Install TWRP Recovery on Galaxy Note 10 (Plus)
- Launch the Odin flash tool on your Windows PC.
- Power off your Galaxy Note 10/10 Plus.
- Hold the Volume Up and Power keys together to boot your phone into stock recovery mode.
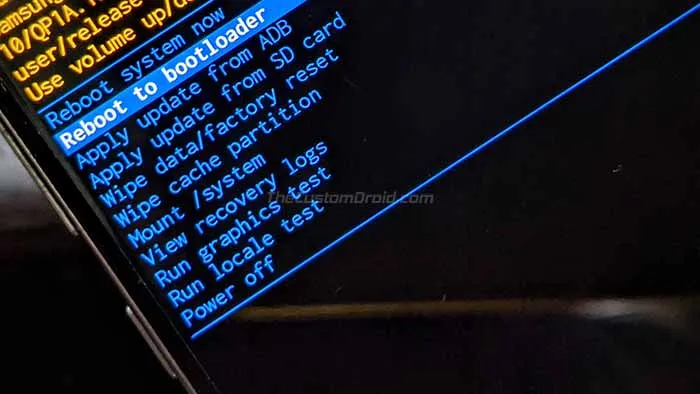
- Select ‘Reboot to bootloader’ in the stock recovery.
- Your Note 10 should now enter Download Mode.
- Connect your phone to the PC using the USB cable.
- The ID:COM port in the Odin window should light up and display the COM port.
- Now, click on the ‘AP’ button and select the Patched TWRP Recovery (magisk_patched.tar) file.
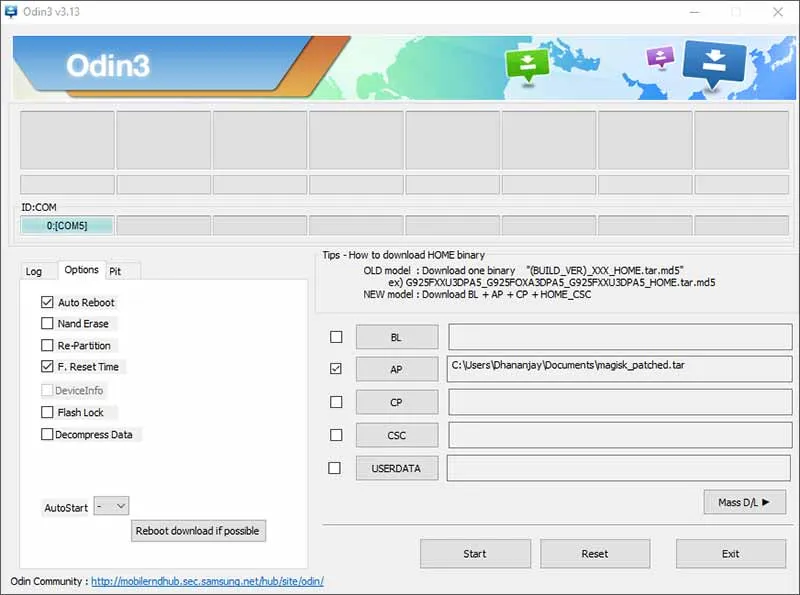
- While holding the Volume Up and Power buttons together, click on the ‘Start’ button to install TWRP recovery on Samsung Galaxy Note 10 (Plus).
- As soon as the process finishes, the phone will boot directly into TWRP.
You can release the keys now.
Important Note:
It is very important to press the Volume Up and Power buttons together and hold them before you click the ‘Start’ button, until your Note 10 boots into TWRP mode. Failing to boot directly into TWRP, will lead your phone into a bootloop. And you’d then need to start all over again.
You have successfully installed TWRP on your Note 10. But there are a few more things to do before you can boot your phone.
Step 3: Flash Multi-disabler and Format Data Partition
- Download the Multi-disabler zip and copy it to the SD card. At this point, TWRP will not be able to mount the internal storage.
- Go to the ‘Install’ menu in TWRP and select the ‘multidisabler-samsung-1.7.zip’ file.
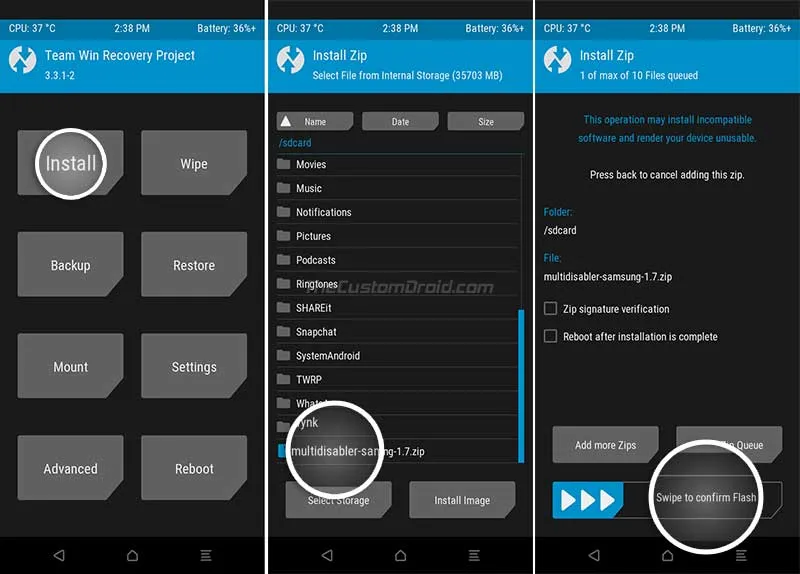
- Swipe the button on the screen to flash the file.
- Once flashed, go to the ‘Wipe’ menu in TWRP.
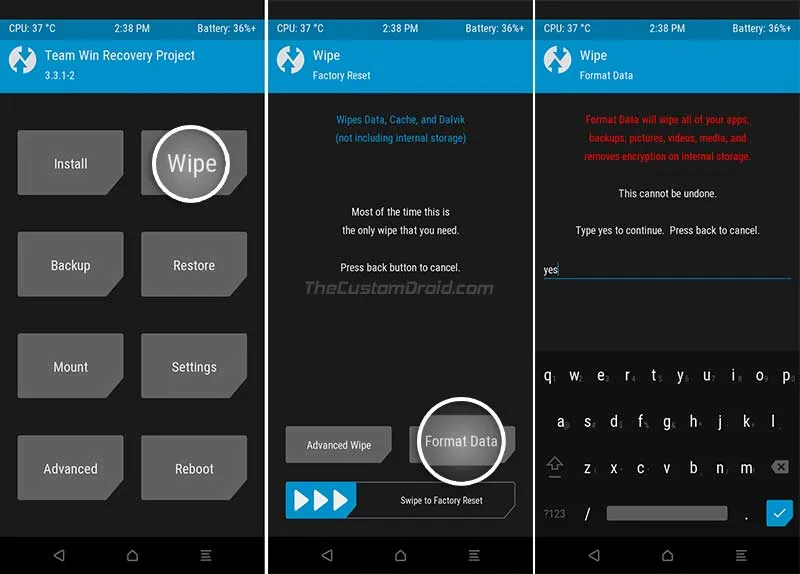
- Tap on ‘Format Data’ and enter ‘Yes’ in the provided field to format the data partition.
- Now go to the ‘Reboot’ menu in TWRP and tap on ‘Power off’ to power off your phone.
- Boot your Note 10 into Recovery Mode. To do so, hold the Volume Up and Power keys until you see the splash screen.
- Then quickly release the Power key and keep holding the Volume Up key to enter TWRP recovery mode.
TWRP should now be able to decrypt and mount the internal storage. It’s done! You can now reboot your phone into the rooted OS.
Booting Galaxy Note 10 (Plus) into Rooted System and Recovery Mode
Due to the fact that Magisk and TWRP are installed on the same partition, you will need to use the following button combinations to boot your Note 10 device into different modes.
- To boot into the stock unrooted system: Simply power on the phone normally.
- To boot into the rooted system with Magisk: Hold the Volume Up and Power buttons until you see the splash screen. Then release all the buttons.
- To boot into TWRP recovery mode: Hold the Volume Up and Power buttons until you see the splash screen. Then release Power button and keep holding the Volume Up button.
So that’s it! You have successfully installed TWRP recovery on your Galaxy Note 10/Note 10 Plus. You may now use it to flash custom ROMs, kernels, mods or backup/restore the full OS (NANDroid). If you have any questions regarding the instructions or TWRP itself, then please let us know by commenting below.
TWRP source: XDA
Comments
Comments are moderated, and published only if they are relevant to the topic and add value in a constructive way. If you disagree with something, please be polite and respectful. We suggest you read our comment policy before commenting.