In this guide, I will instruct you on how to root the Samsung Galaxy S8+ Snapdragon variant using the new Safestrap method. This new method will work on any Galaxy S8+ with SM-G955U/U1 model number and running V7 bootloader version.
Advertisement
Recently, we saw the first working root method for the Snapdragon Galaxy S9, S9+, and Note 9, which was brought to us by the Extreme Syndicate team. The same method was then ported to work on the Snapdragon Galaxy Note 8 and the Galaxy S8 by developer jrkruse. This new process is favored not only because it supports devices running the latest V7 bootloader, but was also comparatively easy than the previous ones.
On the other hand, XDA RC/developer jrkruse has found an even shorter and easier method to root the Snapdragon Galaxy S8+. This is different than the one followed by regular Galaxy S8 users, and it doesn’t involve flashing the combination firmware at all. Instead, you can flash the pre-rooted Android Nougat straight away using the Odin Tool.
Further, if you want to, you can install an Android Pie ROM that has the Safestrap recovery pre-installed. But do note that rooting Android Pie is not possible, so the only way you can modify the software is by installing the provided mods via Safestrap recovery.
Advertisement
The developer has offered two different Android Pie Safestrap ROMs, as follows:
- Debloated Stock ROM with working Samsung Pass, Pay, Secure Folder, enabled Call Recording, Caller ID, Native Hotspot, and support for Multi-user profiles.
- Debloated Google ROM with pre-installed Google Camera and Dialer apps, working Samsung Pass, Pay, and Secure Folder, with support for Native Hotspot and Multi-user profiles.

Page Contents
Supported Devices
The following Snapdragon Galaxy S8+ models are supported. If your device has a model number other than the ones mentioned below, then this method will not work on it.
- SM-G955U
- SM-G955U1
- SM-G955W
It doesn’t matter if your phone is running Android 9 Pie, Android Oreo, or Android Nougat firmware. What’s important is that it should have the V7 bootloader version.
To find out your phone’s bootloader version, go to Settings → About phone → Software information and check the information under the ‘Baseband version‘ section. For example, if it says “G955USQS7DTB3”. The “S7” here denotes the bootloader version, which is V7.
Advertisement
Before You Begin
- All your data stored on the phone will be erased during this process. So, make sure that you have taken a full backup of your important data before you begin with the instructions. If you need it, we also have a detailed guide for this.
- Charge your Galaxy S8+ to a sufficient battery level. This will prevent the phone from suddenly shutting down during the process.
- Download the latest Samsung mobile USB drivers from here and install them on your PC.
- Avoid using USB 3.1/3.0 port for flashing files via Odin. Although it might work, but is also known to cause failures. Using a USB 2.0 port/hub is recommended.
How to Root Galaxy S8+ Snapdragon Variant?
Like I said earlier, this rooting method is extremely easy, especially when compared to what users have to follow for the regular Galaxy S8 or Note 8. I have split the instructions into two different steps so that it’s easier for you to understand what
Step 1: Perform a Factory Reset and Boot Galaxy S8+ into Download Mode
The first step of the rooting process is to perform a factory data reset via the stock recovery and then boot your phone into Download Mode from there. To do this, follow the instructions listed below.
- Power off your Galaxy S8+ first.
- Hold the Volume Up, Bixby, and Power buttons simultaneously. Then release the Power button and keep holding the rest as soon as the phone turns on.
- Your phone should now be in the stock recovery mode.
- Use the Volume buttons to select the ‘Wipe data/factory reset‘ option and press the Power button to confirm the selection.
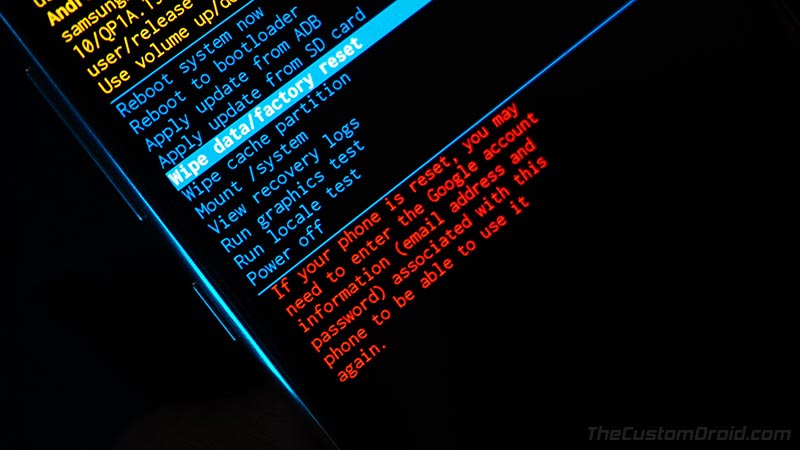
- When prompted, select ‘Factory data reset‘ to perform a factory reset.
- Once done, select the ‘Reboot to Bootloader‘ option to boot your Galaxy S8+ into directly into Download Mode.
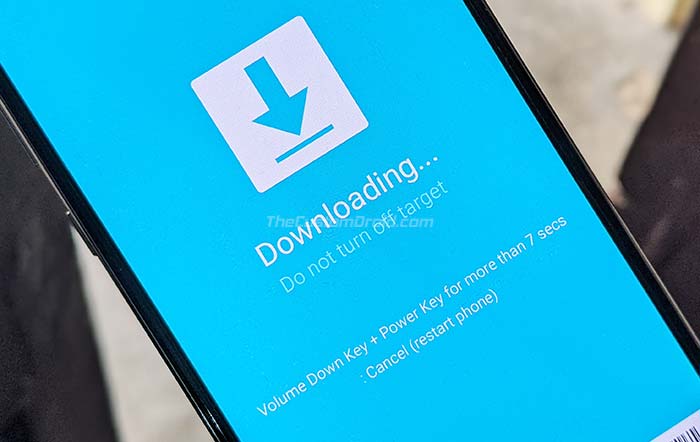
With your phone in Download Mode, connect it to your PC via a USB cable.
Advertisement
Step 2: Install Pre-Rooted Android Nougat ROM
Now, you are ready to install the Pre-rooted Android Nougat ROM on your Snapdragon Galaxy S8+ via the Odin tool.
- Download the Nougat Rescue ROM package to your PC: SM_G955U_RESCUE_ROM_V7.rar
- Extract the downloaded RAR file to your PC using an archive utility like 7Zip, WinRAR, etc.
- The extracted files should contain the BL and AP firmware files along with the modded Odin v3.13.1 tool by Raymonf.
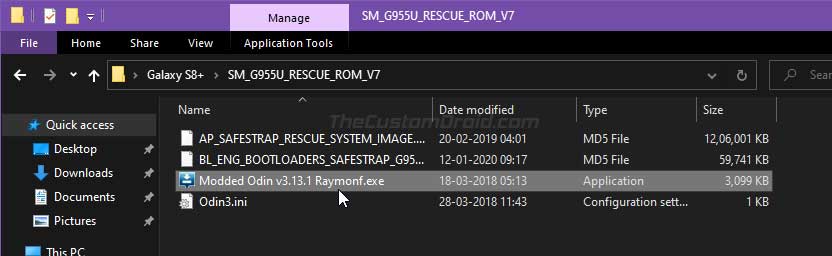
- Launch the Odin tool on your Windows PC by double-clicking on the ‘Modded Odin v3.13.1 Raymonf.exe‘ executable file.
- The ID:COM port on the top-left of the Odin’s GUI should light up blue and display the COM port to which your Galaxy S8+ is connected.
- Click on the ‘BL‘ button and select the extracted ‘BL_ENG_BOOTLOADERS_SAFESTRAP_G955U_V7.tar.md5‘ file in the BL slot.
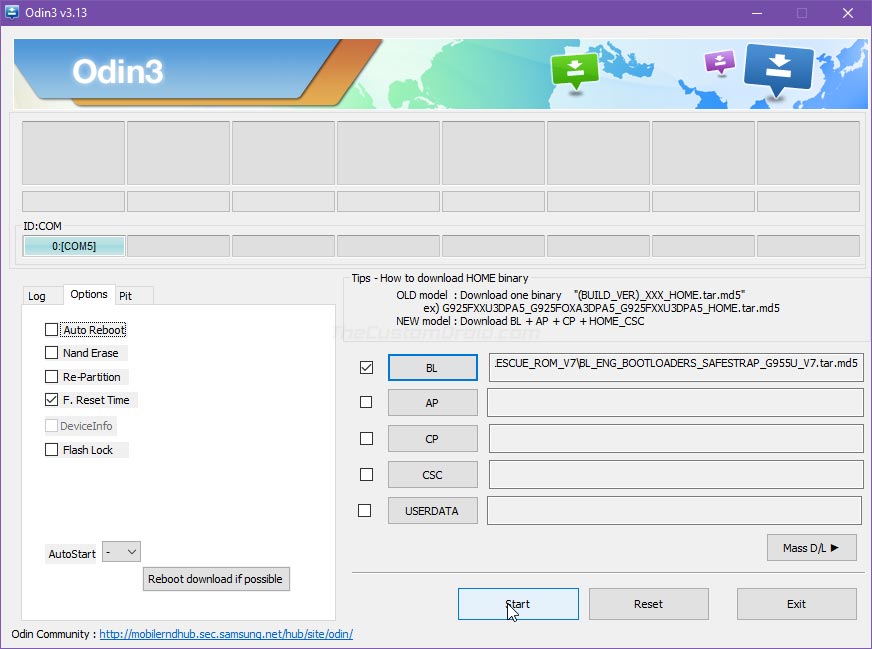
- Uncheck ‘Auto Reboot‘ in Odin’s Options menu. This will prevent your phone from automatically rebooting after the flashing process finishes.
- Now, click on ‘Start‘ to flash the file to your phone.
- Once the file has been flashed, Odin will show a ‘PASS!‘ message. You can close the tool now.
- Now, you have to force-reboot your phone into Download Mode. To do this, first, hold the Volume Down and Power buttons together. Then, as soon as the screen goes off, hold the Volume Down, Bixby, and Power button together to enter Download Mode.
- Launch the Odin tool again and load the ‘AP_SAFESTRAP_RESCUE_SYSTEM_IMAGE.tar.md5‘ file in the ‘AP‘ slot.
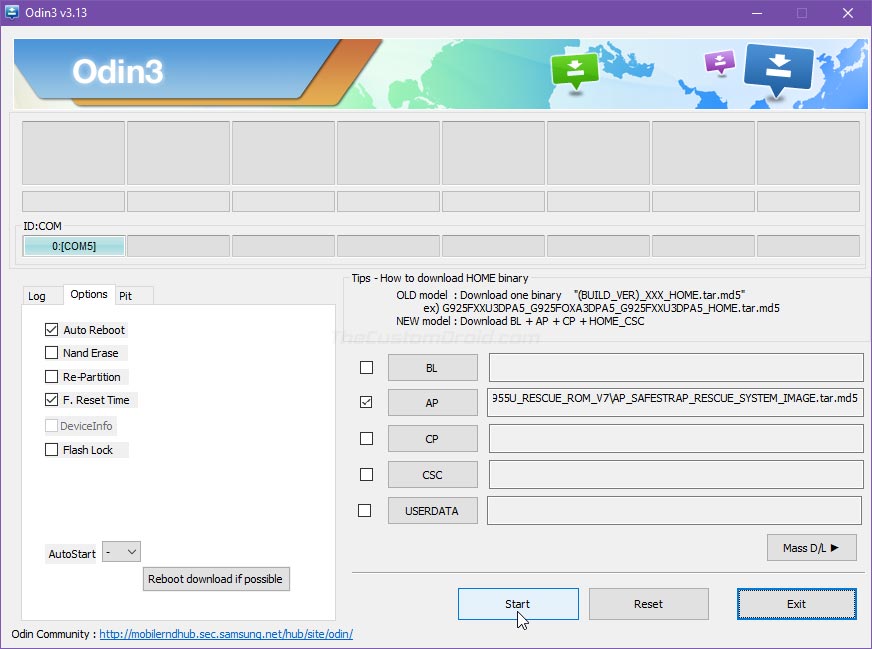
- Click on ‘Start‘ to flash the pre-rooted Nougat ROM on your Galaxy S8+.
- Odin will show the ‘FAIL!‘ message this time and the phone would show that the software update has failed. Don’t worry, this is normal and part of the process.
- Now, re-launch the Odin tool, load the ‘BL_ENG_BOOTLOADERS_SAFESTRAP_G955U_V7.tar.md5‘ file in the BL slot, and flash it.
Once the flashing process finishes, your phone will automatically reboot into the pre-rooted Nougat OS and will have Safestrap recovery.
If you’re only looking for gaining root permissions on your Galaxy S8+, then this is all you need to do. But if rooting isn’t your primary concern and you only want to apply modifications to the software, then follow the next step to install the Android Pie Safestrap ROM on your phone.
Step 3: Install Android Pie Safestrap ROM
Like I mentioned earlier, the developer has provided two different Android Pie ROMs that you can flash, either the stock ROM or the Google ROM. To install it, follow the instructions below.
Advertisement
- Download the Android Pie Safestrap ROM of your choice:
- Stock ROM: SM_G955U_DSL3_SYSTEM.rar
- Google ROM: SM_G955U_GOOGLE_DSL3_SYSTEM.rar
- Extract the downloaded RAR package to your PC.
- The extracted files should include the ROM’s system image and BL firmware file, along with the required version of the Odin tool.
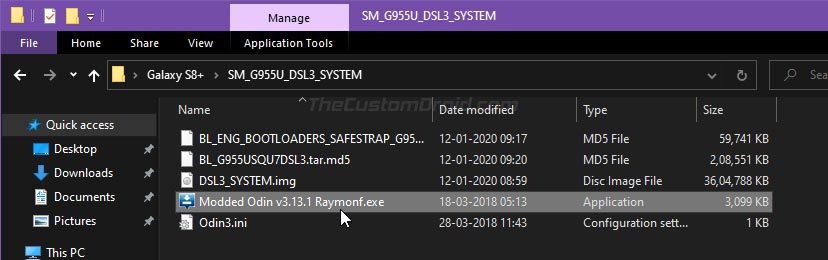
- Connect your Galaxy S8+ to the PC and transfer the Android Pie system image file (i.e. DSL3_SYSTEM.img) to the phone’s internal storage.
- Now reboot your phone and select ‘Recovery‘ on the Safestrap splash screen to boot your phone into Safestrap recovery mode.
- Tap on the ‘Install‘ button in Safestrap and select the ‘DSL3_system.img‘ file. When prompted to select the target partition, select ‘System Image‘.
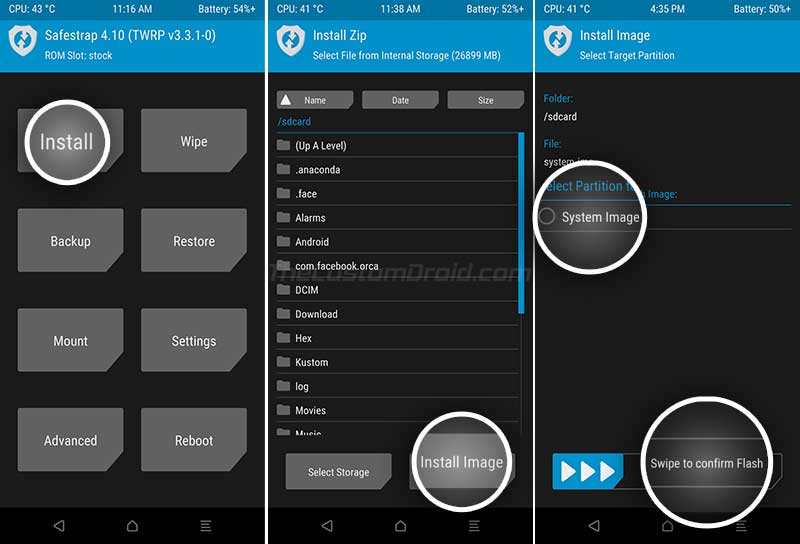
- Swipe the button on the screen to flash the system image and install Android Pie Safestrap ROM on your Galaxy S8+ Snapdragon.
- Once the image has been flashed, go to the ‘Reboot‘ menu of Safestrap and tap ‘System‘. As soon as the screen goes off, press and hold the Volume Down, Bixby, and Power buttons simultaneously to boot your phone into Download Mode.
- Connect your phone to the PC while it is in Download Mode.
- Now, double-click on the ‘Modded Odin v3.13.1 Raymonf.exe‘ file to launch the Odin program on your PC.
- Click on the ‘BL‘ button and select the Android Pie BL firmware file (i.e. BL_G955USQU7DSL3.tar.md5) which you extracted initially.
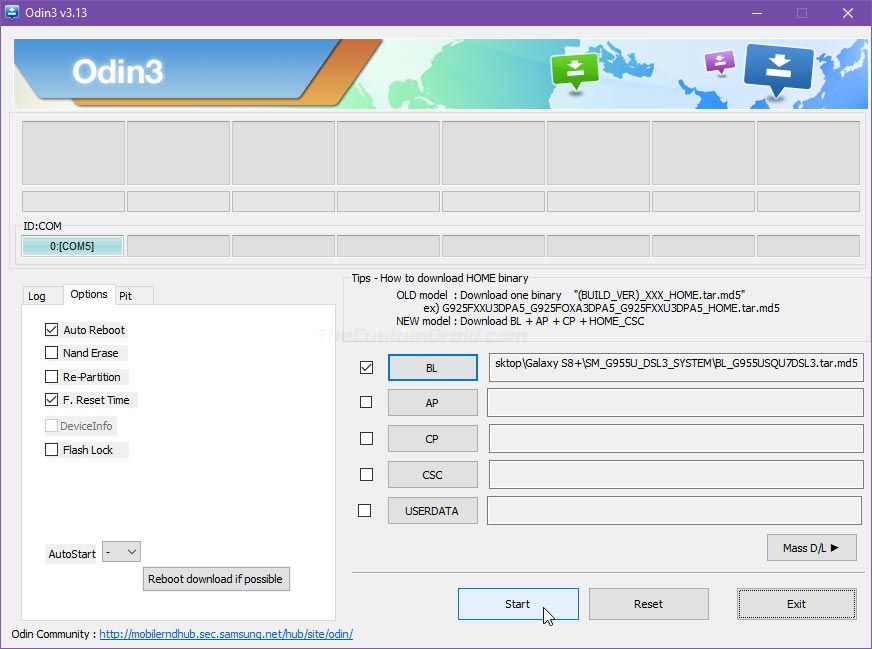
- Finally, click the ‘Start’ button to flash the file to your phone.
Once the flashing process finishes, you should see a ‘PASS!‘ message in Odin and your phone will automatically reboot into the system (OS). That’s it, you now have Android Pie ROM with Safestrap recovery installed on your Galaxy S8+ Snapdragon.
Before you leave, take a look at some important information below.
Important Notes:
- Do not flash any mods that haven’t previously been tested with the setup. You can discuss this with other users over at the original XDA thread (check the source link at the bottom).
- Developer jrkruse himself has provided some of the flashable mods that you can flash on your phone via Safestrap. You can find them here.
- To boot your phone into Safestrap recovery after finishing the instructions above, you need to flash the extracted ‘BL_ENG_BOOTLOADERS_SAFESTRAP_G955U_V7.tar.md5’ file via Odin in the ‘BL’ slot.
- To exit the recovery mode, you can use the ‘Reboot’ menu of Safestrap.
So, this was the guide on how to easily root Galaxy S8+ Snapdragon running V7 bootloader. If you have any questions regarding the method or the instructions, please feel free to ask me. A huge thanks to XDA RC/developer jrkruse for all his contributions to the community and providing his valuable time assisting others.
Source: XDA
Comments 19 Comments
Comments are moderated, and published only if they are relevant to the topic and add value in a constructive way. If you disagree with something, please be polite and respectful. We suggest you read our comment policy before commenting.
For me Odin is stuck at “Get PIT for mapping..”. On “Step 2: Install Pre-Rooted Android Nougat ROM” Step 8. No idea how long this should take.
Now I am getting “sw rev check fail [abl] fused 8 > binary 7”
Felix, a new method has been made available since I last updated this tutorial. For now, please check the XDA thread for up-to-date instructions. I will update this guide as early as possible.
G955USQU5CSA4 can i root?
Yes, you can root it Matt. But make sure that you read more about this method before you proceed. It’s not the traditional rooting method and you still wouldn’t be able to unlock the bootloader. You will also be running Android Nougat to gain root access. You couldn’t run Android Oreo or Pie if you want Root.
One more thing, you will need to update the phone to the latest V7/V8 bootloader in order to use this method.
Sm-G955U
G995USQS7DSK2
should i Try This Method on This Phone?
Zaryab, the developer has updated the method for V8 bootloader. You can find more details, files, and instructions on this XDA thread.
I will try and update this tutorial in a few days as well.
so now bro i have flasshed the BL_ENG_BOOTLOADERS_SAFESTRAP_G955U_V7.tar.md5’ on my pie…and it just keeps rebooting from the samsung logo to twrp recovery even when i indicate reboot through safestrap same thing nothing changes ..phone doest go past that ..i really need this and another question can i instal a ported rom through this
Dennis, to exit Safestrap, go to the “Reboot” menu in Safestrp (TWRP) and select “Download”. Don’t use “System”, “Power off”, etc.
As for the ROM, I am afraid there aren’t many options but one, which is the Google Experience ROM. This is provided by the same developer who devised this root method. Check it out on this thread.
i did follow every step as stated above. Now i have nothing on my phone. There’s no any application i mean i cant turn my wifi on i cant even open a picture nor install apps.. what should i do now? PLEASE HELP
Just download the latest stock firmware using the Frija or Samloader tool. Then follow the instructions on this page to flash the firmware to your Galaxy S8+.
This will restore your phone back to the regular state.
Bro can wo go to pre rooted 8.0 or 9.0 or with any method can we root 8.0 or 9.0 because i need rooted oreo or pie my device is sm-g955u1 9.0 v7 bootloader
Hi Mehran. I am afraid no. The only way root is possible on Nougat is through an exploit found in the combination firmware by the developers. The exploit was patched with Oreo (and so on Pie), so it can’t be used to root either of them.
For future reference, how do you unroot this method?
Hi Brandon. All you’ll need to do to unroot is download the latest stock firmware (I recommend using Frija) and then flashing it through Odin. For instructions, you can refer to this page.
Does this root all cell phone carriers?
Will it limit the battery capacity? Thanks!
Yes, it will. And yes again, it will limit the battery capacity to 80%, that’s a known bug with the combination firmware exploit.
Thank you for post on “How to root Samsung Galaxy S8+ Snapdragon (V7 Bootloader)”. I noticed that the article doesn’t mention anything about Phone Carriers. My phone is a T-Mobile phone. Will this root procedure & SM_G955U_RESCUE_ROM_V7.rar file work on a T-Mobile phone?
Also, previous rooting procedures (2017-2018, etc) tripped the Knox & also greatly reduced the battery capacity. Does your rooting method cause any of those issues? Please let me know! Thanks,
Hi Mark. Yes, it will work on your T-Mobile S8+. The carrier does not matter. It’s important however to match the model number, which in this case should be SM-G955U or SM-G955U1.
About KNOX, it will always be tripped when you flash an unofficial binary through Odin. As for the battery, it is a known issue with all the root methods available for Snapdragon Galaxy devices (sold in the US). The exploit used in the combination firmware limits the device’s charge to 80%. Maybe that’s the reason why you’re seeing a reduced battery life.
I will make sure to mention carrier compatibility within the post.
Also, I will make sure to mention that any carrier is supported.