Having an unlocked bootloader allows you to flash factory images/stock firmware, install a custom recovery like TWRP or flash a custom ROM like LineageOS. Not only that you could even root your device using Magisk and apply modifications to the software. In this guide, we will show you how to unlock bootloader using fastboot on various Android OEM devices in a step-by-step manner.
Advertisement
Page Contents
- What is a Bootloader and Why Would You Need to Unlock it?
- Step-by-Step Guide on How to Unlock the Bootloader using Fastboot on Android Devices
- Step 1: Backup All Your Data
- Step 2: Install Android SDK Platform-Tools on Your PC
- Step 3: Enable USB Debugging and OEM Unlocking on Your Device
- Step 4: [If Applicable] Get an Unlock Key From Your Device Manufacturer
- Step 5: Boot Your Android Device into Bootloader/Fastboot Mode
- Step 6: Unlock Your Android Device Bootloader Using Fastboot
What is a Bootloader and Why Would You Need to Unlock it?
A bootloader is a software that runs every time the device starts up. It tells the phone what program it has to load to make your phone run. Not only that, but it is also used to boot up the device to recovery mode. All the devices nowadays are shipped with a locked bootloader. The reason is that the manufacturers only want their authorized operating system to run on the devices, thereby preventing the installation of third-party firmware/custom ROMs.
But many of the tech enthusiasts out there are always ready to tweak their Android device’s software for enhanced performance, battery life, features, etc. In spite of the risk involved in all these, they still want to go ahead and unlock their device bootloader. This is because it opens the gateway to tons of new features. The most important among them is the ability to obtain root access on your device, to make modifications to the software. Apart from that, you could also try out various MODs and frameworks, or capture much-improved pictures by installing different ports of Google Camera.

Advertisement
Unlocking the bootloader for most Android devices is a fairly easy process, for example, Google Nexus, Pixel, Essential Phone and OnePlus devices are easily unlockable. But not all Android devices follow this straightforward method. Other OEMs like Sony, HTC, Motorola or Nokia also allow their phones’ bootloader to be unlocked, but not directly. You’d need to get a device-specific unlock code/token from the manufacturer and then only you could carry on with the process.
Some devices and carriers don’t allow unlocking of their device’s bootloader in an official manner. In such cases, the user might have to wait until independent developers find an unofficial way (You can check for your device-specific section at XDA forums). In recent times, even Huawei has taken a rather strange route. They no longer provide the unlock-key for their devices launched after April 2018. As a result, users are left with no choice but to shell out extra money and purchase the code from third party websites- with no guarantee regarding the genuineness of such codes.
With all these pieces of information in hand, read on the below guide on how to Unlock Bootloader on Android Devices using Fastboot.
Step-by-Step Guide on How to Unlock the Bootloader using Fastboot on Android Devices
For your ease and understanding, we have split this guide into six steps.
The first step involves creating a backup of all your device data as they would be erased during the unlocking process. The second step will guide you to install the ADB and Fastboot (Android SDK Platform-Tools) on your PC. The third step talks about enabling USB Debugging and OEM Unlocking on your Android device. The fourth step is optional and only required in case of some OEM devices. In this step, you obtain an unlock-token from the device’s manufacturer. The fifth step is all about booting your device to bootloader/fastboot mode. Finally, the sixth step explains the procedure of unlocking the bootloader of your Android device using fastboot.
Step 1: Backup All Your Data
Unlocking the bootloader would completely wipe all the data from the device. So before beginning with the process, it is extremely important to have a complete backup of all your data- media files, contacts, call logs, app data, and other important data. Try to copy all the possible data to your PC/laptop.
Also, make sure to turn on the ‘Backup’ option under ‘Settings’ -> ‘System’ option. Upload your photos and videos to Google Photos. Also, make sure to keep all your app data synced with your Google ID. This could be done by turning on the sync feature present under ‘Settings’ -> ‘Accounts’. It is also advisable to remove your SD card before beginning with the process. If you want further help on this, refer to our detailed guide on how to make a complete backup of the data present on your Android devices.
Step 2: Install Android SDK Platform-Tools on Your PC
In order to follow the instructions below, you must first install the Android SDK Platform-Tools on your PC. We already have a detailed tutorial on how to install them on Windows, macOS, or Linux. Alternatively, you can also use Minimal ADB and Fastboot Tool for this.
Advertisement
During this guide, we will refer to “C:\adb”, which would be the folder where the ADB and Fastboot tools are installed, if you’d have followed our tutorial. If the installation folder/directory is different in your case, then make sure to proceed accordingly.
Step 3: Enable USB Debugging and OEM Unlocking on Your Device
‘USB Debugging’ and ‘OEM Unlocking’ are two of the most widely used options we talk about while unlocking a bootloader or rooting an Android device. But what exactly are they and what role do they explicitly perform?
Well, as far as ‘USB Debugging’ is concerned, it is used to establish an ADB connection between your Android device and PC. ADB stands for “Android Debugging Bridge” and as the name suggests it creates a bridge (virtual link) between your Android device and the PC. This is used not only for effective communication between the device and the PC but also for executing various commands.
Whereas ‘OEM Unlocking’ is exclusively used for bootloader unlocking purposes. If you want to tweak with your device software, root your device or flash MODs then the first requirement is to have an unlocked bootloader. And this is where OEM Unlocking comes into play. Until and unless you enable this option, you won’t be able to carry on with the unlocking process.
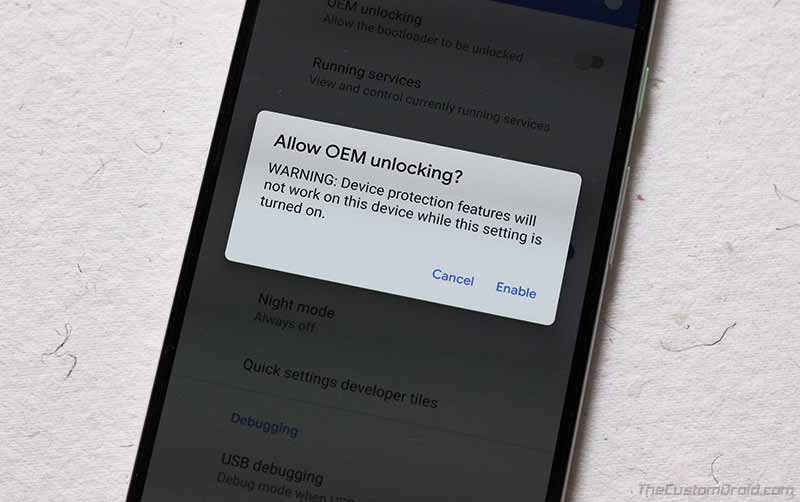
Do note that both of these options (i.e. USB Debugging and OEM Unlocking) are present under Developer Options, which is hidden by default. So first you need to enable ‘Developer Options’ before enabling these two. Follow the below steps for the same:
Advertisement
- Go to ‘Settings’.
- Select ‘About Phone’,
- Tap on ‘Build Number’ 7 times until you see the ‘You’re now a developer!’ message on the screen.
- Again go back to the ‘Settings’ menu.
- Next, go to ‘Developer Options’.
- Enable ‘USB Debugging’ and ‘OEM Unlocking’ from there.
You could also follow our separate guides on how to enable USB Debugging and OEM Unlocking.
Step 4: [If Applicable] Get an Unlock Key From Your Device Manufacturer
As mentioned before, not all devices’ bootloader could be unlocked directly via the fastboot. Some vendors like Sony, Motorola, HTC, Nokia, etc require you to get an unlock-token/key from them before you could proceed further.
So, below are the links to bootloader unlocking pages for various OEMs:
Once you have fetched the unlock key/code/token for your OEM Android device, follow the steps below to unlock the bootloader using fastboot.
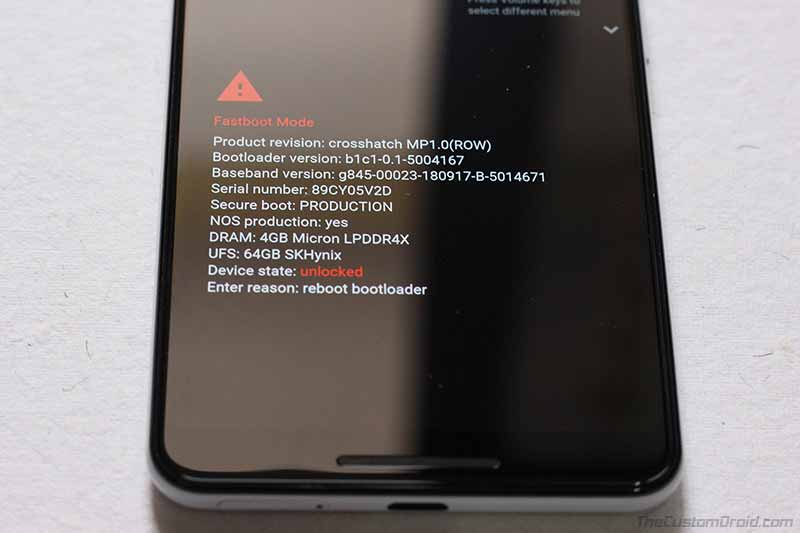
Step 5: Boot Your Android Device into Bootloader/Fastboot Mode
Before entering the fastboot commands for unlocking the bootloader, you need to boot your device to bootloader/fastboot mode.
Different devices have different hardware key combinations for booting into bootloader mode. For example, OnePlus device requires you to press the Power and Volume Up button together for a few seconds whereas for Xiaomi devices it is Power and Volume Down. The hardware key combination for booting to fastboot for various Google Pixel/Nexus devices could be found on this page.
Advertisement
If you are unsure about your device, either Google it or follow the below procedure:
- Go to the folder where ADB and Fastboot binaries are installed.
- While holding the SHIFT, right-click in an empty location inside the folder.
- Select ‘Open command window here’ or ‘Open PowerShell Window here’.
- Connect your device to PC via USB Cable.
- Type in the below code:
adb devices
- A device code indicates that a successful connection is established between your device and the PC. Otherwise, make sure that the USB drivers are properly installed.
- Now type the below command to boot your device to Bootloader/Fastboot Mode:
adb reboot bootloader
Your device will successfully boot into bootloader/fastboot mode. Now just follow the below steps in order to finally unlock your device’s bootloader.
Step 6: Unlock Your Android Device Bootloader Using Fastboot
- Make sure your device is in bootloader/fastboot mode and connected to PC.
- In order to unlock the bootloader of Google Nexus/Pixel devices or other OEM devices launched in 2015 or later, type the below command:
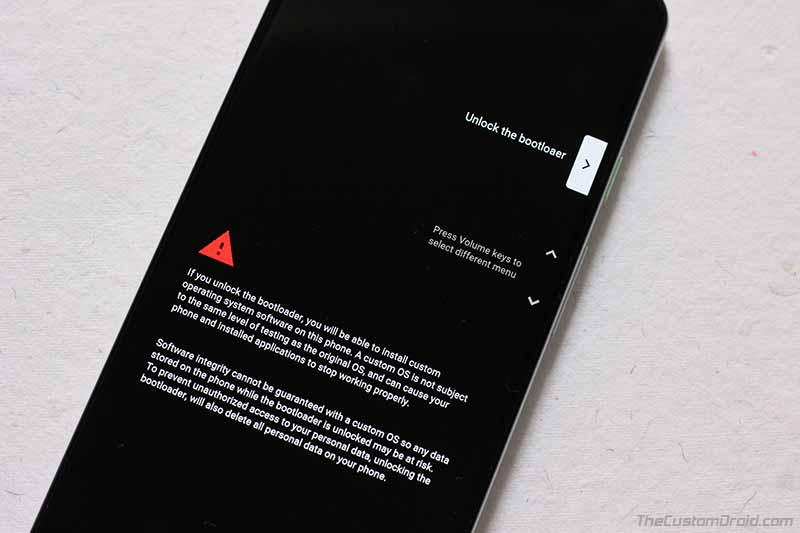
fastboot flashing unlock
- For all other devices and the Nexus devices launched prior to 2015, type the following code to unlock the bootloader:
fastboot oem unlock
- As soon as the command is executed, you should see a confirmation message on your Android device’s screen, seeking your response on unlocking the bootloader.
- Use the Volume buttons to highlight ‘Unlock the Bootloader’, ‘Yes’ or similar options. Then press the Power button to confirm the selection.
- Once the bootloader is unlocked, the phone will reboot back into Fastboot Mode. Simply enter the command below to boot it into the PC:
fastboot reboot
That’s it. You have successfully unlocked the bootloader on your Android device. Note that when your device boots up for the first time, it might take up a little more time than usual. This is completely normal. Also, you will have to set up your device all over again as all the data on your device would have been wiped off.
With your bootloader unlocked, you could now install install a custom recovery like TWRP to flash custom ROMs/kernels, root your device via Magisk or even tweak your device software with the help of various mods like ViPER4Android.
Also, if you have any doubts with regards to unlocking the bootloader on your device, do ask in the comments section below.
Comments 12 Comments
Comments are moderated, and published only if they are relevant to the topic and add value in a constructive way. If you disagree with something, please be polite and respectful. We suggest you read our comment policy before commenting.
when I run th e fastboot command it gets stuck on waiting for any device
Hi David, the error indicates that your computer is not able to recognize your Android device, which could be due to missing drivers or if your device is not booted into Bootloader Mode when the command is ran.
Which device are you using and is it connected to the computer while it’s in Bootloader Mode?
hi, i need help on “adb reboot bootloader”, its showing a error saying “error: device unauthorized.
This adb server’s $ADB_VENDOR_KEYS is not set
Try ‘adb kill-server’ if that seems wrong.
Otherwise check for a confirmation dialog on your device.”. please help.
Hi Samuel, the error message you just shared indicates that USB Debugging is not enabled on your device. You can follow our guide to enable USB Debugging to do this. If you’re still stuck, please share the device you’re using so that I can provide you with the exact instructions on how to enable USB debugging on your particular device and model.
I have a galaxy A42. Ive toggled usb debugging but there is no option in developer mode to toggle oem. Ive done everything I possibly can. I have all the correct drivers installed. followed every step. typed every command. Im in fastboot mode now when I type fastboot flashing unlock. I get an error. when I type fastboot flashing unlock_critical. I get the same error. Is there a way to make the oem toggle appear back in developer?
Jack, could you please mention the model number of your Galaxy A42? Is it a carrier-branded variant?
The reason why fastboot isn’t working is because Samsung phones do not support Fastboot. They instead use Download Mode.
The following two resources will give you more context on how things work on Samsung Galaxy devices:
i tried all the commands above but i cant open bootloader in my realme3i. help me to do so.
Priyanshu, follow this tutorial to unlock the bootloader on Realme 3i.
Hi,
When I try to unlock the bootloader of my Pixel 3 (Android 11), the command prompt always returns me : FAILED remote: “flashing unlock is not allowed”).
Is there something else to try?
Thanks
Greg, the error you mentioned indicates that the “OEM Unlocking” toggle is not enabled. You can enable it by following the instructions here.
Hi there
Can you help me please
I broke my cosmo communicator after i tried to install debian and TWRP and magisk then i reboot in recovery mode i get a screen said
Your device has failed verification and may not
work properly.
Please download boot image with correct signature
or disable verified boot.
Your device will reboot in 5 seconds.
RED STATE
and keep going reboot in the same screen!!!!
Hi Ghaleb. You have certainly brought something interesting to me. I believe you unlocked the bootloader before trying any of it, right?
Also, which TWRP build did you use? I suppose the one provided here: https://github.com/Treeki/unofficial-twrp-cosmo/releases
The first thing I would suggest doing right now is flashing the latest stock firmware. What I would suggest is going through this thread.
I have literally gone through all the nine pages of that thread, and it includes some very in-depth information about rooting the Cosmo Comm. as well as regarding flashing the stock firmware.