Advertisement

Want to customize your new Redmi device? Then follow this guide to install TWRP Recovery and root Xiaomi Redmi 5 & Redmi 5 Plus using Magisk or SuperSU.

Xiaomi has seen some really good times during 2017. One major factor in its success is the “Redmi” device lineup, that focuses on bringing powerful hardware at an affordable price. Xiaomi released another Redmi series successor during December, last year. If you’ve already got the device, then here’s your chance to install TWRP Recovery on Xiaomi Redmi 5 and Redmi 5 Plus, and root it.

Install TWRP Recovery and Root Xiaomi Redmi 5

Table of Contents

How to Install TWRP and Root Xiaomi Redmi 5 (Plus)

Following the current trend, the Redmi 5 features a curved full-view display. The aesthetical features stay the same with an Aluminium body. On the inside, the phone runs a Qualcomm Snapdragon 450 processor powered by 8 cores. It comes with MIUI 9, based on Android Nougat 7.1.2.

If you consider adding more features to stock firmware or move up to a third-party firmware totally, you will need root or a custom recovery like TWRP, in that order. In this article, we will help you install TWRP recovery and root Xiaomi Redmi 5/Redmi 5 Plus.

There are several reasons why Android users desire root access on their devices and often times this arises from the need to add extra functionalities and customizations to their device. Other times it’s is just to bypass certain limitations and apply patches. Take a look at a few things you will be able to do after you root Xiaomi Redmi 5 and Redmi 5 Plus.

  • Improve your device’s overall performance using custom kernels.
  • Install custom ROMs to get the latest Android version running on your Xiaomi phone.
  • Enhance audio performance using popular mods like ViPER4Android.
  • Add extra features using Xposed Framework or Magisk.
  • Use root-enabled apps

This is just an overview of a long list of advantages.

Recently, TWRP developers have added official support for Redmi 5 and Redmi 5 Plus. We will guide you on how to easily install it using a simple Fastboot command. Further down, you will be able to use Magisk to root Xiaomi Redmi 5 and Redmi 5 Plus.

Prerequisites

Once you have fulfilled the requirements stated above, move down below to install TWRP and root Xiaomi Redmi 5/Redmi 5 Plus.

Downloads

Install TWRP Recovery on Xiaomi Redmi 5/Redmi 5 Plus

The first step in order to root Xiaomi Redmi 5, is to install TWRP recovery on it.

  1. First of all, download the TWRP recovery image for your device, from the links above.
  2. Copy the downloaded img file to C:\adb, where all the ADB and Fastboot files are present.
  3. Open the folder, hold down the SHIFT key on your keyboard and right-click on an empty space. 
  4. Select ‘Open PowerShell window here’.
  5. Boot Redmi device into Fastboot mode:
    • Power off completely.
    • Press and hold the Volume Down and Power button simultaneously.
  6. Now connect your device to your PC using the USB cable. 
  7. Finally, install TWRP on Redmi 5:
    fastboot flash recovery twrp-3.2.3-0-rosy.img
  8. Use the following command to install TWRP on Redmi 5 Plus:
    fastboot flash recovery twrp-3.2.3-0-vince.img
  9. Do not reboot your phone yet, or TWRP will be overwritten by stock recovery.

You’ve just flashed TWRP Recovery on Xiaomi Redmi 5 and Redmi 5 Plus. Now head on to root Redmi 5 using the steps outlined below.

Root Xiaomi Redmi 5 (Plus) using Magisk

  1. While the phone is still in fastboot mode, press and hold the Volume Up and Power button until the TWRP Recovery screen shows up.
  2. When prompted for the decryption password, enter the PIN/password that you previously wrote down.
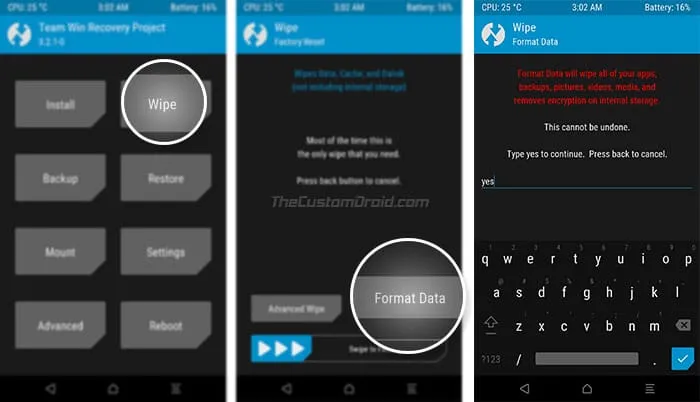
  3. On TWRP Recovery menu, go to ‘Wipe’ -> ‘Format Data’.
  4. Input “Yes” in the provided field to wipe the device completely.
    Format Data in TWRP to Root Xiaomi Redmi 5
    Format Data in TWRP to Root Xiaomi Redmi 5
  5. Once wiped, reboot recovery by going to ‘Reboot’ -> ‘Recovery’.
  6. In TWRP, go to the ‘Mount’ menu.
  7. Connect your phone to the PC and press the ‘Enable MTP’ button.
  8. Then download the Magisk or SuperSU zip and transfer it to your phone’s internal storage.
  9. Disconnect the device.
  10. Return to the TWRP Recovery menu and tap on ‘Install’. 
  11. Then select the Magisk/SuperSU zip file.
  12. Finally, swipe the button on the screen to flash Magisk and root Xiaomi Redmi 5 and Redmi 5 Plus.
  13. Once the installation is complete, press the ‘Wipe Cache/Dalvik’ button.
  14. After clearing the cache, reboot your device by hitting the ‘Reboot System’ button.

I hope you find these steps easy to follow and that you enjoy the privileges of having root access on your device.

So you have just been able to root Xiaomi Redmi 5/Redmi 5 Plus and install TWRP on it. Kindly use the comment section below if you have any questions.

Comments

  1. I have successfully root my Redmi 5 MIUI 11 with Android ver 8.1 and security patch 2019-10-1, I follow the steps carefully, but at first I my phone hang at logo and into bootloop. Here is how I fix it. I enter twrp with vol up+power and then reset it from there, with the slider reset and not type yes reset. Before trying to install twrp (I assume you have unlocked your bootloader first) ,my advice is backup first, then logout of mi account and Google account and reset it first (so no password issue afterward). And then of course again enable developer option, oem unlocking, and mi unlock status should display unlocked and USB debugging and install via usb should all be enabled. After fastboot flash recovery nameofrecovery.img don’t reboot using command, instead press vol up+power and twrp will come up with still plugin in USB to pc, from there follow the above steps. Also make the twrp and\or magisk as a system apps so that you can update it inside Android itself. Also it will still be there even after wipe\reset (in hang or bootloop scenario) because it is already system app. I hope I help at least one people. Thanks you guys.

  2. Thanks Dhananjay for your answer.

    It’s not exactly the same case. And I can’t enter the phone other than by TWRP.

    I re-installed the TWRP (3.2.3-vince) . Now I do not have a password request.
    That’s better but I can’t reboot the system.

    Same state as before: waiting on Fastboot.

    1. Okay. So, if you use TWRP to boot into Fastboot Mode (TWRP > Reboot > Bootloader), is your phone entering into fastboot?

    2. Okay. Then you can re-flash the stock firmware (fastboot image) via Mi Flash Tool to restore the phone. Make sure to select ‘Save user data’ option in the Mi Flash Tool window.

    3. After small difficulties, i got an operational fastboot stock ROM that i have installed onto my phone with success.

      Thanks a lot Dhananjay.

      Now, i have just to repeat the operation after changing password without zero in it!
      I would like to install LineageOS ROM.
      Do you know if this ROM is working fine on Redmi 5 Plus?

    4. Great! Yes, or do not set any password/PIN for time being until the whole flashing process is done. As for LineageOS, users on the XDA thread seem to be quite happy with the current builds. The latest one is LineageOS 16 based on Pie. Here’s the link to the thread.

  3. Hi,
    I have just installed TWRP. When i fill in the password (PIN/password) which contains a zero “0” (it is the last character), TWRP did not accept this password.
    I can pass this step but the system does not reboot it stays on Fastboot each time I push the power button.
    Now, how i can go back (or continue) to recover my phone’s system?
    Thank’s for helping.

    1. Hi Pat. I have a link to a post specifically for the OnePlus devices, but I guess it will work for your phone as well. Please visit this link and follow the stated instructions. Then see if you’re successfully able to decrypt the storage in TWRP.

  4. Just wanted to thank you for the great guide.
    Worked on redmi 5 plus Miui 10.
    P.S. Better tu use Magisk 17.3 for now, Because V18.0 is not recognised by the Magisk 6.1.0 manager on this phone.

  5. After doing all the steps it keeps rebooting to fastboot even if i hold the power button for 10 secs it reappears what should I do? ?

    1. Hello. That’s probably because of device encryption. After you install the TWRP recovery image, it is very important to boot directly into TWRP recovery mode directly. After you do that, simply go to Wipe -> Format Data in TWRP to completely wipe the /data partition and remove encryption.

      Once that is done, simply connect the phone to the PC, go to TWRP -> Mount and press the ‘Enable MTP’ button. Then transfer the root ZIP and flash it via TWRP itself.

  6. How do I bypass 15 days of waiting time to unlock bootloader ? Is it possible to fastboot oem unlock ?

    1. After successfully booting to twrp, can I wipe system, data and cache before flashing aosp rom ?

      Do I need to format data to remove encryption or I can wipe system if I am flashing aosp rom?

    2. If you’re running MIUI and the encryption is not disabled already, then please Format the Data. Other than that, the system, cache, dalvik etc needs to be wiped too.

  7. Hello !
    I tried to root my device using this methode.
    1- flashing TWRP using ADB while the phone is on fastboot mode then Vol+ power button to enter recovery -TWRP- this works for me. in TWRP the password didn’t pass til I perform a data wipe -it goes away actually-
    2- after re-installing the rom and Magisk + SU (wipe chache/delvik) and reboot the phone restart after a while to fastboot mode without entering the rom like there is no rom installed.
    3- re entering to TWRP goes to stock recovery.
    :/

    1. Hi Ahmed, so in your situation, I would start from scratch. And here’s what I want you to do:

      1) Install stock MIUI Fastboot image on your phone. You can get it from here
      2) Next, make sure that you only boot into the OS and remember NOT TO SET A PASSWORD/PIN/PATTERN etc.
      3) Flash TWRP and boot directly into it. Then go to ‘Wipe’ -> ‘Format Data’ and enter ‘Yes’ to format the phone completely.
      4) Once done, go to TWRP -> Mount and press the ‘Enable MTP’ button.
      5) Connect the phone to the PC using the USB cable.
      6) Download the Magisk 16.7 ZIP file and transfer it to the phone’s storge.
      7) Disconnect the phone and go to TWRP -> Install.
      8) Flash the Magisk ZIP and reboot.

      This time, your phone should boot into the OS with root using Magisk. Don’t forget to let me know of the results.

    2. Hey man.

      I got the same problem. So basically, i already tried to install twrp for rosy, and wanted to install Batik recovery instead. But i got a problem, that my sdcard is not detecting any file. It goes the same as mounting the phone (enable MTP), my pc doesn’t show any driver connect to it.

      What i did is simply unlocking the bootloader, flash the twrp through minimal adb, and ‘canceling’ the password. I get it that it just the same problem, but i don’t really know how to fix it since my phone can’t read any storage. Can you give any solution?

      Aye, Thanks

    3. Hi Edgar, after flashing TWRP, you also need to wipe the /data partition (TWRP > Wipe > Format Data) to make the internal storage accessible.

      Once formatted, go to TWRP > Mount and tap on the ‘Enable MTP’ button. Then connect your phone to the PC using the USB cable. Transfer Magisk zip and flash it using TWRP and finally boot up your phone. That’s it.

  8. Thank you, Eberhard Stephan. It’s nice of you to correct the mistake. I have updated the article to reflect the changes. If there’s still something missing or needs omitting, please let me know. Again, thanks for your feedback.

    1. Hi Emma, wiping the phone will ensure that it doesn’t fall into a bootloop due to dm-verity. We highly recommend doing it. However, if you have your data backed up, you can try installing the Magisk ZIP without wiping.

      Then try and boot into the OS. If it boots, then great! But in case it doesn’t, then you will have to perform a wipe and reinstall Magisk after that.

  9. Hello my friend. I tried with your steps, but the issue i’m having is that is asking for a password to decrypt the storage when TWRP screen loads. Since i haven’t setup a password, i don’t know what to put and click on Cancel. But after that, is not possible to wipe data or flash some zip because it doesn’t have access to the storage (because password wasn’t entered). I think that is about dm-verity. What do you suggest do do in this case?

    1. Hi Oscar, yes, you’re right that’s related to encryption. The password is basically the PIN/Password that you have previously set on the lock screen before flashing the TWRP recovery. Simply enter that to have access to the userdata (storage) partition.

  10. After “fastboot flash recovery [name of recovery.img]” you have to boot directly into recovery -> “fastboot boot [name of recovery.img]”
    Otherwise TWRP will be overwritten by stock-recovery.

    1. Thanks Cua, for your feedback. The extra temporary command is not needed, you can simply use the buttons combination.

      Although, that’s a very good step that you have pointed out.

    1. No, you cannot use it on a locked bootloader. If you wish to roll back to stock MIUI, simply download the full ROM ZIP from here and flash it.

    2. No, that ZIP could be easily flashed using the stock recovery itself. Simply rename the downloaded ROM ZIP to “update.zip”. Then copy it over to the root of the phone’s storage. By “root” I mean outside all the folders.

      Then just boot into the recovery and flash it.

Leave a Reply to Cua Cancel reply

Comment Policy: We welcome relevant and respectable comments. Only input your real first name and valid email address if you want your comment to appear. Read our comment policy fully before posting a comment.