Through this step-by-step guide, you will learn how to unlock the bootloader, install TWRP recovery, and simultaneously root Samsung Galaxy Tab S6 via Magisk. This guide is compatible with SM-T860 (WiFi) and SM-T865 (LTE) model numbers of the Tab S6, running Android 9 Pie or Android 10.
Advertisement
In the era when most major manufacturers have backed out from building Android tablets, Samsung is still in the game. The manufacturer refused to give up on its Galaxy Tab lineup and released the Galaxy Tab S6 back in July 2019. And it is truly the only Android tablet that can compete against Apple’s iPad.
The Tab S6 features a 10.5-inch OLED screen that supports HDR10/10+, powerful Snapdragon 855 processor, four speakers on the corners with Dolby Atmos-enabled, and an S Pen that could be hooked directly on the tab’s rear. On the software end, it runs Android 9 Pie with Samsung’s One UI skin sitting atop it.
There’s no doubt that Samsung has readily improved its software with One UI when compared to the old Samsung Experience. But if you’re looking for more, more customization, and more control over the tablet’s software, then you might find yourself inclined towards the process of rooting. Rooting your Samsung Tab will not only allow you to use root applications but also gives you the ability to customize the tablet’s software to your own liking.
Advertisement
You can root tablet in two different ways, that is by using TWRP, or without it. In this post, we will be focusing our attention on the former, which is to first install TWRP recovery on Samsung Galaxy Tab S6 and then flash Magisk via it to gain root permissions. In order to any of this, you would first need to unlock the bootloader as well.
The instructions in this guide will take you through all these things in an orderly and step-by-step manner. It doesn’t matter if you’re a beginner or a veteran in the field of Android modding, you will be able to follow and perform these instructions quite easily.
Important Information
Make sure that you fully understand the things listed below before you proceed to the instructions.
- Installing a custom binary like TWRP and rooting your Galaxy Tab S6 will void the official warranty offered by the manufacturer.
- The process will also trip the KNOX counter, which is irreversible. This means you will not be able to use apps and services like Samsung Pay and Secure Folder, even if you unroot the device and restore the stock firmware using Odin.
Page Contents
Before You Begin
Fulfill all the requirements listed below.
- All the data on your Galaxy Tab S6 will be erased while performing the instructions below. So, make sure that you have taken a full backup of all your important data before you proceed. If you want, you can refer to this detailed guide on how to take full backups.
- Charge your tablet to a sufficient battery level. This will prevent your phone from accidentally shutting down in the middle of the process.
- Download and install the latest version of the Samsung USB drivers on your PC.
- You will be using ADB and Fastboot tools to flash files to your phone. So, download the latest Android SDK platform-tools package from here and install them on your PC using this guide.
- When asked to launch the command-line window on your PC, do the following:
- On Windows PC: Open the folder where the Android platform-tools are installed (e.g. C:\platform-tools). Then hold the SHIFT key of the keyboard and right-click on an empty space inside this folder. Select the ‘Open PowerShell window here’ option.
- On macOS/Linux PC: Open the ‘Terminal’ and change its directory to the folder where the Android platform-tools are installed. For example, if the tools are installed to /Documents/platform-tools, then enter the following command:
cd Documents/platform-tools
- All the commands in this guide are to be preceded with “.\” (dot and backward slash) when entering on a Windows PC, or with “./” (dot and a forward slash) when entering on a macOS/Linux PC.
Downloads
TWRP for Galaxy Tab S6 is developed and being maintained by XDA Recognized Developer Mentalmuso. He has published both the official and unofficial builds over at the official XDA thread.
Important Note: It’s recommended to use the unofficial TWRP as it’s more frequently updated and has better support from the developer. Also, the WETA kernel is only mandatory for Android 9 Pie and optional for Android 10.
- Latest unofficial TWRP builds and WETA kernel:
- SM-T860 (WiFi variant): TWRP_T860_3.4.0-15.tar | WETA_Kernel_T860-6.1_TF1.zip
- SM-T865 (LTE variant): TWRP_T865_3.4.0-15.tar | WETA_Kernel_T865-6.1_TF1.zip
- Official TWRP Builds (Not recommended, but the links have been posted for documentation purposes)
- SM-T860: twrp-3.3.1-1-gts6lwifi.img.tar
- SM-T865: twrp-3.3.1-1-gts6l.img.tar
- Magisk Installer ZIP: Magisk-v21.0.zip
- Universal Forced Encryption Disabler (Huge thanks to Zackptg5): Disable_Dm-Verity_ForceEncrypt_03.04.2020.zip
Instructions
For your convenience and easy understanding, we have split this guide and its instructions into four major steps.
In brief, the first step is to unlock your Tab S6’s bootloader, which is a prerequisite to install TWRP, root, or perform any sort of modification to the software. Then the second step is to flash TWRP recovery on your tablet using Odin and then boot directly into it. This is followed by the third step, wherein you have to format the /data partition and reboot your tablet back into TWRP. At last, the fourth and final step is to flash the Forced-Encryption Disabler, WETA kernel, and Magisk ZIP files to disable encryption and simultaneously root your Galaxy Tab S6 using Magisk.
Please read the ‘F.A.Q’ section at the bottom of this post before you proceed with the steps. It will clear out some of the most common questions that you might have. Now without any ado, let us start with the instructions.
Step 1: Unlock the Bootloader
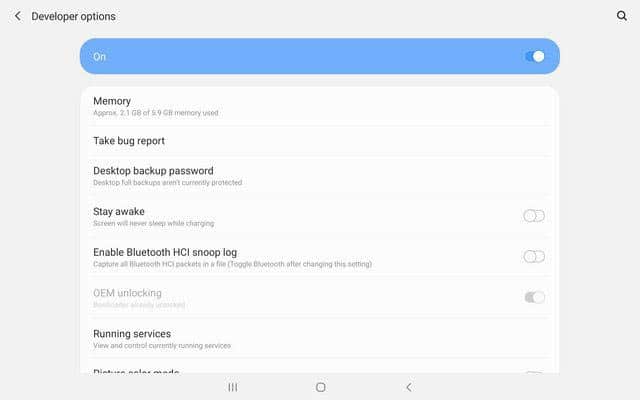
Go to ‘Settings’ → ‘About phone’ → ‘Software information’ on your Galaxy Tab S6. Then continuously tap on the ‘Build number’ section until you see the “Developer mode has been enabled” message on the screen. Developer options should now be enabled on your tablet. Access them by going to ‘Settings’ → ‘Developer options’, and turn ON the ‘OEM unlocking’ toggle.
- Note: In case the ‘OEM unlocking’ toggle isn’t visible, connect your Tab S6 to WiFi/mobile data and try again.
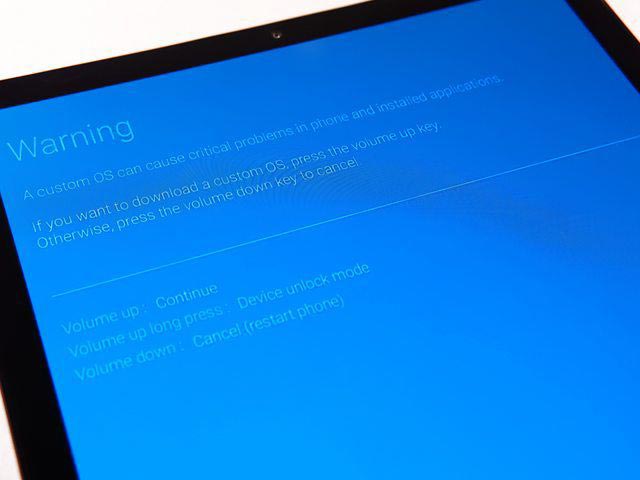
Now power off your tablet completely. Once powered off, connect the tablet to the PC via a USB cable while holding the Volume Up and Volume Down keys together. You should now see a blue-colored Warning screen. Now, long-press the Volume Up key to enter the Device Unlock Mode and initiate the bootloader unlocking process.
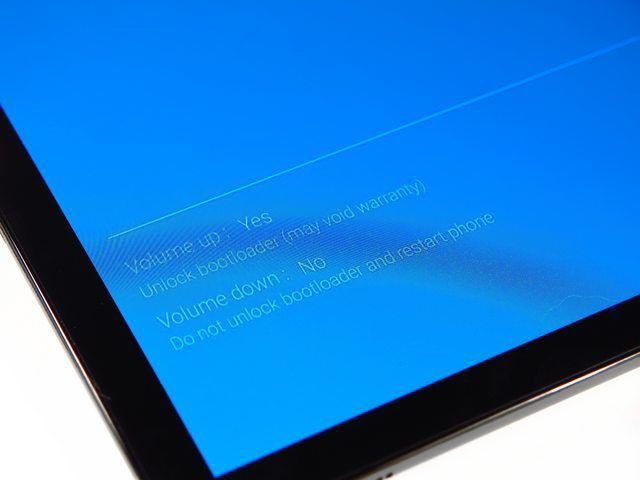
On the next screen, press the Volume Up key once to confirm and unlock the bootloader on Samsung Galaxy Tab S6.
Advertisement
Your tablet will perform a factory reset (erase all the data) and reboot into the OS. Once it does, set up the device by following the on-screen instructions. Finally, enable Developer Options on your tablet again and make sure that the ‘OEM unlocking’ toggle is turned on and greyed out. If it is, then it means that the bootloader of your Galaxy Tab S6 has been successfully unlocked.
Step 2: Install TWRP Recovery
With the bootloader unlocked, you can now flash and install TWRP recovery on your Galaxy Tab S6. To begin, download the TAR file of the latest TWRP Recovery from the ‘Downloads’ section to your PC. Make sure that you download the recovery file according to your tablet’s variant/model number, this is SM-T860 (WiFi variant) or SM-T865 (LTE variant).
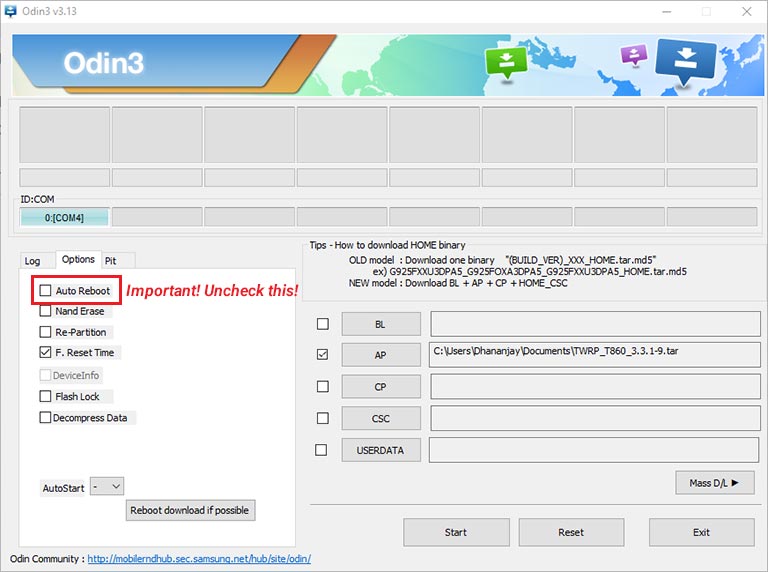
Next, download the latest Odin tool on your PC and extract the contents of the downloaded ZIP file. Then launch the Odin tool on your PC by double-clicking on the ‘Odin3 v3.14.4.exe’ executable file.
Now power off your Tab S6 completely and boot it into Download Mode. To do this, connect the tablet to the PC via a USB cable while holding the Volume Up and Volume Down buttons together.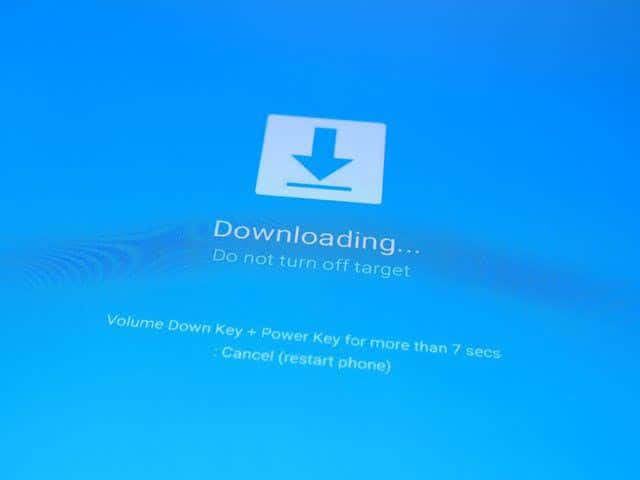
As soon as the device enters Download Mode, Odin will detect it, and the corresponding serial port number will be shown under the ‘ID:COM’ section of the tool. If it doesn’t, then it’s highly likely that your PC is missing the proper USB drivers. Simply download the latest drivers from here, install them on your PC, and reboot it.
At this point, your device is ready to be flashed. So, click on the ‘AP’ button in Odin and select the TWRP recovery TAR file you have downloaded (‘TWRP_T860_3.4.0-15.tar’ for SM-T860 or ‘TWRP_T865_3.4.0-15.tar’ for SM-T865). Before flashing, make sure to uncheck the ‘Auto Reboot’ option is unchecked under the ‘Options’ menu of the Odin tool.
Advertisement
Finally, click the ‘Start’ button in Odin to flash and install TWRP recovery on your Samsung Galaxy Tab S6. The flashing process could take a couple of seconds. Once it is finished, you may close the Odin tool by clicking ‘Exit’.
Important Note: It’s extremely important that you force-reboot your tablet directly into TWRP recovery after step #8 below. If your tablet even tries to enter the system (OS), it will end up in a bootloop due to triggered KG/RMM state and you will not be able to perform any further steps. To fix this, you will then have to restore the stock firmware and wait for 7 days until KG status turns back to ‘Checking’, and only then you’d be able to re-install TWRP.
So carefully read the instructions listed below and perform them as is. To force-reboot into TWRP mode:
- First, exit the Download Mode by holding the Volume Down and Power buttons together until the screen turns off.
- As soon as the screen of your tablet turns off, release the Volume Down button and quickly press and hold the Volume Up and Power buttons to force-reboot into TWRP recovery.
Your Galaxy Tab S6 should now be in the TWRP recovery mode.
Step 3: Format Data and Reboot Recovery
Once TWRP has been installed, you will need to do a few more things to make it fully functional and to properly boot your Tab S6 into System after rooting.
The first thing you need to do is to format the /data partition of your Galaxy Tab S6. This will decrypt your tablet’s internal storage and allow TWRP to read/access it (for flashing, storing NANDroid backups, etc). To do this, go to ‘Wipe’ > ‘Format Data’ from the TWRP main menu. Then enter ‘yes’ in the provided field to format the /data partition.
Once formatted, go to the ‘Reboot’ menu in TWRP and press ‘Recovery’. This will reboot your tablet into the TWRP recovery mode. Since you have formatted the said partition, a reboot will be essential in order for TWRP to recognize that. Once your Tab S6 boots back into TWRP, it will be ready to root.
Step 4: Flash Encryption Disabler, WETA Kernel, and Magisk ZIP to Root Galaxy Tab S6
Now, although you have decrypted the data partition, it will be encrypted again upon reboot. To prevent this from happening, you must flash the provided encryption-disabler ZIP file. This file will make necessary modifications in the kernel to fully disable Samsung encryption. After this, you can flash the WETA custom kernel (only necessary on Pie, optional for Android 10) and finally the Magisk ZIP file to finally root your Galaxy Tab S6.
Follow the instructions listed below to do this:
- Go to the ‘Mount’ menu in TWRP and press the ‘Enable MTP’ button. If it already shows ‘Disable MTP’ in place, then it means that MTP mode is already enabled.
- Connect your Tab S6 to the PC via a USB cable.
- Download the Encryption-disabler, WETA kernel, and Magisk ZIP files on your PC.
- Transfer all the three downloaded ZIP files to the internal storage of your tablet.
- Once transferred, disconnect the tablet from the PC and go back to the TWRP main menu.
- Important: Before you flash any files, go to the ‘Mount’ menu in TWRP and ensure that the ‘system’ partition is unmounted. If it’s mounted, make sure to unmount it first.
- Press the ‘Install’ button in TWRP and navigate to the location where the files were transferred earlier.
- Select the Encryption-disabler file (Disable_Dm-Verity_ForceEncrypt_03.04.2020.zip) first and then tap on the ‘Add more Zips’ button.
- Next, select the WETA custom kernel file (‘WETA_Kernel_T860-6.1_TF1.zip’ for SM-T860 or ‘WETA_Kernel_T865-6.1_TF1.zip’ for SM-T865) to add it to the flashing queue.
- Note: Flashing this custom kernel is only mandatory if your Tab S6 has Android Pie installed. For Android 10, it’s optional.
- Now, tap on the ‘Add more Zips’ button again and select the Magisk installer ZIP file (Magisk-v21.0.zip) this time. At this point, you have all the files added to TWRP’s flashing queue.
- Swipe the button at the bottom of the screen to flash all the files and finally root your Galaxy Tab S6.
Once the flashing process finishes press the ‘Reboot System’ button.
Advertisement
When your Galaxy Tab S6 boots into the system (OS), it should be rooted with Magisk and have fully working TWRP recovery. You may now go ahead and use root applications or use MagiskHide to hide root from apps that might stop working after detecting it, like Google Pay, Pokemon Go, etc. You can also install audio mods like ViPER4Android and use TWRP to flash custom kernels/ROMs/mods.
F.A.Q
Question: Download Mode shows ‘Only official released binaries are allowed to be flashed’ error message, what should I do?
- Answer: This error means that Prenormal KG state has been triggered on your Tab S6. You can confirm this by looking at the information at the top of your tablet’s screen while it is in Download Mode. This is normally caused when you fail to boot your tablet directly into TWRP mode after flashing, and it tries to boot into the system.
Once Prenormal KG state is triggered, you will need to flash the stock firmware using Odin, then boot the tablet, connect it to the internet, log into your Google account, and wait for 7 days. After this 7 day period, you will again be able to flash TWRP and carry out the instructions further. You can download the latest firmware using Frija Tool and follow the flashing instructions in this post.
Question: I would like to keep my Tab S6’s storage encrypted, is it possible?
- Answer: Yes, it’s possible to have your tablet’s storage encrypted. But this also means that TWRP will not be able to read/access the tablet’s internal storage. So, you will need to use a micro SD card (external storage) to flash any files or to take NANDroid backups.
Question: I have flashed the WETA custom kernel and my tablet fails to boot, what should I do?
- Answer: This is common if you flashed an older version of the kernel. If your Tab S6 is running Android 10, always make sure to use the latest version of the WETA kernel if you plan on flashing it.
If your tablet has already entered a boot loop due to a wrong flash, simply reboot into TWRP, download the latest kernel, and flash it. This should fix the problem and allow your Tab S6 to boot into the system.
So there you go! You have just learned how to root the Galaxy Tab S6 using Magisk and install TWRP recovery on it. If you have any questions regarding the process or the instructions in this post, then feel free to ask us.
We couldn’t end this post without thanking XDA developer mentalmuso who is in charge of developing a stable TWRP build and maintaining it constantly. He has also provided immense support to users over the official Telegram channel. So, please consider visiting the thread or the group and show him your appreciation.
TWRP Source: XDA
Screenshots in this post were sourced from this XDA thread. Thanks to XDA Senior Member AHE_XDA for them!
Comments 12 Comments
Comments are moderated, and published only if they are relevant to the topic and add value in a constructive way. If you disagree with something, please be polite and respectful. We suggest you read our comment policy before commenting.
Can anyone tell me what WETA kernel is? It says it’s only required for android 9, for 10 it’s optional. Why is that so? And what’s that kernel for anyway? It’s optional, but do I get anything from flashing (or NOT flashing) it?
Maria, WETA turns off certain kernel security features that are needed for booting the tablet after flashing TWRP on it. With Android 10, Magisk automatically deals with this and hence the flashing the extra WETA kernel file is not required.
Hi whats the best way to update firmware on the sm-t865 If Im already rooted with magisk and twrp?
Hi Tony. It’s quite simple actually. The first step is to download the latest firmware. This could be done using the Frija tool. Once you have the firmware, follow the instructions on this page to flash the firmware using the Odin program.
I keep getting the bootloader unlocked and security message at startup after rooting and installing this and Magisk 420 ROM… How to get rid of this warning screen? Should I relock the bootloader again?
I think the boot loops are the unit starting to boot into the system trying the button methods… change that to use TWRP to reboot into recovery by itself. others should try it. I also think it wipes the system stock ROM and there’s nothing to boot into = boot loop. Hence the Magisk 420 ROM install worked for me.
I also had an unauthorized software warning, and I had already installed TWRP. I got into download mode and connected to Odin, and reinstalled TWRP. I restarted into TWRP recovery, and installed the decrypt file and kernel, then instead of holding buttons down, I had TWRP reboot itself into recovery again, then installed magisk, and added the base files for the Magisk 420 ROM, and rebooted into a new setup. FYI, this ROM works well. except for the warning screen at startup, which is the tablet not the ROM.
Note: Follow the instructions, do the installs in order and one at a time except the decrypt and WETA kernel step, wipe the Dalvik cache twice, go to the home page in TWRP and reboot into recovery again. Install magisk, wipe the Dalvik cache twice, and reboot recovery again. Then install the Magisk 420 ROM files, wipe the Dalvik cache twice, and boot into the system. it will take a long minute to boot into the setup page. Here’s the ROM link: https://forum.xda-developers.com/galaxy-tab-s6/development/magisk-custom-module-base-rom-recovery-t4103325
Hi James. Thanks for the briefing, as well as for sharing your observations regarding the Magisk 420 ROM.
Yes, the bootloop will be caused by that. You have to make sure to boot your tablet directly into TWRP after its installation.
As for the bootloader warning, you will need to cope with it. The warning is mandatory and couldn’t be made to go away without relocking the bootloader. But if you’re using TWRP, root, a custom ROMs, or any other modification, you must keep the bootloader unlocked.
Hi Dhananjay,
I couldn’t force reboot into twrp and now im stuck in a bootloop. Can you please advise what’s the trick the bypass the RMM check so I boot into twrp and root my tab s6, thank you.
Regards,
Bachir
Hello Bachir. One of our readers (Name is “Amir”) found himself stuck in the same situation and later also shared some very useful tips on how to get past it and continue with the instructions in this guide.
Please refer to the advice offered by him in this comment. You can optionally just browse through the comments on the page to find his comment.
did not work got stuck in triggered KG/RMM state!
Hi Gerd. After flashing TWRP did you boot your tablet directly into TWRP mode?
Thanks for great article.
After few tweaks, I fixed the bootloop or KG/RMM issue.
Follow these steps:
1. Restart PC and run extracted Odin.exe as Administration
2. Connect device to PC, press Volume down and Power button for 6-7 second until screen turns off and quickly press Volume up and Volume down button to enter in Download mode.
3. Downloaded Stock firmware for Samsung Tablet. Follow this guideline for more details https://www.thecustomdroid.com/frija-tool-samsung-firmware-downloader/
4. Extract download file and upload BL, AP, CP & CSC file (or use HOME_CSC file to preserve configuration and data) in Odin and click Start. Check this video https://www.youtube.com/watch?v=3d0AACLSIUA
5. Once stock firmware installed, start the device and skip all configurations (wifi, google, samsung id login etc.)
6. Turn off Automatic date and time from Settings > General Management > Date and Time and Set date back 10 days (for fixing the issue for 7 days waiting). Please check this video https://www.youtube.com/watch?v=9rpaGiHQNo4
7. Turn Off “Find My Device” from Settings > Biometrics and Security > Other Security settings.
8. Don’t connect to wifi or network, better Enable flight mode (optional to make sure no network is connected for date update).
9. Enable Developer mode and enable “OEM Unlocking” (if already enable and grey, Device is already in Bootload Unlock Mode).
10. Switch off the device and press Volume up and Volume Download button together to enter in Download Mode.
11. Verify these setting in Download mode
a. KG STATE: Checking
b. FRP LOCK: Off
c. OEM LOCK: ON(U)
12. Now follow the “Install TWRP Recovery on Samsung Galaxy Tab S6” section of this article, and download Unofficial TWRP (Official TWRP didnt work for me).
Let me know if it work.
Hello Amir. Thanks a lot for your careful observation and for sharing it here.
I am sure others who land into the KG/RMM bootloop issue will benefit from this advice. Thanks, again!