Users who want to customize their Android phone with third-party custom ROMs, root, or mods, must first install a custom recovery. In this tutorial, we will show you how to download and install TWRP recovery on Android devices using Fastboot and Odin. The latest TWRP version available for officially supported devices is TWRP v3.3.1-0.
Advertisement
Android is a versatile OS and that’s majorly because of its open source nature. There’s no limit to what you can tweak up in the software. But that certainly couldn’t be done on any stock OEM device. Manufacturers only tend to deliver certain unique features to specific devices and that’s just about what a regular user would get.
So, if you want to add some more features, customize the appearance of the OS, or want to shift to another firmware altogether, you will need a few things. To start with, you will first have to unlock the phone’s bootloader, which will further enable you to install a custom recovery, like TWRP in this case.
So, what is TWRP? – TWRP (short for “TeamWin Recovery Project“) is a custom recovery for Android smartphones and tablets, and also the first one to support touch-enabled interface in recovery mode. The project is led by Dee’s Troy, along with other developers responsible for maintaining TWRP for individual Android devices. At the moment, TeamWin officially supports more than 100 Android devices from various manufacturers. Unofficial ports/development are handled by individual developers for specific Android devices.
Advertisement
TWRP recovery allows users to install third-party firmware like custom ROMs, kernels, and mods. In addition to that, it also enables a user to erase/flash device partitions and backup/restore the complete firmware. And that’s just the starting point, there’s a lot that TWRP can do once you have installed it on your Android device.
Page Contents
Prerequisites
Make sure to fulfill the requirements below before you follow the instructions to install TWRP recovery on Android.
- We strongly recommend taking a full backup of the device before flashing TWRP. You can follow our guide on how to backup Android phones.
- Charge your phone to at least 50-60% battery level to avoid any sudden shutdowns during the process.
- In order to flash TWRP recovery, you must first enable OEM unlocking and unlock the bootloader of your device.
- Download and install USB drivers on your PC.
- For method 1, you will also need to install ADB/Fastboot tools on the PC. Alternatively, you can also use the Minimal ADB and Fastboot Tool for this.
Download Latest TWRP Recovery for Android Devices
1. Official TWRP Recovery
For your added convenience, we have listed links to all the officially supported Android manufacturers. Simply click on your device’s manufacturer name and download TWRP recovery for your Android device.
Advertisement
- Alcatel
- Allview
- Amazon
- Amlogic
- Arcos
- Asus
- Barnes & Noble
- BQ
- Cat
- Dell
- Elephone
- Fairphone
- HP
- HTC
- Huawei
- Infinix
- IUNI
- Kazam
- LeEco
- Lenovo
- Letv
- LG
- Marshall
- Mattel
- Micromax
- Minix
- Motorola
- Nextbit
- Nubia
- Nvidia
- Omate
- OnePlus
- Oppo
- Pantech
- Quanta
- Razer
- Samsung
- Silentcircle
- Sony
- Wileyfox
- Wingtech
- Xiaomi
- Yu
- ZTE
- ZUK
2. Unofficial TWRP Recovery
If you could not find your device in the links above, then TWRP doesn’t support your Android device officially. In that case, you can download the latest unofficial TWRP recovery through TWRP Builder. It is an open-source project that allows users to download TWRP recovery for devices that aren’t supported officially.
You can go directly to the project’s download page and enter your Android device’s name/model/manufacturer in the search bar. Alternatively, you can also download their official app from the Play Store (Click the app box below) and use it to download the latest unofficial TWRP for your device.
[googleplay url=”https://play.google.com/store/apps/details?id=com.github.TwrpBuilderF”]
Once you have succeeded to download latest TWRP recovery for your Android device, follow the installation instructions below.
Advertisement
Requirements
In order to install TWRP 3.3+ on your Android device, make sure that the requirements listed below are fully met.
- You will need a PC with Windows, macOS, or Linux operating system.
- Take a full backup of all your important data stored on your Android device. Flashing TWRP doesn’t normally erase any data. But for some devices, you’d need to format the /data partition later, so that TWRP can recognize the internal storage. Taking a backup will safeguard all your data in case it’s wiped. You could also follow our detailed guide for this purpose.
- In order to install TWRP, your phone must have an unlocked bootloader. The bootloader on most OEM Android devices could be unlocked via fastboot. You will find the instructions for that on this page. Alternatively, you can also try looking up for your device-specific guide on our website.
Instructions to Install TWRP Recovery on Android
Installing TWRP on Android devices is easy and there are two different installation methods to do that. First, by using Fastboot, which is highly likely to work on any Android device, irrespective of the manufacturer. And second, by using the Odin tool on Samsung Galaxy devices. That is because these devices do not have a dedicated Fastboot Mode, but Download Mode that communicates with the Odin tool to flash stock firmware or custom binaries in [*.tar] or [*.tar.md5] extension.
The instructions for both the methods has been listed in detail below.
Advertisement
Method 1: Using Fastboot
Important notes:
Most new Android devices come with the A/B partition scheme, like the Google Pixel 3/Pixel 3 XL, Mi A3, etc. These devices do not support direct flashing of the TWRP recovery image via fastboot. On such devices, you will need to temporarily boot into TWRP using the recovery image and then flash the TWRP installer zip file. So, make sure that you know if your device supports A-only or the A/B partition scheme. If you don’t know, then follow this guide on how to check it.
Also, make sure to prepend the commands mentioned in the instructions below with “.\” if you’re using a Windows PC, or “./” if you’re using a macOS/Linux PC.
-
- First off, download TWRP recovery image and TWRP installer zip (If applicable) for your device.
- Copy the downloaded TWRP image to the folder where adb and fastboot are installed (e.g. C:\platform-tools”).
- Transfer the TWRP installer zip (again, if applicable) to your Android device’s storage.
- Open the command-line window:
- On Windows: Go to the folder where the TWRP recovery image is present. Then hold the SHIFT key and right-click on an empty space inside the folder. Select the ‘Open PowerShell window here’ option to launch PowerShell.
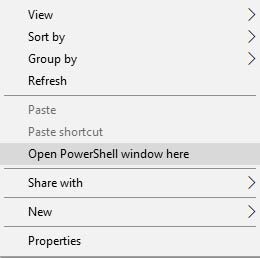
- On macOS or Linux: Open Terminal and “cd” to the folder where the TWRP recovery image is present (e.g. cd Documents/platform-tools).

- On Windows: Go to the folder where the TWRP recovery image is present. Then hold the SHIFT key and right-click on an empty space inside the folder. Select the ‘Open PowerShell window here’ option to launch PowerShell.
- Connect your phone to the PC using the USB cable.
- Now, boot your Android device into Bootloader/Fastboot mode by entering the below ADB command:
adb reboot bootloader
- Once your device is in Bootloader/Fastboot mode and connected to the PC, follow the instructions in the section below depending on if your device supports A-only (Step #8) or the A/B parition (Step #9) scheme.
- Devices with A-only Partition:
- Enter the below command to flash the recovery image and install TWRP recovery on Android device with A-only partition:
fastboot flash recovery <recovery-image.img>
- Replace “<recovery-image.img>” with the actual filename of the TWRP recovery image. For example:
fastboot flash recovery twrp-3.3.1-0-angler.img

- Now reboot your device using the following command:
fastboot reboot
- Enter the below command to flash the recovery image and install TWRP recovery on Android device with A-only partition:
- Devices with A/B Partitions:
- Temporarily boot into TWRP recovery image by entering the following command:
fastboot boot <twrp-recovery.img>
- Replace “<twrp-recovery.img>” with the actual filename. For example:
fastboot boot twrp-3.3.1-2-crosshatch.img

- Your Android device should now boot into TWRP recovery mode.
- Swipe the “Swipe to Allow Modifications” button when prompted.
- Tap on the ‘Install’ button in TWRP.
- Navigate to the storage and select the TWRP installer zip (twrp-installer-3.3.x-x-codename.zip) file.
- Finally, swipe the button on the screen to flash the file and permanently install TWRP recovery on Android device with A/B partition.
- Temporarily boot into TWRP recovery image by entering the following command:
So this was how you can install TWRP recove ry using Fastboot. The method shall work for the majority of OEM Android devices.
Method 2: Using Odin on Samsung Galaxy Devices
- Download TWRP recovery Odin flashable (*.img.tar) file for your Samsung Device.
- Also, download Odin tool and extract the ZIP on your PC.
- Go to the extracted folder and run ‘Odin3.exe’ by double-clicking on it.
- Boot your Samsung device into Download mode and connect it to the PC.
- The COM port in the Odin window should light up.
- Click on the ‘AP’ button.
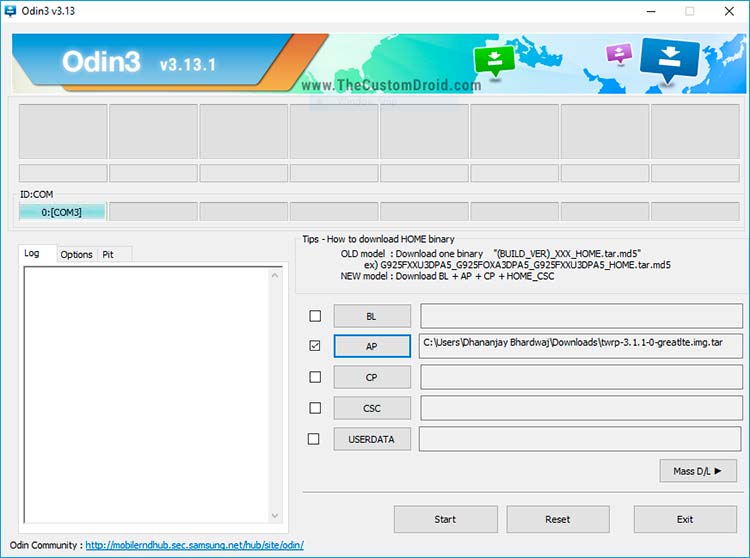
- Select the TWRP recovery tar file for your device.
- Do not modify any other settings.
- Finally, click on the ‘Start’ button to install TWRP recovery using Odin tool.
- Once the flashing process is complete, you shall see the ‘PASS!’ message on the screen and the phone will reboot automatically.
So this was how to install TWRP recovery using Odin on Samsung Galaxy devices.
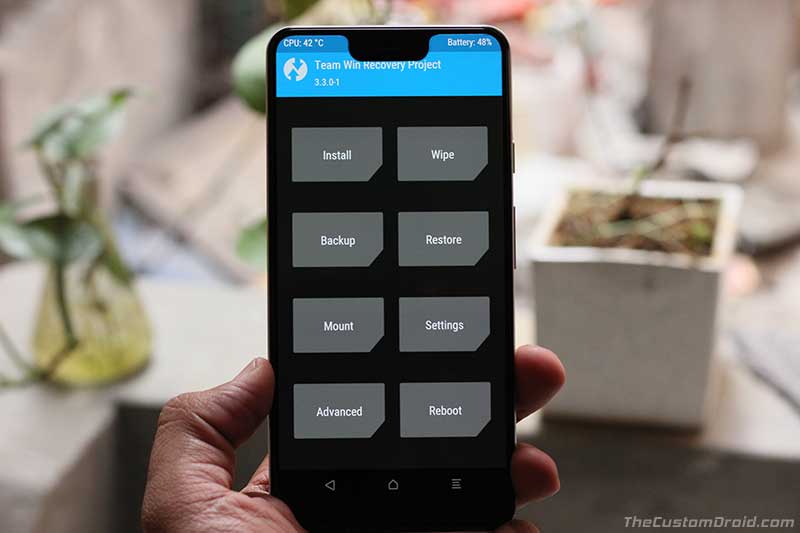
How to Update TWRP Recovery?
- Download the latest TWRP version (.img) for your device.
- Connect your phone to the PC using the USB cable.
- Copy the downloaded IMG file to the phone’s storage or SD card.
- Disconnect the device and power it off.
- Boot your Android device into TWRP recovery mode.
- Go to the ‘Install’ menu and tap on the ‘Install image’ button at the bottom.
- Select the TWRP IMG file.
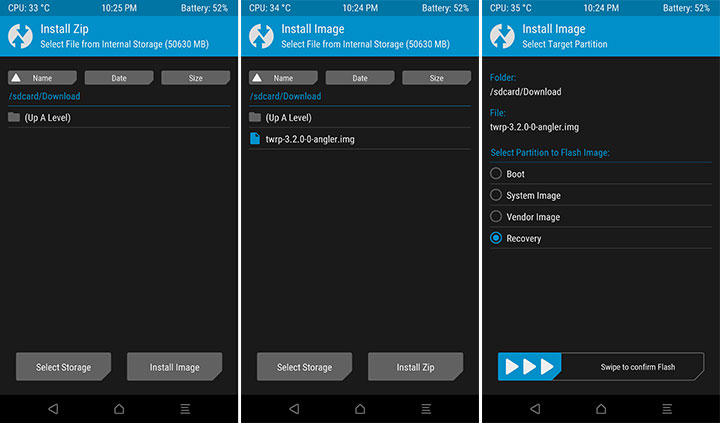
- Next, select ‘Recovery’ from the list of partitions shown on the screen.
- Finally, swipe the button on the screen to update TWRP recovery to the latest version.
- Once done, tap on the ‘Reboot System’ button.
So now that you have been able to install TWRP recovery on your Android devices, go ahead and flash custom ROMs like Android Pie-based LineageOS 16 and Resurrection Remix 6.0. You can also use it to root your Android phone by flashing Magisk or SuperSU.
If you have any questions regarding TWRP or its usage, or are facing any sort of troubles with installing TWRP on your device then let us know through the comments.
Comments 8 Comments
Comments are moderated, and published only if they are relevant to the topic and add value in a constructive way. If you disagree with something, please be polite and respectful. We suggest you read our comment policy before commenting.
Do i really need root to dowload twrp on my Mi A3
Not necessarily. You can install TWRP on the Xiaomi Mi A3 without having to root. However, there are features in the kernel that might need to be disabled so that the device could boot after installing TWRP. Like AVB (Android Verified Boot).
When you flash Magisk, it automatically patches the kernel and disables such features.
Hello Dhananjay!
I just read your both guides about installing TWRP.
This current guide.
And the second one is this: https://www.thecustomdroid.com/install-twrp-recovery-xiaomi-mi-a3-guide/
Can you pls explain what’s the difference? I’m gonna install TWRP on my Xiaomi Mi A3.
————————————————————
In this guide installation seems much easier:
1. Via Fastboot temporarily boot into TWRP recovery
2. And then just install TWRP installer
————————————————————
But in the second guide it requires more steps:
1. Via Fastboot flash stock boot image on active slot A
2. Then change to slot B and flash TWRP image
3. Then boot to TWRP recovery and then install TWRP installer
4. After that switch to the slot A and reboot in System
Hi Yaroslav. If you’re going to install TWRP on the Mi A3, I suggest you follow the dedicated guide. This particular guide is a generic one, which means it details the general steps that would work for a majority of different OEM devices.
Some devices (like the Mi A3 here) might require additional steps due to the way the software is set up by the manufacturer (Xiaomi). So, stick with the instructions in the device-specific guide and let me know if you have any questions or need help installing TWRP.
Will this metod work for sm g965f, android 9, without dm verity file, thank you for answer
Hi Vojo. Flashing the DM-Verity file is necessary in case of the Galaxy S9+.
I have already covered a complete guide on the topic here.
Hello sir, my phone Moto E5 plus is not in the list of twrp images, pleases help me..
Hi Satyy, for your phone there’s an unofficial port of TWRP available on this XDA thread.